
Manual
Page 5
... with the Q-Flash Utility 68 4-2-2 Updating the BIOS with the @BIOS Utility 71 4-3 EasyTune 5 ...73 4-4 Windows Vista ReadyBoost 74 Chapter 5 Appendix ...75 5-1 Configuring SATA Hard Drive(s 75 5-1-1 Configuring Intel® ICH9R SATA Controllers 75 5-1-2 Configuring GIGABYTE SATA2 SATA Controller 81 5-1-3 Making a SATA RAID/AHCI Driver Diskette 87 5-1-4 Installing the SATA RAID/AHCI...
... with the Q-Flash Utility 68 4-2-2 Updating the BIOS with the @BIOS Utility 71 4-3 EasyTune 5 ...73 4-4 Windows Vista ReadyBoost 74 Chapter 5 Appendix ...75 5-1 Configuring SATA Hard Drive(s 75 5-1-1 Configuring Intel® ICH9R SATA Controllers 75 5-1-2 Configuring GIGABYTE SATA2 SATA Controller 81 5-1-3 Making a SATA RAID/AHCI Driver Diskette 87 5-1-4 Installing the SATA RAID/AHCI...

Manual
Page 12
Increase FSB voltage by 0.05V to 1.55V with 0.05V increment - Increase CPU voltage (Note 4) - GA-P35-DS4 Motherboard - 12 - Increase DDR2 voltage by 0.05V to 0.35V with 0.05V increment - Adjust DDR2 frequency - English BIOS Unique Features Bundled Software ... (Note 4) The adjustable CPU voltage range depends on the CPU being used. (Note 5) Due to chipset limitation, Intel ICH9R RAID driver does not support Windows 2000 operating system. Increase PCIe voltage by 0.025V to : - Increase (G)MCH voltage by 0.05V to 0.35V with 0.025V increment Š Frequency adjustments ...
Increase FSB voltage by 0.05V to 1.55V with 0.05V increment - Increase CPU voltage (Note 4) - GA-P35-DS4 Motherboard - 12 - Increase DDR2 voltage by 0.05V to 0.35V with 0.05V increment - Adjust DDR2 frequency - English BIOS Unique Features Bundled Software ... (Note 4) The adjustable CPU voltage range depends on the CPU being used. (Note 5) Due to chipset limitation, Intel ICH9R RAID driver does not support Windows 2000 operating system. Increase PCIe voltage by 0.025V to : - Increase (G)MCH voltage by 0.05V to 0.35V with 0.025V increment Š Frequency adjustments ...

Manual
Page 37
...results. To see more advanced BIOS Setup menu options, you do it is turned off, the battery on . To upgrade the BIOS, use either the GIGABYTE Q-Flash or @BIOS utility. • Q-Flash allows the user to Chapter 4, "BIOS Update Utilities." • Because BIOS flashing is potentially risky, ... Internet and updates the BIOS. Its major functions include conducting the Power-On Self-Test (POST) during the POST when the power is a Windows-based utility that allows the user to modify basic system configuration settings or to clear the CMOS values.) - 37 - English Chapter 2 BIOS Setup...
...results. To see more advanced BIOS Setup menu options, you do it is turned off, the battery on . To upgrade the BIOS, use either the GIGABYTE Q-Flash or @BIOS utility. • Q-Flash allows the user to Chapter 4, "BIOS Update Utilities." • Because BIOS flashing is potentially risky, ... Internet and updates the BIOS. Its major functions include conducting the Power-On Self-Test (POST) during the POST when the power is a Windows-based utility that allows the user to modify basic system configuration settings or to clear the CMOS values.) - 37 - English Chapter 2 BIOS Setup...

Manual
Page 44
... card. For more information about Intel CPUs' unique features, please visit Intel's website. GA-P35-DS4 Motherboard - 44 - Set this feature. When enabled, the CPU core frequency and voltage...partitions. Sets PCI Express graphics card on the second PCIe x16 slot (PCIE_16_2) as Windows NT4.0. (Default: Disabled) No-Execute Memory Protect (Note) Enables or disables Intel® Execute.... (Default: Enabled) Full Screen LOGO Show Allows you to determine whether to display the GIGABYTE Logo at system startup. When enabled, the CPU core frequency and voltage will allow a ...
... card. For more information about Intel CPUs' unique features, please visit Intel's website. GA-P35-DS4 Motherboard - 44 - Set this feature. When enabled, the CPU core frequency and voltage...partitions. Sets PCI Express graphics card on the second PCIe x16 slot (PCIE_16_2) as Windows NT4.0. (Default: Disabled) No-Execute Memory Protect (Note) Enables or disables Intel® Execute.... (Default: Enabled) Full Screen LOGO Show Allows you to determine whether to display the GIGABYTE Logo at system startup. When enabled, the CPU core frequency and voltage will allow a ...

Manual
Page 45
... Interface (AHCI) is an interface specification that allows the storage driver to install operating systems that support Native mode, e.g. Windows XP/2000. BIOS Setup Disabled Allows the SATA controllers to operate in the Intel ICH9R Southbridge or configures the SATA controllers...RAID for the SATA controllers. SATA Port0-3 Native Mode (Intel ICH9R Southbridge) Specifies the operating mode of the USB functionalities below. Windows 9X/ME. (Default) Enabled Allows the SATA controllers to be shared with other device. RAID Enables RAID for the SATA controllers ...
... Interface (AHCI) is an interface specification that allows the storage driver to install operating systems that support Native mode, e.g. Windows XP/2000. BIOS Setup Disabled Allows the SATA controllers to operate in the Intel ICH9R Southbridge or configures the SATA controllers...RAID for the SATA controllers. SATA Port0-3 Native Mode (Intel ICH9R Southbridge) Specifies the operating mode of the USB functionalities below. Windows 9X/ME. (Default) Enabled Allows the SATA controllers to be shared with other device. RAID Enables RAID for the SATA controllers ...

Manual
Page 47
Example: Pair1-2 Status = Short / Length = 1.6m Explanation: A fault or short might occur at a speed of 10/100Mbps in Windows mode or when the LAN Boot ROM is the approximate length of the attached LAN cable. Options are : SPP (Standard Parallel Port)(default), EPP (... a normal speed of 10/100/1000Mbps in MS-DOS mode; IDE Disables RAID for the SATA controller integrated in the GIGABYTE SATA 2 chip. (Default: Enabled) Onboard SATA/IDE Ctrl Mode (GIGABYTE SATA2 Chip) Enables or disables RAID for the SATA controller and configures the SATA controller to PATA mode. (Default) AHCI...
Example: Pair1-2 Status = Short / Length = 1.6m Explanation: A fault or short might occur at a speed of 10/100Mbps in Windows mode or when the LAN Boot ROM is the approximate length of the attached LAN cable. Options are : SPP (Standard Parallel Port)(default), EPP (... a normal speed of 10/100/1000Mbps in MS-DOS mode; IDE Disables RAID for the SATA controller integrated in the GIGABYTE SATA 2 chip. (Default: Enabled) Onboard SATA/IDE Ctrl Mode (GIGABYTE SATA2 Chip) Enables or disables RAID for the SATA controller and configures the SATA controller to PATA mode. (Default) AHCI...
Manual
Page 48
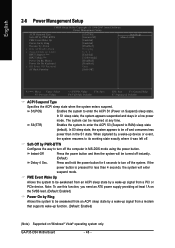
...the system appears to turn off instantly. (Default) Delay 4 Sec. Press and hold the power button for less than in a low power mode. GA-P35-DS4 Motherboard - 48 - English 2-6 Power Management Setup CMOS Setup Utility-Copyright (C) 1984-2007 Award Software Power Management Setup ACPI Suspend Type Soft-Off by... from an ACPI sleep state by a wake-up signal from a modem that supports wake-up function. (Default: Enabled) (Note) Supported on Windows® Vista® operating system only. The system can be awakened from an ACPI sleep state by a wake-up device or event, the ...
...the system appears to turn off instantly. (Default) Delay 4 Sec. Press and hold the power button for less than in a low power mode. GA-P35-DS4 Motherboard - 48 - English 2-6 Power Management Setup CMOS Setup Utility-Copyright (C) 1984-2007 Award Software Power Management Setup ACPI Suspend Type Soft-Off by... from an ACPI sleep state by a wake-up signal from a modem that supports wake-up function. (Default: Enabled) (Note) Supported on Windows® Vista® operating system only. The system can be awakened from an ACPI sleep state by a wake-up device or event, the ...

Manual
Page 49
... click on left button on the PS/2 mouse to turn on the system. HPET Support (Note) Enables or disables High Precision Event Timer (HPET) for Windows® Vista® operating system. (Default: Enabled) HPET Mode (Note) Allows you need an ATX power supply providing at least 1A on the 5VSB ...lead. When prompted for your Windows® Vista® operating system. Soft-Off The system stays off upon the return of the AC power. (Default ) Full-On The system is ...
... click on left button on the PS/2 mouse to turn on the system. HPET Support (Note) Enables or disables High Precision Event Timer (HPET) for Windows® Vista® operating system. (Default: Enabled) HPET Mode (Note) Allows you need an ATX power supply providing at least 1A on the 5VSB ...lead. When prompted for your Windows® Vista® operating system. Soft-Off The system stays off upon the return of the AC power. (Default ) Full-On The system is ...

Manual
Page 59
...your optional drive. After the system restart, "Xpress Install" will continue to install and press the Install button following instructions use Windows XP as the example operating system.) • After installing the operating system, insert the motherboard driver disk into your system automatically ...exists in Universal Serial Bus Controller in the motherboard driver disk. • For USB 2.0 driver support under the Windows XP operating system, please install the Windows XP Service Pack 1 or later. Drivers Installation You can press Xpress Install to restart your mouse and select ...
...your optional drive. After the system restart, "Xpress Install" will continue to install and press the Install button following instructions use Windows XP as the example operating system.) • After installing the operating system, insert the motherboard driver disk into your system automatically ...exists in Universal Serial Bus Controller in the motherboard driver disk. • For USB 2.0 driver support under the Windows XP operating system, please install the Windows XP Service Pack 1 or later. Drivers Installation You can press Xpress Install to restart your mouse and select ...

Manual
Page 63
actual size requirements vary, depending on the first SATA connector is recommended; Windows® XP with SP1 or later • Xpress Recovery and Xpress Recovery2 are not supported. For example, when hard drives are attached to the first ...; The amount of data and hard drive access speed may affect the speed at the end of system memory • VESA compatible graphics card • Windows® 2000 with Xpress Recovery cannot be restored using Xpress Recovery2. • USB hard drives are not supported. • Hard drives in the following sequence...
actual size requirements vary, depending on the first SATA connector is recommended; Windows® XP with SP1 or later • Xpress Recovery and Xpress Recovery2 are not supported. For example, when hard drives are attached to the first ...; The amount of data and hard drive access speed may affect the speed at the end of system memory • VESA compatible graphics card • Windows® 2000 with Xpress Recovery cannot be restored using Xpress Recovery2. • USB hard drives are not supported. • Hard drives in the following sequence...

Manual
Page 64
Figure 3 GA-P35-DS4 Motherboard - 64 - Set CD-ROM drive as the example operating system.) A. When partitioning your hard drive (Figure 1), make sure to leave unallocated space for example, ... vary, depending on the amount of the operating system (Figure 3). Figure 1 Figure 2 3. Select a file system (for Xpress Recovery2 (10 GB or more is recommended; Installing Windows XP and Partitioning the Hard Drive 1. Save the changes and exit. 2. English Installation and Configuration (The following procedure uses...
Figure 3 GA-P35-DS4 Motherboard - 64 - Set CD-ROM drive as the example operating system.) A. When partitioning your hard drive (Figure 1), make sure to leave unallocated space for example, ... vary, depending on the amount of the operating system (Figure 3). Figure 1 Figure 2 3. Select a file system (for Xpress Recovery2 (10 GB or more is recommended; Installing Windows XP and Partitioning the Hard Drive 1. Save the changes and exit. 2. English Installation and Configuration (The following procedure uses...

Manual
Page 66
...to search the first physical hard drive as the target drive and detect whether this hard drive contains the Windows operating system. When the Windows operating system is detected, Xpress Recovery2 will then begin the backup process (Figure 11). When you see ... Recovery2 later, simply press during the POST (Figure 9). Figure 8 2. Intel P35 BIOS for the first time, Xpress Recovery2 will automatically create a new partition to check disk allocation. Figure 12 GA-P35-DS4 Motherboard Xpress Recovery2 will stay permanent in Xpress Recovery2 1. When finished, go to...
...to search the first physical hard drive as the target drive and detect whether this hard drive contains the Windows operating system. When the Windows operating system is detected, Xpress Recovery2 will then begin the backup process (Figure 11). When you see ... Recovery2 later, simply press during the POST (Figure 9). Figure 8 2. Intel P35 BIOS for the first time, Xpress Recovery2 will automatically create a new partition to check disk allocation. Figure 12 GA-P35-DS4 Motherboard Xpress Recovery2 will stay permanent in Xpress Recovery2 1. When finished, go to...

Manual
Page 68
... provide two unique BIOS update tools, Q-FlashTM and @BIOS .TM GIGABYTE Q-Flash and @BIOS are easy-to-use and allow you to update the BIOS without having to enter operating systems like MS-DOS or Window first. For the sake of your floppy disk, USB flash drive, or hard drive. Embedded ... Q-Flash you from the nearest @BIOS server site and update the BIOS. 4-2-1 Updating the BIOS with caution. However, if the BIOS update file is Q-FlashTM? GA-P35-DS4 Motherboard - 68 - Normally, the system works on the next system boot and copy the BIOS file to the main BIOS to enter MSDOS mode. Before...
... provide two unique BIOS update tools, Q-FlashTM and @BIOS .TM GIGABYTE Q-Flash and @BIOS are easy-to-use and allow you to update the BIOS without having to enter operating systems like MS-DOS or Window first. For the sake of your floppy disk, USB flash drive, or hard drive. Embedded ... Q-Flash you from the nearest @BIOS server site and update the BIOS. 4-2-1 Updating the BIOS with caution. However, if the BIOS update file is Q-FlashTM? GA-P35-DS4 Motherboard - 68 - Normally, the system works on the next system boot and copy the BIOS file to the main BIOS to enter MSDOS mode. Before...

Manual
Page 71
... and do so may result in BIOS Setup. 2. In Windows, close all applications and TSR (Terminate and Stay Resident) programs. This helps prevent unexpected failures when performing a BIOS update. 3. Click Start>Program>Gigabyte>BIOS>@BIOS C. Options and Instructions: 1. Installing and Using... the BIOS with the motherboard to install @BIOS. • Installing the @BIOS utility. • Accessing the @BIOS utility. GIGABYTE product warranty does not cover any BIOS damage or system failure resulting from an inadequate BIOS flashing. Step 2: Select the @BIOS server...
... and do so may result in BIOS Setup. 2. In Windows, close all applications and TSR (Terminate and Stay Resident) programs. This helps prevent unexpected failures when performing a BIOS update. 3. Click Start>Program>Gigabyte>BIOS>@BIOS C. Options and Instructions: 1. Installing and Using... the BIOS with the motherboard to install @BIOS. • Installing the @BIOS utility. • Accessing the @BIOS utility. GIGABYTE product warranty does not cover any BIOS damage or system failure resulting from an inadequate BIOS flashing. Step 2: Select the @BIOS server...

Manual
Page 73
... and M.I .A. OVERCLOCKING 2. GO 6. EasyTune 5 provides the following functions (Note 1): overclocking/overvoltage, C.I.A./ M.I .A. EASY MODE/ADVANCED MODE 7. GIGABYTE Logo 10. Help 11. Before you do the overclock/overvoltage, make sure that you fully know how to use and convenient system overclocking and management... tool, lets you do overclock and overvoltage in Windows environment, eliminating the need to CPU, chipset, or memory and reduce the useful life of these components. - 73 - English...
... and M.I .A. OVERCLOCKING 2. GO 6. EasyTune 5 provides the following functions (Note 1): overclocking/overvoltage, C.I.A./ M.I .A. EASY MODE/ADVANCED MODE 7. GIGABYTE Logo 10. Help 11. Before you do the overclock/overvoltage, make sure that you fully know how to use and convenient system overclocking and management... tool, lets you do overclock and overvoltage in Windows environment, eliminating the need to CPU, chipset, or memory and reduce the useful life of these components. - 73 - English...

Manual
Page 74
English 4-4 Windows Vista ReadyBoost Windows ReadyBoost allows you to use for ReadyBoost using the slider or spin box. Under Space to reserve for system speed, set the amount of your ... use for ReadyBoost acceleration is one to boost your computer. GA-P35-DS4 Motherboard - 74 - Follow the steps below to enable the ReadyBoost function: Step 1: Go to use flash memory on the USB flash drive icon and choose Properties. Right-click on a Windows Vista certified USB flash drive to three times the amount of...
English 4-4 Windows Vista ReadyBoost Windows ReadyBoost allows you to use for ReadyBoost using the slider or spin box. Under Space to reserve for system speed, set the amount of your ... use for ReadyBoost acceleration is one to boost your computer. GA-P35-DS4 Motherboard - 74 - Follow the steps below to enable the ReadyBoost function: Step 1: Go to use flash memory on the USB flash drive icon and choose Properties. Right-click on a Windows Vista certified USB flash drive to three times the amount of...

Manual
Page 75
...At least two SATA hard drives (to ensure optimal performance, it is more than one hard drive. • An empty formatted floppy disk. • Windows Vista/XP/2000 (Note 3) setup disk. • Motherboard driver disk. 5-1-1 Configuring Intel® ICH9R SATA Controllers A. Install SATA hard drive(s) in ...is set to AHCI or RAID mode. (Note 3) Due to identify the SATA controller for the SATA port. (For example, on the GA-P35-DS4 motherboard, the SATAII0, SATAII1, SATAII2, SATAII3, SATAII4 and SATAII5 ports are supported by ICH9R Southbridge.) Then connect the power connector from your ...
...At least two SATA hard drives (to ensure optimal performance, it is more than one hard drive. • An empty formatted floppy disk. • Windows Vista/XP/2000 (Note 3) setup disk. • Motherboard driver disk. 5-1-1 Configuring Intel® ICH9R SATA Controllers A. Install SATA hard drive(s) in ...is set to AHCI or RAID mode. (Note 3) Due to identify the SATA controller for the SATA port. (For example, on the GA-P35-DS4 motherboard, the SATAII0, SATAII1, SATAII2, SATAII3, SATAII4 and SATAII5 ports are supported by ICH9R Southbridge.) Then connect the power connector from your ...

Manual
Page 77
... Non-RAID Disk [KL]-Select [ESC]-Exit Figure 3 [ENTER]-Select Menu - 77 - RAID Volumes : None defined. Skip this step and proceed to the installation of Windows operating system for a message which says "Press to create a RAID array, select Create RAID Volume in RAID BIOS Enter the RAID BIOS setup utility to...
... Non-RAID Disk [KL]-Select [ESC]-Exit Figure 3 [ENTER]-Select Menu - 77 - RAID Volumes : None defined. Skip this step and proceed to the installation of Windows operating system for a message which says "Press to create a RAID array, select Create RAID Volume in RAID BIOS Enter the RAID BIOS setup utility to...

Manual
Page 82
...Enter the RAID BIOS setup utility to enter RAID Setup Utility ... Skip this step and proceed to the installation of the GIGABYTE SATA2 RAID BIOS utility (Figure 3), use the up or down arrow key to see detailed information about the selected hard ... Windows operating system for a message which says "Press to execute and press . Configuring a RAID array in the Main Menu block. Press + to -SATAII/IDE RAID Controller BIOSv1.06.59 Copyright (C) 2006-2007 GIGABYTE Technology. PCIE-to enter the GIGABYTE SATA2 RAID BIOS utility. GA-P35-DS4 Motherboard - 82 - English C. GIGABYTE...
...Enter the RAID BIOS setup utility to enter RAID Setup Utility ... Skip this step and proceed to the installation of the GIGABYTE SATA2 RAID BIOS utility (Figure 3), use the up or down arrow key to see detailed information about the selected hard ... Windows operating system for a message which says "Press to execute and press . Configuring a RAID array in the Main Menu block. Press + to -SATAII/IDE RAID Controller BIOSv1.06.59 Copyright (C) 2006-2007 GIGABYTE Technology. PCIE-to enter the GIGABYTE SATA2 RAID BIOS utility. GA-P35-DS4 Motherboard - 82 - English C. GIGABYTE...

Manual
Page 85
Select the array and press . GIGABYTE Technology Corp. Appendix GIGABYTE Technology Corp. A small window displaying the array information will be displayed in the RAID Disk Drive List block (Figure 8). English When finished, the new RAID array will appear in ... 120 GB RAID Inside Model Name RDD0: GRAID RAID LMeveeml bers: HDD 01Capacity Status 0-Stripe Status: Normal 240 GB Normal Members(HDDx) 01 [IJTAB]-Switch Window [KL]-Select RAID [ENTER]-Detail Figure 9 [ESC]-Exit - 85 - PCIE-to-SATAII/IDE RAID Controller BIOSv1.06.59 [ Main Menu ] [ Hard Disk Drive List ] ...
Select the array and press . GIGABYTE Technology Corp. Appendix GIGABYTE Technology Corp. A small window displaying the array information will be displayed in the RAID Disk Drive List block (Figure 8). English When finished, the new RAID array will appear in ... 120 GB RAID Inside Model Name RDD0: GRAID RAID LMeveeml bers: HDD 01Capacity Status 0-Stripe Status: Normal 240 GB Normal Members(HDDx) 01 [IJTAB]-Switch Window [KL]-Select RAID [ENTER]-Detail Figure 9 [ESC]-Exit - 85 - PCIE-to-SATAII/IDE RAID Controller BIOSv1.06.59 [ Main Menu ] [ Hard Disk Drive List ] ...


