Manual
Page 3
... exclusively licensed to their respective owners. All rights reserved. by GIGABYTE without GIGABYTE's prior written permission. Documentation Classifications In order to use GIGABYTE's unique features, read or download the information on/from the Support\Motherboard\Technology Guide page on your motherboard revision before updating motherboard BIOS, drivers, or when looking for technical information. is protected by any...
... exclusively licensed to their respective owners. All rights reserved. by GIGABYTE without GIGABYTE's prior written permission. Documentation Classifications In order to use GIGABYTE's unique features, read or download the information on/from the Support\Motherboard\Technology Guide page on your motherboard revision before updating motherboard BIOS, drivers, or when looking for technical information. is protected by any...
Manual
Page 6
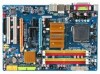
Box Contents GA-N650SLI-DS4L motherboard Motherboard driver disk Motherboard driver disk (For Windows Vista) User's Manual Quick Installation Guide Intel® LGA775 CPU Installation Guide One IDE cable and one floppy disk drive cable Two SATA 3Gb/s cables I/O Shield SLI Bridge Retention Bracket • The box contents above are subject to change without notice. • The motherboard image is...
Box Contents GA-N650SLI-DS4L motherboard Motherboard driver disk Motherboard driver disk (For Windows Vista) User's Manual Quick Installation Guide Intel® LGA775 CPU Installation Guide One IDE cable and one floppy disk drive cable Two SATA 3Gb/s cables I/O Shield SLI Bridge Retention Bracket • The box contents above are subject to change without notice. • The motherboard image is...
Manual
Page 18
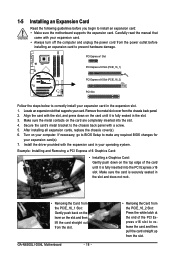
1-5 Installing an Expansion Card Read the following guidelines before installing an expansion card to prevent hardware damage. GA-N650SLI-DS4L Motherboard - 18 - • Removing the Card from the PCIE_16_2 Slot: Press the white latch at the end of the card until it is fully inserted ... lever on the card until it is securely seated in your expansion card(s). 7. After installing all expansion cards, replace the chassis cover(s). 6. Install the driver provided with the slot, and press down on the top edge of the PCI Express x16 slot to release the card and then pull the...
1-5 Installing an Expansion Card Read the following guidelines before installing an expansion card to prevent hardware damage. GA-N650SLI-DS4L Motherboard - 18 - • Removing the Card from the PCIE_16_2 Slot: Press the white latch at the end of the card until it is fully inserted ... lever on the card until it is securely seated in your expansion card(s). 7. After installing all expansion cards, replace the chassis cover(s). 6. Install the driver provided with the slot, and press down on the top edge of the PCI Express x16 slot to release the card and then pull the...
Manual
Page 21
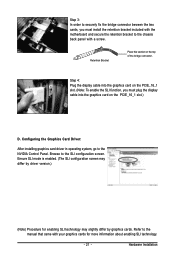
...Browse to the NVIDIA Control Panel. Hardware Installation Refer to the chassis back panel with your graphics cards for enabling SLI technology may differ by driver version.) (Note) Procedure for more information about enabling SLI technology. - 21 - Step 3: In order to securely fix the bridge connector ...into the graphics card on the PCIE_16_1 slot. (Note: To enable the SLI function, you must install the retention bracket included with the motherboard and secure the retention bracket to the manual that came with a screw. Step 4: Plug the display cable into the graphics card on...
...Browse to the NVIDIA Control Panel. Hardware Installation Refer to the chassis back panel with your graphics cards for enabling SLI technology may differ by driver version.) (Note) Procedure for more information about enabling SLI technology. - 21 - Step 3: In order to securely fix the bridge connector ...into the graphics card on the PCIE_16_1 slot. (Note: To enable the SLI function, you must install the retention bracket included with the motherboard and secure the retention bracket to the manual that came with a screw. Step 4: Plug the display cable into the graphics card on...
Manual
Page 36
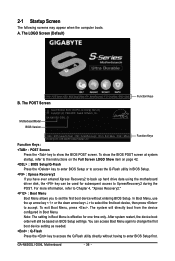
....00PG, An Energy Star Ally Copyright (C) 1984-2007, Award Software, Inc. In Boot Menu, use the up hard drive data using the motherboard driver disk, the key can access Boot Menu again to change the first boot device setting as needed. : Q-Flash Press the key to access ... Function Keys Function Keys: : POST Screen Press the key to enter BIOS Setup first. The system will still be used for one time only. GA-N650SLI-DS4L Motherboard - 36 - For more information, refer to Chapter 4, "Xpress Recovery2." : Boot Menu Boot Menu allows you have ever entered Xpress Recovery2 to ...
....00PG, An Energy Star Ally Copyright (C) 1984-2007, Award Software, Inc. In Boot Menu, use the up hard drive data using the motherboard driver disk, the key can access Boot Menu again to change the first boot device setting as needed. : Q-Flash Press the key to access ... Function Keys Function Keys: : POST Screen Press the key to enter BIOS Setup first. The system will still be used for one time only. GA-N650SLI-DS4L Motherboard - 36 - For more information, refer to Chapter 4, "Xpress Recovery2." : Boot Menu Boot Menu allows you have ever entered Xpress Recovery2 to ...
Manual
Page 59
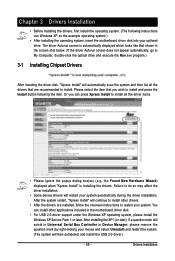
...operating system.) • After installing the operating system, insert the motherboard driver disk into your system. Failure to restart your optional drive. Drivers Installation Chapter 3 Drivers Installation • Before installing the drivers, first install the operating system. (The following the item. the ...Serial Bus Controller in the screen shot below. (If the driver Autorun screen does not appear automatically, go to install other applications included in the motherboard driver disk. • For USB 2.0 driver support under the Windows XP operating system, please install the ...
...operating system.) • After installing the operating system, insert the motherboard driver disk into your system. Failure to restart your optional drive. Drivers Installation Chapter 3 Drivers Installation • Before installing the drivers, first install the operating system. (The following the item. the ...Serial Bus Controller in the screen shot below. (If the driver Autorun screen does not appear automatically, go to install other applications included in the motherboard driver disk. • For USB 2.0 driver support under the Windows XP operating system, please install the ...
Manual
Page 60
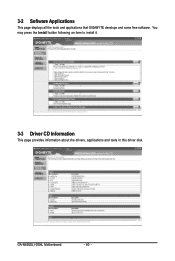
GA-N650SLI-DS4L Motherboard - 60 - 3-2 Software Applications This page displays all the tools and applications that GIGABYTE develops and some free software. You may press the Install button following an item to install it. 3-3 Driver CD Information This page provides information about the drivers, applications and tools in this driver disk.
GA-N650SLI-DS4L Motherboard - 60 - 3-2 Software Applications This page displays all the tools and applications that GIGABYTE develops and some free software. You may press the Install button following an item to install it. 3-3 Driver CD Information This page provides information about the drivers, applications and tools in this driver disk.

Manual
Page 61
Drivers Installation 3-4 Hardware Information This page provides information about the hardware devices on this motherboard. 3-5 Contact Us Check the contacts information of the GIGABYTE headquarter in Taiwan and the overseas branch offices on the last page of this manual. - 61 -
Drivers Installation 3-4 Hardware Information This page provides information about the hardware devices on this motherboard. 3-5 Contact Us Check the contacts information of the GIGABYTE headquarter in Taiwan and the overseas branch offices on the last page of this manual. - 61 -
Manual
Page 66
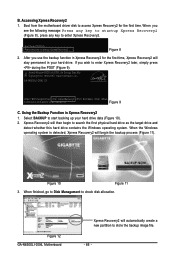
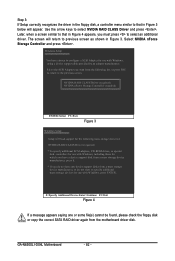
...motherboard driver disk to search the first physical hard drive as the target drive and detect whether this hard drive contains the Windows operating system. Select BACKUP to enter Xpress Recovery2 later, simply press during the POST (Figure 9). When finished, go to Disk Management to enter Xpress Recovery2. . . GA-N650SLI-DS4L...- Award Modular BIOS v6.00PG, An Energy Star Ally Copyright (C) 1984-2007, Award Software, Inc. Figure 12 GA-N650SLI-DS4L Motherboard Xpress Recovery2 will stay permanent in Xpress Recovery2 1. Using the Backup Function in your hard drive data (Figure 10...
...motherboard driver disk to search the first physical hard drive as the target drive and detect whether this hard drive contains the Windows operating system. Select BACKUP to enter Xpress Recovery2 later, simply press during the POST (Figure 9). When finished, go to Disk Management to enter Xpress Recovery2. . . GA-N650SLI-DS4L...- Award Modular BIOS v6.00PG, An Energy Star Ally Copyright (C) 1984-2007, Award Software, Inc. Figure 12 GA-N650SLI-DS4L Motherboard Xpress Recovery2 will stay permanent in Xpress Recovery2 1. Using the Backup Function in your hard drive data (Figure 10...
Manual
Page 71
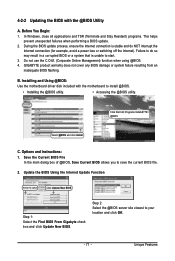
... using @BIOS. 4. Installing and Using @BIOS: Use the motherboard driver disk included with the @BIOS Utility A. C. Update the BIOS Using the Internet Update Function Select this option Click Update New BIOS Step 1: Select the Find BIOS From Gigabyte check box and click Update New BIOS. GIGABYTE product warranty does not cover any BIOS damage...
... using @BIOS. 4. Installing and Using @BIOS: Use the motherboard driver disk included with the @BIOS Utility A. C. Update the BIOS Using the Internet Update Function Select this option Click Update New BIOS Step 1: Select the Find BIOS From Gigabyte check box and click Update New BIOS. GIGABYTE product warranty does not cover any BIOS damage...
Manual
Page 75
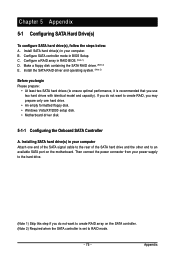
...want to create RAID array on the motherboard. Appendix Installing SATA hard drive(s) in your computer Attach one hard drive. • An empty formatted floppy disk. • Windows Vista/XP/2000 setup disk. • Motherboard driver disk. 5-1-1 Configuring the Onboard SATA ...Controller A. Configure SATA controller mode in RAID BIOS. (Note 1) D. Install the SATA RAID driver and operating system. (Note 2) Before you begin Please prepare: •...
...want to create RAID array on the motherboard. Appendix Installing SATA hard drive(s) in your computer Attach one hard drive. • An empty formatted floppy disk. • Windows Vista/XP/2000 setup disk. • Motherboard driver disk. 5-1-1 Configuring the Onboard SATA ...Controller A. Configure SATA controller mode in RAID BIOS. (Note 1) D. Install the SATA RAID driver and operating system. (Note 2) Before you begin Please prepare: •...
Manual
Page 80
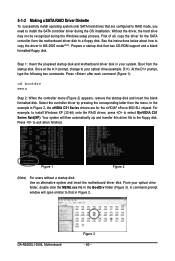
... drive folder, double click the MENU.exe file in Figure 2. Select the controller driver by pressing the corresponding letter from the startup disk. At the D:\> prompt, type the following two commands. GA-N650SLI-DS4L Motherboard Figure 3 - 80 - Once at the A:\> prompt, change to a floppy disk.... In the example in Figure 2, the nVIDIA C51 Series drivers are configured to RAID mode, you need to that in the BootDrv...
... drive folder, double click the MENU.exe file in Figure 2. Select the controller driver by pressing the corresponding letter from the startup disk. At the D:\> prompt, type the following two commands. GA-N650SLI-DS4L Motherboard Figure 3 - 80 - Once at the A:\> prompt, change to a floppy disk.... In the example in Figure 2, the nVIDIA C51 Series drivers are configured to RAID mode, you need to that in the BootDrv...
Manual
Page 82
... drives, or special disk controllers for use with Windows, using a device support disk provided by an adapter manufacturer. NVIDIA RAID CLASS Driver (required) NVIDIA nForce Storage Controller (required) ENTER=Select F3=Exit Figure 3 Windows Setup Setup will appear. The screen will return to...you have a device support disk from a mass storage device manufacturer, press S. * If you do not want from the motherboard driver disk. Select NVIDIA nForce Storage Controller and press . GA-N650SLI-DS4L Motherboard - 82 - Select the SCSI Adapter you must press to select NVIDIA RAID CLASS...
... drives, or special disk controllers for use with Windows, using a device support disk provided by an adapter manufacturer. NVIDIA RAID CLASS Driver (required) NVIDIA nForce Storage Controller (required) ENTER=Select F3=Exit Figure 3 Windows Setup Setup will appear. The screen will return to...you have a device support disk from a mass storage device manufacturer, press S. * If you do not want from the motherboard driver disk. Select NVIDIA nForce Storage Controller and press . GA-N650SLI-DS4L Motherboard - 82 - Select the SCSI Adapter you must press to select NVIDIA RAID CLASS...

Manual
Page 84
... GA-N650SLI-DS4L Motherboard - 84 - The picture to access the Audio Control Panel. Configuring Speakers: (The following for High Definition Audio" has been installed from the motherboard driver disk and your system tray. 5-2 Configuring Audio Input and Output 5-2-1 Configuring 2/4/5.1/7.1-Channel Audio The motherboard provides... Configurations: Refer to the following instructions use Windows XP as the example operating system.) Step 1: After installing the audio driver, the Audio Manager icon will appear in a 4-channel audio configuration, if a Rear speaker is plugged into the default...
... GA-N650SLI-DS4L Motherboard - 84 - The picture to access the Audio Control Panel. Configuring Speakers: (The following for High Definition Audio" has been installed from the motherboard driver disk and your system tray. 5-2 Configuring Audio Input and Output 5-2-1 Configuring 2/4/5.1/7.1-Channel Audio The motherboard provides... Configurations: Refer to the following instructions use Windows XP as the example operating system.) Step 1: After installing the audio driver, the Audio Manager icon will appear in a 4-channel audio configuration, if a Rear speaker is plugged into the default...
Manual
Page 88
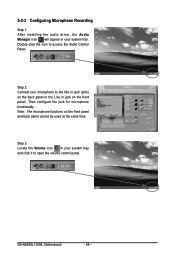
Then configure the jack for microphone functionality. GA-N650SLI-DS4L Motherboard - 88 - Step 2: Connect your system tray. Note: The microphone functions on the front panel. Step 3: Locate the Volume icon in your system tray and click ... (pink) on the back panel or the Line in your microphone to open the volume control panel. 5-2-3 Configuring Microphone Recording Step 1: After installing the audio driver, the Audio Manager icon will appear in jack on the front panel and back panel cannot be used at the same time. Double-click the...
Then configure the jack for microphone functionality. GA-N650SLI-DS4L Motherboard - 88 - Step 2: Connect your system tray. Note: The microphone functions on the front panel. Step 3: Locate the Volume icon in your system tray and click ... (pink) on the back panel or the Line in your microphone to open the volume control panel. 5-2-3 Configuring Microphone Recording Step 1: After installing the audio driver, the Audio Manager icon will appear in jack on the front panel and back panel cannot be used at the same time. Double-click the...


