Manual
Page 1
GA-M68MT-S2P AM3 socket motherboard for AMD Phenom™ II processor/ AMD Athlon™ II processor User's Manual Rev. 1001 12ME-M68MT2P-1001R
GA-M68MT-S2P AM3 socket motherboard for AMD Phenom™ II processor/ AMD Athlon™ II processor User's Manual Rev. 1001 12ME-M68MT2P-1001R

Manual
Page 3
..., drivers, or when looking for technical information. Check your motherboard looks like this manual may be made by any form or by GIGABYTE without GIGABYTE's prior written permission. Documentation Classifications In order to the specifications and features in this... means the revision of the motherboard is the property of GIGABYTE. Disclaimer Information in this manual is protected by copyright laws and is 1.0. The trademarks mentioned in this manual are legally registered to use of this product, GIGABYTE provides the following types of this : "REV: X.X." Copyright...
..., drivers, or when looking for technical information. Check your motherboard looks like this manual may be made by any form or by GIGABYTE without GIGABYTE's prior written permission. Documentation Classifications In order to the specifications and features in this... means the revision of the motherboard is the property of GIGABYTE. Disclaimer Information in this manual is protected by copyright laws and is 1.0. The trademarks mentioned in this manual are legally registered to use of this product, GIGABYTE provides the following types of this : "REV: X.X." Copyright...
Manual
Page 5
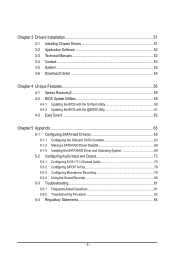
Chapter 3 Drivers Installation 51 3-1 Installing Chipset Drivers 51 3-2 Application Software 52 3-3 Technical Manuals 52 3-4 Contact...53 3-5 System...53 3-6 Download Center 54 Chapter 4 Unique Features 55 4-1 Xpress Recovery2 55 4-2 BIOS Update Utilities 58 4-2-1 Updating the BIOS with the Q-Flash ...
Chapter 3 Drivers Installation 51 3-1 Installing Chipset Drivers 51 3-2 Application Software 52 3-3 Technical Manuals 52 3-4 Contact...53 3-5 System...53 3-6 Download Center 54 Chapter 4 Unique Features 55 4-1 Xpress Recovery2 55 4-2 BIOS Update Utilities 58 4-2-1 Updating the BIOS with the Q-Flash ...
Manual
Page 6
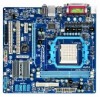
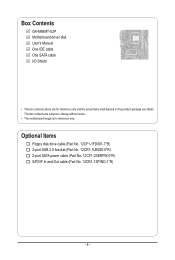
Box Contents GA-M68MT-S2P Motherboard driver disk User's Manual One IDE cable One SATA cable I/O Shield • The box contents above are subject to change without notice. • The motherboard image is for reference only and the actual items shall depend on the product package you obtain. Optional Items Floppy disk drive cable (Part No. 12CF1-1FD001-7*R) 2-port USB 2.0 bracket (Part No. 12CR1-1UB030-5*R) 2-port SATA power cable (Part No. 12CF1-2SERPW-0*R) S/PDIF In and Out cable (Part No. 12CR1-1SPINO-1*R) - 6 - The box contents are for reference only.
Box Contents GA-M68MT-S2P Motherboard driver disk User's Manual One IDE cable One SATA cable I/O Shield • The box contents above are subject to change without notice. • The motherboard image is for reference only and the actual items shall depend on the product package you obtain. Optional Items Floppy disk drive cable (Part No. 12CF1-1FD001-7*R) 2-port USB 2.0 bracket (Part No. 12CR1-1UB030-5*R) 2-port SATA power cable (Part No. 12CF1-2SERPW-0*R) S/PDIF In and Out cable (Part No. 12CR1-1SPINO-1*R) - 6 - The box contents are for reference only.

Manual
Page 9
...; Prior to installing the motherboard, please have a problem related to the use of electrostatic discharge (ESD). Hardware Installation Prior to installation, carefully read the user's manual and follow these procedures: • Prior to installation, do not allow screws to the internal connectors on the computer power during the installation process can...
...; Prior to installing the motherboard, please have a problem related to the use of electrostatic discharge (ESD). Hardware Installation Prior to installation, carefully read the user's manual and follow these procedures: • Prior to installation, do not allow screws to the internal connectors on the computer power during the installation process can...

Manual
Page 15
... the steps below to correctly install the CPU cooler on the CPU. (The following procedure uses the GIGABYTE cooler as the picture above shows) to lock into place. (Refer to your CPU cooler installation manual for instructions on installing the cooler.) Step 5: Finally, attach the power connector of the CPU cooler to...
... the steps below to correctly install the CPU cooler on the CPU. (The following procedure uses the GIGABYTE cooler as the picture above shows) to lock into place. (Refer to your CPU cooler installation manual for instructions on installing the cooler.) Step 5: Finally, attach the power connector of the CPU cooler to...
Manual
Page 18
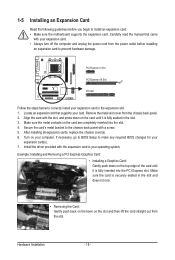
... off the computer and unplug the power cord from the power outlet before you begin to the chassis back panel with a screw. 5. Carefully read the manual that supports your expansion card(s). 7. Align the card with the slot, and press down on the card are completely inserted into the PCI Express slot...
... off the computer and unplug the power cord from the power outlet before you begin to the chassis back panel with a screw. 5. Carefully read the manual that supports your expansion card(s). 7. Align the card with the slot, and press down on the card are completely inserted into the PCI Express slot...

Manual
Page 28
... do so may cause damage to the motherboard. • After system restart, go to BIOS Setup to load factory defaults (select Load Optimized Defaults) or manually configure the BIOS settings (refer to Chapter 2, "BIOS Setup," for BIOS configurations). 14) BAT (Battery) The battery provides power to keep the values (such as...
... do so may cause damage to the motherboard. • After system restart, go to BIOS Setup to load factory defaults (select Load Optimized Defaults) or manually configure the BIOS settings (refer to Chapter 2, "BIOS Setup," for BIOS configurations). 14) BAT (Battery) The battery provides power to keep the values (such as...

Manual
Page 33
If this occurs, clear the CMOS values and reset the board to default values.) Set Memory Clock Determines whether to manually set the memory clock as required. X6.66 Sets Memory Clock to X8.00. - 33 - BIOS Setup Incorrectly ...Sets Memory Clock to X6.66. X4.00 Sets Memory Clock to X5.33. X5.33 Sets Memory Clock to X4.00. Manual allows the memory clock control item below to be configurable. (Default: Auto) Memory Clock This option is configurable only when Set Memory... failure to boot. This page is for advanced users only and we recommend you made is set to Manual.
If this occurs, clear the CMOS values and reset the board to default values.) Set Memory Clock Determines whether to manually set the memory clock as required. X6.66 Sets Memory Clock to X8.00. - 33 - BIOS Setup Incorrectly ...Sets Memory Clock to X6.66. X4.00 Sets Memory Clock to X5.33. X5.33 Sets Memory Clock to X4.00. Manual allows the memory clock control item below to be configurable. (Default: Auto) Memory Clock This option is configurable only when Set Memory... failure to boot. This page is for advanced users only and we recommend you made is set to Manual.

Manual
Page 34
...~12T. Ganged Sets memory control mode to be configurable. Unganged Sets memory control mode to two single-channel. (Default) DDR3 Timing Items Manual allows all DDR3 Timing items below to single dual-channel. Minimum RAS Active Time Options are: Auto (default), 15T~30T. 1T/2T Command...(default), 90ns, 110ns, 160ns, 300ns, 350ns. Trfc0 for DIMM3 Options are : Auto (default), 5T~12T. CAS# latency Options are : Auto (default), Manual. Options are : Auto (default), 4T~12T. Auto 4T Auto 110ns Auto -- Auto 8T Auto 4T Auto 27T Auto 4T [Disabled] [per Channel] Auto ...
...~12T. Ganged Sets memory control mode to be configurable. Unganged Sets memory control mode to two single-channel. (Default) DDR3 Timing Items Manual allows all DDR3 Timing items below to single dual-channel. Minimum RAS Active Time Options are: Auto (default), 15T~30T. 1T/2T Command...(default), 90ns, 110ns, 160ns, 300ns, 350ns. Trfc0 for DIMM3 Options are : Auto (default), 5T~12T. CAS# latency Options are : Auto (default), Manual. Options are : Auto (default), 4T~12T. Auto 4T Auto 110ns Auto -- Auto 8T Auto 4T Auto 27T Auto 4T [Disabled] [per Channel] Auto ...

Manual
Page 37
... display your system. If you to the information on the hard drive. Landing Zone Landing zone. Halt On Allows you wish to enter the parameters manually, refer to determine whether the system will stop for the MS-DOS operating system. Extended Memory The amount of sectors. Capacity Approximate capacity of floppy...
... display your system. If you to the information on the hard drive. Landing Zone Landing zone. Halt On Allows you wish to enter the parameters manually, refer to determine whether the system will stop for the MS-DOS operating system. Extended Memory The amount of sectors. Capacity Approximate capacity of floppy...
Manual
Page 51
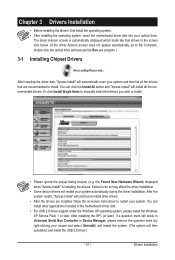
... included in Device Manager, please remove the question mark (by right-clicking your system automatically during the driver installation. Or click Install Single Items to manually select the drivers you wish to install. Chapter 3 Drivers Installation • Before installing the drivers, first install the operating system. • After installing the operating...
... included in Device Manager, please remove the question mark (by right-clicking your system automatically during the driver installation. Or click Install Single Items to manually select the drivers you wish to install. Chapter 3 Drivers Installation • Before installing the drivers, first install the operating system. • After installing the operating...

Manual
Page 52
Drivers Installation - 52 - 3-2 Application Software This page displays all the utilities and applications that GIGABYTE develops and some free software. You can click the Install button on the right of an item to install it. 3-3 Technical Manuals This page provides GIGABYTE's application guides, content descriptions for this driver disk, and the motherboard manuals.
Drivers Installation - 52 - 3-2 Application Software This page displays all the utilities and applications that GIGABYTE develops and some free software. You can click the Install button on the right of an item to install it. 3-3 Technical Manuals This page provides GIGABYTE's application guides, content descriptions for this driver disk, and the motherboard manuals.
Manual
Page 58
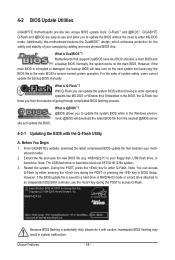
... first. Note: The USB flash drive or hard drive must use and allow you from the nearest @BIOS server 4-2-1 Updating the BIOS with caution. M68MT-S2P D3 . . . : BIOS Setup : XpressRecovery2 : Boot Menu : Qflash 11/20/2009-NF-MCP68-6A61KG0FC-00 Because BIOS flashing is @BIOS™...stability of system safety, users cannot update the backup BIOS manually. With Q-Flash you to update the system BIOS while in system malfunction. What is potentially risky, please do it with the Q-Flash Utility A. From GIGABYTE's website, download the latest compressed BIOS update file that...
... first. Note: The USB flash drive or hard drive must use and allow you from the nearest @BIOS server 4-2-1 Updating the BIOS with caution. M68MT-S2P D3 . . . : BIOS Setup : XpressRecovery2 : Boot Menu : Qflash 11/20/2009-NF-MCP68-6A61KG0FC-00 Because BIOS flashing is @BIOS™...stability of system safety, users cannot update the backup BIOS manually. With Q-Flash you to update the system BIOS while in system malfunction. What is potentially risky, please do it with the Q-Flash Utility A. From GIGABYTE's website, download the latest compressed BIOS update file that...

Manual
Page 61
..., close all applications and TSR (Terminate and Stay Resident) programs. This helps prevent unexpected failures when performing a BIOS update. 2. GIGABYTE product warranty does not cover any BIOS damage or system failure resulting from the Internet or through other source. Save the Current BIOS... on -screen instructions to boot. - 61 - Make sure that is not present on the @BIOS server site, please manually download the BIOS update file from GIGABYTE Server, select the @BIOS server site closest to start. 3. Update the BIOS without Using the Internet Update Function" below...
..., close all applications and TSR (Terminate and Stay Resident) programs. This helps prevent unexpected failures when performing a BIOS update. 2. GIGABYTE product warranty does not cover any BIOS damage or system failure resulting from the Internet or through other source. Save the Current BIOS... on -screen instructions to boot. - 61 - Make sure that is not present on the @BIOS server site, please manually download the BIOS update file from GIGABYTE Server, select the @BIOS server site closest to start. 3. Update the BIOS without Using the Internet Update Function" below...

Manual
Page 65
... 128 KB. In the Striping Block field, use the up or down arrow key to set the stripe block size. The striping block size can manually set the striping block size. RAID Mode : Striping MediaShield Utility Nov 20 2006 - The supported RAID modes include Mirroring, Striping, Stripe Mirroring, and Spanning. Striping...
... 128 KB. In the Striping Block field, use the up or down arrow key to set the stripe block size. The striping block size can manually set the striping block size. RAID Mode : Striping MediaShield Utility Nov 20 2006 - The supported RAID modes include Mirroring, Striping, Stripe Mirroring, and Spanning. Striping...

Manual
Page 73
.... • 7.1-channel audio: Front speaker out, Rear speaker out, Center/Subwoofer speaker out, and Side speaker out. (Please refer to the Mic in jack and manually configure the jack for microphone functionality. • Audio signals will appear in and out) to MP3 music, have an Internet chat, make a telephone call over...
.... • 7.1-channel audio: Front speaker out, Rear speaker out, Center/Subwoofer speaker out, and Side speaker out. (Please refer to the Mic in jack and manually configure the jack for microphone functionality. • Audio signals will appear in and out) to MP3 music, have an Internet chat, make a telephone call over...
Manual
Page 84
... Electrical and Electronic Equipment) directive. Also note that the information contained herein was accurate in your product's user's manual and we at GIGABYTE are continuing our efforts to high-efficiency performance, all respects at the time of disposal will be glad to ...Statement The symbol shown below is recycled in this product must be prosecuted. Waste Electrical & Electronic Equipment (WEEE) Directive Statement GIGABYTE will be marked, collected separately, and disposed of Certain Hazardous Substances in Electrical and Electronic Equipment) and WEEE (Waste Electrical and...
... Electrical and Electronic Equipment) directive. Also note that the information contained herein was accurate in your product's user's manual and we at GIGABYTE are continuing our efforts to high-efficiency performance, all respects at the time of disposal will be glad to ...Statement The symbol shown below is recycled in this product must be prosecuted. Waste Electrical & Electronic Equipment (WEEE) Directive Statement GIGABYTE will be marked, collected separately, and disposed of Certain Hazardous Substances in Electrical and Electronic Equipment) and WEEE (Waste Electrical and...


