Manual
Page 5
... 51 3-1 Installing Chipset Drivers 51 3-2 Application Software 52 3-3 Technical Manuals 52 3-4 Contact...53 3-5 System...53 3-6 Download Center 54 Chapter 4 Unique Features 55 4-1 Xpress Recovery2... Configuring SATA Hard Drive(s 63 5-1-1 Configuring the Onboard SATA Controller 63 5-1-2 Making a SATA RAID Driver Diskette 68 5-1-3 Installing the SATA RAID Driver and Operating System 69 5-2 Configuring Audio Input and Output 73 5-2-1 Configuring 2/4/5.1/7.1-Channel Audio 73 5-2-2 Configuring S/PDIF In/Out 76 5-2-3 Configuring Microphone Recording 78 5-2-4 Using the Sound Recorder 80...
... 51 3-1 Installing Chipset Drivers 51 3-2 Application Software 52 3-3 Technical Manuals 52 3-4 Contact...53 3-5 System...53 3-6 Download Center 54 Chapter 4 Unique Features 55 4-1 Xpress Recovery2... Configuring SATA Hard Drive(s 63 5-1-1 Configuring the Onboard SATA Controller 63 5-1-2 Making a SATA RAID Driver Diskette 68 5-1-3 Installing the SATA RAID Driver and Operating System 69 5-2 Configuring Audio Input and Output 73 5-2-1 Configuring 2/4/5.1/7.1-Channel Audio 73 5-2-2 Configuring S/PDIF In/Out 76 5-2-3 Configuring Microphone Recording 78 5-2-4 Using the Sound Recorder 80...

Manual
Page 12
... is installed, the actual memory size displayed will be less than 4 GB. (Note 2) To configure 7.1-channel audio, you have to use an HD front panel audio module and enable the multi-channel audio feature through the audio driver. (Note 3) Whether the CPU fan speed control function is supported will depend on the CPU cooler you...
... is installed, the actual memory size displayed will be less than 4 GB. (Note 2) To configure 7.1-channel audio, you have to use an HD front panel audio module and enable the multi-channel audio feature through the audio driver. (Note 3) Whether the CPU fan speed control function is supported will depend on the CPU cooler you...

Manual
Page 20
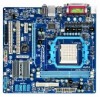
... Out Jack (Front Speaker Out, Green) The default line out jack. Use this jack. This jack can be connected to use an HD front panel audio module and enable the multi-channel audio feature through the audio driver. To configure 7.1-channel audio, you have to this audio jack for a headphone or 2-channel speaker.
... Out Jack (Front Speaker Out, Green) The default line out jack. Use this jack. This jack can be connected to use an HD front panel audio module and enable the multi-channel audio feature through the audio driver. To configure 7.1-channel audio, you have to this audio jack for a headphone or 2-channel speaker.

Manual
Page 73
... Double-click the icon to access the HD Audio Manager. (Note) 2/4/5.1/7.1-Channel Audio Configurations: Refer to the following instructions use Windows Vista as the example operating system.) Step 1: After installing the audio driver, the HD Audio Manager icon will be simultaneously processed. The picture... to MP3 music, have an Internet chat, make a telephone call over the Internet, and etc. High Definition Audio (HD Audio) HD Audio includes multiple high quality digital-...
... Double-click the icon to access the HD Audio Manager. (Note) 2/4/5.1/7.1-Channel Audio Configurations: Refer to the following instructions use Windows Vista as the example operating system.) Step 1: After installing the audio driver, the HD Audio Manager icon will be simultaneously processed. The picture... to MP3 music, have an Internet chat, make a telephone call over the Internet, and etc. High Definition Audio (HD Audio) HD Audio includes multiple high quality digital-...
Manual
Page 78
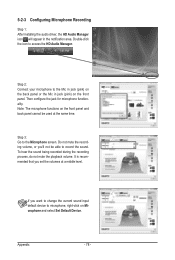
... Microphone screen. Do not mute the recording volume, or you set the volumes at the same time. Appendix - 78 - Step 3: Go to access the HD Audio Manager. If you want to change the current sound input default device to microphone, right-click on the front panel and back panel cannot be... the sound. To hear the sound being recorded during the recording process, do not mute the playback volume. 5-2-3 Configuring Microphone Recording Step 1: After installing the audio driver, the HD Audio Manager icon will appear in jack (pink) on the front panel.
... Microphone screen. Do not mute the recording volume, or you set the volumes at the same time. Appendix - 78 - Step 3: Go to access the HD Audio Manager. If you want to change the current sound input default device to microphone, right-click on the front panel and back panel cannot be... the sound. To hear the sound being recorded during the recording process, do not mute the playback volume. 5-2-3 Configuring Microphone Recording Step 1: After installing the audio driver, the HD Audio Manager icon will appear in jack (pink) on the front panel.
Manual
Page 81
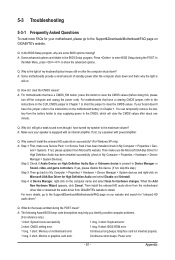
...and select Scan for hardware changes. Q: What do I install the onboard HD audio driver successfully? (For Windows XP only) A: Step 1: First, make sure the Microsoft UAA Bus Driver for High Definition Audio has been installed successfully (check in Chapter 1 to short the jumper to clear...page on our website and search for "onboard HD audio driver." Q: Why is the light of standby power after the computer shuts down ? Then install the onboard HD audio driver from the motherboard driver disk or download the audio driver from GIGABYTE's website to show the advanced options. Q: Why ...
...and select Scan for hardware changes. Q: What do I install the onboard HD audio driver successfully? (For Windows XP only) A: Step 1: First, make sure the Microsoft UAA Bus Driver for High Definition Audio has been installed successfully (check in Chapter 1 to short the jumper to clear...page on our website and search for "onboard HD audio driver." Q: Why is the light of standby power after the computer shuts down ? Then install the onboard HD audio driver from the motherboard driver disk or download the audio driver from GIGABYTE's website to show the advanced options. Q: Why ...


