Manual
Page 3
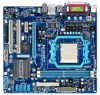
...to their respective owners. Disclaimer Information in any form or by GIGABYTE without GIGABYTE's prior written permission. Example: All rights reserved. For example, "REV: 1.0" means the revision of the motherboard is the property of documentations: For detailed product information... For instructions on how to use GIGABYTE's unique features, read or download the information on/from the Support&Downloads\Motherboard\Technology Guide page on your motherboard revision before updating motherboard BIOS, drivers, or when looking for technical information. Copyright...
...to their respective owners. Disclaimer Information in any form or by GIGABYTE without GIGABYTE's prior written permission. Example: All rights reserved. For example, "REV: 1.0" means the revision of the motherboard is the property of documentations: For detailed product information... For instructions on how to use GIGABYTE's unique features, read or download the information on/from the Support&Downloads\Motherboard\Technology Guide page on your motherboard revision before updating motherboard BIOS, drivers, or when looking for technical information. Copyright...
Manual
Page 6
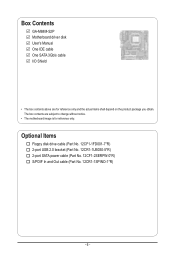
Box Contents GA-M68M-S2P Motherboard driver disk User's Manual One IDE cable One SATA 3Gb/s cable I/O Shield • The box contents above are subject to change without notice. • The motherboard image is for reference only and the actual items shall depend on the product package you obtain. Optional Items Floppy disk drive cable (Part No. 12CF1-1FD001-7*R) 2-port USB 2.0 bracket (Part No. 12CR1-1UB030-5*R) 2-port SATA power cable (Part No. 12CF1-2SERPW-0*R) S/PDIF In and Out cable (Part No. 12CR1-1SPINO-1*R) - 6 - The box contents are for reference only.
Box Contents GA-M68M-S2P Motherboard driver disk User's Manual One IDE cable One SATA 3Gb/s cable I/O Shield • The box contents above are subject to change without notice. • The motherboard image is for reference only and the actual items shall depend on the product package you obtain. Optional Items Floppy disk drive cable (Part No. 12CF1-1FD001-7*R) 2-port USB 2.0 bracket (Part No. 12CR1-1UB030-5*R) 2-port SATA power cable (Part No. 12CF1-2SERPW-0*R) S/PDIF In and Out cable (Part No. 12CR1-1SPINO-1*R) - 6 - The box contents are for reference only.

Manual
Page 12
.... (Note 2) To configure 7.1-channel audio, you have to use an HD front panel audio module and enable the multi-channel audio feature through the audio driver. (Note 3) Whether the CPU fan speed control function is supported will depend on the CPU cooler you install. (Note 4) Available functions in EasyTune may differ...
.... (Note 2) To configure 7.1-channel audio, you have to use an HD front panel audio module and enable the multi-channel audio feature through the audio driver. (Note 3) Whether the CPU fan speed control function is supported will depend on the CPU cooler you install. (Note 4) Available functions in EasyTune may differ...
Manual
Page 18
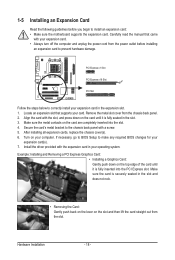
... cover from the power outlet before you begin to install an expansion card: • Make sure the motherboard supports the expansion card. After installing all expansion cards, replace the chassis cover(s). 6. Install the driver provided with the slot, and press down on the card are completely inserted into the PCI Express slot...
... cover from the power outlet before you begin to install an expansion card: • Make sure the motherboard supports the expansion card. After installing all expansion cards, replace the chassis cover(s). 6. Install the driver provided with the slot, and press down on the card are completely inserted into the PCI Express slot...
Manual
Page 20
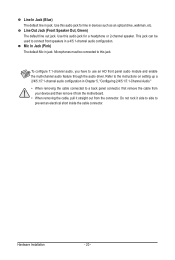
..., etc. Do not rock it side to side to a back panel connector, first remove the cable from your device and then remove it from the motherboard. • When removing the cable, pull it straight out from the connector. Line In Jack (Blue) The default line in jack. Use this audio jack... audio configuration. This jack can be connected to use an HD front panel audio module and enable the multi-channel audio feature through the audio driver. Line Out Jack (Front Speaker Out, Green) The default line out jack. To configure 7.1-channel audio, you have to this jack.
..., etc. Do not rock it side to side to a back panel connector, first remove the cable from your device and then remove it from the motherboard. • When removing the cable, pull it straight out from the connector. Line In Jack (Blue) The default line in jack. Use this audio jack... audio configuration. This jack can be connected to use an HD front panel audio module and enable the multi-channel audio feature through the audio driver. Line Out Jack (Front Speaker Out, Green) The default line out jack. To configure 7.1-channel audio, you have to this jack.
Manual
Page 30
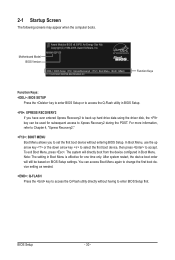
In Boot Menu, use the up hard drive data using the driver disk, the key can access Boot Menu again to change the first boot device...setting in BIOS Setup. : XPRESS RECOVERY2 If you to accept. BIOS Setup - 30 - You can be based on BIOS Setup settings. M68M-S2P D5 . . . . : BIOS Setup : XpressRecovery2 : Boot Menu : Qflash 11/13/2009-NF-MCP68-6A61KG0GC-00 Function Keys Function Keys... the computer boots. The system will still be used for one time only. Motherboard Model BIOS Version Award Modular BIOS v6.00PG, An Energy Star Ally Copyright (C) 1984-2009, Award Software, Inc....
In Boot Menu, use the up hard drive data using the driver disk, the key can access Boot Menu again to change the first boot device...setting in BIOS Setup. : XPRESS RECOVERY2 If you to accept. BIOS Setup - 30 - You can be based on BIOS Setup settings. M68M-S2P D5 . . . . : BIOS Setup : XpressRecovery2 : Boot Menu : Qflash 11/13/2009-NF-MCP68-6A61KG0GC-00 Function Keys Function Keys... the computer boots. The system will still be used for one time only. Motherboard Model BIOS Version Award Modular BIOS v6.00PG, An Energy Star Ally Copyright (C) 1984-2009, Award Software, Inc....
Manual
Page 51
...), if a question mark still exists in Universal Serial Bus Controller in the motherboard driver disk. • For USB 2.0 driver support under the Windows XP operating system, please install the Windows XP Service Pack 1 or later. You can install other drivers. • After the drivers are recommended to install. • Please ignore the popup dialog box...
...), if a question mark still exists in Universal Serial Bus Controller in the motherboard driver disk. • For USB 2.0 driver support under the Windows XP operating system, please install the Windows XP Service Pack 1 or later. You can install other drivers. • After the drivers are recommended to install. • Please ignore the popup dialog box...

Manual
Page 52
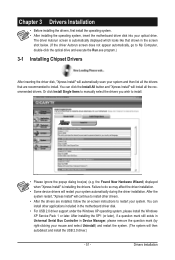
Drivers Installation - 52 - 3-2 Application Software This page displays all the utilities and applications that GIGABYTE develops and some free software. You can click the Install button on the right of an item to install it. 3-3 Technical Manuals This page provides GIGABYTE's application guides, content descriptions for this driver disk, and the motherboard manuals.
Drivers Installation - 52 - 3-2 Application Software This page displays all the utilities and applications that GIGABYTE develops and some free software. You can click the Install button on the right of an item to install it. 3-3 Technical Manuals This page provides GIGABYTE's application guides, content descriptions for this driver disk, and the motherboard manuals.
Manual
Page 56
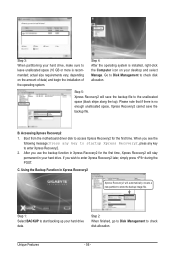
... Recovery2. 2. Step 1: Select BACKUP to check disk allocation. C. Using the Backup Function in Xpress Recovery2 Xpress Recovery2 will save the backup file. Boot from the motherboard driver disk to check disk allocation. When you use the backup function in your hard drive. Step 2: When finished, go to Disk Management to access Xpress...
... Recovery2. 2. Step 1: Select BACKUP to check disk allocation. C. Using the Backup Function in Xpress Recovery2 Xpress Recovery2 will save the backup file. Boot from the motherboard driver disk to check disk allocation. When you use the backup function in your hard drive. Step 2: When finished, go to Disk Management to access Xpress...
Manual
Page 63
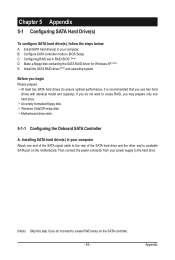
... performance, it is recommended that you use two hard drives with identical model and capacity). C. B. Install the SATA RAID driver (Note) and operating system. Appendix Configure SATA controller mode in your computer. Chapter 5 Appendix 5-1 Configuring SATA Hard Drive(s)...connector from your computer Attach one hard drive. • An empty formatted floppy disk. • Windows Vista/XP setup disk. • Motherboard driver disk. 5-1-1 Configuring the Onboard SATA Controller A. Installing SATA hard drive(s) in RAID BIOS. (Note) D. Before you begin Please prepare:...
... performance, it is recommended that you use two hard drives with identical model and capacity). C. B. Install the SATA RAID driver (Note) and operating system. Appendix Configure SATA controller mode in your computer. Chapter 5 Appendix 5-1 Configuring SATA Hard Drive(s)...connector from your computer Attach one hard drive. • An empty formatted floppy disk. • Windows Vista/XP setup disk. • Motherboard driver disk. 5-1-1 Configuring the Onboard SATA Controller A. Installing SATA hard drive(s) in RAID BIOS. (Note) D. Before you begin Please prepare:...
Manual
Page 68
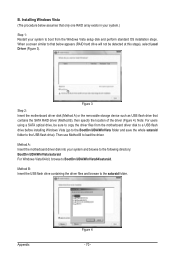
... for the SATA controller from the startup disk. 2: Remove the startup disk and insert the prepared floppy disk and the motherboard driver disk (here we as- For example, from the menu in the command according to the operating system to be recognized during the... operating system onto RAID drive(s), you also can copy the SATA controller driver from the motherboard driver disk to a USB flash drive. A Command Prompt window will then automatically copy the driver files to be installed, select the controller driver by pressing the corresponding letter from the menu and press . sume that...
... for the SATA controller from the startup disk. 2: Remove the startup disk and insert the prepared floppy disk and the motherboard driver disk (here we as- For example, from the menu in the command according to the operating system to be recognized during the... operating system onto RAID drive(s), you also can copy the SATA controller driver from the motherboard driver disk to a USB flash drive. A Command Prompt window will then automatically copy the driver files to be installed, select the controller driver by pressing the corresponding letter from the menu and press . sume that...
Manual
Page 70
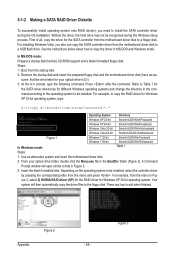
Method B: Insert the USB flash drive containing the driver files and browse to load the driver. Appendix Figure 4 - 70 - Figure 3 Step 2: Insert the motherboard driver disk (Method A) or the removable storage device such as USB flash drive that only one RAID array exists in your...use Method B to the sataraid folder. When a screen similar to BootDrv\UDA\WinVista64\sataraid. Method A: Insert the motherboard driver disk into your system to boot from the motherboard driver disk to a USB flash drive before installing Windows Vista (go to the BootDrv\UDA\WinVista folder and save the whole...
Method B: Insert the USB flash drive containing the driver files and browse to load the driver. Appendix Figure 4 - 70 - Figure 3 Step 2: Insert the motherboard driver disk (Method A) or the removable storage device such as USB flash drive that only one RAID array exists in your...use Method B to the sataraid folder. When a screen similar to BootDrv\UDA\WinVista64\sataraid. Method A: Insert the motherboard driver disk into your system to boot from the motherboard driver disk to a USB flash drive before installing Windows Vista (go to the BootDrv\UDA\WinVista folder and save the whole...
Manual
Page 73
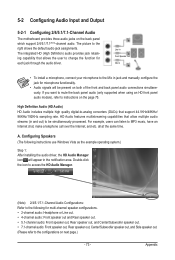
... Manager. (Note) 2/4/5.1/7.1-Channel Audio Configurations: Refer to the following instructions use Windows Vista as the example operating system.) Step 1: After installing the audio driver, the HD Audio Manager icon will appear in and out) to change the function for microphone functionality. • Audio signals will be simultaneously processed. ... that support 44.1KHz/48KHz/ 96KHz/192KHz sampling rate. all at the same time. A. 5-2 Configuring Audio Input and Output 5-2-1 Configuring 2/4/5.1/7.1-Channel Audio The motherboard provides three audio jacks on next page.) - 73 - Appendix
... Manager. (Note) 2/4/5.1/7.1-Channel Audio Configurations: Refer to the following instructions use Windows Vista as the example operating system.) Step 1: After installing the audio driver, the HD Audio Manager icon will appear in and out) to change the function for microphone functionality. • Audio signals will be simultaneously processed. ... that support 44.1KHz/48KHz/ 96KHz/192KHz sampling rate. all at the same time. A. 5-2 Configuring Audio Input and Output 5-2-1 Configuring 2/4/5.1/7.1-Channel Audio The motherboard provides three audio jacks on next page.) - 73 - Appendix
Manual
Page 81
... CMOS jumper, refer to show the advanced options. If not, please update it from GIGABYTE's website to enter BIOS Setup during the POST mean? Then install the onboard HD audio driver from the motherboard driver disk or download the audio driver from Microsoft's website. A: The following Award BIOS beep code descriptions may help you identify...
... CMOS jumper, refer to show the advanced options. If not, please update it from GIGABYTE's website to enter BIOS Setup during the POST mean? Then install the onboard HD audio driver from the motherboard driver disk or download the audio driver from Microsoft's website. A: The following Award BIOS beep code descriptions may help you identify...


