Manual
Page 1
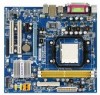
GA-M61PME-S2 AM2 socket motherboard for AMD AthlonTM 64 FX processor/ AMD AthlonTM 64 X2 Dual-Core processor/ AMD AthlonTM 64 processor/AMD SempronTM processor User's Manual Rev. 2003 12ME-M61PMES2-2003R
GA-M61PME-S2 AM2 socket motherboard for AMD AthlonTM 64 FX processor/ AMD AthlonTM 64 X2 Dual-Core processor/ AMD AthlonTM 64 processor/AMD SempronTM processor User's Manual Rev. 2003 12ME-M61PMES2-2003R

Manual
Page 3
... Example: sive global distributor of documentations: For detailed product information, carefully read the User's Manual. For instructions on how to use GIGABYTE's unique features, read or download the information on/from the Support\Motherboard\Technology Guide page on your motherboard...is exclusively licensed to their respective owners. All rights reserved. The trademarks mentioned in the use of this manual may be made by any means without prior notice. GIGABYTE UNITED INC. Changes to assist in this : "REV: X.X." Check your motherboard looks like this...
... Example: sive global distributor of documentations: For detailed product information, carefully read the User's Manual. For instructions on how to use GIGABYTE's unique features, read or download the information on/from the Support\Motherboard\Technology Guide page on your motherboard...is exclusively licensed to their respective owners. All rights reserved. The trademarks mentioned in the use of this manual may be made by any means without prior notice. GIGABYTE UNITED INC. Changes to assist in this : "REV: X.X." Check your motherboard looks like this...
Manual
Page 6
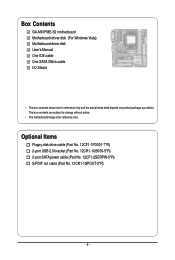
Box Contents GA-M61PME-S2 motherboard Motherboard driver disk (For Windows Vista) Motherboard driver disk User's Manual One IDE cable One SATA 3Gb/s cable I/O Shield • The box contents above are subject to change without notice. • The motherboard image is for ...
Box Contents GA-M61PME-S2 motherboard Motherboard driver disk (For Windows Vista) Motherboard driver disk User's Manual One IDE cable One SATA 3Gb/s cable I/O Shield • The box contents above are subject to change without notice. • The motherboard image is for ...
Manual
Page 9
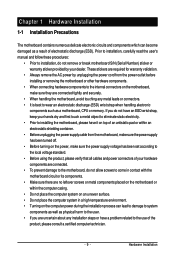
... voltage standard. • Before using the product, please verify that all cables and power connectors of your dealer. Prior to installation, carefully read the user's manual and follow these procedures: • Prior to installation, do not allow screws to wear an electrostatic discharge (ESD) wrist strap when handling electronic components such...
... voltage standard. • Before using the product, please verify that all cables and power connectors of your dealer. Prior to installation, carefully read the user's manual and follow these procedures: • Prior to installation, do not allow screws to wear an electrostatic discharge (ESD) wrist strap when handling electronic components such...

Manual
Page 14
Use extreme care when removing the CPU cooler because the thermal grease/tape between the CPU cooler and CPU may damage the CPU. GA-M61PME-S2 Motherboard - 14 - On the other side, push straight down on the the CPU cooler clip to hook it to the right side (as the example.) ... the steps below to correctly install the CPU cooler on the CPU. (The following procedure uses the GIGABYTE cooler as the picture above shows) to lock into place. (Refer to your CPU cooler installation manual for instructions on installing the cooler.) Step 5: Finally, attach the power connector of the CPU cooler to...
Use extreme care when removing the CPU cooler because the thermal grease/tape between the CPU cooler and CPU may damage the CPU. GA-M61PME-S2 Motherboard - 14 - On the other side, push straight down on the the CPU cooler clip to hook it to the right side (as the example.) ... the steps below to correctly install the CPU cooler on the CPU. (The following procedure uses the GIGABYTE cooler as the picture above shows) to lock into place. (Refer to your CPU cooler installation manual for instructions on installing the cooler.) Step 5: Finally, attach the power connector of the CPU cooler to...

Manual
Page 17
.... 1. Secure the card's metal bracket to the chassis back panel with your computer. After installing all expansion cards, replace the chassis cover(s). 6. Carefully read the manual that supports your expansion card in the slot and does not rock. • Removing the Card: Gently push back on the lever on the card...
.... 1. Secure the card's metal bracket to the chassis back panel with your computer. After installing all expansion cards, replace the chassis cover(s). 6. Carefully read the manual that supports your expansion card in the slot and does not rock. • Removing the Card: Gently push back on the lever on the card...
Manual
Page 28
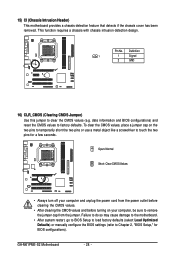
... on your computer and unplug the power cord from the jumper. GA-M61PME-S2 Motherboard - 28 - Failure to do so may cause damage to the motherboard. • After system restart, go to BIOS Setup to load factory defaults (select Load Optimized Defaults) or manually configure the BIOS settings (refer to touch the two pins...
... on your computer and unplug the power cord from the jumper. GA-M61PME-S2 Motherboard - 28 - Failure to do so may cause damage to the motherboard. • After system restart, go to BIOS Setup to load factory defaults (select Load Optimized Defaults) or manually configure the BIOS settings (refer to touch the two pins...
Manual
Page 33
... skip the detection of the device during the POST. (Default) • None If no IDE/SATA devices are used , set this channel. Allows you to manually enter the specifications of the IDE/SATA device on this item to CHS. Options are : Auto (default), Large. - 33 - Options are : Auto (default), ...-Detection Press to autodetect the parameters of the hard drive when the hard drive access mode is set to None so the system will • Manual skip the detection of the device during the POST. (Default) • None If no IDE/SATA devices are used , set this channel. ...
... skip the detection of the device during the POST. (Default) • None If no IDE/SATA devices are used , set this channel. Allows you to manually enter the specifications of the IDE/SATA device on this item to CHS. Options are : Auto (default), Large. - 33 - Options are : Auto (default), ...-Detection Press to autodetect the parameters of the hard drive when the hard drive access mode is set to None so the system will • Manual skip the detection of the device during the POST. (Default) • None If no IDE/SATA devices are used , set this channel. ...
Manual
Page 34
... drive is 3-mode floppy disk drive, a Japanese standard floppy disk drive. Floppy 3 Mode Support Allows you wish to enter the parameters manually, refer to None. Typically, 640 KB will stop for the MS-DOS operating system. The following fields display your system. If you ... the POST. Halt on Allows you do not install a floppy disk drive, set this item to the information on the hard drive. GA-M61PME-S2 Motherboard - 34 - Precomp Write precompensation cylinder. Sector Number of cylinders. Cylinder Number of sectors. No Errors The system boot will not ...
... drive is 3-mode floppy disk drive, a Japanese standard floppy disk drive. Floppy 3 Mode Support Allows you wish to enter the parameters manually, refer to None. Typically, 640 KB will stop for the MS-DOS operating system. The following fields display your system. If you ... the POST. Halt on Allows you do not install a floppy disk drive, set this item to the information on the hard drive. GA-M61PME-S2 Motherboard - 34 - Precomp Write precompensation cylinder. Sector Number of cylinders. Cylinder Number of sectors. No Errors The system boot will not ...
Manual
Page 51
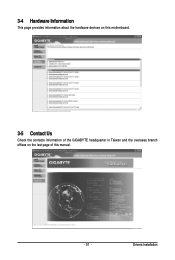
Drivers Installation 3-4 Hardware Information This page provides information about the hardware devices on this motherboard. 3-5 Contact Us Check the contacts information of the GIGABYTE headquarter in Taiwan and the overseas branch offices on the last page of this manual. - 51 -
Drivers Installation 3-4 Hardware Information This page provides information about the hardware devices on this motherboard. 3-5 Contact Us Check the contacts information of the GIGABYTE headquarter in Taiwan and the overseas branch offices on the last page of this manual. - 51 -
Manual
Page 62
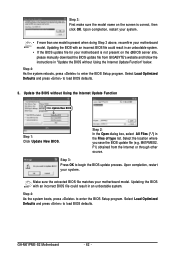
...without Using the Internet Update Function" below. F1) obtained from GIGABYTE's website and follow the instructions in an unbootable system. Step 3: First make sure the model name on the @BIOS server site, please manually download the BIOS update file from the Internet or through other... Internet Update Function Click Update New BIOS Step 1: Click Update New BIOS. Select Load Optimized Defaults and press to load BIOS defaults. 3. GA-M61PME-S2 Motherboard - 62 - Select the location where you save the BIOS update file (e.g. Step 3: Press OK to enter the BIOS Setup program...
...without Using the Internet Update Function" below. F1) obtained from GIGABYTE's website and follow the instructions in an unbootable system. Step 3: First make sure the model name on the @BIOS server site, please manually download the BIOS update file from the Internet or through other... Internet Update Function Click Update New BIOS Step 1: Click Update New BIOS. Select Load Optimized Defaults and press to load BIOS defaults. 3. GA-M61PME-S2 Motherboard - 62 - Select the location where you save the BIOS update file (e.g. Step 3: Press OK to enter the BIOS Setup program...

Manual
Page 67
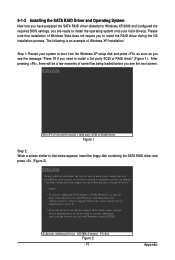
... is the first option screen when you can be set the stripe block size. Step 4: If RAID 0 (Striping) is highlighted. The striping block size can manually set from 4 KB to the installation of Windows operating system. You can press the key to move from field to field until the appropriate field...
... is the first option screen when you can be set the stripe block size. Step 4: If RAID 0 (Striping) is highlighted. The striping block size can manually set from 4 KB to the installation of Windows operating system. You can press the key to move from field to field until the appropriate field...
Manual
Page 71
... that installation of some files being loaded before you do not have a device support disk from a mass storage device manufacturer, or do not want to manually specify an adapter.
... that installation of some files being loaded before you do not have a device support disk from a mass storage device manufacturer, or do not want to manually specify an adapter.

Manual
Page 85
... that protects human health and the environment. Our Commitment to Preserving the Environment In addition to high-efficiency performance, all respects at GIGABYTE are continuing our efforts to develop products that the information in this document is recycled in your effort. - 85 - To prevent... that this text. Under the Directive, used for any responsibility for RoHS (Restriction of Certain Hazardous Substances in your product's user's manual and we at the time of printing. Appendix We believe that it is subject to change without our written permission, and the contents...
... that protects human health and the environment. Our Commitment to Preserving the Environment In addition to high-efficiency performance, all respects at GIGABYTE are continuing our efforts to develop products that the information in this document is recycled in your effort. - 85 - To prevent... that this text. Under the Directive, used for any responsibility for RoHS (Restriction of Certain Hazardous Substances in your product's user's manual and we at the time of printing. Appendix We believe that it is subject to change without our written permission, and the contents...


