Manual
Page 5
... 49 3-1 Installing Chipset Drivers 49 3-2 Software Applications 50 3-3 Driver CD Information 50 3-4 Hardware Information 51 3-5 Contact Us ...51 Chapter 4 Unique Features 53 4-1 Xpress Recovery2 53 4-2 BIOS Update ...Drive(s 65 5-1-1 Configuring the Onboard SATA Controller 65 5-1-2 Making a SATA RAID Driver Diskette (For Windows XP and 2000 70 5-1-3 Installing the SATA RAID Driver and Operating System 71 5-2 Configuring Audio Input and Output 74 5-2-1 Configuring 2/4/5.1-Channel Audio 74 5-2-2 Installing the S/PDIFOut Cable (Optional 77 5-2-3 Configuring Microphone Recording 79 ...
... 49 3-1 Installing Chipset Drivers 49 3-2 Software Applications 50 3-3 Driver CD Information 50 3-4 Hardware Information 51 3-5 Contact Us ...51 Chapter 4 Unique Features 53 4-1 Xpress Recovery2 53 4-2 BIOS Update ...Drive(s 65 5-1-1 Configuring the Onboard SATA Controller 65 5-1-2 Making a SATA RAID Driver Diskette (For Windows XP and 2000 70 5-1-3 Installing the SATA RAID Driver and Operating System 71 5-2 Configuring Audio Input and Output 74 5-2-1 Configuring 2/4/5.1-Channel Audio 74 5-2-2 Installing the S/PDIFOut Cable (Optional 77 5-2-3 Configuring Microphone Recording 79 ...
Manual
Page 74
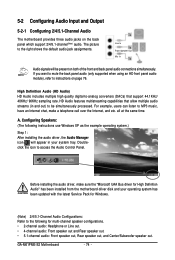
... the back panel which support 2/4/5.1-channel(Note) audio. Configuring Speakers: (The following for High Definition Audio" has been installed from the motherboard driver disk and your system tray. GA-M61PME-S2 Motherboard - 74 - If you want to mute the back panel audio (only supported when using an HD front panel audio module), refer to the right shows the...
... the back panel which support 2/4/5.1-channel(Note) audio. Configuring Speakers: (The following for High Definition Audio" has been installed from the motherboard driver disk and your system tray. GA-M61PME-S2 Motherboard - 74 - If you want to mute the back panel audio (only supported when using an HD front panel audio module), refer to the right shows the...
Manual
Page 79
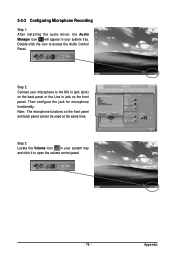
5-2-3 Configuring Microphone Recording Step 1: After installing the audio driver, the Audio Manager icon will appear in your microphone to the Mic in jack (pink) on the back panel or the Line in your system tray and click it to access the Audio Control Panel. Appendix Note: The microphone functions on the front panel. Step 2: Connect your system tray. Step 3: Locate the Volume icon in jack on the front panel and back panel cannot be used at the same time. Then configure the jack for microphone functionality. Double-click the icon to open the volume control panel - 79 -
5-2-3 Configuring Microphone Recording Step 1: After installing the audio driver, the Audio Manager icon will appear in your microphone to the Mic in jack (pink) on the back panel or the Line in your system tray and click it to access the Audio Control Panel. Appendix Note: The microphone functions on the front panel. Step 2: Connect your system tray. Step 3: Locate the Volume icon in jack on the front panel and back panel cannot be used at the same time. Then configure the jack for microphone functionality. Double-click the icon to open the volume control panel - 79 -


