Manual
Page 5
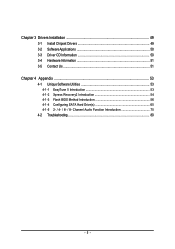
Channel Audio Function Introduction 75 4-2 Troubleshooting 80 - 5 - Chapter 3 Drivers Installation 49 3-1 Install Chipset Drivers 49 3-2 SoftwareApplications 50 3-3 Driver CD Information 50 3-4 Hardware Information 51 3-5 Contact Us ...51 Chapter 4 Appendix 53 4-1 Unique Software Utilities 53 4-1-1 EasyTune 5 Introduction 53 4-1-2 Xpress Recovery2 Introduction 54 4-1-3 Flash BIOS Method Introduction 56 4-1-4 Configuring SATA Hard Drive(s 65 4-1-5 2- / 4- / 6- / 8-
Channel Audio Function Introduction 75 4-2 Troubleshooting 80 - 5 - Chapter 3 Drivers Installation 49 3-1 Install Chipset Drivers 49 3-2 SoftwareApplications 50 3-3 Driver CD Information 50 3-4 Hardware Information 51 3-5 Contact Us ...51 Chapter 4 Appendix 53 4-1 Unique Software Utilities 53 4-1-1 EasyTune 5 Introduction 53 4-1-2 Xpress Recovery2 Introduction 54 4-1-3 Flash BIOS Method Introduction 56 4-1-4 Configuring SATA Hard Drive(s 65 4-1-5 2- / 4- / 6- / 8-
Manual
Page 16
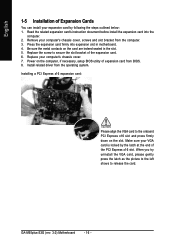
Install related driver from the computer. 3. When you try uninstall the VGA card, please gently press the latch as the picture to the left shows to the onboard ... slot. 5. Power on the card are indeed seated in motherboard. 4. Installing a PCI Express x16 expansion card: Please align the VGA card to release the card. GA-M55plus-S3G (rev. 3.0) Motherboard - 16 - English 1-5 Installation of Expansion Cards You can install your computer's chassis cover. 7. Replace your expansion card by the latch at the end...
Install related driver from the computer. 3. When you try uninstall the VGA card, please gently press the latch as the picture to the left shows to the onboard ... slot. 5. Power on the card are indeed seated in motherboard. 4. Installing a PCI Express x16 expansion card: Please align the VGA card to release the card. GA-M55plus-S3G (rev. 3.0) Motherboard - 16 - English 1-5 Installation of Expansion Cards You can install your computer's chassis cover. 7. Replace your expansion card by the latch at the end...
Manual
Page 17
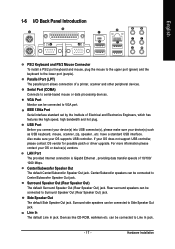
..., mouse, scanner, zip, speaker...etc. For more information please contact your OS does not support USB controller, please contact OS vendor for possible patch or driver upgrade. Surround side speakers can be connected to Surround Speaker Out (Rear Speaker Out) jack. Line In The default Line In jack. If your OS...
..., mouse, scanner, zip, speaker...etc. For more information please contact your OS does not support USB controller, please contact OS vendor for possible patch or driver upgrade. Surround side speakers can be connected to Surround Speaker Out (Rear Speaker Out) jack. Line In The default Line In jack. If your OS...

Manual
Page 21
... 3Gb/s Connectors) SATA 3Gb/s can connect to one IDE device as Master and the other as Slave (for the SATA 3Gb/s and install the proper driver in order to the computer via an IDE connector. English 6) IDE1/2 (IDE Connector) An IDE device connects to work properly. 7 1 SATAII_3 SATAII_2 1 7 7 1 SATAII_1 SATAII_0 1 7 Pin...
... 3Gb/s Connectors) SATA 3Gb/s can connect to one IDE device as Master and the other as Slave (for the SATA 3Gb/s and install the proper driver in order to the computer via an IDE connector. English 6) IDE1/2 (IDE Connector) An IDE device connects to work properly. 7 1 SATAII_3 SATAII_2 1 7 7 1 SATAII_1 SATAII_0 1 7 Pin...
Manual
Page 22
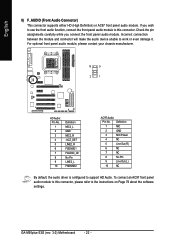
... (R) 6 NC 7 NC 8 No Pin 9 Line Out (L) 10 NC By default, the audio driver is configured to work or even damage it. Incorrect connection between the module and connector will make the audio device unable to support HD Audio. GA-M55plus-S3G (rev. 3.0) Motherboard - 22 - For optional front panel audio module, please contact your chassis...
... (R) 6 NC 7 NC 8 No Pin 9 Line Out (L) 10 NC By default, the audio driver is configured to work or even damage it. Incorrect connection between the module and connector will make the audio device unable to support HD Audio. GA-M55plus-S3G (rev. 3.0) Motherboard - 22 - For optional front panel audio module, please contact your chassis...
Manual
Page 49
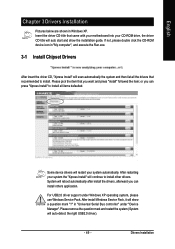
...you can install others application. After install Windows Service Pack, it will continue to install all the drivers that you can press "Xpress Install" to install other drivers. After restarting your system automatically. Please remove the question mark and restart the system (System will ...the CD-ROM device icon in "My computer", and execute the Run.exe. 3-1 Install Chipset Drivers After insert the driver CD, "Xpress Install" will reboot automatically after install the drivers, afterward you want and press "install" followed the item; System will scan automatically the system and...
...you can install others application. After install Windows Service Pack, it will continue to install all the drivers that you can press "Xpress Install" to install other drivers. After restarting your system automatically. Please remove the question mark and restart the system (System will ...the CD-ROM device icon in "My computer", and execute the Run.exe. 3-1 Install Chipset Drivers After insert the driver CD, "Xpress Install" will reboot automatically after install the drivers, afterward you want and press "install" followed the item; System will scan automatically the system and...
Manual
Page 50
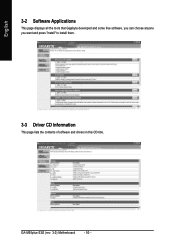
GA-M55plus-S3G (rev. 3.0) Motherboard - 50 - English 3-2 Software Applications This page displays all the tools that Gigabyte developed and some free software, you can choose anyone you want and press "install" to install them. 3-3 Driver CD Information This page lists the contents of software and drivers in this CD-title.
GA-M55plus-S3G (rev. 3.0) Motherboard - 50 - English 3-2 Software Applications This page displays all the tools that Gigabyte developed and some free software, you can choose anyone you want and press "install" to install them. 3-3 Driver CD Information This page lists the contents of software and drivers in this CD-title.
Manual
Page 51
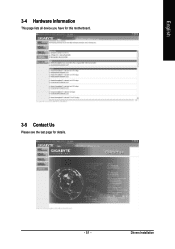
Drivers Installation English 3-4 Hardware Information This page lists all device you have for this motherboard. 3-5 Contact Us Please see the last page for details. - 51 -
Drivers Installation English 3-4 Hardware Information This page lists all device you have for this motherboard. 3-5 Contact Us Please see the last page for details. - 51 -
Manual
Page 54
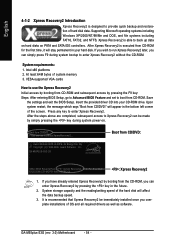
...:" will appear in the bottom left corner of the screen. System storage capacity and the reading/writing speed of OS and all required drivers as well as software. GA-M55plus-S3G (rev. 3.0) Motherboard - 54 - At least 64M bytes of hard disk data. Boot from CD-ROM. It is executed from ... How to use the Xpress Recovery2 Initial access by booting from CD-ROM and subsequent access by pressing the key in your CD-ROM drive. GA-M55PLUS-S3G D3 . . . . :BIOS Setup/Q-Flash, : Xpress Recovery2, :For Boot Menu 10/25/2006-C51-MCP51-6A61HG0MC-00 : Xpress Recovery2 1. If you ...
...:" will appear in the bottom left corner of the screen. System storage capacity and the reading/writing speed of OS and all required drivers as well as software. GA-M55plus-S3G (rev. 3.0) Motherboard - 54 - At least 64M bytes of hard disk data. Boot from CD-ROM. It is executed from ... How to use the Xpress Recovery2 Initial access by booting from CD-ROM and subsequent access by pressing the key in your CD-ROM drive. GA-M55PLUS-S3G D3 . . . . :BIOS Setup/Q-Flash, : Xpress Recovery2, :For Boot Menu 10/25/2006-C51-MCP51-6A61HG0MC-00 : Xpress Recovery2 1. If you ...
Manual
Page 55
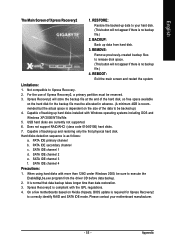
... mode. PATA IDE primary channel b. It is normal that data backup takes longer time than 128G under Windows 2000, be backed up data from the driver CD before data backup. 2. Not compatible to execute the EnableBigLba.exe program from hard disk. 3. Xpress Recovery2 will store the backup file at the end...
... mode. PATA IDE primary channel b. It is normal that data backup takes longer time than 128G under Windows 2000, be backed up data from the driver CD before data backup. 2. Not compatible to execute the EnableBigLba.exe program from hard disk. 3. Xpress Recovery2 will store the backup file at the end...
Manual
Page 65
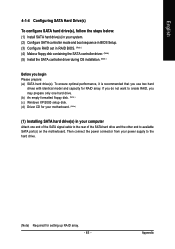
... the power connector from your motherboard. (Note ) (1) Installing SATA hard drive(s) in RAID BIOS. (Note ) (4) Make a floppy disk containing the SATA controller driver. (Note ) (5) Install the SATA controller driver during OS installation. (Note) Before you use two hard drives with identical model and capacity for setting up RAID array. - 65 - If you... do not want to create RAID, you may prepare only one hard drive. (b) An empty formatted floppy disk. (Note ) (c) Windows XP/2000 setup disk. (d) Driver CD for your power supply to available SATA port(s) on the motherboard.
... the power connector from your motherboard. (Note ) (1) Installing SATA hard drive(s) in RAID BIOS. (Note ) (4) Make a floppy disk containing the SATA controller driver. (Note ) (5) Install the SATA controller driver during OS installation. (Note) Before you use two hard drives with identical model and capacity for setting up RAID array. - 65 - If you... do not want to create RAID, you may prepare only one hard drive. (b) An empty formatted floppy disk. (Note ) (c) Windows XP/2000 setup disk. (d) Driver CD for your power supply to available SATA port(s) on the motherboard.
Manual
Page 70
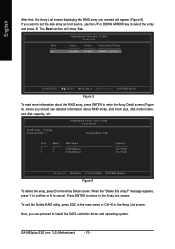
... information about the RAID array, press ENTER to enter the Array Detail screen (Figure 9), where you can proceed to install the SATA controller driver and operating system. The Boot section will appear (Figure 8). Boot No MediaShield Utility May 22 2006 - RAID Mode: Striping Striping Width ...[D] Delete [C] Clear Disk [ENTER] Return Figure 9 To delete the array, press D in the Array List screen. When the "Delete this array?" GA-M55plus-S3G (rev. 3.0) Motherboard - 70 - To exit the Nvidia RAID utility, press ESC in the main menu or Ctrl+X in the Array Detail screen. ...
... information about the RAID array, press ENTER to enter the Array Detail screen (Figure 9), where you can proceed to install the SATA controller driver and operating system. The Boot section will appear (Figure 8). Boot No MediaShield Utility May 22 2006 - RAID Mode: Striping Striping Width ...[D] Delete [C] Clear Disk [ENTER] Return Figure 9 To delete the array, press D in the Array List screen. When the "Delete this array?" GA-M55plus-S3G (rev. 3.0) Motherboard - 70 - To exit the Nvidia RAID utility, press ESC in the main menu or Ctrl+X in the Array Detail screen. ...
Manual
Page 71
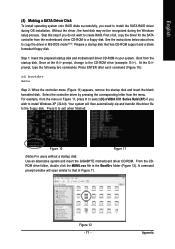
...when finished. Select the controller driver by pressing the corresponding letter from the motherboard driver CD-ROM to a floppy disk... the SATA RAID driver during the Windows setup process. First of all, copy the driver for the SATA ...Appendix Skip this driver file to the floppy disk. See the instructions below about how to copy the driver in MS-... menu in Figure 11. English (4) Making a SATA Driver Disk To install operating system onto RAID disks successfully, ...disk. Step 1: Insert the prepared startup disk and motherboard driver CD-ROM in the BootDrv folder (Figure 12). Figure...
...when finished. Select the controller driver by pressing the corresponding letter from the motherboard driver CD-ROM to a floppy disk... the SATA RAID driver during the Windows setup process. First of all, copy the driver for the SATA ...Appendix Skip this driver file to the floppy disk. See the instructions below about how to copy the driver in MS-... menu in Figure 11. English (4) Making a SATA Driver Disk To install operating system onto RAID disks successfully, ...disk. Step 1: Insert the prepared startup disk and motherboard driver CD-ROM in the BootDrv folder (Figure 12). Figure...

Manual
Page 72
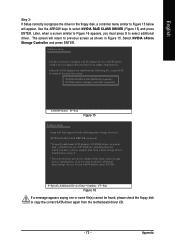
...of Windows XP installation. Windows Setup Press F6 if you need to install a 3rd party SCSI or RAID driver" message (Figure 13). S=Specify Additional Device ENTER=Continue F3=Exit Figure 14 GA-M55plus-S3G (rev. 3.0) Motherboard - 72 - Currently, Setup will be a few moments of one or more ...mass storage devices installed in your system, or you have prepared the SATA driver disk and configured BIOS settings, you are ready to...
...of Windows XP installation. Windows Setup Press F6 if you need to install a 3rd party SCSI or RAID driver" message (Figure 13). S=Specify Additional Device ENTER=Continue F3=Exit Figure 14 GA-M55plus-S3G (rev. 3.0) Motherboard - 72 - Currently, Setup will be a few moments of one or more ...mass storage devices installed in your system, or you have prepared the SATA driver disk and configured BIOS settings, you are ready to...
Manual
Page 73
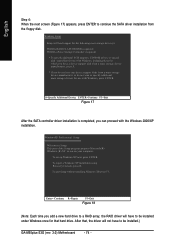
... use with Windows, using a device support disk provided by an adapter manufacturer. Windows Setup You have any device support disks from the motherboard driver CD. - 73 - Select NVIDIA nForce Storage Controller and press ENTER. Later, when a screen similar to Figure 16 appears, you do ...not want from the following mass storage device(s): NVIDIA RAID CLASS DRIVER (required) * To specify additional SCSI adapters, CD-ROM drives, or special disk controllers for use with Windows, including those for use with...
... use with Windows, using a device support disk provided by an adapter manufacturer. Windows Setup You have any device support disks from the motherboard driver CD. - 73 - Select NVIDIA nForce Storage Controller and press ENTER. Later, when a screen similar to Figure 16 appears, you do ...not want from the following mass storage device(s): NVIDIA RAID CLASS DRIVER (required) * To specify additional SCSI adapters, CD-ROM drives, or special disk controllers for use with Windows, including those for use with...
Manual
Page 74
... do not want to run on your computer. S=Specify Additional Device ENTER=Continue F3=Exit Figure 17 After the SATA controller driver installation is completed, you can proceed with Windows, including those for which you have a device support disk from a mass storage... a Windows XP installation using Recovery Console, press R. WindowsXP Professional Setup Welcome to continue the SATA driver installation from a mass storage device manufacturer, or do not have to be installed.) GA-M55plus-S3G (rev. 3.0) Motherboard - 74 - English Step 4: When the next screen (Figure 17) appears...
... do not want to run on your computer. S=Specify Additional Device ENTER=Continue F3=Exit Figure 17 After the SATA controller driver installation is completed, you can proceed with Windows, including those for which you have a device support disk from a mass storage... a Windows XP installation using Recovery Console, press R. WindowsXP Professional Setup Welcome to continue the SATA driver installation from a mass storage device manufacturer, or do not have to be installed.) GA-M55plus-S3G (rev. 3.0) Motherboard - 74 - English Step 4: When the next screen (Figure 17) appears...
Manual
Page 75
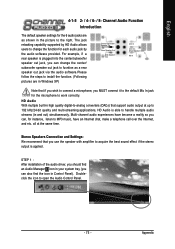
... In Note that if you wish to the right. The jack retasking capability supported by the audio software provided. STEP 1 : After installation of the audio driver, you should find an Audio Manager icon in and out) simultaneously. all at up to handle multiple audio streams (in your system tray (you use...
... In Note that if you wish to the right. The jack retasking capability supported by the audio software provided. STEP 1 : After installation of the audio driver, you should find an Audio Manager icon in and out) simultaneously. all at up to handle multiple audio streams (in your system tray (you use...
Manual
Page 76
Choose Headphone or Line Out depending on the device connected and click OK. STEP 2: In the Audio Control Panel, click the Audio I /O tab. GA-M55plus-S3G (rev. 3.0) Motherboard - 76 - In the upper left list, click 2CH Speaker. STEP 3: After a speaker or headphone is connected. The 2-channel audio setup is ... installation of equipment is plugged into the rear Line Out jack, a small window will pop up and ask you what type of the audio driver, you should find an Audio Manager icon in your system tray (you can also find the icon in Control Panel). Doubleclick the icon to ...
Choose Headphone or Line Out depending on the device connected and click OK. STEP 2: In the Audio Control Panel, click the Audio I /O tab. GA-M55plus-S3G (rev. 3.0) Motherboard - 76 - In the upper left list, click 2CH Speaker. STEP 3: After a speaker or headphone is connected. The 2-channel audio setup is ... installation of equipment is plugged into the rear Line Out jack, a small window will pop up and ask you what type of the audio driver, you should find an Audio Manager icon in your system tray (you can also find the icon in Control Panel). Doubleclick the icon to ...
Manual
Page 77
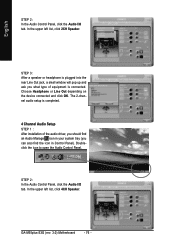
... Speaker Out, and Center/Subwoofer Speaker Out) then click OK. Choose a device depending on the type of speaker connected (4-channel audio consists of the audio driver, you should find an Audio Manager icon in your system tray (you can also find the icon in 4-channel speakers to open the Audio Control...
... Speaker Out, and Center/Subwoofer Speaker Out) then click OK. Choose a device depending on the type of speaker connected (4-channel audio consists of the audio driver, you should find an Audio Manager icon in your system tray (you can also find the icon in 4-channel speakers to open the Audio Control...

Manual
Page 78
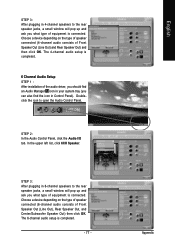
...plugging in 8-channel speakers to open the Audio Control Panel. In the upper left list, click 8CH Speaker. The 8-channel audio setup is connected. GA-M55plus-S3G (rev. 3.0) Motherboard - 78 - Choose a device depending on the type of speaker connected (8-channel audio consists of equipment is completed. Doubleclick the... and ask you can also find the icon in Control Panel). English 8 Channel Audio Setup STEP 1 : After installation of the audio driver, you should find an Audio Manager icon in your system tray (you what type of Front Speaker Out (Line Out), Rear Speaker Out...
...plugging in 8-channel speakers to open the Audio Control Panel. In the upper left list, click 8CH Speaker. The 8-channel audio setup is connected. GA-M55plus-S3G (rev. 3.0) Motherboard - 78 - Choose a device depending on the type of speaker connected (8-channel audio consists of equipment is completed. Doubleclick the... and ask you can also find the icon in Control Panel). English 8 Channel Audio Setup STEP 1 : After installation of the audio driver, you should find an Audio Manager icon in your system tray (you what type of Front Speaker Out (Line Out), Rear Speaker Out...


