Manual
Page 29
...Flash allows the user to quickly and easily update or backup BIOS without entering the operating system. @BIOS is a Windows-based utility that does not require users to boot to a new BIOS, either GIGABYTE's Q-Flash or @BIOS utility can enter the BIOS setup screen by pressing "Ctrl + F1". When the power...Status Page Setup Menu and Option Page Setup Menu - To exit the Help Window press . Because BIOS flashing is displayed at the bottom of the motherboard. English Chapter 2 BIOS Setup BIOS (Basic Input and Output System) includes a CMOS SETUP utility which allows user to configure required ...
...Flash allows the user to quickly and easily update or backup BIOS without entering the operating system. @BIOS is a Windows-based utility that does not require users to boot to a new BIOS, either GIGABYTE's Q-Flash or @BIOS utility can enter the BIOS setup screen by pressing "Ctrl + F1". When the power...Status Page Setup Menu and Option Page Setup Menu - To exit the Help Window press . Because BIOS flashing is displayed at the bottom of the motherboard. English Chapter 2 BIOS Setup BIOS (Basic Input and Output System) includes a CMOS SETUP utility which allows user to configure required ...
Manual
Page 32
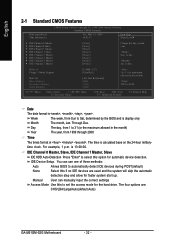
Jan. to 2098 KLJI: Move Enter: Select +/-/PU/PD: Value F5: Previous Values F10: Save ESC: Exit F7: Optimized Defaults F1: General Help Date The date format is display only Month The month, Jan. IDE Device Setup. Drive A Floppy 3 Mode Support Halt On ... methods: Auto Allows BIOS to Sat. The four options are used and the system will skip the automatic detection step and allow for the hard drive. You can manually input the correct settings Access Mode Use this if no IDE devices are : CHS/LBA/Large/Auto(default:Auto) GA-M51GM-S2G Motherboard - 32 - The...
Jan. to 2098 KLJI: Move Enter: Select +/-/PU/PD: Value F5: Previous Values F10: Save ESC: Exit F7: Optimized Defaults F1: General Help Date The date format is display only Month The month, Jan. IDE Device Setup. Drive A Floppy 3 Mode Support Halt On ... methods: Auto Allows BIOS to Sat. The four options are used and the system will skip the automatic detection step and allow for the hard drive. You can manually input the correct settings Access Mode Use this if no IDE devices are : CHS/LBA/Large/Auto(default:Auto) GA-M51GM-S2G Motherboard - 32 - The...
Manual
Page 35
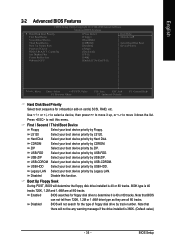
...installed is 40 or 80 tracks. Legacy LAN Select your boot device priority by LS120. LS120 Select your boot device priority by track number. Enabled BIOS searches for onboard(or add-on cards) SCSI, RAID, etc. Capability Init Display First Frame Buffer Size Onboard GPU [Press Enter] [Floppy] ... Menu Level` Select Hard Disk Boot Device Priority KLJI: Move Enter: Select +/-/PU/PD: Value F5: Previous Values F10: Save ESC: Exit F7: Optimized Defaults F1: General Help Hard Disk Boot Priority Select boot sequence for floppy disk drive to move it is 360K. (Default value) - 35...
...installed is 40 or 80 tracks. Legacy LAN Select your boot device priority by LS120. LS120 Select your boot device priority by track number. Enabled BIOS searches for onboard(or add-on cards) SCSI, RAID, etc. Capability Init Display First Frame Buffer Size Onboard GPU [Press Enter] [Floppy] ... Menu Level` Select Hard Disk Boot Device Priority KLJI: Move Enter: Select +/-/PU/PD: Value F5: Previous Values F10: Save ESC: Exit F7: Optimized Defaults F1: General Help Hard Disk Boot Priority Select boot sequence for floppy disk drive to move it is 360K. (Default value) - 35...
Manual
Page 37
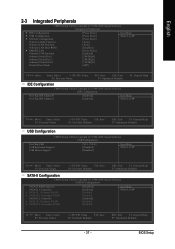
BIOS Setup English 2-3 Integrated Peripherals CMOS Setup Utility-Copyright (C) 1984-2006 Award ...F5: Previous Values +/-/PU/PD: Value F10: Save F6: Fail-Safe Defaults ESC: Exit F1: General Help F7: Optimized Defaults USB Configuration CMOS Setup Utility-Copyright (C) 1984-2006 Award Software USB Configuration On-Chip USB USB Keyboard ...Select F5: Previous Values +/-/PU/PD: Value F10: Save F6: Fail-Safe Defaults ESC: Exit F1: General Help F7: Optimized Defaults SATA-II Configuration CMOS Setup Utility-Copyright (C) 1984-2006 Award Software SATA-II Configuration SATA-II RAID ...
BIOS Setup English 2-3 Integrated Peripherals CMOS Setup Utility-Copyright (C) 1984-2006 Award ...F5: Previous Values +/-/PU/PD: Value F10: Save F6: Fail-Safe Defaults ESC: Exit F1: General Help F7: Optimized Defaults USB Configuration CMOS Setup Utility-Copyright (C) 1984-2006 Award Software USB Configuration On-Chip USB USB Keyboard ...Select F5: Previous Values +/-/PU/PD: Value F10: Save F6: Fail-Safe Defaults ESC: Exit F1: General Help F7: Optimized Defaults SATA-II Configuration CMOS Setup Utility-Copyright (C) 1984-2006 Award Software SATA-II Configuration SATA-II RAID ...
Manual
Page 39
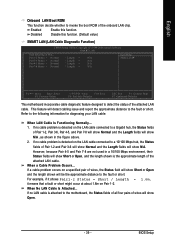
...1-2 and Pair 3-6 will show Normal and the Length fields will detect cabling issue and report the approximate distance to the fault or short. BIOS Setup When a Cable Problem Occurs... If a cable problem occurs on the LAN cable connected to a 10/100 Mbps hub, the Status ...` KLJI: Move Enter: Select F5: Previous Values +/-/PU/PD: Value F10: Save F6: Fail-Safe Defaults ESC: Exit F1: General Help F7: Optimized Defaults This motherboard incorporates cable diagnostic feature designed to detect the status of the onboard LAN chip. Refer to the following information for diagnosing...
...1-2 and Pair 3-6 will show Normal and the Length fields will detect cabling issue and report the approximate distance to the fault or short. BIOS Setup When a Cable Problem Occurs... If a cable problem occurs on the LAN cable connected to a 10/100 Mbps hub, the Status ...` KLJI: Move Enter: Select F5: Previous Values +/-/PU/PD: Value F10: Save F6: Fail-Safe Defaults ESC: Exit F1: General Help F7: Optimized Defaults This motherboard incorporates cable diagnostic feature designed to detect the status of the onboard LAN chip. Refer to the following information for diagnosing...
Manual
Page 41
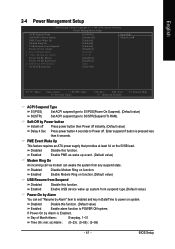
...x Time (hh:mm:ss) Alarm Power On By Mouse Power On By Keyboard x KB Power ON Function AC BACK Function [S1(POS)] [Instant-off . BIOS Setup Enabled Enable PME as wake up system from suspend type.(Default value) Power-On by Alarm You can awake the system from any suspend...] Everyday 0 : 0 : 0 [Disabled] [Disabled] Enter [Soft-Off] Item Help Menu Level` KLJI: Move Enter: Select +/-/PU/PD: Value F5: Previous Values F10: Save ESC: Exit F7: Optimized Defaults F1: General Help ACPI Suspend Type S1(POS) Set ACPI suspend type to S1/POS(Power On Suspend). (Default value) S3(STR) Set...
...x Time (hh:mm:ss) Alarm Power On By Mouse Power On By Keyboard x KB Power ON Function AC BACK Function [S1(POS)] [Instant-off . BIOS Setup Enabled Enable PME as wake up system from suspend type.(Default value) Power-On by Alarm You can awake the system from any suspend...] Everyday 0 : 0 : 0 [Disabled] [Disabled] Enter [Soft-Off] Item Help Menu Level` KLJI: Move Enter: Select +/-/PU/PD: Value F5: Previous Values F10: Save ESC: Exit F7: Optimized Defaults F1: General Help ACPI Suspend Type S1(POS) Set ACPI suspend type to S1/POS(Power On Suspend). (Default value) S3(STR) Set...
Manual
Page 43
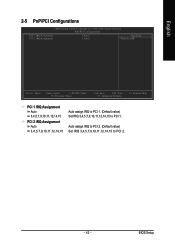
BIOS Setup Auto assign IRQ to PCI 2. (Default value) Set IRQ 3,4,5,7,9,10,11,12,14,15 to PCI 1. English 2-5 PnP/PCI Configurations CMOS Setup Utility-Copyright (C) ... 1 IRQ Assignment PCI 2 IRQ Assignment [Auto] [Auto] Item Help Menu Level` KLJI: Move Enter: Select +/-/PU/PD: Value F5: Previous Values F10: Save ESC: Exit F7: Optimized Defaults F1: General Help PCI 1 IRQ Assignment Auto 3,4,5,7,9,10,11,12,14,15 PCI 2 IRQ Assignment Auto 3,4,5,7,9,10,11,12,14,15 Auto assign...
BIOS Setup Auto assign IRQ to PCI 2. (Default value) Set IRQ 3,4,5,7,9,10,11,12,14,15 to PCI 1. English 2-5 PnP/PCI Configurations CMOS Setup Utility-Copyright (C) ... 1 IRQ Assignment PCI 2 IRQ Assignment [Auto] [Auto] Item Help Menu Level` KLJI: Move Enter: Select +/-/PU/PD: Value F5: Previous Values F10: Save ESC: Exit F7: Optimized Defaults F1: General Help PCI 1 IRQ Assignment Auto 3,4,5,7,9,10,11,12,14,15 PCI 2 IRQ Assignment Auto 3,4,5,7,9,10,11,12,14,15 Auto assign...
Manual
Page 66
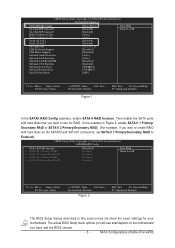
...ESC: Exit F1: General Help F7: Optimized Defaults The BIOS Setup menus described in Figure 2, enable SATA-II 1 Primary/ Secondary RAID or SATA-II 2 Primary/Secondary RAID). (For example, if you wish to create RAID with hard disks that you have and the BIOS version. GA-M51GM-S2G Motherboard - 66 - Then ...enable the SATA ports with hard disks on the motherboard you want to Enabled). The actual BIOS Setup menu options you will see shall depend on the SATAII0 and ...
...ESC: Exit F1: General Help F7: Optimized Defaults The BIOS Setup menus described in Figure 2, enable SATA-II 1 Primary/ Secondary RAID or SATA-II 2 Primary/Secondary RAID). (For example, if you wish to create RAID with hard disks that you have and the BIOS version. GA-M51GM-S2G Motherboard - 66 - Then ...enable the SATA ports with hard disks on the motherboard you want to Enabled). The actual BIOS Setup menu options you will see shall depend on the SATAII0 and ...
Manual
Page 68
CMOS Setup Utility-Copyright (C) 1984-2005 Award Software Advanced BIOS Features Hard Disk Boot Priority First Boot Device Second Boot Device Third Boot ...to CD-ROM (Figure 5). English Step 3: To boot from Windows installation CD-ROM, set First Boot Device under the Advanced BIOS Features menu to 3 No-Execute Memory Protect CPU Enhanced Halt (C1E) CPU Thermal Monitor 2(TM2) CPU EIST Function (µù...: Save F5: Previous Values F6: Fail-Safe Defaults Figure 5 ESC: Exit F1: General Help F7: Optimized Defaults Step 4: Save and exit BIOS Setup. GA-M51GM-S2G Motherboard - 68 -
CMOS Setup Utility-Copyright (C) 1984-2005 Award Software Advanced BIOS Features Hard Disk Boot Priority First Boot Device Second Boot Device Third Boot ...to CD-ROM (Figure 5). English Step 3: To boot from Windows installation CD-ROM, set First Boot Device under the Advanced BIOS Features menu to 3 No-Execute Memory Protect CPU Enhanced Halt (C1E) CPU Thermal Monitor 2(TM2) CPU EIST Function (µù...: Save F5: Previous Values F6: Fail-Safe Defaults Figure 5 ESC: Exit F1: General Help F7: Optimized Defaults Step 4: Save and exit BIOS Setup. GA-M51GM-S2G Motherboard - 68 -

Manual
Page 69
...July 27 2005 - Skip this step and proceed to Section 4 if you can press the TAB key to create RAID. MediaShield IDE ROM BIOS 6.21 Copyright (C) 2005 NVIDIA Corp. You can manually set the Striping Block size. The supported RAID modes include Mirroring (default), Striping, ...Array Disks Loc Disk Model [ ] Add Capacity [ ] Del [ESC] Quit [F6] Back [F7] Finish [TAB] Navigate [ ] Select [ENTER] Popup Figure 7 - 69 - English (3) Configuring RAID set in RAID BIOS Enter the RAID BIOS setup utility to set the striping block size. Figure 6 Step 2: The Define a New Array screen...
...July 27 2005 - Skip this step and proceed to Section 4 if you can press the TAB key to create RAID. MediaShield IDE ROM BIOS 6.21 Copyright (C) 2005 NVIDIA Corp. You can manually set the Striping Block size. The supported RAID modes include Mirroring (default), Striping, ...Array Disks Loc Disk Model [ ] Add Capacity [ ] Del [ESC] Quit [F6] Back [F7] Finish [TAB] Navigate [ ] Select [ENTER] Popup Figure 7 - 69 - English (3) Configuring RAID set in RAID BIOS Enter the RAID BIOS setup utility to set the striping block size. Figure 6 Step 2: The Define a New Array screen...
Manual
Page 76
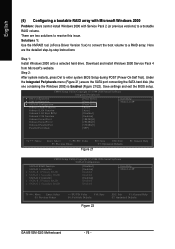
... Windows 2000 Problem: Users cannot install Windows 2000 with Service Pack 2 (or previous versions) to enter system BIOS Setup during POST (Power-On Self Test). Download and install Windows 2000 Service Pack 4 from Microsoft's website.... Item Help Menu Level : Move Enter: Select +/-/PU/PD: Value F5: Previous Values F10: Save ESC: Exit F7: Optimized Defaults Figure 21 F1: General Help CMOS Setup Utility-Copyright (C) 1984-2006 Award Software SATA-II Configuration SATA-...Fail-Safe Defaults Figure 22 ESC: Exit F1: General Help F7: Optimized Defaults GA-M51GM-S2G Motherboard - 76 -
... Windows 2000 Problem: Users cannot install Windows 2000 with Service Pack 2 (or previous versions) to enter system BIOS Setup during POST (Power-On Self Test). Download and install Windows 2000 Service Pack 4 from Microsoft's website.... Item Help Menu Level : Move Enter: Select +/-/PU/PD: Value F5: Previous Values F10: Save ESC: Exit F7: Optimized Defaults Figure 21 F1: General Help CMOS Setup Utility-Copyright (C) 1984-2006 Award Software SATA-II Configuration SATA-...Fail-Safe Defaults Figure 22 ESC: Exit F1: General Help F7: Optimized Defaults GA-M51GM-S2G Motherboard - 76 -

Manual
Page 77
...Step 4: After all the settings, press F7 to the Free Disks section with the TAB key. RAID Mode: Striping MediaShield RAID Utility Feb 8 2005 - Select the desired disk and use the RIGHT ARROW key to add it to exit the NVIDIA RAID BIOS. Then press CTRL+X to Array Disks menu.... Striping Block: Optimal Free Disks Loc Disk Model Name Clear disk data ? Array Disks Loc Disk Model Name [Y] YES [N]1N.0O.M ST3120026AS [ ] Add 1.1.M ST3120026AS [ ] Del [ESC] Quit [F6] Back [F7] Finish [TAB] Navigate [ ] Select [...
...Step 4: After all the settings, press F7 to the Free Disks section with the TAB key. RAID Mode: Striping MediaShield RAID Utility Feb 8 2005 - Select the desired disk and use the RIGHT ARROW key to add it to exit the NVIDIA RAID BIOS. Then press CTRL+X to Array Disks menu.... Striping Block: Optimal Free Disks Loc Disk Model Name Clear disk data ? Array Disks Loc Disk Model Name [Y] YES [N]1N.0O.M ST3120026AS [ ] Add 1.1.M ST3120026AS [ ] Del [ESC] Quit [F6] Back [F7] Finish [TAB] Navigate [ ] Select [...
Manual
Page 3
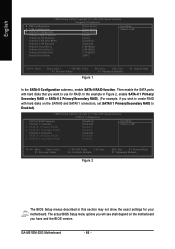
...higf: Move Enter: Select F5: Previous Values +/-/PU/PD: Value F10: Save F6: Fail-Safe Defaults Figure 2 ESC: Exit F1: General Help F7: Optimized Defaults The BIOS Setup menus described in Figure 2, enable SATA-II 1 Primary/ Secondary RAID or SATA-II 2 Primary/Secondary RAID). (For example, if you wish to... create RAID with hard disks that you have and the BIOS version. - 3 - The actual BIOS Setup menu options you will see shall depend on the SATAII0 and SATAII1 connectors, set SATA-II 1 Primary/Secondary RAID to use ...
...higf: Move Enter: Select F5: Previous Values +/-/PU/PD: Value F10: Save F6: Fail-Safe Defaults Figure 2 ESC: Exit F1: General Help F7: Optimized Defaults The BIOS Setup menus described in Figure 2, enable SATA-II 1 Primary/ Secondary RAID or SATA-II 2 Primary/Secondary RAID). (For example, if you wish to... create RAID with hard disks that you have and the BIOS version. - 3 - The actual BIOS Setup menu options you will see shall depend on the SATAII0 and SATAII1 connectors, set SATA-II 1 Primary/Secondary RAID to use ...

Manual
Page 5
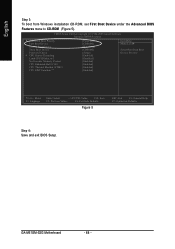
CMOS Setup Utility-Copyright (C) 1984-2005 Award Software Advanced BIOS Features } Hard Disk Boot Priority First Boot Device Second Boot Device Third Boot Device Boot Up Floppy Seek Password Check Init Display First [Press Enter] [...} Select Hard Disk Boot Device Priority higf: Move Enter: Select F5: Previous Values Step 4: Save and exit BIOS Setup. +/-/PU/PD: Value F10: Save F6: Fail-Safe Defaults Figure 5 ESC: Exit F1: General Help F7: Optimized Defaults - 5 - Step 3: To boot from Windows installation CD-ROM, set First Boot Device under the Advanced...
CMOS Setup Utility-Copyright (C) 1984-2005 Award Software Advanced BIOS Features } Hard Disk Boot Priority First Boot Device Second Boot Device Third Boot Device Boot Up Floppy Seek Password Check Init Display First [Press Enter] [...} Select Hard Disk Boot Device Priority higf: Move Enter: Select F5: Previous Values Step 4: Save and exit BIOS Setup. +/-/PU/PD: Value F10: Save F6: Fail-Safe Defaults Figure 5 ESC: Exit F1: General Help F7: Optimized Defaults - 5 - Step 3: To boot from Windows installation CD-ROM, set First Boot Device under the Advanced...

Manual
Page 6
... Disk Model 2.0.M ST3120026AS 2.1.M ST3120026AS Capacity 111.79GB 111.79GB Array Disks Loc Disk Model [g] Add Capacity [f ] Del [ESC] Quit [F6] Back [F7] Finish [TAB] Navigate [hi] Select [ENTER] Popup Figure 7 SATA Configurations (Nvidia nForce430) - 6 - The supported RAID modes include Mirroring (default), ... 27 2005 - Ác (3) Configuring RAID set in RAID BIOS Åé Enter the RAID BIOS setup utility to enter the RAID BIOS setup utility. Hit the F10 key to configure a RAID array. MediaShield IDE ROM BIOS 6.21 Copyright (C) 2005 NVIDIA Corp. Step 3: In the...
... Disk Model 2.0.M ST3120026AS 2.1.M ST3120026AS Capacity 111.79GB 111.79GB Array Disks Loc Disk Model [g] Add Capacity [f ] Del [ESC] Quit [F6] Back [F7] Finish [TAB] Navigate [hi] Select [ENTER] Popup Figure 7 SATA Configurations (Nvidia nForce430) - 6 - The supported RAID modes include Mirroring (default), ... 27 2005 - Ác (3) Configuring RAID set in RAID BIOS Åé Enter the RAID BIOS setup utility to enter the RAID BIOS setup utility. Hit the F10 key to configure a RAID array. MediaShield IDE ROM BIOS 6.21 Copyright (C) 2005 NVIDIA Corp. Step 3: In the...
Manual
Page 14
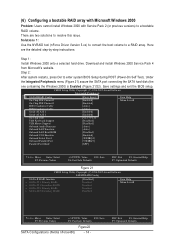
... Fail-Safe Defaults Figure22 SATA Configurations (Nvidia nForce430) - 14 - ESC: Exit F1: General Help F7: Optimized Defaults Here are two solutions to a RAID array. Save settings and exit the BIOS setup. There are the detailed step-by-step instructions: Step 1: Install Windows 2000 onto a selected ... a bootable RAID array with Microsoft Windows 2000 Problem: Users cannot install Windows 2000 with Service Pack 2 (or previous versions) to enter system BIOS Setup during POST (Power-On Self Test). Solutions 1: Use the NVRAID tool (nForce Driver Version 5.xx) to convert the boot volume to ...
... Fail-Safe Defaults Figure22 SATA Configurations (Nvidia nForce430) - 14 - ESC: Exit F1: General Help F7: Optimized Defaults Here are two solutions to a RAID array. Save settings and exit the BIOS setup. There are the detailed step-by-step instructions: Step 1: Install Windows 2000 onto a selected ... a bootable RAID array with Microsoft Windows 2000 Problem: Users cannot install Windows 2000 with Service Pack 2 (or previous versions) to enter system BIOS Setup during POST (Power-On Self Test). Solutions 1: Use the NVRAID tool (nForce Driver Version 5.xx) to convert the boot volume to ...

Manual
Page 15
...daAtarr?ay Disks Loc Disk Model 1.0.M ST3120026AS [Y[]gY]EASdd [N] 1N.1O.M ST3120026AS Capacity 111.79G 111.79G [f ] Del [ESC] Quit [F6] Back [F7] Finish [TAB] Navigate [hi] Select [ENTER] Popup Figure 24 - 15 - Define a New Array - RAID Mode: Striping MediaShield RAID Utility July 27 2005... ST3120026AS Capacity 111.78G 111.78G [f ] Del [ESC] Quit [F6] Back [F7] Finish [TAB] Navigate [hi] Select [ENTER] Popup Figure 23 Step 4: After all the settings, press F7 to exit the NVIDIA RAID BIOS. Then press CTRL+X to complete the configuration. Move to the Free Disks section with ...
...daAtarr?ay Disks Loc Disk Model 1.0.M ST3120026AS [Y[]gY]EASdd [N] 1N.1O.M ST3120026AS Capacity 111.79G 111.79G [f ] Del [ESC] Quit [F6] Back [F7] Finish [TAB] Navigate [hi] Select [ENTER] Popup Figure 24 - 15 - Define a New Array - RAID Mode: Striping MediaShield RAID Utility July 27 2005... ST3120026AS Capacity 111.78G 111.78G [f ] Del [ESC] Quit [F6] Back [F7] Finish [TAB] Navigate [hi] Select [ENTER] Popup Figure 23 Step 4: After all the settings, press F7 to exit the NVIDIA RAID BIOS. Then press CTRL+X to complete the configuration. Move to the Free Disks section with ...


