User Manual
Page 3
... carefully read the "Product User Manual". „ For detailed information related to Gigabyte's unique features, please go to the "Technology Guide" section on Gigabyte's website to their respective companies. No part of Gigabyte. Specifications and features are legally registered to read or download the information you need. Copyright © 2005 GIGA-BYTE TECHNOLOGY CO...
... carefully read the "Product User Manual". „ For detailed information related to Gigabyte's unique features, please go to the "Technology Guide" section on Gigabyte's website to their respective companies. No part of Gigabyte. Specifications and features are legally registered to read or download the information you need. Copyright © 2005 GIGA-BYTE TECHNOLOGY CO...
User Manual
Page 12
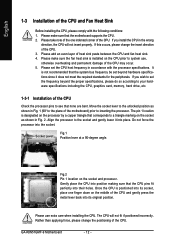
...position. Please add an even layer of the CPU and Fan Heat Sink Before installing the CPU, please comply with the processor specifications. The pin 1 location is installed on the middle of the one finger down on the CPU prior to system use extra care... processor. Please set the frequency beyond hardware specifications since it into place. Move the socket lever to your hardware specifications including the CPU, graphics card, memory, hard drive, etc. 1-3-1 Installation of the CPU. Do not force the processor into their holes. GA-K8N51GMF-9 Motherboard - 12 - If this occurs,...
...position. Please add an even layer of the CPU and Fan Heat Sink Before installing the CPU, please comply with the processor specifications. The pin 1 location is installed on the middle of the one finger down on the CPU prior to system use extra care... processor. Please set the frequency beyond hardware specifications since it into place. Move the socket lever to your hardware specifications including the CPU, graphics card, memory, hard drive, etc. 1-3-1 Installation of the CPU. Do not force the processor into their holes. GA-K8N51GMF-9 Motherboard - 12 - If this occurs,...
User Manual
Page 14
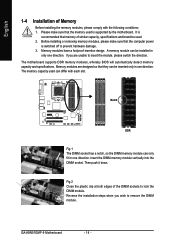
...module. Insert the DIMM memory module vertically into the DIMM socket. Fig.2 Close the plastic clip at both edges of similar capacity, specifications and brand be used. 2. Please make sure that they can differ with the following conditions: 1. Before installing or removing memory modules... is recommended that memory of the DIMM sockets to remove the DIMM module. A memory module can only fit in only one direction. GA-K8N51GMF-9 Motherboard - 14 - English 1-4 Installation of Memory Before installing the memory modules, please comply with each slot. Reverse the installation steps...
...module. Insert the DIMM memory module vertically into the DIMM socket. Fig.2 Close the plastic clip at both edges of similar capacity, specifications and brand be used. 2. Please make sure that they can differ with the following conditions: 1. Before installing or removing memory modules... is recommended that memory of the DIMM sockets to remove the DIMM module. A memory module can only fit in only one direction. GA-K8N51GMF-9 Motherboard - 14 - English 1-4 Installation of Memory Before installing the memory modules, please comply with each slot. Reverse the installation steps...
User Manual
Page 75
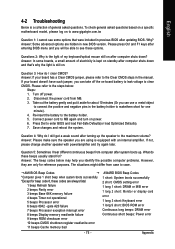
... BIOS after updating BIOS. Answer: The beep codes below : Steps: 1. English 4-2 Troubleshooting Below is a collection of general asked questions based on a specific motherboard model, please log on to www.gigabyte.com.tw Question 1: I still get a weak sound after turning up . Why? Please press Ctrl and F1 keys after computer shuts down ? Answer...
... BIOS after updating BIOS. Answer: The beep codes below : Steps: 1. English 4-2 Troubleshooting Below is a collection of general asked questions based on a specific motherboard model, please log on to www.gigabyte.com.tw Question 1: I still get a weak sound after turning up . Why? Please press Ctrl and F1 keys after computer shuts down ? Answer...