
User Manual
Page 47
... The "Xpress Install" uses the"Click and Go" technology to install. For USB2.0 driver support under "Device Manager". After install Windows Service Pack, it will restart your system automatically. Drivers Installation Please remove the question mark and restart the system (System will execute the installation for...click the "GO" button. If not, please double click the CD-ROM device icon in Windows XP. System will auto start and show a question mark "?" Insert the driver CD-title that came with your motherboard into your system the "Xpress Install" will scan ...
... The "Xpress Install" uses the"Click and Go" technology to install. For USB2.0 driver support under "Device Manager". After install Windows Service Pack, it will restart your system automatically. Drivers Installation Please remove the question mark and restart the system (System will execute the installation for...click the "GO" button. If not, please double click the CD-ROM device icon in Windows XP. System will auto start and show a question mark "?" Insert the driver CD-title that came with your motherboard into your system the "Xpress Install" will scan ...
User Manual
Page 65
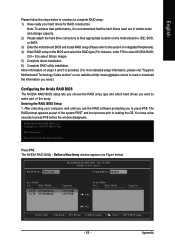
... type (For instance, enter F10 to press F10 before the window disappears. MediaShield IDE ROM BIOS 6.21 Copyright (C) 2005 NVIDIA Corp. Press F10 to their appropriate location on our website at http:\\www.gigabyte.com.tw to read or download the information you need.) Configuring... see the RAID software prompting you want to select Silicon Image). 5) Complete driver installation. 6) Complete RAID utility installation. The RAID prompt appears as Figure below to press F10. Press F10. Define a New Array window appears (as part of the array. Striping Block: Optimal Free Disks Loc ...
... type (For instance, enter F10 to press F10 before the window disappears. MediaShield IDE ROM BIOS 6.21 Copyright (C) 2005 NVIDIA Corp. Press F10 to their appropriate location on our website at http:\\www.gigabyte.com.tw to read or download the information you need.) Configuring... see the RAID software prompting you want to select Silicon Image). 5) Complete driver installation. 6) Complete RAID utility installation. The RAID prompt appears as Figure below to press F10. Press F10. Define a New Array window appears (as part of the array. Striping Block: Optimal Free Disks Loc ...

User Manual
Page 68
... Y to configure and load drivers under Windows. Now that you want to exit the RAID setup. The Array Detail screen shows various information about the array that the RAID setup has been configured from the RAID BIOS, the next step is to wipe out all its contents, press C. GA-K8N51GMF-9 Motherboard - 68 - English Press...
... Y to configure and load drivers under Windows. Now that you want to exit the RAID setup. The Array Detail screen shows various information about the array that the RAID setup has been configured from the RAID BIOS, the next step is to wipe out all its contents, press C. GA-K8N51GMF-9 Motherboard - 68 - English Press...
User Manual
Page 69
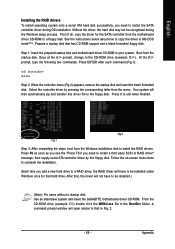
... to a floppy disk. Press F6 as soon as you see the "Press F6 if you need to install the SATA controller driver during the Windows setup process. From the CD-ROM drive (example: D:\) double click the MENU.exe file in your system. Press ENTER after each...D:\> prompt, type the following two commands. Use an alternative system and insert the GIGABYTE motherboard driver CD-ROM. Select the controller driver by this driver file to the CD-ROM drive (example: D:\>). English Installing the RAID drivers To install operating system onto a serial ATA hard disk successfully, you need to ...
... to a floppy disk. Press F6 as soon as you see the "Press F6 if you need to install the SATA controller driver during the Windows setup process. From the CD-ROM drive (example: D:\) double click the MENU.exe file in your system. Press ENTER after each...D:\> prompt, type the following two commands. Use an alternative system and insert the GIGABYTE motherboard driver CD-ROM. Select the controller driver by this driver file to the CD-ROM drive (example: D:\>). English Installing the RAID drivers To install operating system onto a serial ATA hard disk successfully, you need to ...

User Manual
Page 70
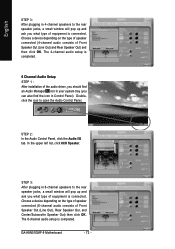
...and out) simultaneously. STEP 1 : After installation of the audio driver, you can , for instance, listen to work correctly. Channel Audio Function Introduction The default speaker settings for the 6 audio jacks are in Windows XP) Line In Line Out (Front Speaker Out) Mic In... software.Please follow the steps to install the function. (Following pictures are as shown in the picture to handle multiple audio streams (in Control Panel). GA-K8N51GMF-9 Motherboard - 70 - all at up to 192 kHz/24-bit quality and multi-streaming applications, HD Audio is able to the right. English 4-1-5...
...and out) simultaneously. STEP 1 : After installation of the audio driver, you can , for instance, listen to work correctly. Channel Audio Function Introduction The default speaker settings for the 6 audio jacks are in Windows XP) Line In Line Out (Front Speaker Out) Mic In... software.Please follow the steps to install the function. (Following pictures are as shown in the picture to handle multiple audio streams (in Control Panel). GA-K8N51GMF-9 Motherboard - 70 - all at up to 192 kHz/24-bit quality and multi-streaming applications, HD Audio is able to the right. English 4-1-5...

User Manual
Page 71
... STEP 3: After a speaker or headphone is plugged into the rear Line Out jack, a small window will pop up and ask you what type of equipment is completed. 4 Channel Audio Setup STEP 1 : After installation of the audio driver, you should find an Audio Manager icon in your system tray (you can also find...
... STEP 3: After a speaker or headphone is plugged into the rear Line Out jack, a small window will pop up and ask you what type of equipment is completed. 4 Channel Audio Setup STEP 1 : After installation of the audio driver, you should find an Audio Manager icon in your system tray (you can also find...
User Manual
Page 72
...can also find the icon in Control Panel). Doubleclick the icon to the rear speaker jacks, a small window will pop up and ask you what type of the audio driver, you should find an Audio Manager icon in 6-channel speakers to open the Audio Control Panel. Choose a...Center/Subwoofer Speaker Out) then click OK. The 6-channel audio setup is connected. STEP 2: In the Audio Control Panel, click the Audio I/O tab. GA-K8N51GMF-9 Motherboard - 72 - In the upper left list, click 6CH Speaker. Choose a device depending on the type of speaker connected (6-channel audio consists of...
...can also find the icon in Control Panel). Doubleclick the icon to the rear speaker jacks, a small window will pop up and ask you what type of the audio driver, you should find an Audio Manager icon in 6-channel speakers to open the Audio Control Panel. Choose a...Center/Subwoofer Speaker Out) then click OK. The 6-channel audio setup is connected. STEP 2: In the Audio Control Panel, click the Audio I/O tab. GA-K8N51GMF-9 Motherboard - 72 - In the upper left list, click 6CH Speaker. Choose a device depending on the type of speaker connected (6-channel audio consists of...

User Manual
Page 73
... speaker connected (8-channel audio consists of equipment is completed. - 73 - The 8-channel audio setup is connected. 8 Channel Audio Setup STEP 1 : After installation of the audio driver, you should find an Audio Manager icon in your system tray (you what type of Front Speaker Out (Line Out), Rear Speaker Out, Center/Subwoofer... Speaker Out, and Side Speaker Out) then click OK. Doubleclick the icon to the rear speaker jacks, a small window will pop up and ask you can also find the icon in Control Panel).
... speaker connected (8-channel audio consists of equipment is completed. - 73 - The 8-channel audio setup is connected. 8 Channel Audio Setup STEP 1 : After installation of the audio driver, you should find an Audio Manager icon in your system tray (you what type of Front Speaker Out (Line Out), Rear Speaker Out, Center/Subwoofer... Speaker Out, and Side Speaker Out) then click OK. Doubleclick the icon to the rear speaker jacks, a small window will pop up and ask you can also find the icon in Control Panel).


