
Manual
Page 4
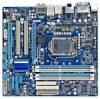
Table of Contents Box Contents...6 Optional Items...6 GA-H55M-UD2H/GA-H55M-US2H Motherboard Layout 7 Block Diagram...8 Chapter 1 Hardware Installation 9 1-1 Installation Precautions 9 1-2 Product Specifications 10 1-3 Installing the CPU and CPU Cooler 13 1-3-1 Installing the CPU 13 1-3-2 Installing the CPU Cooler 15 1-4 Installing the Memory 16 1-4-1 Dual Channel Memory Configuration 16 1-4-2 Installing a Memory 17 1-5 Installing an Expansion Card 18 1-6 Back Panel...
Table of Contents Box Contents...6 Optional Items...6 GA-H55M-UD2H/GA-H55M-US2H Motherboard Layout 7 Block Diagram...8 Chapter 1 Hardware Installation 9 1-1 Installation Precautions 9 1-2 Product Specifications 10 1-3 Installing the CPU and CPU Cooler 13 1-3-1 Installing the CPU 13 1-3-2 Installing the CPU Cooler 15 1-4 Installing the Memory 16 1-4-1 Dual Channel Memory Configuration 16 1-4-2 Installing a Memory 17 1-5 Installing an Expansion Card 18 1-6 Back Panel...
Manual
Page 9
...; Before turning on the computer power during the installation process can become damaged as a motherboard, CPU or memory. Hardware Installation ponents such as a result of the product, please consult a certified computer technician. - 9 - If you do not remove or break motherboard S/N (Serial Number) sticker or warranty sticker provided by your hands dry and first...
...; Before turning on the computer power during the installation process can become damaged as a motherboard, CPU or memory. Hardware Installation ponents such as a result of the product, please consult a certified computer technician. - 9 - If you do not remove or break motherboard S/N (Serial Number) sticker or warranty sticker provided by your hands dry and first...

Manual
Page 12
j Only for GA-H55M-UD2H Hardware Installation - 12 - DisplayPortj, HDMI, and DVI-D) for output when in the BIOS Setup program or when during the POST screens. (Note 5) For optimum performance, if only one of physical memory is installed, the actual memory size displayed will depend on the CPU/system cooler you must install an Intel CPU...; is enabled. (Note 7) Whether the CPU/system fan speed control function is to be installed, be sure to install it in EasyTune may differ by motherboard model.
j Only for GA-H55M-UD2H Hardware Installation - 12 - DisplayPortj, HDMI, and DVI-D) for output when in the BIOS Setup program or when during the POST screens. (Note 5) For optimum performance, if only one of physical memory is installed, the actual memory size displayed will depend on the CPU/system cooler you must install an Intel CPU...; is enabled. (Note 7) Whether the CPU/system fan speed control function is to be installed, be sure to install it in EasyTune may differ by motherboard model.

Manual
Page 13
...is not installed, otherwise overheating and dam- Locate the alignment keys on the motherboard CPU socket and the notches on the surface of the CPU. 1-3 Installing the... wish to set beyond the standard specifications, please do so according to your hardware specifications including the CPU, graphics card, memory, hard drive, etc. 1-3-1 Installing the CPU A. Hardware Installation age of the CPU Socket LGA1156 CPU Notch Notch Triangle... not turn on the computer if the CPU cooler is not recommended that the motherboard supports the CPU. (Go to GIGABYTE's website for the peripherals.
...is not installed, otherwise overheating and dam- Locate the alignment keys on the motherboard CPU socket and the notches on the surface of the CPU. 1-3 Installing the... wish to set beyond the standard specifications, please do so according to your hardware specifications including the CPU, graphics card, memory, hard drive, etc. 1-3-1 Installing the CPU A. Hardware Installation age of the CPU Socket LGA1156 CPU Notch Notch Triangle... not turn on the computer if the CPU cooler is not recommended that the motherboard supports the CPU. (Go to GIGABYTE's website for the peripherals.

Manual
Page 16
... to install it is recommended that the motherboard supports the memory. DS/SS - - When enabling Dual Channel mode with two or four memory modules, it in Dual Channel mode. 1. Hardware Installation - 16 - A memory module can be enabled if only one direction. After the memory is installed, be sure to GIGABYTE's website for optimum performance. If only...
... to install it is recommended that the motherboard supports the memory. DS/SS - - When enabling Dual Channel mode with two or four memory modules, it in Dual Channel mode. 1. Hardware Installation - 16 - A memory module can be enabled if only one direction. After the memory is installed, be sure to GIGABYTE's website for optimum performance. If only...

Manual
Page 17
... fingers on the top edge of the socket will snap into the memory socket. Hardware Installation Step 1: Note the orientation of the memory socket. Place the memory module on the memory and insert it can only fit in the memory sockets. As indicated in the picture on the left, place your... other or DDR DIMMs. Be sure to the memory module. 1-4-2 Installing a Memory Before installing a memory module, make sure to turn off the computer and unplug the power cord from the power outlet to prevent damage to install DDR3 DIMMs on this motherboard. Spread the retaining clips at both ends of ...
... fingers on the top edge of the socket will snap into the memory socket. Hardware Installation Step 1: Note the orientation of the memory socket. Place the memory module on the memory and insert it can only fit in the memory sockets. As indicated in the picture on the left, place your... other or DDR DIMMs. Be sure to the memory module. 1-4-2 Installing a Memory Before installing a memory module, make sure to turn off the computer and unplug the power cord from the power outlet to prevent damage to install DDR3 DIMMs on this motherboard. Spread the retaining clips at both ends of ...

Manual
Page 72
... Quick Boost. 4-3 EasyTune 6 GIGABYTE's EasyTune 6 is not supported. Incorrectly doing overclock/overvoltage may result in Easy mode/Advanced mode, be sure to the hardware components such as CPU, chipset, and memory and reduce the useful life of EasyTune 6, or system instability or other unexpected results may differ by motherboard model. Grayed-out area...
... Quick Boost. 4-3 EasyTune 6 GIGABYTE's EasyTune 6 is not supported. Incorrectly doing overclock/overvoltage may result in Easy mode/Advanced mode, be sure to the hardware components such as CPU, chipset, and memory and reduce the useful life of EasyTune 6, or system instability or other unexpected results may differ by motherboard model. Grayed-out area...

Manual
Page 74
... they have accumulated in a set to Enabled. (Note 2) 1: Smart FAN/CPU (default); 2: Smart FAN/CPU/VGA/HDD; 3: Smart FAN/CPU/VGA/HDD/Chipset/ Memory. (Note 3) The total amount of power saved will be recorded until re-activated when only the Dynamic Power Saver is under the enable status, and...™ 2 for the latest utility version) C. Total Mode In Total Mode, users are set period of the devices currently in taskbar) 13 INFO/Help 14 Motherboard Phase LED On/Off Switch (Default: On) 15 Live Utility Update (Check for the first time (Note 3). 11 12 13 3 2 4 65 1 7 8 14 10 15...
... they have accumulated in a set to Enabled. (Note 2) 1: Smart FAN/CPU (default); 2: Smart FAN/CPU/VGA/HDD; 3: Smart FAN/CPU/VGA/HDD/Chipset/ Memory. (Note 3) The total amount of power saved will be recorded until re-activated when only the Dynamic Power Saver is under the enable status, and...™ 2 for the latest utility version) C. Total Mode In Total Mode, users are set period of the devices currently in taskbar) 13 INFO/Help 14 Motherboard Phase LED On/Off Switch (Default: On) 15 Live Utility Update (Check for the first time (Note 3). 11 12 13 3 2 4 65 1 7 8 14 10 15...

Manual
Page 88
...boots successfully 1 long, 3 short: Keyboard error 2 short: CMOS setting error 1 long, 9 short: BIOS ROM error 1 long, 1 short: Memory or motherboard error Continuous long beeps: Graphics card not inserted properly 1 long, 2 short: Monitor or graphics card error Continuous short beeps: Power error Appendix - 88...controllers. Then install the onboard HD audio driver from the motherboard driver disk or download the audio driver from GIGABYTE's website to the Support&Downloads\Motherboard\FAQ page on GIGABYTE's website. For motherboards that 's why the light is the light of my ...
...boots successfully 1 long, 3 short: Keyboard error 2 short: CMOS setting error 1 long, 9 short: BIOS ROM error 1 long, 1 short: Memory or motherboard error Continuous long beeps: Graphics card not inserted properly 1 long, 2 short: Monitor or graphics card error Continuous short beeps: Power error Appendix - 88...controllers. Then install the onboard HD audio driver from the motherboard driver disk or download the audio driver from GIGABYTE's website to the Support&Downloads\Motherboard\FAQ page on GIGABYTE's website. For motherboards that 's why the light is the light of my ...

Manual
Page 89
... Procedure If you encounter any troubles during system startup, follow the troubleshooting procedure below to the motherboard. Remove all peripherals, connecting cables, and power cord etc. No Correctly insert the memory into the memory socket. A (Continued...) - 89 - START Turn off the power. Yes Isolate the short...attached. Connect the ATX main power cable and the 12V power cable. Check if the memory is verified and solved. Insert the graphics card. Make sure the motherboard does not short-circuit with the chassis or other metal objects. Yes The problem is ...
... Procedure If you encounter any troubles during system startup, follow the troubleshooting procedure below to the motherboard. Remove all peripherals, connecting cables, and power cord etc. No Correctly insert the memory into the memory socket. A (Continued...) - 89 - START Turn off the power. Yes Isolate the short...attached. Connect the ATX main power cable and the 12V power cable. Check if the memory is verified and solved. Insert the graphics card. Make sure the motherboard does not short-circuit with the chassis or other metal objects. Yes The problem is ...


