Manual
Page 7
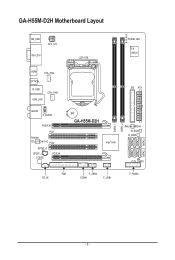
GA-H55M-D2H Motherboard Layout KB_USB ATX_12V VGA_DVI LGA1156 PHASE LED iTE IT8720 HDMI SYS_FAN OPTICAL R_USB USB_LAN CPU_FAN AUDIO F_AUDIO PCIEX16 PCI1 Realtek RTL8111D/8111E PCI2 SPDIF_O SPDIF_I CODEC PCIEX4 IDE ATX BAT GA-H55M-D2H Intel® H55 JMicron JMB368 M_BIOS B_BIOS CLR_CMOS FDD CD_IN F_USB2 COMA F_USB1 F_PANEL DDR3_1 DDR3_2 SATA2_5 SATA2_2 SATA2_4 SATA2_1 SATA2_3 SATA2_0 - 7 -
GA-H55M-D2H Motherboard Layout KB_USB ATX_12V VGA_DVI LGA1156 PHASE LED iTE IT8720 HDMI SYS_FAN OPTICAL R_USB USB_LAN CPU_FAN AUDIO F_AUDIO PCIEX16 PCI1 Realtek RTL8111D/8111E PCI2 SPDIF_O SPDIF_I CODEC PCIEX4 IDE ATX BAT GA-H55M-D2H Intel® H55 JMicron JMB368 M_BIOS B_BIOS CLR_CMOS FDD CD_IN F_USB2 COMA F_USB1 F_PANEL DDR3_1 DDR3_2 SATA2_5 SATA2_2 SATA2_4 SATA2_1 SATA2_3 SATA2_0 - 7 -

Manual
Page 21
... 9 1) ATX_12V 2) ATX 3) CPU_FAN 4) SYS_FAN 5) FDD 6) IDE 7) SATA2_0/1/2/3/4/5 8) BAT 9) F_PANEL 10) F_AUDIO 11) CD_IN 12) SPDIF_I 13) SPDIF_O 14) F_USB1/F_USB2 15) COMA 16) CLR_CMOS 17) PHASE LED Read the following guidelines before turning on the computer, make sure your devices are compliant with the connectors you wish to connect. • Before installing...
... 9 1) ATX_12V 2) ATX 3) CPU_FAN 4) SYS_FAN 5) FDD 6) IDE 7) SATA2_0/1/2/3/4/5 8) BAT 9) F_PANEL 10) F_AUDIO 11) CD_IN 12) SPDIF_I 13) SPDIF_O 14) F_USB1/F_USB2 15) COMA 16) CLR_CMOS 17) PHASE LED Read the following guidelines before turning on the computer, make sure your devices are compliant with the connectors you wish to connect. • Before installing...
Manual
Page 30
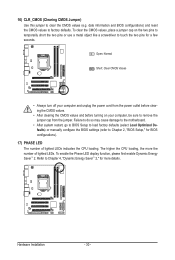
Refer to Chapter 2, "BIOS Setup," for BIOS configurations). 17) PHASE LED The number of lighted LEDs. 16) CLR_CMOS (Clearing CMOS Jumper) Use this jumper to remove the jumper cap from the power outlet before clearing the CMOS values. • After ... defaults (select Load Optimized Defaults) or manually configure the BIOS settings (refer to Chapter 4, "Dynamic Energy Saver™ 2," for a few seconds. To enable the Phase LED display function, please first enable Dynamic Energy Saver™ 2. To clear the CMOS values, place a jumper cap on your computer and unplug the power cord...
Refer to Chapter 2, "BIOS Setup," for BIOS configurations). 17) PHASE LED The number of lighted LEDs. 16) CLR_CMOS (Clearing CMOS Jumper) Use this jumper to remove the jumper cap from the power outlet before clearing the CMOS values. • After ... defaults (select Load Optimized Defaults) or manually configure the BIOS settings (refer to Chapter 4, "Dynamic Energy Saver™ 2," for a few seconds. To enable the Phase LED display function, please first enable Dynamic Energy Saver™ 2. To clear the CMOS values, place a jumper cap on your computer and unplug the power cord...

Manual
Page 69
...Unique Features The Dynamic Energy Saver™ 2 Interface A. Meter Mode In Meter Mode, GIGABYTE Dynamic Energy Saver™ 2 shows how much power they have saved in taskbar) 14 INFO/Help 15 Motherboard Phase LED On/Off Switch (Default: On) 16 Live Utility Update (Check for the latest ...utility version) • The above data is for reference only. 4-4 Dynamic Energy Saver™ 2 GIGABYTE Dynamic Energy Saver™ 2 (Note 1) is able...
...Unique Features The Dynamic Energy Saver™ 2 Interface A. Meter Mode In Meter Mode, GIGABYTE Dynamic Energy Saver™ 2 shows how much power they have saved in taskbar) 14 INFO/Help 15 Motherboard Phase LED On/Off Switch (Default: On) 16 Live Utility Update (Check for the latest ...utility version) • The above data is for reference only. 4-4 Dynamic Energy Saver™ 2 GIGABYTE Dynamic Energy Saver™ 2 (Note 1) is able...

Manual
Page 70
... the Dynamic Energy Saver™ 2 function, make sure the CPU Enhanced Halt (C1E) and CPU EIST Function items in taskbar) 13 INFO/Help 14 Motherboard Phase LED On/Off Switch (Default: On) 15 Live Utility Update (Check for the first time (Note 3). 11 12 13 3 2 4 65 1 7 8 ... work with Dynamic Energy Saver enabled) (Note 4) 4 Time/Date Dynamic Energy Saver Enabled 5 Total Mode Switch 6 Meter Mode Switch 7 Dynamic Power Phase Status 8 Power Saving Status (Icons of the devices currently in power-saving mode will light on) 9 3-Level Power Saving Switch (Default:1) (Note ...
... the Dynamic Energy Saver™ 2 function, make sure the CPU Enhanced Halt (C1E) and CPU EIST Function items in taskbar) 13 INFO/Help 14 Motherboard Phase LED On/Off Switch (Default: On) 15 Live Utility Update (Check for the first time (Note 3). 11 12 13 3 2 4 65 1 7 8 ... work with Dynamic Energy Saver enabled) (Note 4) 4 Time/Date Dynamic Energy Saver Enabled 5 Total Mode Switch 6 Meter Mode Switch 7 Dynamic Power Phase Status 8 Power Saving Status (Icons of the devices currently in power-saving mode will light on) 9 3-Level Power Saving Switch (Default:1) (Note ...


