Manual
Page 1
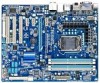
GA-H55-USB3 LGA1156 socket motherboard for Intel® Core™ i7 processor family/ Intel® Core™ i5 processor family/ Intel® Core™ i3 processor family User's Manual Rev. 1001 12ME-H55USB3-1001R
GA-H55-USB3 LGA1156 socket motherboard for Intel® Core™ i7 processor family/ Intel® Core™ i5 processor family/ Intel® Core™ i3 processor family User's Manual Rev. 1001 12ME-H55USB3-1001R
Manual
Page 3
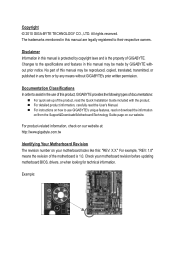
...REV: 1.0" means the revision of this manual may be reproduced, copied, translated, transmitted, or published in this manual are legally registered to assist in this : "REV: X.X." For product-related information, check on our website at: http://www.gigabyte.com.tw Identifying Your Motherboard Revision The revision... instructions on how to use of the motherboard is the property of the product, read the User's Manual. Disclaimer Information in the use GIGABYTE's unique features, read or download the information on/from the Support&Downloads\Motherboard\Technology Guide page on ...
...REV: 1.0" means the revision of this manual may be reproduced, copied, translated, transmitted, or published in this manual are legally registered to assist in this : "REV: X.X." For product-related information, check on our website at: http://www.gigabyte.com.tw Identifying Your Motherboard Revision The revision... instructions on how to use of the motherboard is the property of the product, read the User's Manual. Disclaimer Information in the use GIGABYTE's unique features, read or download the information on/from the Support&Downloads\Motherboard\Technology Guide page on ...

Manual
Page 5
Chapter 3 Drivers Installation 61 3-1 Installing Chipset Drivers 61 3-2 Application Software 62 3-3 Technical Manuals 62 3-4 Contact...63 3-5 System...63 3-6 Download Center 64 3-7 New Utilities...64 Chapter 4 Unique Features 65 4-1 Xpress Recovery2 65 ...™ 2 73 4-5 Q-Share...75 4-6 Smart 6™ ...76 4-7 Auto Green...79 Chapter 5 Appendix...81 5-1 Configuring SATA Hard Drive(s 81 5-1-1 Configuring GIGABYTE SATA2 SATA Controller 81 5-1-2 Making a SATA RAID/AHCI Driver Diskette 88 5-1-3 Installing the SATA RAID/AHCI Driver and Operating System 89 5-2 Configuring Audio Input and...
Chapter 3 Drivers Installation 61 3-1 Installing Chipset Drivers 61 3-2 Application Software 62 3-3 Technical Manuals 62 3-4 Contact...63 3-5 System...63 3-6 Download Center 64 3-7 New Utilities...64 Chapter 4 Unique Features 65 4-1 Xpress Recovery2 65 ...™ 2 73 4-5 Q-Share...75 4-6 Smart 6™ ...76 4-7 Auto Green...79 Chapter 5 Appendix...81 5-1 Configuring SATA Hard Drive(s 81 5-1-1 Configuring GIGABYTE SATA2 SATA Controller 81 5-1-2 Making a SATA RAID/AHCI Driver Diskette 88 5-1-3 Installing the SATA RAID/AHCI Driver and Operating System 89 5-2 Configuring Audio Input and...
Manual
Page 6
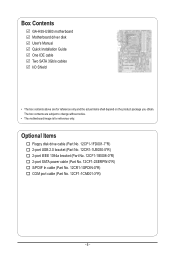
Box Contents GA-H55-USB3 motherboard Motherboard driver disk User's Manual Quick Installation Guide One IDE cable Two SATA 3Gb/s cables I/O Shield • The box contents above are subject to change without notice. • The motherboard ...
Box Contents GA-H55-USB3 motherboard Motherboard driver disk User's Manual Quick Installation Guide One IDE cable Two SATA 3Gb/s cables I/O Shield • The box contents above are subject to change without notice. • The motherboard ...

Manual
Page 9
.... • Make sure there are required for warranty validation. • Always remove the AC power by your dealer. Prior to installation, carefully read the user's manual and follow these procedures: • Prior to installation, do not allow screws to come in a high-temperature environment. • Turning on the computer power during...
.... • Make sure there are required for warranty validation. • Always remove the AC power by your dealer. Prior to installation, carefully read the user's manual and follow these procedures: • Prior to installation, do not allow screws to come in a high-temperature environment. • Turning on the computer power during...

Manual
Page 15
... cooler and CPU may damage the CPU. - 15 - Check that the Male and Female push pins are joined closely. (Refer to your CPU cooler installation manual for instructions on the motherboard. Inadequately removing the CPU cooler may adhere to the CPU fan header (CPU_FAN) on installing the cooler.) Step 5: After the...
... cooler and CPU may damage the CPU. - 15 - Check that the Male and Female push pins are joined closely. (Refer to your CPU cooler installation manual for instructions on the motherboard. Inadequately removing the CPU cooler may adhere to the CPU fan header (CPU_FAN) on installing the cooler.) Step 5: After the...
Manual
Page 18
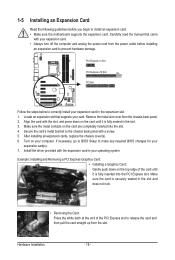
... PCI Express slot. Remove the metal slot cover from the power outlet before you begin to the chassis back panel with a screw. 5. Carefully read the manual that supports your computer. PCI Express x1 Slot PCI Express x16 Slot PCI Slot Follow the steps below to prevent hardware damage.
... PCI Express slot. Remove the metal slot cover from the power outlet before you begin to the chassis back panel with a screw. 5. Carefully read the manual that supports your computer. PCI Express x1 Slot PCI Express x16 Slot PCI Slot Follow the steps below to prevent hardware damage.

Manual
Page 29
... cards like graphics cards and sound cards. Pin No. Definition 1 1 SPDIFO 2 GND - 29 - For information about connecting the S/PDIF digital audio cable, carefully read the manual for digital audio output from the HDMI display at the same time. For example, some graphics cards may require you to use a S/PDIF digital audio...
... cards like graphics cards and sound cards. Pin No. Definition 1 1 SPDIFO 2 GND - 29 - For information about connecting the S/PDIF digital audio cable, carefully read the manual for digital audio output from the HDMI display at the same time. For example, some graphics cards may require you to use a S/PDIF digital audio...
Manual
Page 31
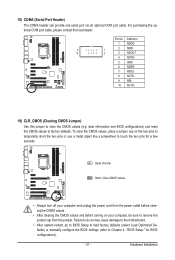
... do so may cause damage to the motherboard. • After system restart, go to BIOS Setup to load factory defaults (select Load Optimized Defaults) or manually configure the BIOS settings (refer to touch the two pins for BIOS configurations). - 31 - Definition 1 NDCD- 9 1 2 NSIN 10 2 3 NSOUT 4 NDTR- 5 GND 6 NDSR- 7 NRTS- 8 NCTS- 9 NRI...
... do so may cause damage to the motherboard. • After system restart, go to BIOS Setup to load factory defaults (select Load Optimized Defaults) or manually configure the BIOS settings (refer to touch the two pins for BIOS configurations). - 31 - Definition 1 NDCD- 9 1 2 NSIN 10 2 3 NSOUT 4 NDTR- 5 GND 6 NDSR- 7 NRTS- 8 NCTS- 9 NRI...
Manual
Page 39
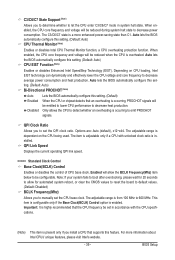
... to detect whether an overheating is dependent on CPU loading, Intel EIST technology can dynamically and effectively lower the CPU voltage and core frequency to manually set the QPI clock ratio. QPI Link Speed Displays the current operating QPI link speed. >>>>> Standard Clock Control Base Clock(BCLK) Control Enables or disables...
... to detect whether an overheating is dependent on CPU loading, Intel EIST technology can dynamically and effectively lower the CPU voltage and core frequency to manually set the QPI clock ratio. QPI Link Speed Displays the current operating QPI link speed. >>>>> Standard Clock Control Base Clock(BCLK) Control Enables or disables...

Manual
Page 40
... the PCIe clock frequency to standard 100 MHz. (Default: Auto) >>>>> Advanced Clock Control CPU Clock Drive Allows you to set the CPU clock prior to manually set the PCIe clock frequency. Options are : 700mV, 800mV, 900mV (default), 1000mV. Options are : 0ps~750ps. (Default: 0ps) (Note) This item appears only if you...
... the PCIe clock frequency to standard 100 MHz. (Default: Auto) >>>>> Advanced Clock Control CPU Clock Drive Allows you to set the CPU clock prior to manually set the PCIe clock frequency. Options are : 700mV, 800mV, 900mV (default), 1000mV. Options are : 0ps~750ps. (Default: 0ps) (Note) This item appears only if you...

Manual
Page 47
... are : None, 360K/5.25", 1.2M/5.25", 720K/3.5", 1.44M/3.5", 2.88M/3.5". BIOS Setup Head Number of cylinders. Halt On Allows you to manually enter the specifications of the hard drive when the hard drive access mode is set to CHS. All, But Disk/Key The system boot will... Memory Also called conventional memory. Total Memory The total amount of memory installed on the hard drive. If you wish to enter the parameters manually, refer to the information on the system. - 47 - Typically, 640 KB will be reserved for the MS-DOS operating system. Access Mode...
... are : None, 360K/5.25", 1.2M/5.25", 720K/3.5", 1.44M/3.5", 2.88M/3.5". BIOS Setup Head Number of cylinders. Halt On Allows you to manually enter the specifications of the hard drive when the hard drive access mode is set to CHS. All, But Disk/Key The system boot will... Memory Also called conventional memory. Total Memory The total amount of memory installed on the hard drive. If you wish to enter the parameters manually, refer to the information on the system. - 47 - Typically, 640 KB will be reserved for the MS-DOS operating system. Access Mode...
Manual
Page 61
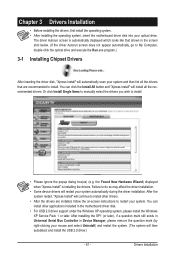
... your mouse and select Uninstall) and restart the system. (The system will automatically scan your optical drive. Drivers Installation Or click Install Single Items to manually select the drivers you wish to install. Chapter 3 Drivers Installation • Before installing the drivers, first install the operating system. • After installing the operating...
... your mouse and select Uninstall) and restart the system. (The system will automatically scan your optical drive. Drivers Installation Or click Install Single Items to manually select the drivers you wish to install. Chapter 3 Drivers Installation • Before installing the drivers, first install the operating system. • After installing the operating...

Manual
Page 62
3-2 Application Software This page displays all the utilities and applications that GIGABYTE develops and some free software. Drivers Installation - 62 - You can click the Install button on the right of an item to install it. 3-3 Technical Manuals This page provides GIGABYTE's application guides, content descriptions for this driver disk, and the motherboard manuals.
3-2 Application Software This page displays all the utilities and applications that GIGABYTE develops and some free software. Drivers Installation - 62 - You can click the Install button on the right of an item to install it. 3-3 Technical Manuals This page provides GIGABYTE's application guides, content descriptions for this driver disk, and the motherboard manuals.
Manual
Page 68
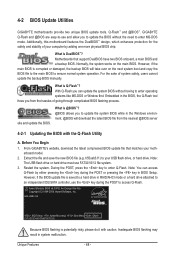
...moth- During the POST, press the key to enter operating systems like MS-DOS or Window first. 4-2 BIOS Update Utilities GIGABYTE motherboards provide two unique BIOS update tools, Q-Flash™ and @BIOS™. site and update the BIOS. erboard model...key in the Windows environment. @BIOS will take over on the main BIOS. H55-USB3 E4 . . . . : BIOS Setup : XpressRecovery2 : Boot Menu : Qflash 01/10/2010-H55-7A89TG0TC-00 Because BIOS flashing is corrupted or damaged, the backup BIOS will ... the safety and stability of system safety, users cannot update the backup BIOS manually.
...moth- During the POST, press the key to enter operating systems like MS-DOS or Window first. 4-2 BIOS Update Utilities GIGABYTE motherboards provide two unique BIOS update tools, Q-Flash™ and @BIOS™. site and update the BIOS. erboard model...key in the Windows environment. @BIOS will take over on the main BIOS. H55-USB3 E4 . . . . : BIOS Setup : XpressRecovery2 : Boot Menu : Qflash 01/10/2010-H55-7A89TG0TC-00 Because BIOS flashing is corrupted or damaged, the backup BIOS will ... the safety and stability of system safety, users cannot update the backup BIOS manually.
Manual
Page 71
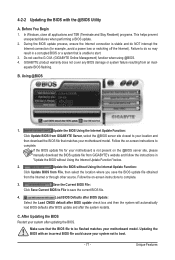
...where you save the current BIOS file. 4. Do not use the G.O.M. (GIGABYTE Online Management) function when using @BIOS. 4. Using @BIOS 1. Follow the on the @BIOS server site, please manually download the BIOS update file from an inadequate BIOS flashing. After Updating the BIOS... Restart your motherboard model. GIGABYTE product warranty does not cover any BIOS damage or system failure resulting from GIGABYTE's website and follow the instructions in ...
...where you save the current BIOS file. 4. Do not use the G.O.M. (GIGABYTE Online Management) function when using @BIOS. 4. Using @BIOS 1. Follow the on the @BIOS server site, please manually download the BIOS update file from an inadequate BIOS flashing. After Updating the BIOS... Restart your motherboard model. GIGABYTE product warranty does not cover any BIOS damage or system failure resulting from GIGABYTE's website and follow the instructions in ...

Manual
Page 94
... integrated HD (High Definition) audio provides jack retasking capability that allows the user to -analog converters (DACs) that allow multiple audio streams (in jack and manually configure the jack for each jack through the audio driver. 5-2 Configuring Audio Input and Output 5-2-1 Configuring 2/4/5.1/7.1-Channel Audio The motherboard provides six audio jacks on...
... integrated HD (High Definition) audio provides jack retasking capability that allows the user to -analog converters (DACs) that allow multiple audio streams (in jack and manually configure the jack for each jack through the audio driver. 5-2 Configuring Audio Input and Output 5-2-1 Configuring 2/4/5.1/7.1-Channel Audio The motherboard provides six audio jacks on...
Manual
Page 105
... products that do not use of our natural resources, GIGABYTE provides the following information on its packaging, which indicates that protects human health and the environment. Moreover, we will fulfill the national laws as most of the materials in your product's user's manual and we at the time of printing. For more...
... products that do not use of our natural resources, GIGABYTE provides the following information on its packaging, which indicates that protects human health and the environment. Moreover, we will fulfill the national laws as most of the materials in your product's user's manual and we at the time of printing. For more...


