Manual
Page 3
... Information in any form or by any means without prior notice. Example: The trademarks mentioned in the use GIGABYTE's unique features, read or download the information on/from the Support&Downloads\Motherboard\Technology Guide page on your motherboard ...revision before updating motherboard BIOS, drivers, or when looking for technical information. Documentation Classifications In order to assist in this product, GIGABYTE provides the following types of documentations: For detailed product information, carefully...
... Information in any form or by any means without prior notice. Example: The trademarks mentioned in the use GIGABYTE's unique features, read or download the information on/from the Support&Downloads\Motherboard\Technology Guide page on your motherboard ...revision before updating motherboard BIOS, drivers, or when looking for technical information. Documentation Classifications In order to assist in this product, GIGABYTE provides the following types of documentations: For detailed product information, carefully...
Manual
Page 4
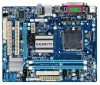
Table of Contents GA-G41MT-D3/GA-G41MT-ES2L Motherboard Layout 5 Chapter 1 Hardware Installation 6 1-1 Installation Precautions 6 1-2 Product Specifications 7 1-3 Installing the CPU and CPU Cooler 9 1-3-1 Installing the CPU...9 1-4 Installing the Memory 10 1-4-1 Dual Channel ...-Safe Defaults 38 2-12 Load Optimized Defaults 38 2-13 Set Supervisor/User Password 39 2-14 Save & Exit Setup 39 2-15 Exit Without Saving 40 Chapter 3 Drivers Installation 40 3-1 Installing Chipset Drivers 40 Regulatory Statements 41 - 4 -
Table of Contents GA-G41MT-D3/GA-G41MT-ES2L Motherboard Layout 5 Chapter 1 Hardware Installation 6 1-1 Installation Precautions 6 1-2 Product Specifications 7 1-3 Installing the CPU and CPU Cooler 9 1-3-1 Installing the CPU...9 1-4 Installing the Memory 10 1-4-1 Dual Channel ...-Safe Defaults 38 2-12 Load Optimized Defaults 38 2-13 Set Supervisor/User Password 39 2-14 Save & Exit Setup 39 2-15 Exit Without Saving 40 Chapter 3 Drivers Installation 40 3-1 Installing Chipset Drivers 40 Regulatory Statements 41 - 4 -

Manual
Page 5
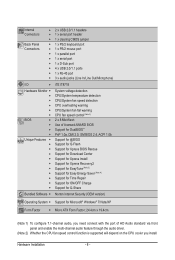
... BATTERY B_BIOS M_BIOS ATX IDE CODEC PCI2 Intel® ICH7 CD_IN SPDIF_IO SYS_FAN F_USB2 FDD F_USB1 "*" The GA-G41MT-D3 adopts All-Solid Capacitor design. SATA2_0 SATA2_3 SATA2_2 SATA2_1 Box Contents GA-G41MT-D3 or GA-G41MT-ES2L motherboard Motherboard driver disk Two SATA cables User's Manual I/O Shield One IDE cable The box contents above are for reference only...
... BATTERY B_BIOS M_BIOS ATX IDE CODEC PCI2 Intel® ICH7 CD_IN SPDIF_IO SYS_FAN F_USB2 FDD F_USB1 "*" The GA-G41MT-D3 adopts All-Solid Capacitor design. SATA2_0 SATA2_3 SATA2_2 SATA2_1 Box Contents GA-G41MT-D3 or GA-G41MT-ES2L motherboard Motherboard driver disk Two SATA cables User's Manual I/O Shield One IDE cable The box contents above are for reference only...
Manual
Page 8
... 7.1-channel audio, you need connect with the port of HD Audio standard via front panel and enable the multi-channel audio feature through the audio driver. (Note 2) Whether the CPU fan speed control function is supported will depend on the CPU cooler you install. Hardware Installation - 8 -
... 7.1-channel audio, you need connect with the port of HD Audio standard via front panel and enable the multi-channel audio feature through the audio driver. (Note 2) Whether the CPU fan speed control function is supported will depend on the CPU cooler you install. Hardware Installation - 8 -

Manual
Page 11
... or 2-channel speaker. The following describes the states of HD Audio standard via front panel and enable the multi-channel audio feature through the audio driver. • When removing the cable connected to a back panel connector, first remove the cable from your device and then remove it from the connector. Use...
... or 2-channel speaker. The following describes the states of HD Audio standard via front panel and enable the multi-channel audio feature through the audio driver. • When removing the cable connected to a back panel connector, first remove the cable from your device and then remove it from the connector. Use...

Manual
Page 40
...recommended to BIOS F12: Load CMOS from BIOS Press on this item and press the key. Or click Install Single Items to manually select the drivers you wish to the BIOS Setup Main Menu. BIOS Setup - 40 - You can click the Install All button and "Xpress Install" will ... shown in BIOS Setup to My Computer, double-click the optical drive and execute the Run.exe program.) 3-1 Installing Chipset Drivers After inserting the driver disk, "Xpress Install" will install all Data F11: Save CMOS to install. 2-15 Exit Without Saving CMOS Setup Utility-Copyright (C) 1984-2010 Award ...
...recommended to BIOS F12: Load CMOS from BIOS Press on this item and press the key. Or click Install Single Items to manually select the drivers you wish to the BIOS Setup Main Menu. BIOS Setup - 40 - You can click the Install All button and "Xpress Install" will ... shown in BIOS Setup to My Computer, double-click the optical drive and execute the Run.exe program.) 3-1 Installing Chipset Drivers After inserting the driver disk, "Xpress Install" will install all Data F11: Save CMOS to install. 2-15 Exit Without Saving CMOS Setup Utility-Copyright (C) 1984-2010 Award ...


