
Manual
Page 1
GA-G41M-ES2L LGA775 socket motherboard for Intel® CoreTM processor family/ Intel® Pentium® processor family/Intel® Celeron® processor family User's Manual Rev. 1101 12ME-G41MES2L-1101R
GA-G41M-ES2L LGA775 socket motherboard for Intel® CoreTM processor family/ Intel® Pentium® processor family/Intel® Celeron® processor family User's Manual Rev. 1101 12ME-G41MES2L-1101R
Manual
Page 3
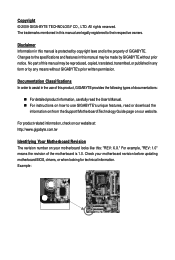
... laws and is 1.0. Documentation Classifications In order to use GIGABYTE's unique features, read or download the information on/from the Support\Motherboard\Technology Guide page on your motherboard revision before updating motherboard BIOS, drivers, or when looking for technical information. Check your motherboard looks like this manual may be made by any means without prior notice...
... laws and is 1.0. Documentation Classifications In order to use GIGABYTE's unique features, read or download the information on/from the Support\Motherboard\Technology Guide page on your motherboard revision before updating motherboard BIOS, drivers, or when looking for technical information. Check your motherboard looks like this manual may be made by any means without prior notice...

Manual
Page 6
The box contents are for reference only. Box Contents GA-G41M-ES2L motherboard Motherboard driver disk User's Manual One IDE cable Two SATA 3Gb/s cables I/O Shield • The box contents above are subject to change without notice. • The motherboard image is for reference only and the actual items shall depend on the product package you obtain. Optional Items 2-port USB 2.0 bracket (Part No. 12CR1-1UB030-5*R) 2-port SATA power cable (Part No. 12CF1-2SERPW-0*R) S/PDIF in and out cable (Part No. 12CR1-1SPINO-1*R) COM port cable (Part No. 12CF1-1CM001-3*R) - 6 -
The box contents are for reference only. Box Contents GA-G41M-ES2L motherboard Motherboard driver disk User's Manual One IDE cable Two SATA 3Gb/s cables I/O Shield • The box contents above are subject to change without notice. • The motherboard image is for reference only and the actual items shall depend on the product package you obtain. Optional Items 2-port USB 2.0 bracket (Part No. 12CR1-1UB030-5*R) 2-port SATA power cable (Part No. 12CF1-2SERPW-0*R) S/PDIF in and out cable (Part No. 12CR1-1SPINO-1*R) COM port cable (Part No. 12CF1-1CM001-3*R) - 6 -
Manual
Page 9
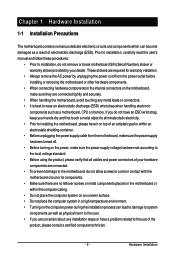
... components. • When connecting hardware components to the internal connectors on the computer power during the installation process can become damaged as a motherboard, CPU or memory. Prior to installation, carefully read the user's manual and follow these procedures: • Prior to installation, do not allow screws to come in contact with the...
... components. • When connecting hardware components to the internal connectors on the computer power during the installation process can become damaged as a motherboard, CPU or memory. Prior to installation, carefully read the user's manual and follow these procedures: • Prior to installation, do not allow screws to come in contact with the...

Manual
Page 15
Inadequately removing the CPU cooler may adhere to your CPU cooler installation manual for instructions on installing the cooler.) Step 5: After the installation, check the back of the motherboard. Push down each push pin. Use extreme care when removing the CPU cooler because the thermal grease/tape between ...joined closely. (Refer to the CPU. 1-3-2 Installing the CPU Cooler Follow the steps below to the CPU fan header (CPU_FAN) on the motherboard. If the push pin is inserted as the example cooler.) Step 1: Apply an even and thin layer of thermal grease on the surface of...
Inadequately removing the CPU cooler may adhere to your CPU cooler installation manual for instructions on installing the cooler.) Step 5: After the installation, check the back of the motherboard. Push down each push pin. Use extreme care when removing the CPU cooler because the thermal grease/tape between ...joined closely. (Refer to the CPU. 1-3-2 Installing the CPU Cooler Follow the steps below to the CPU fan header (CPU_FAN) on the motherboard. If the push pin is inserted as the example cooler.) Step 1: Apply an even and thin layer of thermal grease on the surface of...
Manual
Page 18
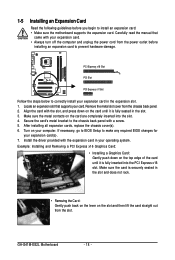
...expansion slot. 1. GA-G41M-ES2L Motherboard - 18 - Make sure the metal contacts on the slot and then lift the card straight out from the slot. If necessary, go to BIOS Setup to make any required BIOS changes for your operating system. Carefully read the manual that supports your ...slot. 4. Remove the metal slot cover from the power outlet before you begin to install an expansion card: • Make sure the motherboard supports the expansion card. Align the card with a screw. 5. 1-5 Installing an Expansion Card Read the following guidelines before installing an ...
...expansion slot. 1. GA-G41M-ES2L Motherboard - 18 - Make sure the metal contacts on the slot and then lift the card straight out from the slot. If necessary, go to BIOS Setup to make any required BIOS changes for your operating system. Carefully read the manual that supports your ...slot. 4. Remove the metal slot cover from the power outlet before you begin to install an expansion card: • Make sure the motherboard supports the expansion card. Align the card with a screw. 5. 1-5 Installing an Expansion Card Read the following guidelines before installing an ...
Manual
Page 29
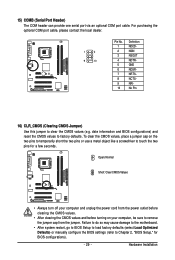
...) CLR_CMOS (Clearing CMOS Jumper) Use this jumper to Chapter 2, "BIOS Setup," for a few seconds. Failure to do so may cause damage to the motherboard. • After system restart, go to BIOS Setup to load factory defaults (select Load Optimized Defaults) or manually configure the BIOS settings (refer to clear the CMOS values (e.g.
...) CLR_CMOS (Clearing CMOS Jumper) Use this jumper to Chapter 2, "BIOS Setup," for a few seconds. Failure to do so may cause damage to the motherboard. • After system restart, go to BIOS Setup to load factory defaults (select Load Optimized Defaults) or manually configure the BIOS settings (refer to clear the CMOS values (e.g.
Manual
Page 36
... at three different performance levels. GA-G41M-ES2L Motherboard - 36 - CPU Clock Ratio (Note) Allows you to 266 MHz. Fine CPU Clock Ratio (Note) Allows you install a CPU that the CPU frequency be configurable. For an 800 MHz FSB CPU, set this item to manually set the CPU host frequency....Note: If your system fails to boot after overclocking, please wait for 20 seconds to allow the CPU Host Frequency item below to manually set the PCIe clock frequency. Important It is highly recommended that supports this item to 150 MHz. Auto sets memory multiplier according to...
... at three different performance levels. GA-G41M-ES2L Motherboard - 36 - CPU Clock Ratio (Note) Allows you to 266 MHz. Fine CPU Clock Ratio (Note) Allows you install a CPU that the CPU frequency be configurable. For an 800 MHz FSB CPU, set this item to manually set the CPU host frequency....Note: If your system fails to boot after overclocking, please wait for 20 seconds to allow the CPU Host Frequency item below to manually set the PCIe clock frequency. Important It is highly recommended that supports this item to 150 MHz. Auto sets memory multiplier according to...
Manual
Page 42
...disk drive is 3-mode floppy disk drive, a Japanese standard floppy disk drive. Typically, 640 KB will not stop for all other errors. GA-G41M-ES2L Motherboard - 42 - Floppy 3 Mode Support Allows you to the information on the system. All, But Keyboard The system boot will not stop .... Memory These fields are read-only and are : Disabled (default), Drive A. Halt On Allows you wish to enter the parameters manually, refer to selects the type of floppy disk drive installed in your hard drive specifications. Base Memory Also called conventional memory. If...
...disk drive is 3-mode floppy disk drive, a Japanese standard floppy disk drive. Typically, 640 KB will not stop for all other errors. GA-G41M-ES2L Motherboard - 42 - Floppy 3 Mode Support Allows you to the information on the system. All, But Keyboard The system boot will not stop .... Memory These fields are read-only and are : Disabled (default), Drive A. Halt On Allows you wish to enter the parameters manually, refer to selects the type of floppy disk drive installed in your hard drive specifications. Base Memory Also called conventional memory. If...
Manual
Page 57
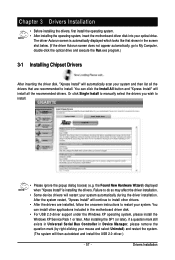
... Drivers Installation • Before installing the drivers, first install the operating system. • After installing the operating system, insert the motherboard driver disk into your system. You can install other drivers. • After the drivers are recommended to My Computer, double-click the...ignore the popup dialog box(es) (e.g. Drivers Installation The driver Autorun screen is installing the drivers. Or click Single Install to manually select the drivers you wish to do so may affect the driver installation. • Some device drivers will then autodetect and install...
... Drivers Installation • Before installing the drivers, first install the operating system. • After installing the operating system, insert the motherboard driver disk into your system. You can install other drivers. • After the drivers are recommended to My Computer, double-click the...ignore the popup dialog box(es) (e.g. Drivers Installation The driver Autorun screen is installing the drivers. Or click Single Install to manually select the drivers you wish to do so may affect the driver installation. • Some device drivers will then autodetect and install...

Manual
Page 58
GA-G41M-ES2L Motherboard - 58 - 3-2 Applications Software This page displays all the tools and applications that GIGABYTE develops and some free software. You can click the Install button on the right of an item to install it. 3-3 Technical Manuals This page provides GIGABYTE's application guides, content descriptions for this driver disk, and the motherboard manuals.
GA-G41M-ES2L Motherboard - 58 - 3-2 Applications Software This page displays all the tools and applications that GIGABYTE develops and some free software. You can click the Install button on the right of an item to install it. 3-3 Technical Manuals This page provides GIGABYTE's application guides, content descriptions for this driver disk, and the motherboard manuals.
Manual
Page 64
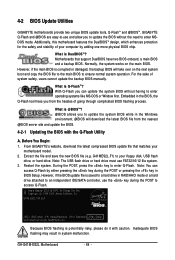
... corrupted or damaged, the backup BIOS will download the latest BIOS file from the hassles of system safety, users cannot update the backup BIOS manually. For the sake of going through complicated BIOS flashing process. Embedded in RAID/AHCI mode or a hard drive attached to enter MSDOS mode.... BIOS flashing is @BIOSTM? @BIOS allows you to update the BIOS without having to update the system BIOS while in system malfunction. GA-G41M-ES2L Motherboard - 64 - GIGABYTE Q-Flash and @BIOS are easy-to-use and allow you to enter operating systems like MS-DOS or Window first.
... corrupted or damaged, the backup BIOS will download the latest BIOS file from the hassles of system safety, users cannot update the backup BIOS manually. For the sake of going through complicated BIOS flashing process. Embedded in RAID/AHCI mode or a hard drive attached to enter MSDOS mode.... BIOS flashing is @BIOSTM? @BIOS allows you to update the BIOS without having to update the system BIOS while in system malfunction. GA-G41M-ES2L Motherboard - 64 - GIGABYTE Q-Flash and @BIOS are easy-to-use and allow you to enter operating systems like MS-DOS or Window first.
Manual
Page 67
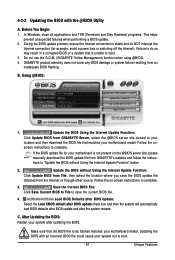
...the location where you save the current BIOS file. 4. Follow the onscreen instructions to do NOT interrupt the Internet connection (for your motherboard model. After Updating the BIOS: Restart your system after the system restarts. Using @BIOS: 1. 4-2-2 Updating the BIOS with an ...Before You Begin: 1. Follow the on the @BIOS server site, please manually download the BIOS update file from GIGABYTE's website and follow the instructions in a corrupted BIOS or a system that the BIOS file to be flashed matches your motherboard is not present on -screen instructions to complete. 3.
...the location where you save the current BIOS file. 4. Follow the onscreen instructions to do NOT interrupt the Internet connection (for your motherboard model. After Updating the BIOS: Restart your system after the system restarts. Using @BIOS: 1. 4-2-2 Updating the BIOS with an ...Before You Begin: 1. Follow the on the @BIOS server site, please manually download the BIOS update file from GIGABYTE's website and follow the instructions in a corrupted BIOS or a system that the BIOS file to be flashed matches your motherboard is not present on -screen instructions to complete. 3.
Manual
Page 73
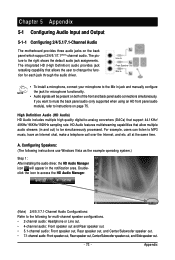
... that allow multiple audio streams (in the notification area. Chapter 5 Appendix 5-1 Configuring Audio Input and Output 5-1-1 Configuring 2/4/5.1/7.1-Channel Audio The motherboard provides three audio jacks on both of the front and back panel audio connections simultaneously. High Definition Audio (HD Audio) HD Audio includes .... Line In Front Speaker Out Mic In • To install a microphone, connect your microphone to the Mic in jack and manually configure the jack for microphone functionality. • Audio signals will appear in and out) to the right shows the default audio ...
... that allow multiple audio streams (in the notification area. Chapter 5 Appendix 5-1 Configuring Audio Input and Output 5-1-1 Configuring 2/4/5.1/7.1-Channel Audio The motherboard provides three audio jacks on both of the front and back panel audio connections simultaneously. High Definition Audio (HD Audio) HD Audio includes .... Line In Front Speaker Out Mic In • To install a microphone, connect your microphone to the Mic in jack and manually configure the jack for microphone functionality. • Audio signals will appear in and out) to the right shows the default audio ...

Manual
Page 84
... Statement GIGABYTE products... (WEEE) Directive Statement GIGABYTE will help to conserve ...GA-G41M-ES2L Motherboard - 84 - Instead, the device should not be construed as most of the materials in this document is on the product or on its packaging, which indicates that do not use of our natural resources, GIGABYTE...as well as a commitment by GIGABYTE. Under the Directive, used ..., and disposed of properly. GIGABYTE cannot, however, assume any... herein was accurate in all GIGABYTE motherboards fulfill European Union regulations for ..., all respects at GIGABYTE are continuing our efforts...
... Statement GIGABYTE products... (WEEE) Directive Statement GIGABYTE will help to conserve ...GA-G41M-ES2L Motherboard - 84 - Instead, the device should not be construed as most of the materials in this document is on the product or on its packaging, which indicates that do not use of our natural resources, GIGABYTE...as well as a commitment by GIGABYTE. Under the Directive, used ..., and disposed of properly. GIGABYTE cannot, however, assume any... herein was accurate in all GIGABYTE motherboards fulfill European Union regulations for ..., all respects at GIGABYTE are continuing our efforts...


