Manual
Page 12
... memory is installed, the actual memory size displayed will be less than 4 GB. (Note 2) To configure 7.1-channel audio, you need connect with the port of HD Audio standard via front panel and enable the multi-channel audio feature through the audio driver. (Note 3) The DVI-D port does not support D-Sub connection...
... memory is installed, the actual memory size displayed will be less than 4 GB. (Note 2) To configure 7.1-channel audio, you need connect with the port of HD Audio standard via front panel and enable the multi-channel audio feature through the audio driver. (Note 3) The DVI-D port does not support D-Sub connection...

Manual
Page 20
... setting up to this audio jack for USB devices such as an optical drive, walkman, etc. Playback of HD DVD and Blu-ray Discs: In order to get better playback quality, when playing the HD DVD or Blu-ray discs, refer to the recommended system requirements (or better) below. • CPU: Intel... Dual-Core processor • Memory: Two 1 GB DDR2 800 memory modules with the port of the LAN port LEDs. The following describes the states of HD Audio standard via front panel and enable the multi-channel audio feature through the audio driver. Use this jack. RJ-45 LAN Port The Gigabit...
... setting up to this audio jack for USB devices such as an optical drive, walkman, etc. Playback of HD DVD and Blu-ray Discs: In order to get better playback quality, when playing the HD DVD or Blu-ray discs, refer to the recommended system requirements (or better) below. • CPU: Intel... Dual-Core processor • Memory: Two 1 GB DDR2 800 memory modules with the port of the LAN port LEDs. The following describes the states of HD Audio standard via front panel and enable the multi-channel audio feature through the audio driver. Use this jack. RJ-45 LAN Port The Gigabit...
Manual
Page 25
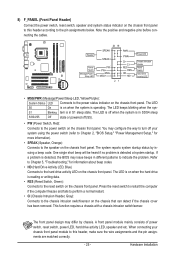
... issuing a beep code. When connecting your system using the power switch (refer to Chapter 2, "BIOS Setup," "Power Management Setup," for information about beep codes. • HD (Hard Drive Activity LED, Blue) Connects to the hard drive activity LED on the chassis front panel. The system reports system startup status by chassis...
... issuing a beep code. When connecting your system using the power switch (refer to Chapter 2, "BIOS Setup," "Power Management Setup," for information about beep codes. • HD (Hard Drive Activity LED, Blue) Connects to the hard drive activity LED on the chassis front panel. The system reports system startup status by chassis...
Manual
Page 26
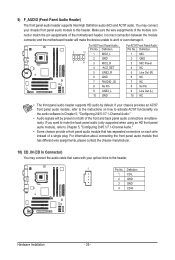
... 5 Line Out (R) 6 GND 6 NC 7 FAUDIO_JD 7 NC 8 No Pin 8 No Pin 9 LINE2_L 9 Line Out (L) 10 GND 10 NC • The front panel audio header supports HD audio by default. You may connect the audio cable that has separated connectors on both of a single plug. For...." • Audio signals will make the device unable to this header. If you want to mute the back panel audio (only supported when using an HD front panel audio module), refer to Chapter 5, "Configuring 2/4/5.1/7.1-Channel Audio." • Some chassis provide a front panel audio module that came with your chassis ...
... 5 Line Out (R) 6 GND 6 NC 7 FAUDIO_JD 7 NC 8 No Pin 8 No Pin 9 LINE2_L 9 Line Out (L) 10 GND 10 NC • The front panel audio header supports HD audio by default. You may connect the audio cable that has separated connectors on both of a single plug. For...." • Audio signals will make the device unable to this header. If you want to mute the back panel audio (only supported when using an HD front panel audio module), refer to Chapter 5, "Configuring 2/4/5.1/7.1-Channel Audio." • Some chassis provide a front panel audio module that came with your chassis ...
Manual
Page 73
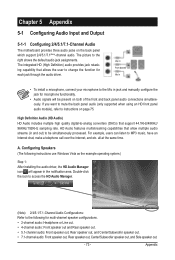
... Center/Subwoofer speaker out, and Side speaker out. - 73 - all at the same time. Appendix Double-click the icon to access the HD Audio Manager. (Note) 2/4/5.1/7.1-Channel Audio Configurations: Refer to instructions on the back panel which support 2/4/5.1/7.1(Note)-channel audio. If you want to mute... the back panel audio (only supported when using an HD front panel audio module), refer to the following instructions use Windows Vista as the example operating system.) Step 1: After installing the audio ...
... Center/Subwoofer speaker out, and Side speaker out. - 73 - all at the same time. Appendix Double-click the icon to access the HD Audio Manager. (Note) 2/4/5.1/7.1-Channel Audio Configurations: Refer to instructions on the back panel which support 2/4/5.1/7.1(Note)-channel audio. If you want to mute... the back panel audio (only supported when using an HD front panel audio module), refer to the following instructions use Windows Vista as the example operating system.) Step 1: After installing the audio ...
Manual
Page 75
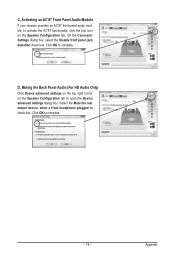
Muting the Back Panel Audio (For HD Audio Only) Click Device advanced settings on the top right corner on the Speaker Configuration tab to activate the AC'97 functionality, click the tool ...
Muting the Back Panel Audio (For HD Audio Only) Click Device advanced settings on the top right corner on the Speaker Configuration tab to activate the AC'97 functionality, click the tool ...
Manual
Page 78
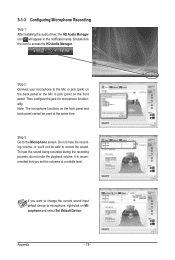
... sound input default device to microphone, right-click on Microphone and select Set Default Device. 5-1-3 Configuring Microphone Recording Step 1: After installing the audio driver, the HD Audio Manager icon will appear in jack (pink) on the front panel and back panel cannot be able to record the sound. Double-click the...
... sound input default device to microphone, right-click on Microphone and select Set Default Device. 5-1-3 Configuring Microphone Recording Step 1: After installing the audio driver, the HD Audio Manager icon will appear in jack (pink) on the front panel and back panel cannot be able to record the sound. Double-click the...
Manual
Page 79
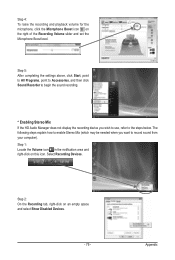
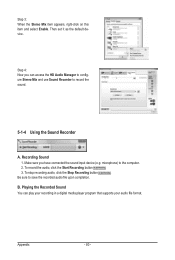
... above, click Start, point to All Programs, point to Accessories, and then click Sound Recorder to begin the sound recording. * Enabling Stereo Mix If the HD Audio Manager does not display the recording device you want to the steps below. Step 4: To raise the recording and playback volume for the microphone...
... above, click Start, point to All Programs, point to Accessories, and then click Sound Recorder to begin the sound recording. * Enabling Stereo Mix If the HD Audio Manager does not display the recording device you want to the steps below. Step 4: To raise the recording and playback volume for the microphone...
Manual
Page 80
...) to save the recorded audio file upon completion. To record the audio, click the Start Recording button . 3. Playing the Recorded Sound You can access the HD Audio Manager to configure Stereo Mix and use Sound Recorder to record the sound. 5-1-4 Using the Sound Recorder A. Be sure to the computer. 2. Step 3: When...
...) to save the recorded audio file upon completion. To record the audio, click the Start Recording button . 3. Playing the Recorded Sound You can access the HD Audio Manager to configure Stereo Mix and use Sound Recorder to record the sound. 5-1-4 Using the Sound Recorder A. Be sure to the computer. 2. Step 3: When...
Manual
Page 81
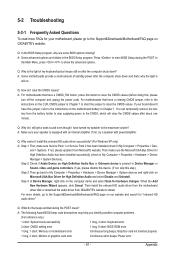
... > Device Manager > System Devices). Q: Why do I clear the CMOS values? eral > System). If not, please update it from GIGABYTE's website to show the advanced options. 5-2 Troubleshooting 5-2-1 Frequently Asked Questions To read more details, go to the Support&Downloads\Motherboards\FAQ page... go back to My Computer > Properties > Hardware > Device Manager > System devices and right-click on our website and search for "onboard HD audio driver." For motherboards that 's why the light is equipped with power/amplifier. If not, try a speaker with an internal amplifier. ...
... > Device Manager > System Devices). Q: Why do I clear the CMOS values? eral > System). If not, please update it from GIGABYTE's website to show the advanced options. 5-2 Troubleshooting 5-2-1 Frequently Asked Questions To read more details, go to the Support&Downloads\Motherboards\FAQ page... go back to My Computer > Properties > Hardware > Device Manager > System devices and right-click on our website and search for "onboard HD audio driver." For motherboards that 's why the light is equipped with power/amplifier. If not, try a speaker with an internal amplifier. ...


