

Manual
Page 1
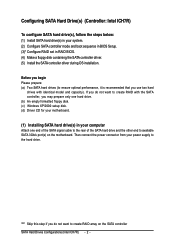
Table of Contents Configuring SATA Hard Drive(s) (Controller: Intel ICH7R 2 (1) Installing SATA hard drive(s) in your computer 2 (2) Configuring SATA controller mode and boot sequence in BIOS Setup 3 (3) Configuring RAID set in RAID BIOS 5 (4) Making a SATA Driver Disk ...9 (5) Installing SATA controller driver during OS installation 11
Table of Contents Configuring SATA Hard Drive(s) (Controller: Intel ICH7R 2 (1) Installing SATA hard drive(s) in your computer 2 (2) Configuring SATA controller mode and boot sequence in BIOS Setup 3 (3) Configuring RAID set in RAID BIOS 5 (4) Making a SATA Driver Disk ...9 (5) Installing SATA controller driver during OS installation 11
Manual
Page 2
... for your motherboard. (1) Installing SATA hard drive(s) in RAID BIOS. (4) Make a floppy disk containing the SATA controller driver. (5) Install the SATA controller driver during OS installation. "*" Skip this step if you do not want to available SATA 3Gb/s port(s) on the SATA controller SATA Hard Drives Configurations (Intel ...
... for your motherboard. (1) Installing SATA hard drive(s) in RAID BIOS. (4) Make a floppy disk containing the SATA controller driver. (5) Install the SATA controller driver during OS installation. "*" Skip this step if you do not want to available SATA 3Gb/s port(s) on the SATA controller SATA Hard Drives Configurations (Intel ...
Manual
Page 5
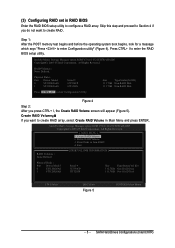
...wRAID5 Copyright(C) 2003-05 Intel Corporation. Delete RAID Volume 3. Exit RAID Volumes : None Defined. [ DISK/VOLUME INFORMATION ] Physical Disks : Port Driver Model 0 ST3120026AS 1 ST3120026AS Serial # 3JT354CP 3JT329JX Size Type/Status(Vol ID) 111.7GB Non-RAID Disk 111.7GB Non-RAID Disk [KL...select Create RAID Volume in RAID BIOS Enter the RAID BIOS setup utility to enter Configuration utility" (Figure 4). Physical Disks : Port Driver Model 0 ST3120026AS 1 ST3120026AS Serial # 3JT354CP 3JT329JX Size Type/Status(Vol ID) 111.7GB Non-RAID Disk 111.7GB Non-RAID ...
...wRAID5 Copyright(C) 2003-05 Intel Corporation. Delete RAID Volume 3. Exit RAID Volumes : None Defined. [ DISK/VOLUME INFORMATION ] Physical Disks : Port Driver Model 0 ST3120026AS 1 ST3120026AS Serial # 3JT354CP 3JT329JX Size Type/Status(Vol ID) 111.7GB Non-RAID Disk 111.7GB Non-RAID Disk [KL...select Create RAID Volume in RAID BIOS Enter the RAID BIOS setup utility to enter Configuration utility" (Figure 4). Physical Disks : Port Driver Model 0 ST3120026AS 1 ST3120026AS Serial # 3JT354CP 3JT329JX Size Type/Status(Vol ID) 111.7GB Non-RAID Disk 111.7GB Non-RAID ...

Manual
Page 8
... Name 0 Volume0 [ DISK/VOLUME INFORMATION ] Level RAID(Stripe) Strip 128KB Size Status Bootable 223.6GB Normal Yes Physical Disks : Port Driver Model 0 ST3120026AS 1 ST3120026AS Serial # 3JT354CP 3JT329JX Size Type/Status(Vol ID) 111.8GB Member Disk(0) 111.8GB Member Disk(0) [KL... Name 0 Volume0 [ DISK/VOLUME INFORMATION ] Level RAID(Stripe) Strip 128KB Size Status Bootable 223.6GB Normal Yes Physical Disks : Port Driver Model 0 ST3120026AS 1 ST3120026AS Serial # 3JT354CP 3JT329JX Size Type/Status(Vol ID) 111.8GB Member Disk(0) 111.8GB Member Disk(0) [KL...
... Name 0 Volume0 [ DISK/VOLUME INFORMATION ] Level RAID(Stripe) Strip 128KB Size Status Bootable 223.6GB Normal Yes Physical Disks : Port Driver Model 0 ST3120026AS 1 ST3120026AS Serial # 3JT354CP 3JT329JX Size Type/Status(Vol ID) 111.8GB Member Disk(0) 111.8GB Member Disk(0) [KL... Name 0 Volume0 [ DISK/VOLUME INFORMATION ] Level RAID(Stripe) Strip 128KB Size Status Bootable 223.6GB Normal Yes Physical Disks : Port Driver Model 0 ST3120026AS 1 ST3120026AS Serial # 3JT354CP 3JT329JX Size Type/Status(Vol ID) 111.8GB Member Disk(0) 111.8GB Member Disk(0) [KL...
Manual
Page 9
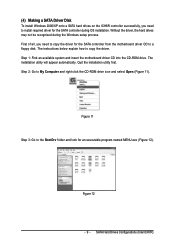
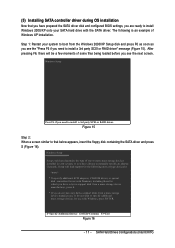
The instructions below explain how to My Computer and right-click the CD-ROM drive icon and select Open (Figure 11). Without the driver, the hard drives may not be recognized during OS installation. Figure 11 Step 3: Go to the BootDrv folder and look for the SATA controller during... the Windows setup process. Step 1: Find an available system and insert the motherboard driver CD into the CD-ROM drive. Quit the installation utility first. SATA Hard Drives Configurations (Intel ICH7R) Step 2: Go to copy the...
The instructions below explain how to My Computer and right-click the CD-ROM drive icon and select Open (Figure 11). Without the driver, the hard drives may not be recognized during OS installation. Figure 11 Step 3: Go to the BootDrv folder and look for the SATA controller during... the Windows setup process. Step 1: Find an available system and insert the motherboard driver CD into the CD-ROM drive. Quit the installation utility first. SATA Hard Drives Configurations (Intel ICH7R) Step 2: Go to copy the...
Manual
Page 10
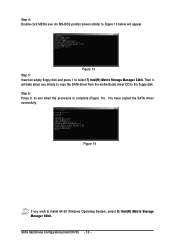
An MS-DOS prompt screen similar to Figure 13 below will take about one minute to copy the SATA driver from the motherboard driver CD to select 7) Intel(R) Matrix Storage Manager 32bit. Step 6: Press 0 to install 64-bit Windows Operating System, select 8) Intel(R) Matrix Storage ...;é ¤¤ ¤å Figure 13 Step 5: Insert an empty floppy disk and press 1 to the floppy disk. You have copied the SATA driver sucessfully. Figure 14 If you wish to exit when the procedure is complete (Figure 14). SATA Hard Drives Configurations (Intel ICH7R) - 10 - Ác Step...
An MS-DOS prompt screen similar to Figure 13 below will take about one minute to copy the SATA driver from the motherboard driver CD to select 7) Intel(R) Matrix Storage Manager 32bit. Step 6: Press 0 to install 64-bit Windows Operating System, select 8) Intel(R) Matrix Storage ...;é ¤¤ ¤å Figure 13 Step 5: Insert an empty floppy disk and press 1 to the floppy disk. You have copied the SATA driver sucessfully. Figure 14 If you wish to exit when the procedure is complete (Figure 14). SATA Hard Drives Configurations (Intel ICH7R) - 10 - Ác Step...
Manual
Page 11
... When a screen similar to that you have any device support disks from a mass storage device manufacturer, or do not have prepared the SATA driver disk and configured BIOS settings, you are ready to manually specify an adapter. Windows Setup Press F6 if you see the "Press F6 if ... before you need to boot from a mass storage device manufacturer, press S. * If you do not want to install a 3rd party SCSI or RAID driver. S=Specify Additional Device ENTER=Continue F3=Exit Figure 16 - 11 - SATA Hard Drives Configurations (Intel ICH7R) After pressing F6, there will load support ...
... When a screen similar to that you have any device support disks from a mass storage device manufacturer, or do not have prepared the SATA driver disk and configured BIOS settings, you are ready to manually specify an adapter. Windows Setup Press F6 if you see the "Press F6 if ... before you need to boot from a mass storage device manufacturer, press S. * If you do not want to install a 3rd party SCSI or RAID driver. S=Specify Additional Device ENTER=Continue F3=Exit Figure 16 - 11 - SATA Hard Drives Configurations (Intel ICH7R) After pressing F6, there will load support ...

Manual
Page 12
...197;é will be finished in the floppy disk, a controller menu similar to Figure 20 below appears, press ENTER to continue the SATA driver installation from the floppy disk. Intel(R) 82801 GR/GH SATA RAID Controller (Desktop ICH7R/DH) Intel(R) 82801 GR/GH SATA AHCI Controller (...Desktop ICH6R) Intel(R) 82801 FR SATA AHCI Controller (Desktop ICH6R) ENTER=Select F3=Exit Figure 17 If a message appears saying one minute. The driver installation will appear. Select the SCSI Adapter you wish to select Intel(R) 82801 GR/GH SATA RAID Controller (Desktop ¤¤ ICH7R/DH)*...
...197;é will be finished in the floppy disk, a controller menu similar to Figure 20 below appears, press ENTER to continue the SATA driver installation from the floppy disk. Intel(R) 82801 GR/GH SATA RAID Controller (Desktop ICH7R/DH) Intel(R) 82801 GR/GH SATA AHCI Controller (...Desktop ICH6R) Intel(R) 82801 FR SATA AHCI Controller (Desktop ICH6R) ENTER=Select F3=Exit Figure 17 If a message appears saying one minute. The driver installation will appear. Select the SCSI Adapter you wish to select Intel(R) 82801 GR/GH SATA RAID Controller (Desktop ¤¤ ICH7R/DH)*...

Manual
Page 13
... R=Repair F3=Exit Figure 19 (Note: Each time you add a new hard drive to a RAID array, the RAID driver will not have installed the SATA controller driver successfully. WindowsXP Professional Setup Welcome to run on your computer. To repair a Windows XP installation using Recovery Console, press R.... of the Setup program prepares Microsoft(R) Windows (R) XP to Setup. After that you should see a screen as below. After the SATA controller driver installation is completed, you have to be installed.) - 13 - To set up Windows XP now, press ENTER. You can proceed with the...
... R=Repair F3=Exit Figure 19 (Note: Each time you add a new hard drive to a RAID array, the RAID driver will not have installed the SATA controller driver successfully. WindowsXP Professional Setup Welcome to run on your computer. To repair a Windows XP installation using Recovery Console, press R.... of the Setup program prepares Microsoft(R) Windows (R) XP to Setup. After that you should see a screen as below. After the SATA controller driver installation is completed, you have to be installed.) - 13 - To set up Windows XP now, press ENTER. You can proceed with the...
Manual
Page 5
Channel Audio Function Introduction 90 4-1-6 DTS Introduction 96 4-2 Troubleshooting 103 4-3 POST Error Code 104 - 5 - Chapter 3 Drivers Installation 59 3-1 Install Chipset Drivers 59 3-2 SoftwareApplications 60 3-3 Driver CD Information 60 3-4 Hardware Information 61 3-5 Contact Us ...61 Chapter 4 Appendix 63 4-1 Unique Software Utilities 63 4-1-1 EasyTune 5 Introduction 64 4-1-2 Xpress Recovery2 Introduction 65 4-1-3 Flash BIOS Method Introduction 67 4-1-4 Configuring SATA Hard Drive(s) (Controller: Intel ICH7R 79 4-1-5 2- / 4- / 5.1- / 6.1- / 7.1-
Channel Audio Function Introduction 90 4-1-6 DTS Introduction 96 4-2 Troubleshooting 103 4-3 POST Error Code 104 - 5 - Chapter 3 Drivers Installation 59 3-1 Install Chipset Drivers 59 3-2 SoftwareApplications 60 3-3 Driver CD Information 60 3-4 Hardware Information 61 3-5 Contact Us ...61 Chapter 4 Appendix 63 4-1 Unique Software Utilities 63 4-1-1 EasyTune 5 Introduction 64 4-1-2 Xpress Recovery2 Introduction 65 4-1-3 Flash BIOS Method Introduction 67 4-1-4 Configuring SATA Hard Drive(s) (Controller: Intel ICH7R 79 4-1-5 2- / 4- / 5.1- / 6.1- / 7.1-
Manual
Page 17
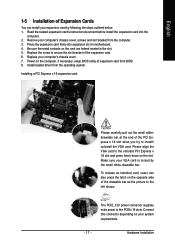
... on your computer's chassis cover. 7. Read the related expansion card's instruction document before install the expansion card into expansion slot in the slot. 5. Install related driver from the operating system. Make sure your computer's chassis cover, screws and slot bracket from BIOS. 8. Replace the screw to secure the slot bracket of...
... on your computer's chassis cover. 7. Read the related expansion card's instruction document before install the expansion card into expansion slot in the slot. 5. Install related driver from the operating system. Make sure your computer's chassis cover, screws and slot bracket from BIOS. 8. Replace the screw to secure the slot bracket of...
Manual
Page 19
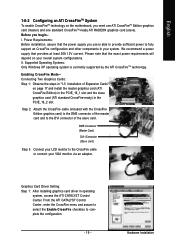
... motherboard, you need one ATI CrossFireTM Edition graphics card (master) and one standard CrossFireTM-ready ATI RADEON graphics card (slave). Graphics Card Driver Setting: Step 1: After installing graphics card driver in operating system, access the ATI CATALYST Control Center. Hardware Installation Before you use is currrently supported by the ATI CrossFireTM technology...
... motherboard, you need one ATI CrossFireTM Edition graphics card (master) and one standard CrossFireTM-ready ATI RADEON graphics card (slave). Graphics Card Driver Setting: Step 1: After installing graphics card driver in operating system, access the ATI CATALYST Control Center. Hardware Installation Before you use is currrently supported by the ATI CrossFireTM technology...
Manual
Page 20
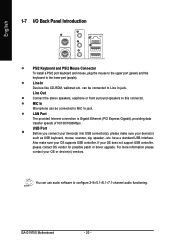
... use audio software to MIC In jack. MIC In Microphone can be connected to configure 2-/4-/5.1-/6.1-/7.1-channel audio functioning. If your OS or device(s) vendors. GA-G1975X Motherboard - 20 - can be connected to the lower port (purple). Also make sure your OS supports USB controller. English 1-7 I/O Back Panel Introduction..., speaker...etc. For more information please contact your OS does not support USB controller, please contact OS vendor for possible patch or driver upgrade. Line Out Connect the stereo speakers, earphone or front surround speakers to this connector.
... use audio software to MIC In jack. MIC In Microphone can be connected to configure 2-/4-/5.1-/6.1-/7.1-channel audio functioning. If your OS or device(s) vendors. GA-G1975X Motherboard - 20 - can be connected to the lower port (purple). Also make sure your OS supports USB controller. English 1-7 I/O Back Panel Introduction..., speaker...etc. For more information please contact your OS does not support USB controller, please contact OS vendor for possible patch or driver upgrade. Line Out Connect the stereo speakers, earphone or front surround speakers to this connector.
Manual
Page 25
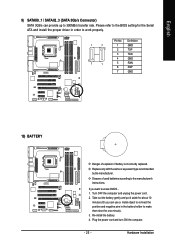
... a metal object to connect the positive and negative pins in the battery holder to make them short for the Serial ATA and install the proper driver in order to work properly. 1 7 7 1 Pin No. 1 2 3 4 5 6 7 Definition GND TXP TXN GND RXN RXP GND 10) BATTERY Danger of used batteries according to the manufacturer...
... a metal object to connect the positive and negative pins in the battery holder to make them short for the Serial ATA and install the proper driver in order to work properly. 1 7 7 1 Pin No. 1 2 3 4 5 6 7 Definition GND TXP TXN GND RXN RXP GND 10) BATTERY Danger of used batteries according to the manufacturer...
Manual
Page 44
...] [Enabled] [Disabled] [3F8/IRQ4] [Enabled] Item Help Menu Level` If a hard disk controller card is an interface specification that allows the storage driver to enable advanced Serial ATA features such as Native Command Queuing and hot plug. Advanced Host Controller Interface (AHCI) is used, set to ". For more... Master/Slave, this function will be automatically made by the setting "On-Chip SATA Mode" and "PATA IDE Set to Ch. 1 Master/Slave. GA-G1975X Motherboard - 44 - Non-Combined Set On-Chip SATA mode to Ch. 1 Master/Slave, this function. PATA IDE Set to Ch.1 Master/Slave Set...
...] [Enabled] [Disabled] [3F8/IRQ4] [Enabled] Item Help Menu Level` If a hard disk controller card is an interface specification that allows the storage driver to enable advanced Serial ATA features such as Native Command Queuing and hot plug. Advanced Host Controller Interface (AHCI) is used, set to ". For more... Master/Slave, this function will be automatically made by the setting "On-Chip SATA Mode" and "PATA IDE Set to Ch. 1 Master/Slave. GA-G1975X Motherboard - 44 - Non-Combined Set On-Chip SATA mode to Ch. 1 Master/Slave, this function. PATA IDE Set to Ch.1 Master/Slave Set...
Manual
Page 59
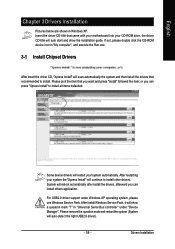
... Windows Service Pack. After install Windows Service Pack, it will show the installation guide. Drivers Installation or you want and press "install" followed the item; For USB2.0 driver support under "Device Manager". Please remove the question mark and restart the system (System ...will continue to install other drivers. English Chapter 3 Drivers Installation Pictures below are shown in "My computer", and execute the Run.exe. 3-1 Install Chipset Drivers After insert the driver CD, "Xpress Install" will auto start and show a question mark ...
... Windows Service Pack. After install Windows Service Pack, it will show the installation guide. Drivers Installation or you want and press "install" followed the item; For USB2.0 driver support under "Device Manager". Please remove the question mark and restart the system (System ...will continue to install other drivers. English Chapter 3 Drivers Installation Pictures below are shown in "My computer", and execute the Run.exe. 3-1 Install Chipset Drivers After insert the driver CD, "Xpress Install" will auto start and show a question mark ...
Manual
Page 60
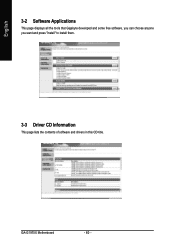
English 3-2 Software Applications This page displays all the tools that Gigabyte developed and some free software, you can choose anyone you want and press "install" to install them. 3-3 Driver CD Information This page lists the contents of software and drivers in this CD-title. GA-G1975X Motherboard - 60 -
English 3-2 Software Applications This page displays all the tools that Gigabyte developed and some free software, you can choose anyone you want and press "install" to install them. 3-3 Driver CD Information This page lists the contents of software and drivers in this CD-title. GA-G1975X Motherboard - 60 -
Manual
Page 61
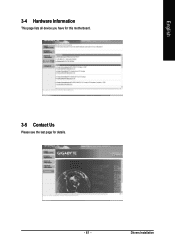
English 3-4 Hardware Information This page lists all device you have for this motherboard. 3-5 Contact Us Please see the last page for details. - 61 - Drivers Installation
English 3-4 Hardware Information This page lists all device you have for this motherboard. 3-5 Contact Us Please see the last page for details. - 61 - Drivers Installation
Manual
Page 63
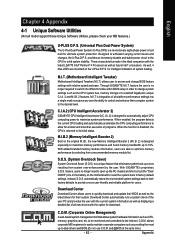
... accelerates the CPU computing performance to allow for solid system stability. to -date drivers and BIOS.(Do not use C.O.M. allows corporate MIS engineers to easily maintain corporate computers such as the CPU system bus, memory timings or to enabled Gigabyte's unique C.I.A. 2 and M.I .A. 2) is returned to its initial status. These characteristics make it...
... accelerates the CPU computing performance to allow for solid system stability. to -date drivers and BIOS.(Do not use C.O.M. allows corporate MIS engineers to easily maintain corporate computers such as the CPU system bus, memory timings or to enabled Gigabyte's unique C.I.A. 2 and M.I .A. 2) is returned to its initial status. These characteristics make it...
Manual
Page 65
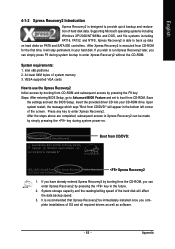
... the hard disk will appear in the bottom left corner of the screen. Save the settings and exit the BIOS Setup. Insert the provided driver CD into your hard disk. If you wish to enter Xpress Recovery2. Intel x86 platforms 2. At least 64M bytes of hard disk data....-on PATA and SATA IDE controllers. Boot from the CD-ROM, you can be immediately installed once you complete installations of OS and all required drivers as well as software. - 65 - English 4-1-2 Xpress Recovery2 Introduction Xpress Recovery2 is recommended that Xpress Recovery2 be made by pressing the F9 key:...
... the hard disk will appear in the bottom left corner of the screen. Save the settings and exit the BIOS Setup. Insert the provided driver CD into your hard disk. If you wish to enter Xpress Recovery2. Intel x86 platforms 2. At least 64M bytes of hard disk data....-on PATA and SATA IDE controllers. Boot from the CD-ROM, you can be immediately installed once you complete installations of OS and all required drivers as well as software. - 65 - English 4-1-2 Xpress Recovery2 Introduction Xpress Recovery2 is recommended that Xpress Recovery2 be made by pressing the F9 key:...


