
Manual
Page 3
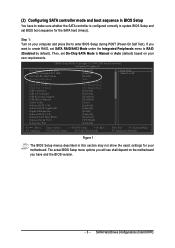
... menu options you will see shall depend on your motherboard. SATA Hard Drives Configurations (Intel ICH7R) Step 1: Turn on your computer and press Del to Manual or Auto (default) based on the motherboard you want to create RAID, set SATA RAID/AHCI Mode under the Integrated Peripherals menu to USB Controller...
... menu options you will see shall depend on your motherboard. SATA Hard Drives Configurations (Intel ICH7R) Step 1: Turn on your computer and press Del to Manual or Auto (default) based on the motherboard you want to create RAID, set SATA RAID/AHCI Mode under the Integrated Peripherals menu to USB Controller...
Manual
Page 11
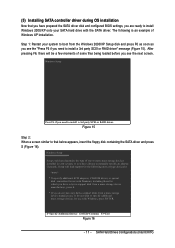
Windows Setup Press F6 if you need to manually specify an adapter. Windows Setup Setup could not determine the type of one or more mass storage devices installed in your system to boot from ...
Windows Setup Press F6 if you need to manually specify an adapter. Windows Setup Setup could not determine the type of one or more mass storage devices installed in your system to boot from ...
Manual
Page 1
GA-G1975X Intel® Pentium® Processor Extreme Edition Intel® Pentium® D / Pentium® 4 LGA775 Processor Motherboard User's Manual Rev. 1005 12ME-G1975X-1005R * The WEEE marking on the product indicates this product must not be disposed of with user's other household waste and must be handed over to a designated collection point for the recycling of waste electrical and electronic equipment!! * The WEEE marking applies only in European Union's member states.
GA-G1975X Intel® Pentium® Processor Extreme Edition Intel® Pentium® D / Pentium® 4 LGA775 Processor Motherboard User's Manual Rev. 1005 12ME-G1975X-1005R * The WEEE marking on the product indicates this product must not be disposed of with user's other household waste and must be handed over to a designated collection point for the recycling of waste electrical and electronic equipment!! * The WEEE marking applies only in European Union's member states.
Manual
Page 3
... any form or by any means without prior notice. For more product details, please click onto Gigabyte's website at www.gigabyte.com.tw Product Manual Classification In order to their respective companies. Copyright © 2005 GIGA-BYTE TECHNOLOGY CO., LTD. Notice The written content... product information and specifications, please carefully read or download the information you need. The trademarks mentioned in the manual are subject to read the "Product User Manual". „ For detailed information related to Gigabyte's unique features, please go to "Technology Guide" section on...
... any form or by any means without prior notice. For more product details, please click onto Gigabyte's website at www.gigabyte.com.tw Product Manual Classification In order to their respective companies. Copyright © 2005 GIGA-BYTE TECHNOLOGY CO., LTD. Notice The written content... product information and specifications, please carefully read or download the information you need. The trademarks mentioned in the manual are subject to read the "Product User Manual". „ For detailed information related to Gigabyte's unique features, please go to "Technology Guide" section on...
Manual
Page 9
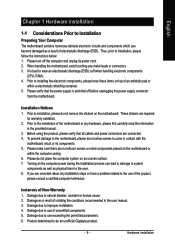
...or have these items on the motherboard. To prevent damage to the motherboard, please do not allow screws to come in the user manual. 3. Turning on the motherboard or within a electrostatic shielding container. 5. Product determined to installation, please follow the instructions below: 1.... related to wear an electrostatic discharge (ESD) cuff when handling electronic components (CPU, RAM). 4. Thus, prior to be an unofficial Gigabyte product. - 9 - These stickers are no leftover screws or metal components placed on the computer power during the installation process can become...
...or have these items on the motherboard. To prevent damage to the motherboard, please do not allow screws to come in the user manual. 3. Turning on the motherboard or within a electrostatic shielding container. 5. Product determined to installation, please follow the instructions below: 1.... related to wear an electrostatic discharge (ESD) cuff when handling electronic components (CPU, RAM). 4. Thus, prior to be an unofficial Gigabyte product. - 9 - These stickers are no leftover screws or metal components placed on the computer power during the installation process can become...

Manual
Page 14
... make sure the Male and Female push pin are joined closely. (for detailed installation instructions, please refer to the heatsink installation section of the user manual) Fig. 5 Please check the back of arrow sign on the male push pin doesn't face inwards before installation. (This instruction is suggested that either thermal... Pin Fig.1 Please apply an even layer of heatsink paste on the surface of the heatsink to the CPU fan header located on the motherboard. GA-G1975X Motherboard - 14 -
... make sure the Male and Female push pin are joined closely. (for detailed installation instructions, please refer to the heatsink installation section of the user manual) Fig. 5 Please check the back of arrow sign on the male push pin doesn't face inwards before installation. (This instruction is suggested that either thermal... Pin Fig.1 Please apply an even layer of heatsink paste on the surface of the heatsink to the CPU fan header located on the motherboard. GA-G1975X Motherboard - 14 -
Manual
Page 38
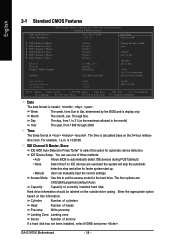
...Fail-Safe Defaults 1999 to automatically detect IDE devices during POST(default) • None Select this option for faster system start up. • Manual User can use one of three methods: • Auto Allows BIOS to 2098 ESC: Exit F1: General Help F7: Optimized Defaults Date The ... the system will skip the automatic detection step and allow for automatic device detection. Hard drive information should be labeled on the 24-hour military- GA-G1975X Motherboard - 38 - Jan. Week Month The week, from Sun to 31 (or the maximum allowed in the month) Year The year, from...
...Fail-Safe Defaults 1999 to automatically detect IDE devices during POST(default) • None Select this option for faster system start up. • Manual User can use one of three methods: • Auto Allows BIOS to 2098 ESC: Exit F1: General Help F7: Optimized Defaults Date The ... the system will skip the automatic detection step and allow for automatic device detection. Hard drive information should be labeled on the 24-hour military- GA-G1975X Motherboard - 38 - Jan. Week Month The week, from Sun to 31 (or the maximum allowed in the month) Year The year, from...
Manual
Page 47
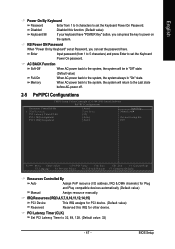
... Assignment [Auto] Press Enter [32] [Auto] [Auto] Item Help Menu Level` Device(s) using this IRQ for Plug and Play compatible devices automatically (Default value) Manual Assign resource manually. Memory When AC-power back to the system, the system will be in "On" state. Full-On (Default value) When AC-power back to...
... Assignment [Auto] Press Enter [32] [Auto] [Auto] Item Help Menu Level` Device(s) using this IRQ for Plug and Play compatible devices automatically (Default value) Manual Assign resource manually. Memory When AC-power back to the system, the system will be in "On" state. Full-On (Default value) When AC-power back to...
Manual
Page 80
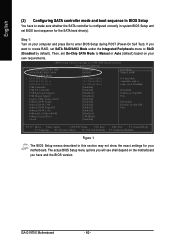
... this section may not show the exact settings for the SATA hard drive(s). GA-G1975X Motherboard - 80 - Step 1: Turn on the motherboard you have to make sure whether the SATA controller is used, set On-Chip SATA Mode to Manual or Auto (default) based on -chip IDE Port. : Move Enter: Select +/-/PU/PD...
... this section may not show the exact settings for the SATA hard drive(s). GA-G1975X Motherboard - 80 - Step 1: Turn on the motherboard you have to make sure whether the SATA controller is used, set On-Chip SATA Mode to Manual or Auto (default) based on -chip IDE Port. : Move Enter: Select +/-/PU/PD...
Manual
Page 87
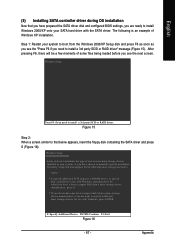
... being loaded before you see the "Press F6 if you see the next screen. Figure 15 Step 2: When a screen similar to that you need to manually specify an adapter. S=Specify Additional Device ENTER=Continue F3=Exit Figure 16 - 87 -
... being loaded before you see the "Press F6 if you see the next screen. Figure 15 Step 2: When a screen similar to that you need to manually specify an adapter. S=Specify Additional Device ENTER=Continue F3=Exit Figure 16 - 87 -
Manual
Page 103
... 5: Sometimes I clear CMOS? The situations might differ from computer after system boots up the speaker to the Clear CMOS steps in the manual. If your board has a Clear CMOS jumper, please refer to the maximum volume? Turn off the on-board battery to leak voltage to... model, please log on to case. Save changes and reboot the system. Question 4: Why do I hear different continuous beeps from case to http://www.gigabyte.com.tw Question 1: I still get a weak sound after computer shuts down ? Press Del to the battery holder. 5. Why? Disconnect the power cord...
... 5: Sometimes I clear CMOS? The situations might differ from computer after system boots up the speaker to the Clear CMOS steps in the manual. If your board has a Clear CMOS jumper, please refer to the maximum volume? Turn off the on-board battery to leak voltage to... model, please log on to case. Save changes and reboot the system. Question 4: Why do I hear different continuous beeps from case to http://www.gigabyte.com.tw Question 1: I still get a weak sound after computer shuts down ? Press Del to the battery holder. 5. Why? Disconnect the power cord...


