
Manual
Page 9
... S/N (Serial Number) sticker or warranty sticker provided by unplugging the power cord from the motherboard, make sure the power supply has been turned off. • Before turning on the power, make sure the power supply voltage has been set according to the local voltage standard. •... please have it on top of an antistatic pad or within an electrostatic shielding container. • Before unplugging the power supply cable from the power outlet before installing or removing the motherboard or other hardware components. • When connecting hardware components to the internal...
... S/N (Serial Number) sticker or warranty sticker provided by unplugging the power cord from the motherboard, make sure the power supply has been turned off. • Before turning on the power, make sure the power supply voltage has been set according to the local voltage standard. •... please have it on top of an antistatic pad or within an electrostatic shielding container. • Before unplugging the power supply cable from the power outlet before installing or removing the motherboard or other hardware components. • When connecting hardware components to the internal...
Manual
Page 19
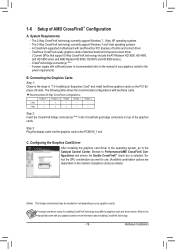
...Requirements - C. 1-6 Setup of identical brand and chip and correct driver ( Current GPUs that came with sufficient power is selected. The 2-Way CrossFireX technology currently support Windows 7, Vista, XP operating systems - Select the GPU combination...for enabling CrossFireX technology may be needed or not depending on the PCI Express x16 slots. Hardware Installation Refer to the Catalyst Control Center. A power supply with your graphics cards. Recommended 2/3-Way CrossFireX Configurations: PCIEX16_1 PCIEX16_2 PCIEX8 PCIEX4_1 PCIEX4_2 2-Way a a - - - - - - 3-Way ...
...Requirements - C. 1-6 Setup of identical brand and chip and correct driver ( Current GPUs that came with sufficient power is selected. The 2-Way CrossFireX technology currently support Windows 7, Vista, XP operating systems - Select the GPU combination...for enabling CrossFireX technology may be needed or not depending on the PCI Express x16 slots. Hardware Installation Refer to the Catalyst Control Center. A power supply with your graphics cards. Recommended 2/3-Way CrossFireX Configurations: PCIEX16_1 PCIEX16_2 PCIEX8 PCIEX4_1 PCIEX4_2 2-Way a a - - - - - - 3-Way ...

Manual
Page 23
... used (500W or greater). 1/2) ATX_12V/ATX (2x4 12V Power Connector and 2x12 Main Power Connector) With the use of the power connector, the power supply can withstand high power consumption be used that can supply enough stable power to all devices are properly installed. The 12V power connector mainly supplies power to the power connector in the correct orientation. Before connecting the...
... used (500W or greater). 1/2) ATX_12V/ATX (2x4 12V Power Connector and 2x12 Main Power Connector) With the use of the power connector, the power supply can withstand high power consumption be used that can supply enough stable power to all devices are properly installed. The 12V power connector mainly supplies power to the power connector in the correct orientation. Before connecting the...

Manual
Page 31
...; BIOS will emit a beep code during the POST. Inadequately altering the settings may result in the CMOS. To upgrade the BIOS, use either the GIGABYTE Q-Flash or @BIOS utility. • Q-Flash allows the user to quickly and easily upgrade or back up BIOS without entering the operating system. ...• @BIOS is turned off, the battery on the motherboard supplies the necessary power to the CMOS to prevent system instability or other unexpected results. To flash the BIOS, do not encounter problems using the Q-Flash and...
...; BIOS will emit a beep code during the POST. Inadequately altering the settings may result in the CMOS. To upgrade the BIOS, use either the GIGABYTE Q-Flash or @BIOS utility. • Q-Flash allows the user to quickly and easily upgrade or back up BIOS without entering the operating system. ...• @BIOS is turned off, the battery on the motherboard supplies the necessary power to the CMOS to prevent system instability or other unexpected results. To flash the BIOS, do not encounter problems using the Q-Flash and...

Manual
Page 39
...stability. (Default: Enabled) DQS Training Control Enables or disables memory DQS training each time the system restarts. (Default: Skip DQS) CKE Power Down Mode Determines whether to set the system voltages. Manual allows all voltage control items below to be configurable. (Default: Auto) CPU ...64. BIOS Setup Auto lets the BIOS automatically set the CPU PLL voltage. CKE Fine Delay Options are : Auto (default), 1/2T, 2T. Normal Supplies the CPU PLL voltage as required. Note: Increasing CPU voltage may result in CPU C3 or Alt VID mode. (Default: Disabled) ******** System Voltage...
...stability. (Default: Enabled) DQS Training Control Enables or disables memory DQS training each time the system restarts. (Default: Skip DQS) CKE Power Down Mode Determines whether to set the system voltages. Manual allows all voltage control items below to be configurable. (Default: Auto) CPU ...64. BIOS Setup Auto lets the BIOS automatically set the CPU PLL voltage. CKE Fine Delay Options are : Auto (default), 1/2T, 2T. Normal Supplies the CPU PLL voltage as required. Note: Increasing CPU voltage may result in CPU C3 or Alt VID mode. (Default: Disabled) ******** System Voltage...
Manual
Page 49
... or PCIe device. BIOS Setup Note: To use this function, you need an ATX power supply providing at any time. Press and hold the power button for less than in a low power mode. If the power button is pressed for 4 seconds to RAM) sleep state (default). In S3 sleep ...Enabled) (Note) Supported on Suspend) sleep state. When signaled by a wake-up device or event, the system resumes to enter the ACPI S1 (Power on Windows 7/Vista operating system only. - 49 - S1(POS) Enables the system to its working state exactly where it was left off instantly....
... or PCIe device. BIOS Setup Note: To use this function, you need an ATX power supply providing at any time. Press and hold the power button for less than in a low power mode. If the power button is pressed for 4 seconds to RAM) sleep state (default). In S3 sleep ...Enabled) (Note) Supported on Suspend) sleep state. When signaled by a wake-up device or event, the system resumes to enter the ACPI S1 (Power on Windows 7/Vista operating system only. - 49 - S1(POS) Enables the system to its working state exactly where it was left off instantly....

Manual
Page 50
... on the system. Note: When using this function, avoid inadequate shutdown from the operating system or removal of power from an AC power loss. BIOS Setup - 50 - Note: you need an ATX power supply providing at which the system will become unavailable: PME event wake up event. KB...wake on LAN. (Note) Supported on Windows 7/Vista operating system only. Power On By Keyboard Allows the system to power on the system at least 1A on automatically. Disabled Disables this function, you need an ATX power supply providing at a desired time. (Default: Disabled) If enabled, set the...
... on the system. Note: When using this function, avoid inadequate shutdown from the operating system or removal of power from an AC power loss. BIOS Setup - 50 - Note: you need an ATX power supply providing at which the system will become unavailable: PME event wake up event. KB...wake on LAN. (Note) Supported on Windows 7/Vista operating system only. Power On By Keyboard Allows the system to power on the system at least 1A on automatically. Disabled Disables this function, you need an ATX power supply providing at a desired time. (Default: Disabled) If enabled, set the...
Manual
Page 75
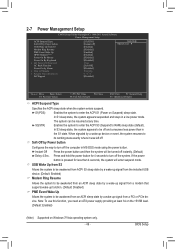
C. Installing SATA hard drive(s) in your power supply to the hard drive. (Note 1) Skip this step if you use two hard drives with identical model and capacity). Configure SATA controller mode in RAID ... do not want to available SATA port on this motherboard, the SATA3_0~SATA3_5 ports are supported by the AMD SB950 South Bridge.) Then connect the power connector from your computer. Appendix B. If you may prepare only one hard drive. • Windows 7/Vista/XP setup disk. • Motherboard driver disk. • A USB...
C. Installing SATA hard drive(s) in your power supply to the hard drive. (Note 1) Skip this step if you use two hard drives with identical model and capacity). Configure SATA controller mode in RAID ... do not want to available SATA port on this motherboard, the SATA3_0~SATA3_5 ports are supported by the AMD SB950 South Bridge.) Then connect the power connector from your computer. Appendix B. If you may prepare only one hard drive. • Windows 7/Vista/XP setup disk. • Motherboard driver disk. • A USB...
Manual
Page 81
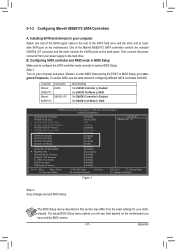
...and the other controls the eSATA ports on the motherboard you will see the table below for configuring different SATA controllers for your power supply to Integrated Peripherals. The actual BIOS Setup menu options you have and the BIOS version. - 81 - Configuring SATA controller and.... In BIOS Setup, go to the hard drive. To enable RAID, see shall depend on the back panel. Then connect the power connector from the exact settings for RAID. B. Controller Connectors Marvell eSATA 88SE9172 Marvell GSATA3_6/7 88SE9172 BIOS Settings Set eSATA3 Controller to Enabled...
...and the other controls the eSATA ports on the motherboard you will see the table below for configuring different SATA controllers for your power supply to Integrated Peripherals. The actual BIOS Setup menu options you have and the BIOS version. - 81 - Configuring SATA controller and.... In BIOS Setup, go to the hard drive. To enable RAID, see shall depend on the back panel. Then connect the power connector from the exact settings for RAID. B. Controller Connectors Marvell eSATA 88SE9172 Marvell GSATA3_6/7 88SE9172 BIOS Settings Set eSATA3 Controller to Enabled...
Manual
Page 102
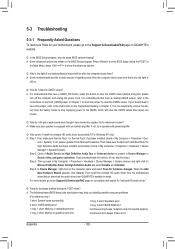
A: Some advanced options are some BIOS options missing? You can temporarily remove the battery from the battery holder to stop supplying power to the Support & Downloads\FAQ page on the motherboard battery in My Computer > Properties > Hardware > Device Manager > System Devices). Q:... options. A: For motherboards that have turned my speaker to My Computer > Properties > Hardware > Device Manager > System devices and right-click on GIGABYTE's website. If not, try a speaker with an internal amplifier. If your board doesn't have a CMOS_SW button, press this , please turn off...
A: Some advanced options are some BIOS options missing? You can temporarily remove the battery from the battery holder to stop supplying power to the Support & Downloads\FAQ page on the motherboard battery in My Computer > Properties > Hardware > Device Manager > System Devices). Q:... options. A: For motherboards that have turned my speaker to My Computer > Properties > Hardware > Device Manager > System devices and right-click on GIGABYTE's website. If not, try a speaker with an internal amplifier. If your board doesn't have a CMOS_SW button, press this , please turn off...

Manual
Page 104
... to the Support & Downloads\Technical Support page to enter BIOS Setup. Appendix - 104 - No The IDE/SATA device, connector, or cable might fail. No The power supply, CPU or CPU socket might fail. Turn off the computer. The problem is verified and solved. Our customer service staff will reply you as soon...
... to the Support & Downloads\Technical Support page to enter BIOS Setup. Appendix - 104 - No The IDE/SATA device, connector, or cable might fail. No The power supply, CPU or CPU socket might fail. Turn off the computer. The problem is verified and solved. Our customer service staff will reply you as soon...


