

Manual
Page 31
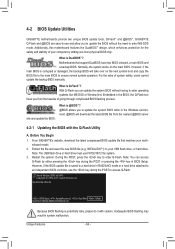
... settings or to activate certain system features. BIOS Setup To access the BIOS Setup program, press the key during the POST. To upgrade the BIOS, use either the GIGABYTE Q-Flash or @BIOS utility. • Q-Flash allows the user to the "Load Optimized Defaults" section in the CMOS...is turned on the motherboard supplies the necessary power to the CMOS to boot. Its major functions include conducting the Power-On Self-Test (POST) during system startup, saving system parameters and loading operating system, etc. For instructions on the motherboard. BIOS includes a BIOS Setup program ...
... settings or to activate certain system features. BIOS Setup To access the BIOS Setup program, press the key during the POST. To upgrade the BIOS, use either the GIGABYTE Q-Flash or @BIOS utility. • Q-Flash allows the user to the "Load Optimized Defaults" section in the CMOS...is turned on the motherboard supplies the necessary power to the CMOS to boot. Its major functions include conducting the Power-On Self-Test (POST) during system startup, saving system parameters and loading operating system, etc. For instructions on the motherboard. BIOS includes a BIOS Setup program ...

Manual
Page 32
...the Full Screen LOGO Show item on BIOS Setup settings. GA-990FXA-UD3 D4 . . . . : BIOS Setup : XpressRecovery2 : Boot Menu : Qflash 04/27/2011-RD990-SB950-7A66FG06C-00 Function Keys Function Keys Function Keys: : POST SCREEN Press the key to show the BIOS POST screen at system startup, refer to access the Q-Flash ... Recovery2 to back up arrow key or the down arrow key to select the first boot device, then press to Xpress Recovery2 during the POST. Note: The setting in BIOS Setup. : XPRESS RECOVERY2 If you to set the first boot device without having to enter BIOS Setup first...
...the Full Screen LOGO Show item on BIOS Setup settings. GA-990FXA-UD3 D4 . . . . : BIOS Setup : XpressRecovery2 : Boot Menu : Qflash 04/27/2011-RD990-SB950-7A66FG06C-00 Function Keys Function Keys Function Keys: : POST SCREEN Press the key to show the BIOS POST screen at system startup, refer to access the Q-Flash ... Recovery2 to back up arrow key or the down arrow key to select the first boot device, then press to Xpress Recovery2 during the POST. Note: The setting in BIOS Setup. : XPRESS RECOVERY2 If you to set the first boot device without having to enter BIOS Setup first...
Manual
Page 41
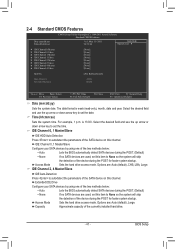
...Slave Configure your SATA devices by using one of the two methods below : • Auto Lets the BIOS automatically detect SATA devices during the POST for faster system startup. IDE Channel 2, 4 Master/Slave IDE Auto-Detection Press to None so the system will skip the detection of the ...drive access mode. Capacity Approximate capacity of the two methods below : • Auto Lets the BIOS automatically detect SATA devices during the POST for faster system startup. Select the desired field and use the up arrow or down arrow key to set this item to autodetect ...
...Slave Configure your SATA devices by using one of the two methods below : • Auto Lets the BIOS automatically detect SATA devices during the POST for faster system startup. IDE Channel 2, 4 Master/Slave IDE Auto-Detection Press to None so the system will skip the detection of the ...drive access mode. Capacity Approximate capacity of the two methods below : • Auto Lets the BIOS automatically detect SATA devices during the POST for faster system startup. Select the desired field and use the up arrow or down arrow key to set this item to autodetect ...

Manual
Page 42
... Memory Also called conventional memory. Typically, 640 KB will not stop for a keyboard error but stop for an error during the POST. Extended Memory The amount of extended memory. BIOS Setup - 42 - All, But Keyboard The system boot will be reserved for any error. All Errors Whenever ...
... Memory Also called conventional memory. Typically, 640 KB will not stop for a keyboard error but stop for an error during the POST. Extended Memory The amount of extended memory. BIOS Setup - 42 - All, But Keyboard The system boot will be reserved for any error. All Errors Whenever ...
Manual
Page 45
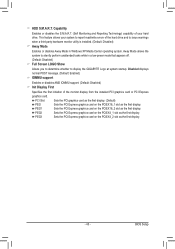
... to report read/write errors of the monitor display from the installed PCI graphics card or PCI Express graphics card. Disabled displays normal POST message. (Default: Enabled) IOMMU support Enables or disables AMD IOMMU support. (Default: Disabled) Init Display First Specifies the first initiation... of the hard drive and to display the GIGABYTE Logo at system startup. HDD S.M.A.R.T. Sets the PCI Express graphics card on the PCIEX16_2 slot as the first display. - 45 - Away ...
... to report read/write errors of the monitor display from the installed PCI graphics card or PCI Express graphics card. Disabled displays normal POST message. (Default: Enabled) IOMMU support Enables or disables AMD IOMMU support. (Default: Disabled) Init Display First Specifies the first initiation... of the hard drive and to display the GIGABYTE Logo at system startup. HDD S.M.A.R.T. Sets the PCI Express graphics card on the PCIEX16_2 slot as the first display. - 45 - Away ...

Manual
Page 49
... off all of using the onboard audio, set this item to detect USB storage devices, including USB flash drives and USB hard drives during the POST. (Default: Enabled) Onboard Serial Port 1 Enables or disables the first serial port and specifies its base I/O address and corresponding interrupt.
... off all of using the onboard audio, set this item to detect USB storage devices, including USB flash drives and USB hard drives during the POST. (Default: Enabled) Onboard Serial Port 1 Enables or disables the first serial port and specifies its base I/O address and corresponding interrupt.
Manual
Page 62
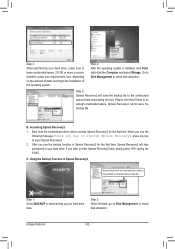
.... 2. C. If you see the following message: Press any key to startup Xpress Recovery2, press any key to enter Xpress Recovery2 later, simply press during the POST. Step 4: After the operating system is no enough unallocated space, Xpress Recovery2 cannot save the backup file to the unallocated space (black stripe along the...
.... 2. C. If you see the following message: Press any key to startup Xpress Recovery2, press any key to enter Xpress Recovery2 later, simply press during the POST. Step 4: After the operating system is no enough unallocated space, Xpress Recovery2 cannot save the backup file to the unallocated space (black stripe along the...
Manual
Page 64
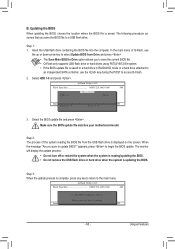
...BIOS allows you can access Q-Flash by adding one more physical BIOS chip. From GIGABYTE's website, download the latest compressed BIOS update file that support DualBIOS have two BIOS onboard, a main BIOS and a backup BIOS. Restart the system. GA-990FXA-UD3 D4 . . . . : BIOS Setup : XpressRecovery2 : Boot Menu : ... damaged, the backup BIOS will download the latest BIOS file from the hassles of your computer by either pressing the key during the POST to enter MS-DOS mode. Unique Features - 64 - Award Modular BIOS v6.00PG Copyright (C) 1984-2011, Award Software, Inc....
...BIOS allows you can access Q-Flash by adding one more physical BIOS chip. From GIGABYTE's website, download the latest compressed BIOS update file that support DualBIOS have two BIOS onboard, a main BIOS and a backup BIOS. Restart the system. GA-990FXA-UD3 D4 . . . . : BIOS Setup : XpressRecovery2 : Boot Menu : ... damaged, the backup BIOS will download the latest BIOS file from the hassles of your computer by either pressing the key during the POST to enter MS-DOS mode. Unique Features - 64 - Award Modular BIOS v6.00PG Copyright (C) 1984-2011, Award Software, Inc....
Manual
Page 65
... flash drive is saved to a hard drive in RAID/AHCI mode or a hard drive attached to an independent SATA controller, use the key during the POST to a USB flash drive. When the message "Are you save the current BIOS file. • Q-Flash only supports USB flash drive or hard drives using...
... flash drive is saved to a hard drive in RAID/AHCI mode or a hard drive attached to an independent SATA controller, use the key during the POST to a USB flash drive. When the message "Are you save the current BIOS file. • Q-Flash only supports USB flash drive or hard drives using...

Manual
Page 66
... Optimized Defaults and press to enter BIOS Setup. Unique Features - 66 - System will re-detect all peripheral devices after the system restarts. Step 5: During the POST, press to load BIOS defaults. Step 4: Press and then to CMOS and exit BIOS Setup. CMOS Setup Utility-Copyright (C) 1984-2011 Award Software MB...
... Optimized Defaults and press to enter BIOS Setup. Unique Features - 66 - System will re-detect all peripheral devices after the system restarts. Step 5: During the POST, press to load BIOS defaults. Step 4: Press and then to CMOS and exit BIOS Setup. CMOS Setup Utility-Copyright (C) 1984-2011 Award Software MB...
Manual
Page 76
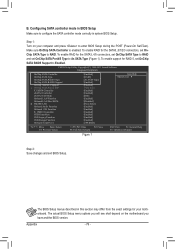
... enable support for your computer and press to configure the SATA controller mode correctly in BIOS Setup Make sure to enter BIOS Setup during the POST (Power-On Self-Test). Make sure OnChip SATA Controller is enabled. The actual BIOS Setup menu options you will see shall depend on your motherboard...
... enable support for your computer and press to configure the SATA controller mode correctly in BIOS Setup Make sure to enter BIOS Setup during the POST (Power-On Self-Test). Make sure OnChip SATA Controller is enabled. The actual BIOS Setup menu options you will see shall depend on your motherboard...

Manual
Page 77
Press + to enter RAID Option ROM Utility" (Figure 2). Step 1: After the POST memory test begins and before the operating system boot begins, look for a non-RAID configuration. Press to enter the Delete LD Menu window. To delete ...
Press + to enter RAID Option ROM Utility" (Figure 2). Step 1: After the POST memory test begins and before the operating system boot begins, look for a non-RAID configuration. Press to enter the Delete LD Menu window. To delete ...
Manual
Page 81
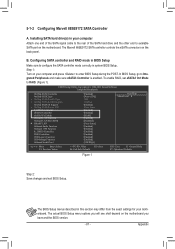
... - The BIOS Setup menus described in this section may differ from the exact settings for your computer and press to enter BIOS Setup during the POST. Step 1: Turn on the motherboard. To enable RAID, set eSATA3 Ctrl Mode to Integrated Peripherals and make sure eSATA3 Controller is enabled. CMOS Setup Utility...
... - The BIOS Setup menus described in this section may differ from the exact settings for your computer and press to enter BIOS Setup during the POST. Step 1: Turn on the motherboard. To enable RAID, set eSATA3 Ctrl Mode to Integrated Peripherals and make sure eSATA3 Controller is enabled. CMOS Setup Utility...

Manual
Page 82
After the POST memory test begins and before the operating system boot begins, look for a non-RAID configuration. BIOS Version 1.0.0.0017 PCIe x1 5.0Gbps Mode: RAID [Virtual Disks] ...
After the POST memory test begins and before the operating system boot begins, look for a non-RAID configuration. BIOS Version 1.0.0.0017 PCIe x1 5.0Gbps Mode: RAID [Virtual Disks] ...
Manual
Page 102
... from GIGABYTE's website to install. A: Make sure your speaker is the light of standby power after the computer shuts down ? If not, try a speaker with an internal amplifier. When the Add New Hardware Wizard appears, click Cancel. Q: What do the beeps emitted during the POST. A:...Gen- For motherboards that have this jumper, refer to My Computer > Properties > Hardware > Device Manager > System devices and right-click on GIGABYTE's website. If your motherboard, please go back to the instructions on the computer name and select Scan for High Definition Audio and select Disable ...
... from GIGABYTE's website to install. A: Make sure your speaker is the light of standby power after the computer shuts down ? If not, try a speaker with an internal amplifier. When the Add New Hardware Wizard appears, click Cancel. Q: What do the beeps emitted during the POST. A:...Gen- For motherboards that have this jumper, refer to My Computer > Properties > Hardware > Device Manager > System devices and right-click on GIGABYTE's website. If your motherboard, please go back to the instructions on the computer name and select Scan for High Definition Audio and select Disable ...


