Manual
Page 16
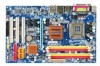
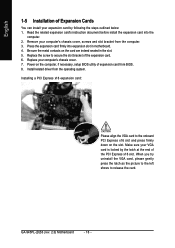
... the VGA card, please gently press the latch as the picture to the left shows to secure the slot bracket of the expansion card. 6. GA-945PL-(D)S3 (rev. 2.0) Motherboard - 16 - Read the related expansion card's instruction document before install the expansion card into expansion slot in the slot....your expansion card by the latch at the end of the PCI Express x16 slot. Replace the screw to release the card. Install related driver from BIOS. 8. Replace your computer's chassis cover, screws and slot bracket from the computer. 3. Installing a PCI Express x16 expansion card:...
... the VGA card, please gently press the latch as the picture to the left shows to secure the slot bracket of the expansion card. 6. GA-945PL-(D)S3 (rev. 2.0) Motherboard - 16 - Read the related expansion card's instruction document before install the expansion card into expansion slot in the slot....your expansion card by the latch at the end of the PCI Express x16 slot. Replace the screw to release the card. Install related driver from BIOS. 8. Replace your computer's chassis cover, screws and slot bracket from the computer. 3. Installing a PCI Express x16 expansion card:...
Manual
Page 22
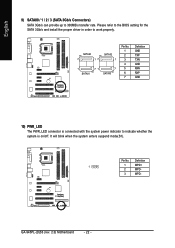
...- 3 MPD- It will blink when the system enters suspend mode(S1). Please refer to the BIOS setting for the SATA 3Gb/s and install the proper driver in order to indicate whether the system is on/off. SATAII0 7 17 SATAII2 1 1 71 7 SATAII1 SATAII3 Pin No. 1 2 3 4 5 6 7 Definition GND TXP TXN GND RXN RXP... connected with the system power indicator to work properly. Pin No. English 9) SATAII0 / 1 / 2 / 3 (SATA 3Gb/s Connectors) SATA 3Gb/s can provide up to 300MB/s transfer rate. GA-945PL-(D)S3 (rev. 2.0) Motherboard - 22 -
...- 3 MPD- It will blink when the system enters suspend mode(S1). Please refer to the BIOS setting for the SATA 3Gb/s and install the proper driver in order to indicate whether the system is on/off. SATAII0 7 17 SATAII2 1 1 71 7 SATAII1 SATAII3 Pin No. 1 2 3 4 5 6 7 Definition GND TXP TXN GND RXN RXP... connected with the system power indicator to work properly. Pin No. English 9) SATAII0 / 1 / 2 / 3 (SATA 3Gb/s Connectors) SATA 3Gb/s can provide up to 300MB/s transfer rate. GA-945PL-(D)S3 (rev. 2.0) Motherboard - 22 -
Manual
Page 52
GA-945PL-(D)S3 (rev. 2.0) Motherboard - 52 - English 3-2 Software Applications This page displays all the tools that Gigabyte developed and some free software, you can choose anyone you want and press "install" to install them. 3-3 Driver CD Information This page lists the contents of software and drivers in this CD-title.
GA-945PL-(D)S3 (rev. 2.0) Motherboard - 52 - English 3-2 Software Applications This page displays all the tools that Gigabyte developed and some free software, you can choose anyone you want and press "install" to install them. 3-3 Driver CD Information This page lists the contents of software and drivers in this CD-title.
Manual
Page 56
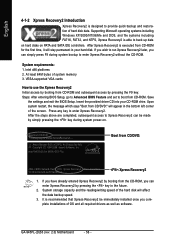
...already entered Xpress Recovery2 by booting from the CD-ROM, you complete installations of hard disk data. GA-945PL-(D)S3 (rev. 2.0) Motherboard - 56 - System storage capacity and the reading/writing speed of the hard...Xpress Recovery2 is designed to provide quick backup and restoration of OS and all required drivers as well as software. It is recommended that Xpress Recovery2 be made by simply ...DOS, and file systems including FAT16, FAT32, and NTFS, Xpress Recovery2 is executed from CD-ROM for 945PL-DS3 F1a . . . . :BIOS Setup/Q-Flash, : Xpress Recovery2, : Boot Menu 10/18/2006-...
...already entered Xpress Recovery2 by booting from the CD-ROM, you complete installations of hard disk data. GA-945PL-(D)S3 (rev. 2.0) Motherboard - 56 - System storage capacity and the reading/writing speed of the hard...Xpress Recovery2 is designed to provide quick backup and restoration of OS and all required drivers as well as software. It is recommended that Xpress Recovery2 be made by simply ...DOS, and file systems including FAT16, FAT32, and NTFS, Xpress Recovery2 is executed from CD-ROM for 945PL-DS3 F1a . . . . :BIOS Setup/Q-Flash, : Xpress Recovery2, : Boot Menu 10/18/2006-...

Manual
Page 68
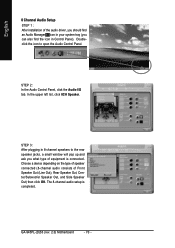
In the upper left list, click 4CH Speaker. GA-945PL-(D)S3 (rev. 2.0) Motherboard - 68 - English STEP 2: In the Audio Control Panel, click the Audio I /O tab. STEP 3: After a speaker or headphone is connected. Choose Headphone or Line ... Speaker. Doubleclick the icon to open the Audio Control Panel. The 2-channel audio setup is completed. 4 Channel Audio Setup STEP 1 : After installation of the audio driver, you should find an Audio Manager icon in your system tray (you what type of equipment is plugged into the rear Line Out jack, a small...
In the upper left list, click 4CH Speaker. GA-945PL-(D)S3 (rev. 2.0) Motherboard - 68 - English STEP 2: In the Audio Control Panel, click the Audio I /O tab. STEP 3: After a speaker or headphone is connected. Choose Headphone or Line ... Speaker. Doubleclick the icon to open the Audio Control Panel. The 2-channel audio setup is completed. 4 Channel Audio Setup STEP 1 : After installation of the audio driver, you should find an Audio Manager icon in your system tray (you what type of equipment is plugged into the rear Line Out jack, a small...
Manual
Page 70
In the upper left list, click 8CH Speaker. GA-945PL-(D)S3 (rev. 2.0) Motherboard - 70 - English 8 Channel Audio Setup STEP 1 : After installation of the audio driver, you should find the icon in Control Panel). Doubleclick the icon to the rear speaker jacks, a small window will pop up and ask you can ...
In the upper left list, click 8CH Speaker. GA-945PL-(D)S3 (rev. 2.0) Motherboard - 70 - English 8 Channel Audio Setup STEP 1 : After installation of the audio driver, you should find the icon in Control Panel). Doubleclick the icon to the rear speaker jacks, a small window will pop up and ask you can ...


