
Manual
Page 1
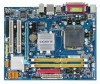
GA-945GCM-S2L/ GA-945GCM-S2C LGA775 socket motherboard for Intel® CoreTM processor family/ Intel® Pentium® processor family/Intel® Celeron® processor family User's Manual Rev. 1007 12ME-945GCMS2-1007R
GA-945GCM-S2L/ GA-945GCM-S2C LGA775 socket motherboard for Intel® CoreTM processor family/ Intel® Pentium® processor family/Intel® Celeron® processor family User's Manual Rev. 1007 12ME-945GCMS2-1007R
Manual
Page 3
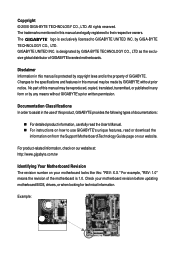
... updating motherboard BIOS, drivers, or when looking for technical information. Changes to assist in this product, GIGABYTE provides the following types of this manual is protected by GIGA-BYTE TECHNOLOGY CO., LTD. Documentation Classifications In order to the specifications and features ...in the use GIGABYTE's unique features, read the User's Manual. „ For instructions on how to use of GIGABYTE branded motherboards. Copyright © 2008 GIGA-BYTE TECHNOLOGY CO., LTD. All rights reserved. GIGABYTE UNITED INC. by copyright laws and is...
... updating motherboard BIOS, drivers, or when looking for technical information. Changes to assist in this product, GIGABYTE provides the following types of this manual is protected by GIGA-BYTE TECHNOLOGY CO., LTD. Documentation Classifications In order to the specifications and features ...in the use GIGABYTE's unique features, read the User's Manual. „ For instructions on how to use of GIGABYTE branded motherboards. Copyright © 2008 GIGA-BYTE TECHNOLOGY CO., LTD. All rights reserved. GIGABYTE UNITED INC. by copyright laws and is...
Manual
Page 6
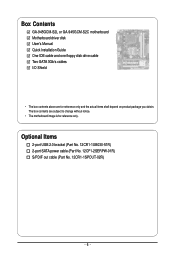
...-1UB030-51R) 2-port SATA power cable (Part No. 12CF1-2SERPW-01R) S/PDIF out cable (Part No. 12CR1-1SPOUT-02R) - 6 - Box Contents GA-945GCM-S2L or GA-945GCM-S2C motherboard Motherboard driver disk User's Manual Quick Installation Guide One IDE cable and one floppy disk drive cable Two SATA 3Gb/s cables I/O Shield • The box contents above...
...-1UB030-51R) 2-port SATA power cable (Part No. 12CF1-2SERPW-01R) S/PDIF out cable (Part No. 12CR1-1SPOUT-02R) - 6 - Box Contents GA-945GCM-S2L or GA-945GCM-S2C motherboard Motherboard driver disk User's Manual Quick Installation Guide One IDE cable and one floppy disk drive cable Two SATA 3Gb/s cables I/O Shield • The box contents above...
Manual
Page 9
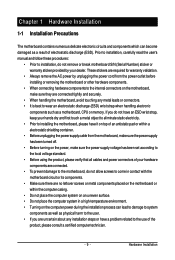
Hardware Installation Prior to installation, carefully read the user's manual and follow these procedures: • Prior to installation, do not remove or break motherboard S/N (Serial Number) sticker or warranty sticker provided by unplugging the power ...
Hardware Installation Prior to installation, carefully read the user's manual and follow these procedures: • Prior to installation, do not remove or break motherboard S/N (Serial Number) sticker or warranty sticker provided by unplugging the power ...
Manual
Page 15
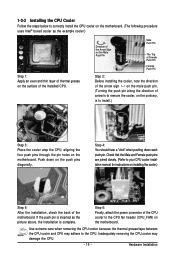
... between the CPU cooler and CPU may damage the CPU. - 15 - Hardware Installation Inadequately removing the CPU cooler may adhere to your CPU cooler installation manual for instructions on the motherboard. Push down each push pin. Step 6: Finally, attach the power connector of the CPU cooler to install.) Step 3: Place the...
... between the CPU cooler and CPU may damage the CPU. - 15 - Hardware Installation Inadequately removing the CPU cooler may adhere to your CPU cooler installation manual for instructions on the motherboard. Push down each push pin. Step 6: Finally, attach the power connector of the CPU cooler to install.) Step 3: Place the...
Manual
Page 18
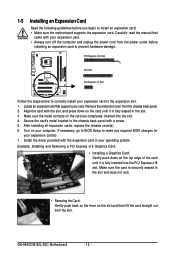
...slot, and press down on your card. Make sure the metal contacts on the card until it is fully seated in the expansion slot. 1. GA-945GCM-S2L/S2C Motherboard - 18 - If necessary, go to BIOS Setup to prevent hardware damage. Turn on the top edge of the card until it...Card: • Installing a Graphics Card: Gently push down on the card are completely inserted into the PCI Express x16 slot. Carefully read the manual that supports your computer. Locate an expansion slot that came with your operating system. Secure the card's metal bracket to install an expansion card:...
...slot, and press down on your card. Make sure the metal contacts on the card until it is fully seated in the expansion slot. 1. GA-945GCM-S2L/S2C Motherboard - 18 - If necessary, go to BIOS Setup to prevent hardware damage. Turn on the top edge of the card until it...Card: • Installing a Graphics Card: Gently push down on the card are completely inserted into the PCI Express x16 slot. Carefully read the manual that supports your computer. Locate an expansion slot that came with your operating system. Secure the card's metal bracket to install an expansion card:...
Manual
Page 29
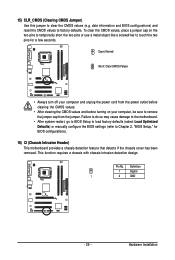
... do so may cause damage to the motherboard. • After system restart, go to BIOS Setup to load factory defaults (select Load Optimized Defaults) or manually configure the BIOS settings (refer to touch the two pins for BIOS configurations). 16) CI (Chassis Intrusion Header) This motherboard provides a chassis detection feature that...
... do so may cause damage to the motherboard. • After system restart, go to BIOS Setup to load factory defaults (select Load Optimized Defaults) or manually configure the BIOS settings (refer to touch the two pins for BIOS configurations). 16) CI (Chassis Intrusion Header) This motherboard provides a chassis detection feature that...
Manual
Page 35
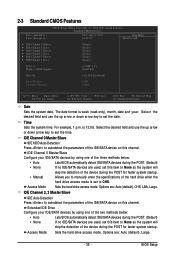
...used , set this item to None so the system will skip the detection of the device during the POST for faster system startup. • Manual Allows you to autodetect the parameters of the hard drive when the hard drive access mode is set the time. For example, 1 p.m. Extended ...devices during the POST. (Default) If no IDE/SATA devices are used , set the date. IDE Channel 2, 3 Master/Slave IDE Auto-Detection Press to manually enter the specifications of the IDE/SATA device on this channel. Options are : Auto (default), CHS, LBA, Large. Options are : Auto (default), Large. ...
...used , set this item to None so the system will skip the detection of the device during the POST for faster system startup. • Manual Allows you to autodetect the parameters of the hard drive when the hard drive access mode is set the time. For example, 1 p.m. Extended ...devices during the POST. (Default) If no IDE/SATA devices are used , set the date. IDE Channel 2, 3 Master/Slave IDE Auto-Detection Press to manually enter the specifications of the IDE/SATA device on this channel. Options are : Auto (default), CHS, LBA, Large. Options are : Auto (default), Large. ...
Manual
Page 36
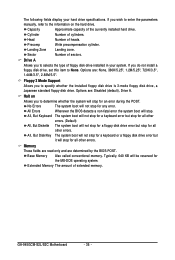
... you to determine whether the system will stop for all other errors. Base Memory Also called conventional memory. If you wish to enter the parameters manually, refer to the information on Allows you do not install a floppy disk drive, set this item to specify whether the installed floppy disk drive is... will not stop for a keyboard error but stop for all other errors. Memory These fields are read-only and are determined by the BIOS POST. GA-945GCM-S2L/S2C Motherboard - 36 -
... you to determine whether the system will stop for all other errors. Base Memory Also called conventional memory. If you wish to enter the parameters manually, refer to the information on Allows you do not install a floppy disk drive, set this item to specify whether the installed floppy disk drive is... will not stop for a keyboard error but stop for all other errors. Memory These fields are read-only and are determined by the BIOS POST. GA-945GCM-S2L/S2C Motherboard - 36 -
Manual
Page 39
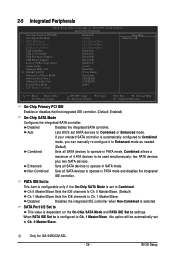
... On-Chip SATA Mode Configures the integrated SATA controller. If your onboard SATA controller is automatically configured to Combined mode, you can manually re-configure it to Enhanced mode as needed. (Default) Combined Sets all SATA devices to operate in PATA mode and disables the ...plus two SATA devices. Enhanced Sets all SATA devices to operate in SATA mode. SATA Port 0/2 Set to This value is selected. Only for GA-945GCM-S2L. - 39 - BIOS Setup Combined allows a maximum of 4 ATA devices to be automatically set to operate in PATA mode. 2-5 Integrated Peripherals...
... On-Chip SATA Mode Configures the integrated SATA controller. If your onboard SATA controller is automatically configured to Combined mode, you can manually re-configure it to Enhanced mode as needed. (Default) Combined Sets all SATA devices to operate in PATA mode and disables the ...plus two SATA devices. Enhanced Sets all SATA devices to operate in SATA mode. SATA Port 0/2 Set to This value is selected. Only for GA-945GCM-S2L. - 39 - BIOS Setup Combined allows a maximum of 4 ATA devices to be automatically set to operate in PATA mode. 2-5 Integrated Peripherals...
Manual
Page 49
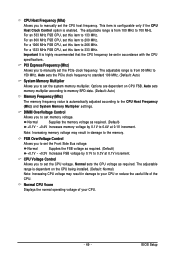
... BIOS Setup CPU Host Frequency (Mhz) Allows you to set the system memory multiplier. For an 533 MHz FSB CPU, set this item to manually set in damage to 150 MHz. Auto sets the PCIe clock frequency to standard 100 MHz. (Default: Auto) System Memory Multiplier Allows you to...Allows you to 0.3V at 0.1V increment. Normal Supplies the memory voltage as required. (Default) +0.1V ~ +0.4V Increases memory voltage by 0.1V to manually set memory voltage. PCI Express Frequency (Mhz) Allows you to 200 MHz. For an 800 MHz FSB CPU, set this item to set the PCIe...
... BIOS Setup CPU Host Frequency (Mhz) Allows you to set the system memory multiplier. For an 533 MHz FSB CPU, set this item to manually set in damage to 150 MHz. Auto sets the PCIe clock frequency to standard 100 MHz. (Default: Auto) System Memory Multiplier Allows you to...Allows you to 0.3V at 0.1V increment. Normal Supplies the memory voltage as required. (Default) +0.1V ~ +0.4V Increases memory voltage by 0.1V to manually set memory voltage. PCI Express Frequency (Mhz) Allows you to 200 MHz. For an 800 MHz FSB CPU, set this item to set the PCIe...
Manual
Page 55
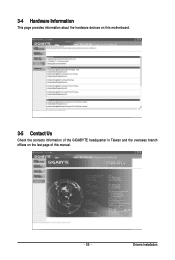
3-4 Hardware Information This page provides information about the hardware devices on this motherboard. 3-5 Contact Us Check the contacts information of the GIGABYTE headquarter in Taiwan and the overseas branch offices on the last page of this manual. - 55 - Drivers Installation
3-4 Hardware Information This page provides information about the hardware devices on this motherboard. 3-5 Contact Us Check the contacts information of the GIGABYTE headquarter in Taiwan and the overseas branch offices on the last page of this manual. - 55 - Drivers Installation
Manual
Page 66
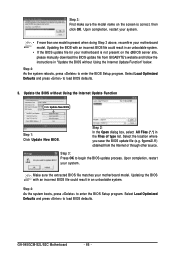
...Defaults and press to load BIOS defaults. Select the location where you save the BIOS update file (e.g. 9gcms2l.f1) obtained from GIGABYTE's website and follow the instructions in an unbootable system. Make sure the extracted BIOS file matches your system. Select Load Optimized ..., then click OK. Update the BIOS without Using the Internet Update Function" below. GA-945GCM-S2L/S2C Motherboard - 66 - Step 3: First make sure the model name on the @BIOS server site, please manually download the BIOS update file from the Internet or through other source. Upon completion, ...
...Defaults and press to load BIOS defaults. Select the location where you save the BIOS update file (e.g. 9gcms2l.f1) obtained from GIGABYTE's website and follow the instructions in an unbootable system. Make sure the extracted BIOS file matches your system. Select Load Optimized ..., then click OK. Update the BIOS without Using the Internet Update Function" below. GA-945GCM-S2L/S2C Motherboard - 66 - Step 3: First make sure the model name on the @BIOS server site, please manually download the BIOS update file from the Internet or through other source. Upon completion, ...
Manual
Page 80
...& Electronic Equipment (WEEE) Directive Statement GIGABYTE will be prosecuted. GA-945GCM-S2L/S2C Motherboard - 80 - We believe that the information contained herein was accurate in this product must not be disposed of your product's user's manual and we at the time of disposal .... Instead, the device should not be marked, collected separately, and disposed of Hazardous Substances (RoHS) Directive Statement GIGABYTE products have been carefully selected to develop products that protects human health and the environment. Regulatory Statements Regulatory Notices This...
...& Electronic Equipment (WEEE) Directive Statement GIGABYTE will be prosecuted. GA-945GCM-S2L/S2C Motherboard - 80 - We believe that the information contained herein was accurate in this product must not be disposed of your product's user's manual and we at the time of disposal .... Instead, the device should not be marked, collected separately, and disposed of Hazardous Substances (RoHS) Directive Statement GIGABYTE products have been carefully selected to develop products that protects human health and the environment. Regulatory Statements Regulatory Notices This...


