Manual
Page 15
Be sure the metal contacts on the card are indeed seated in motherboard. 4. Hardware Installation Replace the screw to secure the slot bracket of the AGP slot when you try to the onboard AGP slot and press firmly ... slot in the slot. 5. English 1-5 Installation of Expansion Cards You can install your computer's chassis cover, screws and slot bracket from the computer. 3. Install related driver from BIOS. 8. Press the expansion card firmly into the computer. 2.
Be sure the metal contacts on the card are indeed seated in motherboard. 4. Hardware Installation Replace the screw to secure the slot bracket of the AGP slot when you try to the onboard AGP slot and press firmly ... slot in the slot. 5. English 1-5 Installation of Expansion Cards You can install your computer's chassis cover, screws and slot bracket from the computer. 3. Install related driver from BIOS. 8. Press the expansion card firmly into the computer. 2.

Manual
Page 16
For more information please contact your OS does not supportUSB controller, please contact OS vendor for possible patch or driver upgrade. GA-8S661FXM-775 Motherboard - 16 - VGA Port Monitor can be connected to MIC In jack. have a standard USB interface. MIC In Microphone can be connected to VGA port. Serial ...
For more information please contact your OS does not supportUSB controller, please contact OS vendor for possible patch or driver upgrade. GA-8S661FXM-775 Motherboard - 16 - VGA Port Monitor can be connected to MIC In jack. have a standard USB interface. MIC In Microphone can be connected to VGA port. Serial ...

Manual
Page 49
.... The Xpress Install will appear. System will reboot automatically after OS installation and before installing motherboard drivers. (2) Insert the driver CD that came with your motherboard into your CD-ROM drive, the driver CD will auto start and installation screen will execute the installation for you want then click the "GO" button. Click "GO". Please...
.... The Xpress Install will appear. System will reboot automatically after OS installation and before installing motherboard drivers. (2) Insert the driver CD that came with your motherboard into your CD-ROM drive, the driver CD will auto start and installation screen will execute the installation for you want then click the "GO" button. Click "GO". Please...
Manual
Page 50
GA-8S661FXM-775 Motherboard - 50 - English 3-2 Software Applications This page displays all the tools that Gigabyte developed and some free software, you can choose anyone you want and press "install" to install them. 3-3 Driver CD Information This page lists the contents of software and drivers in this CD-title.
GA-8S661FXM-775 Motherboard - 50 - English 3-2 Software Applications This page displays all the tools that Gigabyte developed and some free software, you can choose anyone you want and press "install" to install them. 3-3 Driver CD Information This page lists the contents of software and drivers in this CD-title.
Manual
Page 51
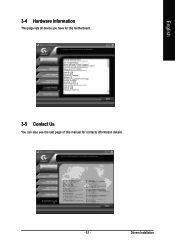
Drivers Installation English 3-4 Hardware Information This page lists all device you have for this motherboard. 3-5 Contact Us You can also see the last page of this manual for contacts information details. - 51 -
Drivers Installation English 3-4 Hardware Information This page lists all device you have for this motherboard. 3-5 Contact Us You can also see the last page of this manual for contacts information details. - 51 -
Manual
Page 53
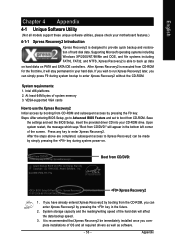
... After entering BIOS Setup, go to Advanced BIOS Feature and set to startup XpressRecovery2..... System requirements: 1. GA-8S661FXM-775 F5a . . . . :BIOS Setup/Q-Flash, : Xpress Recovery2, For Boot Menu 11/07/2006-...64M bytes of OS and all models support these unique software utilities, please check your motherboard features.) 4-1-1 Xpress Recovery2 Introduction Xpress Recovery2 is executed from CD-ROM for the first ...time, it will stay permanent in the future. 2. Insert the provided driver CD into your CD-ROM drive. Appendix VESA-supported VGA cards How to use ...
... After entering BIOS Setup, go to Advanced BIOS Feature and set to startup XpressRecovery2..... System requirements: 1. GA-8S661FXM-775 F5a . . . . :BIOS Setup/Q-Flash, : Xpress Recovery2, For Boot Menu 11/07/2006-...64M bytes of OS and all models support these unique software utilities, please check your motherboard features.) 4-1-1 Xpress Recovery2 Introduction Xpress Recovery2 is executed from CD-ROM for the first ...time, it will stay permanent in the future. 2. Insert the provided driver CD into your CD-ROM drive. Appendix VESA-supported VGA cards How to use ...
Manual
Page 54
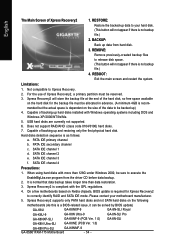
...driver CD before data backup. 2. USB hard disks are currently not supported. 6. Not compatible to execute the EnableBigLba.exe program from hard disk. 3. Hard disks detection sequence is normal that data backup takes longer time than 128G under Windows 2000, be solved by BIOS update) GA-K8U GA-K8NXP-9 GA-8N-SLI Royal GA-K8U-9 GA...-K8N Ultra-9 GA-8N-SLI Pro GA-K8NXP-SLI GA-K8NF-9 (PCB Ver. 1.0) GA-8N-SLI GA-K8N Ultra-SLI GA-K8NE (PCB Ver. 1.0) GA-K8N Pro-SLI GA-K8NMF-9 GA-8S661FXM-775 Motherboard - ...
...driver CD before data backup. 2. USB hard disks are currently not supported. 6. Not compatible to execute the EnableBigLba.exe program from hard disk. 3. Hard disks detection sequence is normal that data backup takes longer time than 128G under Windows 2000, be solved by BIOS update) GA-K8U GA-K8NXP-9 GA-8N-SLI Royal GA-K8U-9 GA...-K8N Ultra-9 GA-8N-SLI Pro GA-K8NXP-SLI GA-K8NF-9 (PCB Ver. 1.0) GA-8N-SLI GA-K8N Ultra-SLI GA-K8NE (PCB Ver. 1.0) GA-K8N Pro-SLI GA-K8NMF-9 GA-8S661FXM-775 Motherboard - ...
Manual
Page 65
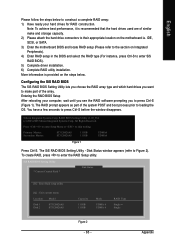
More information is recommended that the hard drives used are of the system POST and boot process prior to enter SiS RAID BIOS). 5) Complete driver installation. 6) Complete RAID utility installation. All Rights Reserved. The SiS RAID BIOS Setting Utility - Disk Status window appears (refer to skip waiting. RAID BIOS...BIOS The SiS RAID BIOS Setting Utility lets you choose the RAID array type and which hard drives you to the section on the motherboard ie. IDE, SCSI, or SATA. 3) Enter the motherboard BIOS and locate RAID setup (Please refer to press Ctrl-S (Figure 1).
More information is recommended that the hard drives used are of the system POST and boot process prior to enter SiS RAID BIOS). 5) Complete driver installation. 6) Complete RAID utility installation. All Rights Reserved. The SiS RAID BIOS Setting Utility - Disk Status window appears (refer to skip waiting. RAID BIOS...BIOS The SiS RAID BIOS Setting Utility lets you choose the RAID array type and which hard drives you to the section on the motherboard ie. IDE, SCSI, or SATA. 3) Enter the motherboard BIOS and locate RAID setup (Please refer to press Ctrl-S (Figure 1).
Manual
Page 70
... be listed on all , you complete the steps, boot from the Windows CD to install the RAID drivers. After you have to copy the driver for the SATA controller on your motherboard during the Windows setup process. GA-8S661FXM-775 Motherboard - 70 - See the instructions below about how to My Computer and right-click the CD-ROM...
... be listed on all , you complete the steps, boot from the Windows CD to install the RAID drivers. After you have to copy the driver for the SATA controller on your motherboard during the Windows setup process. GA-8S661FXM-775 Motherboard - 70 - See the instructions below about how to My Computer and right-click the CD-ROM...
Manual
Page 72
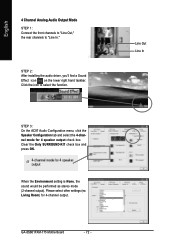
... Configuration tab and select the 4-channel mode for 4-channel output. Line Out Line In STEP 2: After installing the audio driver, you'll find a Sound Effect icon on the lower right hand taskbar. GA-8S661FXM-775 Motherboard - 72 - Clear the Only SURROUND-KIT check box and press OK. When the Environment setting is None, the sound...
... Configuration tab and select the 4-channel mode for 4-channel output. Line Out Line In STEP 2: After installing the audio driver, you'll find a Sound Effect icon on the lower right hand taskbar. GA-8S661FXM-775 Motherboard - 72 - Clear the Only SURROUND-KIT check box and press OK. When the Environment setting is None, the sound...

Manual
Page 2
...An empty formatted floppy disk. (c) Windows XP/2000 setup disk. (d) Driver CD for the connector. Before you begin Please prepare: (a) Two SATA hard drives (to ensure optimal performance, it is controlled by the SATA controller on your motherboard, you do not want to create RAID with the SATA controller, you.../SATA_SB is recommended that you may check the name of the SATA hard drive and the other end to available SATA port(s) on the motherboard. (If there are more than one SATA controller on South-Bridge.) Then connect the power connector from your power supply to the hard ...
...An empty formatted floppy disk. (c) Windows XP/2000 setup disk. (d) Driver CD for the connector. Before you begin Please prepare: (a) Two SATA hard drives (to ensure optimal performance, it is controlled by the SATA controller on your motherboard, you do not want to create RAID with the SATA controller, you.../SATA_SB is recommended that you may check the name of the SATA hard drive and the other end to available SATA port(s) on the motherboard. (If there are more than one SATA controller on South-Bridge.) Then connect the power connector from your power supply to the hard ...
Manual
Page 10
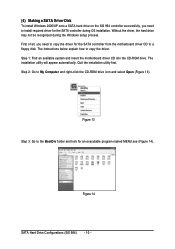
... Windows setup process. ¤å First of all, you need to copy the driver for the SATA controller from the motherboard driver CD to a floppy disk. Step 1: Find an available system and insert the motherboard driver CD into the CD-ROM drive. Step 2: Go to the BootDrv folder and look...-click the CD-ROM drive icon and select Open (Figure 13). The instructions below explain how to copy the driver. Quit the installation utility first. Ác (4) Making a SATA Driver Disk Åé To install Windows 2000/XP onto a SATA hard drive on the SiS 964 controller successfully,...
... Windows setup process. ¤å First of all, you need to copy the driver for the SATA controller from the motherboard driver CD to a floppy disk. Step 1: Find an available system and insert the motherboard driver CD into the CD-ROM drive. Step 2: Go to the BootDrv folder and look...-click the CD-ROM drive icon and select Open (Figure 13). The instructions below explain how to copy the driver. Quit the installation utility first. Ác (4) Making a SATA Driver Disk Åé To install Windows 2000/XP onto a SATA hard drive on the SiS 964 controller successfully,...
Manual
Page 11
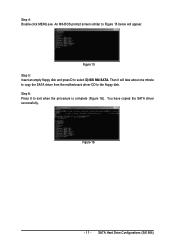
Step 6: Press 0 to Figure 15 below will take about one minute to copy the SATA driver from the motherboard driver CD to select D) SiS 964 SATA. You have copied the SATA driver successfully. SATA Hard Drive Configurations (SiS 964) An MS-DOS prompt screen similar to exit when the procedure is complete (Figure 16). Step 4: Double-click MENU.exe. Then it will appear. Figure 16 - 11 - Figure 15 Step 5: Insert an empty floppy disk and press D to the floppy disk.
Step 6: Press 0 to Figure 15 below will take about one minute to copy the SATA driver from the motherboard driver CD to select D) SiS 964 SATA. You have copied the SATA driver successfully. SATA Hard Drive Configurations (SiS 964) An MS-DOS prompt screen similar to exit when the procedure is complete (Figure 16). Step 4: Double-click MENU.exe. Then it will appear. Figure 16 - 11 - Figure 15 Step 5: Insert an empty floppy disk and press D to the floppy disk.
Manual
Page 13
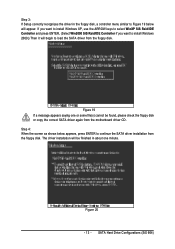
... will be finished in the floppy disk, a controller menu similar to Figure 19 below appears, press ENTER to load the SATA driver from the floppy disk. If you want to install Windows XP, use the ARROW keys to select WinXP SiS Raid/IDE Controller and press ENTER. (... it will appear. Step 4: When the screen as shown below will begin to continue the SATA driver installation from the floppy disk. Step 3: If Setup correctly recognizes the driver in about one or some file(s) cannot be found, please check the floppy disk or copy the correct SATA driver again from the motherboard driver CD.
... will be finished in the floppy disk, a controller menu similar to Figure 19 below appears, press ENTER to load the SATA driver from the floppy disk. If you want to install Windows XP, use the ARROW keys to select WinXP SiS Raid/IDE Controller and press ENTER. (... it will appear. Step 4: When the screen as shown below will begin to continue the SATA driver installation from the floppy disk. Step 3: If Setup correctly recognizes the driver in about one or some file(s) cannot be found, please check the floppy disk or copy the correct SATA driver again from the motherboard driver CD.
Manual
Page 4
Table of Contents GA-8S661FXM-775 Motherboard Layout 6 Block Diagram ...7 Chapter 1 Hardware Installation 9 1-1 Considerations Prior to Installation 9 1-2 Feature Summary 10 1-3 Installation of the CPU and Heatsink 12 1-3-1 Installation of the CPU 12 1-3-2 ...-Safe Defaults 44 2-10 Load Optimized Defaults 45 2-11 Set Supervisor/User Password 45 2-12 Save & Exit Setup 46 2-13 Exit Without Saving 46 Chapter 3 Drivers Installation 49 3-1 Install Chipset Drivers 49 3-2 SoftwareApplications 50 3-3 Driver CD Information 50 3-4 Hardware Information 51 3-5 Contact Us ...51 - 4 -
Table of Contents GA-8S661FXM-775 Motherboard Layout 6 Block Diagram ...7 Chapter 1 Hardware Installation 9 1-1 Considerations Prior to Installation 9 1-2 Feature Summary 10 1-3 Installation of the CPU and Heatsink 12 1-3-1 Installation of the CPU 12 1-3-2 ...-Safe Defaults 44 2-10 Load Optimized Defaults 45 2-11 Set Supervisor/User Password 45 2-12 Save & Exit Setup 46 2-13 Exit Without Saving 46 Chapter 3 Drivers Installation 49 3-1 Install Chipset Drivers 49 3-2 SoftwareApplications 50 3-3 Driver CD Information 50 3-4 Hardware Information 51 3-5 Contact Us ...51 - 4 -

Manual
Page 15
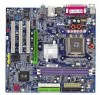
... outlined below: 1. Please align the VGA card to install/uninstall the VGA card. Be sure the metal contacts on the card are indeed seated in motherboard. 4. Power on the slot. Installing a AGP expansion card: AGP Card Please carefully pull out the small white-drawable bar at the end of the AGP... your computer's chassis cover, screws and slot bracket from the computer. 3. Replace the screw to secure the slot bracket of the expansion card. 6. Install related driver from the operating system.
... outlined below: 1. Please align the VGA card to install/uninstall the VGA card. Be sure the metal contacts on the card are indeed seated in motherboard. 4. Power on the slot. Installing a AGP expansion card: AGP Card Please carefully pull out the small white-drawable bar at the end of the AGP... your computer's chassis cover, screws and slot bracket from the computer. 3. Replace the screw to secure the slot bracket of the expansion card. 6. Install related driver from the operating system.

Manual
Page 16
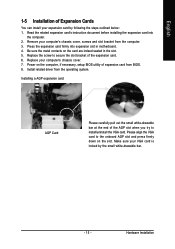
... connected to Serial port. If your OS or device(s) vendors. GA-8S661FXM-775 Motherboard - 16 - can be connected to VGA port. have a standard USB interface. For more information please contact your OS does not support USB controller, please contact OS vendor for possible patch or driver upgrade. English 1-6 I/O Back Panel Introduction PS/2 Keyboard and PS...
... connected to Serial port. If your OS or device(s) vendors. GA-8S661FXM-775 Motherboard - 16 - can be connected to VGA port. have a standard USB interface. For more information please contact your OS does not support USB controller, please contact OS vendor for possible patch or driver upgrade. English 1-6 I/O Back Panel Introduction PS/2 Keyboard and PS...
Manual
Page 49
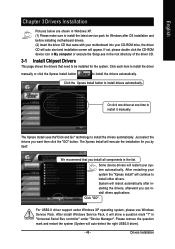
... Install button to be installed for you install all components in the root directory of the driver CD. 3-1 Install Chipset Drivers This page shows the drivers that came with your motherboard into your system the "Xpress Install" will appear. After restarting your CD-ROM drive,... the driver CD will auto start and installation screen will continue to install it will execute the installation for the system. System will reboot automatically after OS installation and before installing motherboard drivers. (2) Insert the driver CD that need to install...
... Install button to be installed for you install all components in the root directory of the driver CD. 3-1 Install Chipset Drivers This page shows the drivers that came with your motherboard into your system the "Xpress Install" will appear. After restarting your CD-ROM drive,... the driver CD will auto start and installation screen will continue to install it will execute the installation for the system. System will reboot automatically after OS installation and before installing motherboard drivers. (2) Insert the driver CD that need to install...

Manual
Page 50
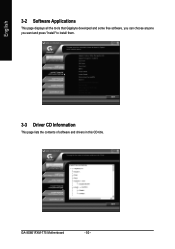
GA-8S661FXM-775 Motherboard - 50 - English 3-2 Software Applications This page displays all the tools that Gigabyte developed and some free software, you can choose anyone you want and press "install" to install them. 3-3 Driver CD Information This page lists the contents of software and drivers in this CD-title.
GA-8S661FXM-775 Motherboard - 50 - English 3-2 Software Applications This page displays all the tools that Gigabyte developed and some free software, you can choose anyone you want and press "install" to install them. 3-3 Driver CD Information This page lists the contents of software and drivers in this CD-title.
Manual
Page 71
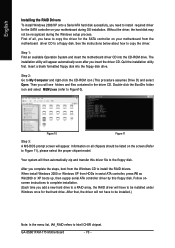
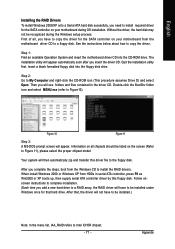
..., press F6 as Win2000 or XP boots up, then supply serial ATA controller driver by this driver file to the floppy disk. Step 1: Find an available Operation System and insert the motherboard driver CD into the floppy disk drive. When install Windows 2000 or Windows XP from... hard drive to a RAID array, the RAID driver will appear. English Installing the RAID Drivers To install Windows 2000/XP onto a Serial ATA hard disk sucessfully, you need to install required driver for the SATA controller on your motherboard from the motherboard driver CD to a floppy disk. After that hard drive...
..., press F6 as Win2000 or XP boots up, then supply serial ATA controller driver by this driver file to the floppy disk. Step 1: Find an available Operation System and insert the motherboard driver CD into the floppy disk drive. When install Windows 2000 or Windows XP from... hard drive to a RAID array, the RAID driver will appear. English Installing the RAID Drivers To install Windows 2000/XP onto a Serial ATA hard disk sucessfully, you need to install required driver for the SATA controller on your motherboard from the motherboard driver CD to a floppy disk. After that hard drive...


