Manual
Page 12
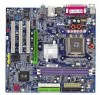
...functionality requirement content : Enabling the functionality of Hyper-Threading Technology for your hardware specifications including the CPU, graphics card, memory, hard drive, etc. It is not recommended that the motherboard supports the CPU. 2. Chipset: An SiS® Chipset that has optimizations ...Installation of the CPU Metal Lever Fig. 1 Gently lift the metal lever located on the CPU prior to the CPU during installation.) GA-8S661FXM-775 Motherboard - 12 - Fig. 3 Notice the small gold colored triangle located on the CPU socket. English 1-3 Installation of the ...
...functionality requirement content : Enabling the functionality of Hyper-Threading Technology for your hardware specifications including the CPU, graphics card, memory, hard drive, etc. It is not recommended that the motherboard supports the CPU. 2. Chipset: An SiS® Chipset that has optimizations ...Installation of the CPU Metal Lever Fig. 1 Gently lift the metal lever located on the CPU prior to the CPU during installation.) GA-8S661FXM-775 Motherboard - 12 - Fig. 3 Notice the small gold colored triangle located on the CPU socket. English 1-3 Installation of the ...
Manual
Page 20
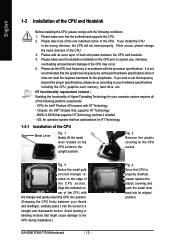
... can then connect to the computer via an IDE connector. English 5) IDE1/IDE2 (IDE Connector) An IDE device connects to two IDE devices (hard drive or optical drive). The types of the cable connects to the pin1 position. 34 33 2 1 GA-8S661FXM-775 Motherboard - 20 - Please connect the red power connector wire to the FDD...
... can then connect to the computer via an IDE connector. English 5) IDE1/IDE2 (IDE Connector) An IDE device connects to two IDE devices (hard drive or optical drive). The types of the cable connects to the pin1 position. 34 33 2 1 GA-8S661FXM-775 Motherboard - 20 - Please connect the red power connector wire to the FDD...
Manual
Page 32
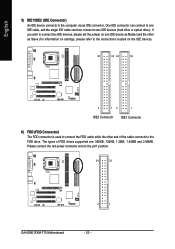
...drive. Day The date, from 1999 through 2098. is calculated based on this option for faster system start up. IDE Channel 0/Channel 1 Master(Slave) setup You can manually input the correct settings Access Mode Use this if no IDE devices are : CHS/LBA/Large/Auto (Default:Auto) Capacity Capacity of sectors GA-8S661FXM-775...22:31:24 Item Help Menu Level ` ` IDE Channel 0 Master ` IDE Channel 0 Slave ` IDE Channel 1 Master ` IDE Channel 1 Slave Drive A Drive B Floppy 3 Mode Support [None] [None] [None] [None] [1.44M, 3.5"] [None] [Disabled] Change the day, month, year Sun. Hard...
...drive. Day The date, from 1999 through 2098. is calculated based on this option for faster system start up. IDE Channel 0/Channel 1 Master(Slave) setup You can manually input the correct settings Access Mode Use this if no IDE devices are : CHS/LBA/Large/Auto (Default:Auto) Capacity Capacity of sectors GA-8S661FXM-775...22:31:24 Item Help Menu Level ` ` IDE Channel 0 Master ` IDE Channel 0 Slave ` IDE Channel 1 Master ` IDE Channel 1 Slave Drive A Drive B Floppy 3 Mode Support [None] [None] [None] [None] [1.44M, 3.5"] [None] [Disabled] Change the day, month, year Sun. Hard...

Manual
Page 33
... systems with 640K or more memory installed on The category determines whether the computer will stop for Japan Area) Disabled Drive A Drive B Normal Floppy Drive. (Default value) Drive A is determined by POST (Power On Self Test) of memory located above 1 MB in the system. it...displays the memory size that has been installed in the computer. BIOS Setup English Drive A / Drive B The category identifies the types of floppy disk drive A or drive B that used. - 33 - Both Drive A & B are 3 mode Floppy Drives. All, But Keyboard The system boot will not stop for a keyboard or ...
... systems with 640K or more memory installed on The category determines whether the computer will stop for Japan Area) Disabled Drive A Drive B Normal Floppy Drive. (Default value) Drive A is determined by POST (Power On Self Test) of memory located above 1 MB in the system. it...displays the memory size that has been installed in the computer. BIOS Setup English Drive A / Drive B The category identifies the types of floppy disk drive A or drive B that used. - 33 - Both Drive A & B are 3 mode Floppy Drives. All, But Keyboard The system boot will not stop for a keyboard or ...
Manual
Page 35
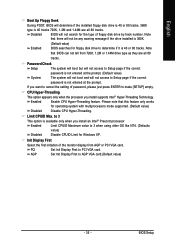
... Hyper-Threading. Limit CPUID Max. BIOS Setup Disabled BIOS will not access to PCI VGA card. Note that this feature only works for floppy disk drive to AGP VGA card.(Default value) - 35 - CPU Hyper-Threading This option appears only when the processor you want to cancel the setting of password... BIOS can not tell from AGP or PCI VGA card. English Boot Up Floppy Seek During POST, BIOS will determine if the installed floppy disk drive is 40 or 80 tracks. 360K type is 40 tracks 720K, 1.2M and 1.44M are all 80 tracks. Password Check Setup The system will boot...
... Hyper-Threading. Limit CPUID Max. BIOS Setup Disabled BIOS will not access to PCI VGA card. Note that this feature only works for floppy disk drive to AGP VGA card.(Default value) - 35 - CPU Hyper-Threading This option appears only when the processor you want to cancel the setting of password... BIOS can not tell from AGP or PCI VGA card. English Boot Up Floppy Seek During POST, BIOS will determine if the installed floppy disk drive is 40 or 80 tracks. 360K type is 40 tracks 720K, 1.2M and 1.44M are all 80 tracks. Password Check Setup The system will boot...
Manual
Page 49
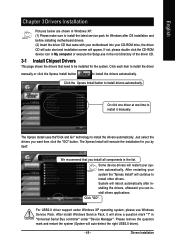
.... in the root directory of the driver CD. 3-1 Install Chipset Drivers This page shows the drivers that came with your motherboard into your CD-ROM drive, the driver CD will auto start and installation screen will continue to be installed for you want then click the "GO" button.
.... in the root directory of the driver CD. 3-1 Install Chipset Drivers This page shows the drivers that came with your motherboard into your CD-ROM drive, the driver CD will auto start and installation screen will continue to be installed for you want then click the "GO" button.
Manual
Page 53
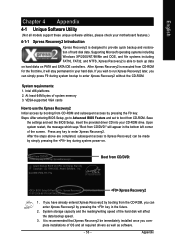
...of hard disk data. Press any key to startup XpressRecovery2..... If you can enter Xpress Recovery2 by pressing the key in your CD-ROM drive. Appendix VESA-supported VGA cards How to use the Xpress Recovery2 Initial access by simply pressing the key during system bootup to provide quick... all required drivers as well as software. - 53 - Intel x86 platforms 2. Boot from CD-ROM and subsequent access by booting from CD-ROM. GA-8S661FXM-775 F5a . . . . :BIOS Setup/Q-Flash, : Xpress Recovery2, For Boot Menu 11/07/2006-661FX-6A79HG0GC-00 Xpress Recovery2 1.
...of hard disk data. Press any key to startup XpressRecovery2..... If you can enter Xpress Recovery2 by pressing the key in your CD-ROM drive. Appendix VESA-supported VGA cards How to use the Xpress Recovery2 Initial access by simply pressing the key during system bootup to provide quick... all required drivers as well as software. - 53 - Intel x86 platforms 2. Boot from CD-ROM and subsequent access by booting from CD-ROM. GA-8S661FXM-775 F5a . . . . :BIOS Setup/Q-Flash, : Xpress Recovery2, For Boot Menu 11/07/2006-661FX-6A79HG0GC-00 Xpress Recovery2 1.
Manual
Page 64
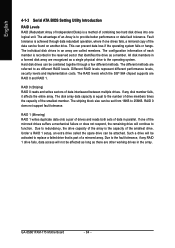
... array. RAID 0 does not support fault tolerance. RAID 1 (Mirroring) RAID 1 writes duplicate data onto a pair of drives and reads both sets of data interleaved between multiple drives. GA-8S661FXM-775 Motherboard - 64 - The different methods are other working drives in the reserved sector that is achieved through a few different methods. The striping block size can be...
... array. RAID 0 does not support fault tolerance. RAID 1 (Mirroring) RAID 1 writes duplicate data onto a pair of drives and reads both sets of data interleaved between multiple drives. GA-8S661FXM-775 Motherboard - 64 - The different methods are other working drives in the reserved sector that is achieved through a few different methods. The striping block size can be...
Manual
Page 65
... The SiS RAID BIOS Setting Utility lets you choose the RAID array type and which hard drives you to enter the RAID Setup utility. You have a few seconds to Figure 2). RAID...-S to loading the OS. More information is recommended that the hard drives used are of the array. The SiS RAID BIOS Setting Utility - Entering the RAID BIOS Setup After ...rebooting your hard drives for RAID construction. Silicon Integrated Systems Corp. Primary Master: Secondary Master: ST3120026AS ST3120026AS 111GB...
... The SiS RAID BIOS Setting Utility lets you choose the RAID array type and which hard drives you to enter the RAID Setup utility. You have a few seconds to Figure 2). RAID...-S to loading the OS. More information is recommended that the hard drives used are of the array. The SiS RAID BIOS Setting Utility - Entering the RAID BIOS Setup After ...rebooting your hard drives for RAID construction. Silicon Integrated Systems Corp. Primary Master: Secondary Master: ST3120026AS ST3120026AS 111GB...
Manual
Page 70
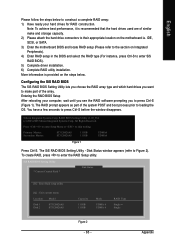
... below about how to the floppy disk. Insert a blank formatted floppy disk into the CD-ROM drive. Your system will then automatically zip and transfer this floppy disk. GA-8S661FXM-775 Motherboard - 70 - First of all chipsets should be recognized during OS installation. The installation utility ...the SATA controller on your motherboard during the Windows setup process. Follow onscreen instructions to complete installation. (Each time you add a new hard drive to a RAID array, the RAID driver will have to be installed.) Note: In the menu list, IAA_RAID refers to a floppy disk...
... below about how to the floppy disk. Insert a blank formatted floppy disk into the CD-ROM drive. Your system will then automatically zip and transfer this floppy disk. GA-8S661FXM-775 Motherboard - 70 - First of all chipsets should be recognized during OS installation. The installation utility ...the SATA controller on your motherboard during the Windows setup process. Follow onscreen instructions to complete installation. (Each time you add a new hard drive to a RAID array, the RAID driver will have to be installed.) Note: In the menu list, IAA_RAID refers to a floppy disk...
Manual
Page 1
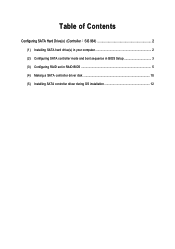
Table of Contents Configuring SATA Hard Drive(s) (Controller SiS 964 2 (1) Installing SATA hard drive(s) in your computer 2 (2) Configuring SATA controller mode and boot sequence in BIOS Setup 3 (3) Configuring RAID set in RAID BIOS 5 (4) Making a SATA controller driver disk 10 (5) Installing SATA controller driver during OS installation 12
Table of Contents Configuring SATA Hard Drive(s) (Controller SiS 964 2 (1) Installing SATA hard drive(s) in your computer 2 (2) Configuring SATA controller mode and boot sequence in BIOS Setup 3 (3) Configuring RAID set in RAID BIOS 5 (4) Making a SATA controller driver disk 10 (5) Installing SATA controller driver during OS installation 12

Manual
Page 2
...on South-Bridge.) Then connect the power connector from your power supply to identify the SATA controller for your motherboard. (1) Installing SATA hard drive(s) in RAID BIOS. (4) Make a floppy disk containing the SATA controller driver. (5) Install the SATA controller driver during OS installation. If you... SATA port(s) on the motherboard. (If there are more than one SATA controller on your motherboard, you may prepare only one hard drive. (b) An empty formatted floppy disk. (c) Windows XP/2000 setup disk. (d) Driver CD for the connector. Before you begin Please prepare: (a)...
...on South-Bridge.) Then connect the power connector from your power supply to identify the SATA controller for your motherboard. (1) Installing SATA hard drive(s) in RAID BIOS. (4) Make a floppy disk containing the SATA controller driver. (5) Install the SATA controller driver during OS installation. If you... SATA port(s) on the motherboard. (If there are more than one SATA controller on your motherboard, you may prepare only one hard drive. (b) An empty formatted floppy disk. (c) Windows XP/2000 setup disk. (d) Driver CD for the connector. Before you begin Please prepare: (a)...

Manual
Page 3
... F1: General Help F7: Optimized Defaults The BIOS Setup menus described in this section may not show the exact settings for the SATA hard drive(s). SATA Hard Drive Configurations (SiS 964) If you have to RAID (RAID by default) (Figure 1). Step 1: Turn on the motherboard you want to enter BIOS Setup during...
... F1: General Help F7: Optimized Defaults The BIOS Setup menus described in this section may not show the exact settings for the SATA hard drive(s). SATA Hard Drive Configurations (SiS 964) If you have to RAID (RAID by default) (Figure 1). Step 1: Turn on the motherboard you want to enter BIOS Setup during...
Manual
Page 4
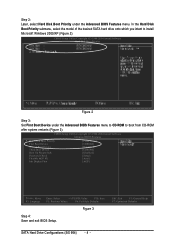
... Boot Priority `` K L KL Figure 2 Step 3: Set First Boot Device under the Advanced BIOS Features menu. ESC: Exit F1: General Help F7: Optimized Defaults SATA Hard Drive Configurations (SiS 964) - 4 - Ác Step 2: Later, select Hard Disk Boot Priority under the Advanced BIOS Features menu to CD-ROM to install ¤¤ Microsoft... Defaults Figure 3 Step 4: Save and exit BIOS Setup. In the Hard Disk Åé Boot Priority submenu, select the model of the desired SATA hard drive onto which you intent to boot from CD-ROM after system restarts (Figure 3).
... Boot Priority `` K L KL Figure 2 Step 3: Set First Boot Device under the Advanced BIOS Features menu. ESC: Exit F1: General Help F7: Optimized Defaults SATA Hard Drive Configurations (SiS 964) - 4 - Ác Step 2: Later, select Hard Disk Boot Priority under the Advanced BIOS Features menu to CD-ROM to install ¤¤ Microsoft... Defaults Figure 3 Step 4: Save and exit BIOS Setup. In the Hard Disk Åé Boot Priority submenu, select the model of the desired SATA hard drive onto which you intent to boot from CD-ROM after system restarts (Figure 3).
Manual
Page 5
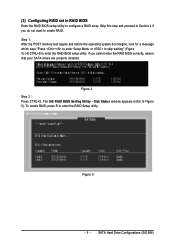
... BIOS setup utility to enter the RAID Setup utility. The SiS RAID BIOS Setting Utility - To create RAID, press R to configure a RAID array. SATA Hard Drive Configurations (SiS 964) If you do not want to create RAID. Skip this step and proceed to enter the RAID BIOS setup utility. Hit CTRL...
... BIOS setup utility to enter the RAID Setup utility. The SiS RAID BIOS Setting Utility - To create RAID, press R to configure a RAID array. SATA Hard Drive Configurations (SiS 964) If you do not want to create RAID. Skip this step and proceed to enter the RAID BIOS setup utility. Hit CTRL...
Manual
Page 6
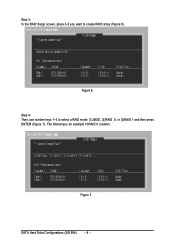
Ác Step 3: In the RAID Setup screen, press A if you want to create RAID array (Figure 6). Åé ¤¤ ¤å Figure 6 Step 4: Then, use number keys 1~3 to select a RAID mode: (1)JBOD, (2)RAID 0, or (3)RAID 1 and then press ENTER (Figure 7). Figure 7 SATA Hard Drive Configurations (SiS 964) - 6 - The following is an example of RAID 0 creation.
Ác Step 3: In the RAID Setup screen, press A if you want to create RAID array (Figure 6). Åé ¤¤ ¤å Figure 6 Step 4: Then, use number keys 1~3 to select a RAID mode: (1)JBOD, (2)RAID 0, or (3)RAID 1 and then press ENTER (Figure 7). Figure 7 SATA Hard Drive Configurations (SiS 964) - 6 - The following is an example of RAID 0 creation.

Manual
Page 7
Figure 9 - 7 - SATA Hard Drive Configurations (SiS 964) Press 1 to select Auto Create or 2 to select Manual Create. (We recommend selecting Auto Create to most users.) Figure 8 Step 6: When the next message appears, press Y if you want the RAID array to be created automatically or manually (Figure 8). Then press ENTER (Figure 9). Otherwise press N to the RAID disks. Step 5: If RAID 0 is selected, you'll have to decide whether you wish to proceed to map and stripe all current data and future data to perform striping on future data only.
Figure 9 - 7 - SATA Hard Drive Configurations (SiS 964) Press 1 to select Auto Create or 2 to select Manual Create. (We recommend selecting Auto Create to most users.) Figure 8 Step 6: When the next message appears, press Y if you want the RAID array to be created automatically or manually (Figure 8). Then press ENTER (Figure 9). Otherwise press N to the RAID disks. Step 5: If RAID 0 is selected, you'll have to decide whether you wish to proceed to map and stripe all current data and future data to perform striping on future data only.
Manual
Page 8
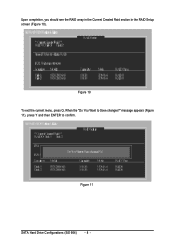
When the "Do You Want to confirm. Figure 11 SATA Hard Drive Configurations (SiS 964) - 8 - message appears (Figure 11), press Y and then ENTER to Save changes?" Ác Upon completion, you should see the RAID array in the Current Created Raid section in the RAID Setup screen (Figure 10). Åé ¤¤ ¤å Figure 10 To exit the current menu, press Q.
When the "Do You Want to confirm. Figure 11 SATA Hard Drive Configurations (SiS 964) - 8 - message appears (Figure 11), press Y and then ENTER to Save changes?" Ác Upon completion, you should see the RAID array in the Current Created Raid section in the RAID Setup screen (Figure 10). Åé ¤¤ ¤å Figure 10 To exit the current menu, press Q.
Manual
Page 9
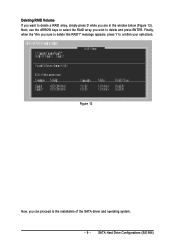
Figure 12 Now, you can proceed to confirm your selections. message appears, press Y to the installation of the SATA driver and operating system. - 9 - SATA Hard Drive Configurations (SiS 964) Deleting RAID Volume If you want to delete and press ENTER. Next, use the ARROW keys to select the RAID array you wish to delete a RAID array, simply press D while you sure to delete this RAID?" Finally, when the "Are you are in the window below (Figure 12).
Figure 12 Now, you can proceed to confirm your selections. message appears, press Y to the installation of the SATA driver and operating system. - 9 - SATA Hard Drive Configurations (SiS 964) Deleting RAID Volume If you want to delete and press ENTER. Next, use the ARROW keys to select the RAID array you wish to delete a RAID array, simply press D while you sure to delete this RAID?" Finally, when the "Are you are in the window below (Figure 12).
Manual
Page 10
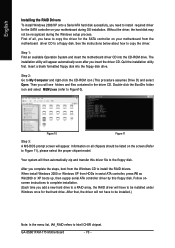
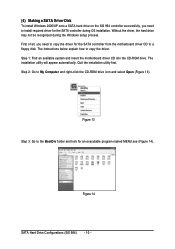
... and select Open (Figure 13). Step 1: Find an available system and insert the motherboard driver CD into the CD-ROM drive. Without the driver, the hard drive ¤¤ may not be recognized during the Windows setup process. ¤å First of all, you need to copy the ...driver for an executable program named MENU.exe (Figure 14). Figure 14 SATA Hard Drive Configurations (SiS 964) - 10 - Step 2: Go to copy the driver. Ác (4) Making a SATA Driver Disk Åé To install Windows 2000/XP onto...
... and select Open (Figure 13). Step 1: Find an available system and insert the motherboard driver CD into the CD-ROM drive. Without the driver, the hard drive ¤¤ may not be recognized during the Windows setup process. ¤å First of all, you need to copy the ...driver for an executable program named MENU.exe (Figure 14). Figure 14 SATA Hard Drive Configurations (SiS 964) - 10 - Step 2: Go to copy the driver. Ác (4) Making a SATA Driver Disk Åé To install Windows 2000/XP onto...


