Manual
Page 1
Table of Contents Configuring SATA Hard Drive(s) (Controller SiS 964 2 (1) Installing SATA hard drive(s) in your computer 2 (2) Configuring SATA controller mode and boot sequence in BIOS Setup 3 (3) Configuring RAID set in RAID BIOS 5 (4) Making a SATA controller driver disk 10 (5) Installing SATA controller driver during OS installation 12
Table of Contents Configuring SATA Hard Drive(s) (Controller SiS 964 2 (1) Installing SATA hard drive(s) in your computer 2 (2) Configuring SATA controller mode and boot sequence in BIOS Setup 3 (3) Configuring RAID set in RAID BIOS 5 (4) Making a SATA controller driver disk 10 (5) Installing SATA controller driver during OS installation 12

Manual
Page 2
.... (d) Driver CD for your motherboard. (1) Installing SATA hard drive(s) in RAID BIOS. (4) Make a floppy disk containing the SATA controller driver. (5) Install the SATA controller driver during OS installation. Before you begin Please prepare: (a) Two SATA hard drives (to ensure optimal performance, it is controlled... RAID set in your computer Attach one end of the SATA signal cable to the rear of the SATA connector to available SATA port(s) on the motherboard. (If there are more than one SATA controller on the SATA controller SATA Hard Drive Configurations (SiS 964) - 2 - For ...
.... (d) Driver CD for your motherboard. (1) Installing SATA hard drive(s) in RAID BIOS. (4) Make a floppy disk containing the SATA controller driver. (5) Install the SATA controller driver during OS installation. Before you begin Please prepare: (a) Two SATA hard drives (to ensure optimal performance, it is controlled... RAID set in your computer Attach one end of the SATA signal cable to the rear of the SATA connector to available SATA port(s) on the motherboard. (If there are more than one SATA controller on the SATA controller SATA Hard Drive Configurations (SiS 964) - 2 - For ...

Manual
Page 3
... is enabled. The actual BIOS Setup menu options you have to RAID (RAID by default) (Figure 1). SATA Hard Drive Configurations (SiS 964) (2) Configuring SATA controller mode and boot sequence in BIOS Setup You have and the BIOS version. - 3 - Step 1: Turn on the motherboard you will see shall depend ... 1 ESC: Exit F1: General Help F7: Optimized Defaults The BIOS Setup menus described in this section may not show the exact settings for the SATA hard drive(s). Change the SiS Serial ATA Mode item to IDE if you want to enter BIOS Setup during POST (Power-On Self Test).
... is enabled. The actual BIOS Setup menu options you have to RAID (RAID by default) (Figure 1). SATA Hard Drive Configurations (SiS 964) (2) Configuring SATA controller mode and boot sequence in BIOS Setup You have and the BIOS version. - 3 - Step 1: Turn on the motherboard you will see shall depend ... 1 ESC: Exit F1: General Help F7: Optimized Defaults The BIOS Setup menus described in this section may not show the exact settings for the SATA hard drive(s). Change the SiS Serial ATA Mode item to IDE if you want to enter BIOS Setup during POST (Power-On Self Test).
Manual
Page 4
...Priority `` K L KL Figure 2 Step 3: Set First Boot Device under the Advanced BIOS Features menu. ESC: Exit F1: General Help F7: Optimized Defaults SATA Hard Drive Configurations (SiS 964) - 4 - Ác Step 2: Later, select Hard Disk Boot Priority under the Advanced BIOS Features menu to CD-ROM to...;¤ Microsoft Windows 2000/XP (Figure 2). In the Hard Disk Åé Boot Priority submenu, select the model of the desired SATA hard drive onto which you intent to boot from CD-ROM after system restarts (Figure 3). CMOS Setup Utility-Copyright (C) 1984-2004 Award ...
...Priority `` K L KL Figure 2 Step 3: Set First Boot Device under the Advanced BIOS Features menu. ESC: Exit F1: General Help F7: Optimized Defaults SATA Hard Drive Configurations (SiS 964) - 4 - Ác Step 2: Later, select Hard Disk Boot Priority under the Advanced BIOS Features menu to CD-ROM to...;¤ Microsoft Windows 2000/XP (Figure 2). In the Hard Disk Åé Boot Priority submenu, select the model of the desired SATA hard drive onto which you intent to boot from CD-ROM after system restarts (Figure 3). CMOS Setup Utility-Copyright (C) 1984-2004 Award ...
Manual
Page 5
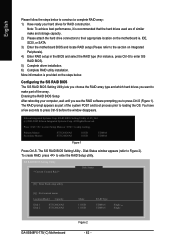
...- (3) Configuring RAID set in RAID BIOS Enter the RAID BIOS setup utility to skip waiting" (Figure 4). To create RAID, press R to Figure 5). Figure 5 - 5 - SATA Hard Drive Configurations (SiS 964) Disk Status window appears (refer to enter the RAID Setup utility. Hit CTRL+S to Section 4 if you cannot enter the... RAID BIOS correctly, assure that your SATA drives are properly installed. Figure 4 Step 2 Press CTRL+S. Skip this step and proceed to enter the RAID BIOS setup utility.
...- (3) Configuring RAID set in RAID BIOS Enter the RAID BIOS setup utility to skip waiting" (Figure 4). To create RAID, press R to Figure 5). Figure 5 - 5 - SATA Hard Drive Configurations (SiS 964) Disk Status window appears (refer to enter the RAID Setup utility. Hit CTRL+S to Section 4 if you cannot enter the... RAID BIOS correctly, assure that your SATA drives are properly installed. Figure 4 Step 2 Press CTRL+S. Skip this step and proceed to enter the RAID BIOS setup utility.
Manual
Page 6
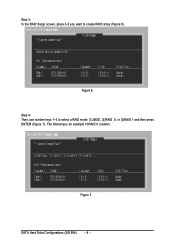
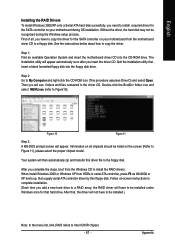
Ác Step 3: In the RAID Setup screen, press A if you want to create RAID array (Figure 6). Åé ¤¤ ¤å Figure 6 Step 4: Then, use number keys 1~3 to select a RAID mode: (1)JBOD, (2)RAID 0, or (3)RAID 1 and then press ENTER (Figure 7). The following is an example of RAID 0 creation. Figure 7 SATA Hard Drive Configurations (SiS 964) - 6 -
Ác Step 3: In the RAID Setup screen, press A if you want to create RAID array (Figure 6). Åé ¤¤ ¤å Figure 6 Step 4: Then, use number keys 1~3 to select a RAID mode: (1)JBOD, (2)RAID 0, or (3)RAID 1 and then press ENTER (Figure 7). The following is an example of RAID 0 creation. Figure 7 SATA Hard Drive Configurations (SiS 964) - 6 -

Manual
Page 7
Press 1 to select Auto Create or 2 to select Manual Create. (We recommend selecting Auto Create to most users.) Figure 8 Step 6: When the next message appears, press Y if you want the RAID array to be created automatically or manually (Figure 8). SATA Hard Drive Configurations (SiS 964) Figure 9 - 7 - Step 5: If RAID 0 is selected, you'll have to decide whether you wish to proceed to map and stripe all current data and future data to the RAID disks. Then press ENTER (Figure 9). Otherwise press N to perform striping on future data only.
Press 1 to select Auto Create or 2 to select Manual Create. (We recommend selecting Auto Create to most users.) Figure 8 Step 6: When the next message appears, press Y if you want the RAID array to be created automatically or manually (Figure 8). SATA Hard Drive Configurations (SiS 964) Figure 9 - 7 - Step 5: If RAID 0 is selected, you'll have to decide whether you wish to proceed to map and stripe all current data and future data to the RAID disks. Then press ENTER (Figure 9). Otherwise press N to perform striping on future data only.
Manual
Page 8
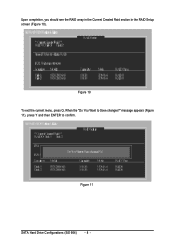
Figure 11 SATA Hard Drive Configurations (SiS 964) - 8 - When the "Do You Want to confirm. message appears (Figure 11), press Y and then ENTER to Save changes?" Ác Upon completion, you should see the RAID array in the Current Created Raid section in the RAID Setup screen (Figure 10). Åé ¤¤ ¤å Figure 10 To exit the current menu, press Q.
Figure 11 SATA Hard Drive Configurations (SiS 964) - 8 - When the "Do You Want to confirm. message appears (Figure 11), press Y and then ENTER to Save changes?" Ác Upon completion, you should see the RAID array in the Current Created Raid section in the RAID Setup screen (Figure 10). Åé ¤¤ ¤å Figure 10 To exit the current menu, press Q.
Manual
Page 9
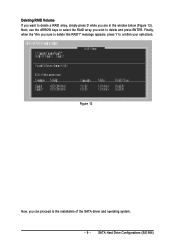
Figure 12 Now, you are in the window below (Figure 12). message appears, press Y to delete and press ENTER. SATA Hard Drive Configurations (SiS 964) Deleting RAID Volume If you want to delete a RAID array, simply press D while you can proceed to the installation of the SATA driver and operating system. - 9 - Next, use the ARROW keys to select the RAID array you sure to delete this RAID?" Finally, when the "Are you wish to confirm your selections.
Figure 12 Now, you are in the window below (Figure 12). message appears, press Y to delete and press ENTER. SATA Hard Drive Configurations (SiS 964) Deleting RAID Volume If you want to delete a RAID array, simply press D while you can proceed to the installation of the SATA driver and operating system. - 9 - Next, use the ARROW keys to select the RAID array you sure to delete this RAID?" Finally, when the "Are you wish to confirm your selections.
Manual
Page 10
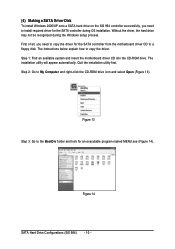
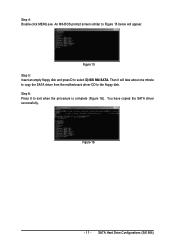
..., the hard drive ¤¤ may not be recognized during OS installation. The installation utility will appear automatically. Ác (4) Making a SATA Driver Disk Åé To install Windows 2000/XP onto a SATA hard drive on the SiS 964 controller successfully, you need to install required driver for the...to copy the driver for an executable program named MENU.exe (Figure 14). Step 2: Go to the BootDrv folder and look for the SATA controller from the motherboard driver CD to a floppy disk. Quit the installation utility first. Figure 13 Step 3: Go to My Computer and...
..., the hard drive ¤¤ may not be recognized during OS installation. The installation utility will appear automatically. Ác (4) Making a SATA Driver Disk Åé To install Windows 2000/XP onto a SATA hard drive on the SiS 964 controller successfully, you need to install required driver for the...to copy the driver for an executable program named MENU.exe (Figure 14). Step 2: Go to the BootDrv folder and look for the SATA controller from the motherboard driver CD to a floppy disk. Quit the installation utility first. Figure 13 Step 3: Go to My Computer and...
Manual
Page 11
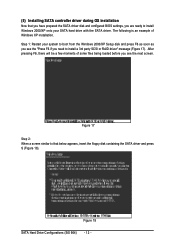
Step 4: Double-click MENU.exe. An MS-DOS prompt screen similar to select D) SiS 964 SATA. You have copied the SATA driver successfully. Figure 15 Step 5: Insert an empty floppy disk and press D to Figure 15 below will take about one minute to copy the SATA driver from the motherboard driver CD to exit when the procedure is complete (Figure 16). Step 6: Press 0 to the floppy disk. Figure 16 - 11 - SATA Hard Drive Configurations (SiS 964) Then it will appear.
Step 4: Double-click MENU.exe. An MS-DOS prompt screen similar to select D) SiS 964 SATA. You have copied the SATA driver successfully. Figure 15 Step 5: Insert an empty floppy disk and press D to Figure 15 below will take about one minute to copy the SATA driver from the motherboard driver CD to exit when the procedure is complete (Figure 16). Step 6: Press 0 to the floppy disk. Figure 16 - 11 - SATA Hard Drive Configurations (SiS 964) Then it will appear.
Manual
Page 12
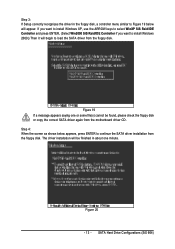
...be a few moments of ¤¤ Windows XP installation. ¤å Step 1: Restart your SATA hard drive with the SATA driver. Figure 17 Step 2: When a screen similar to that you have prepared the SATA driver disk and configured BIOS settings, you see the "Press F6 if you need to boot from... driver during OS installation Åé Now that below appears, insert the floppy disk containing the SATA driver and press S (Figure 18). Figure 18 SATA Hard Drive Configurations (SiS 964) - 12 - The following is an example of some files being loaded before you are ready to install ...
...be a few moments of ¤¤ Windows XP installation. ¤å Step 1: Restart your SATA hard drive with the SATA driver. Figure 17 Step 2: When a screen similar to that you have prepared the SATA driver disk and configured BIOS settings, you see the "Press F6 if you need to boot from... driver during OS installation Åé Now that below appears, insert the floppy disk containing the SATA driver and press S (Figure 18). Figure 18 SATA Hard Drive Configurations (SiS 964) - 12 - The following is an example of some files being loaded before you are ready to install ...
Manual
Page 13
... in the floppy disk, a controller menu similar to Figure 19 below appears, press ENTER to load the SATA driver from the floppy disk. Step 4: When the screen as shown below will appear. SATA Hard Drive Configurations (SiS 964) Figure 19 If a message appears saying one minute. The driver installation will... begin to continue the SATA driver installation from the motherboard driver CD. Figure 20 - 13 - If you want to install Windows XP, use the ARROW keys to select ...
... in the floppy disk, a controller menu similar to Figure 19 below appears, press ENTER to load the SATA driver from the floppy disk. Step 4: When the screen as shown below will appear. SATA Hard Drive Configurations (SiS 964) Figure 19 If a message appears saying one minute. The driver installation will... begin to continue the SATA driver installation from the motherboard driver CD. Figure 20 - 13 - If you want to install Windows XP, use the ARROW keys to select ...
Manual
Page 14
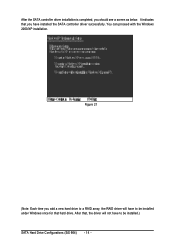
After that, the driver will have installed the SATA controller driver successfully. It indicates that hard drive. You can proceed with the Windows Åé 2000/XP installation. ¤¤ ¤å Figure 21 (Note: Each time you add a new hard drive to a RAID array, the RAID driver will not have to be installed.) SATA Hard Drive Configurations (SiS 964) - 14 - Ác After the SATA controller driver installation is completed, you have to be installed under Windows once for that you should see a screen as below.
After that, the driver will have installed the SATA controller driver successfully. It indicates that hard drive. You can proceed with the Windows Åé 2000/XP installation. ¤¤ ¤å Figure 21 (Note: Each time you add a new hard drive to a RAID array, the RAID driver will not have to be installed.) SATA Hard Drive Configurations (SiS 964) - 14 - Ác After the SATA controller driver installation is completed, you have to be installed under Windows once for that you should see a screen as below.
Manual
Page 10
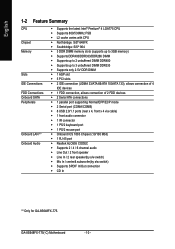
English 1-2 Feature Summary CPU Chipset Memory Slots IDE Connections FDD Connections Onboard SATA Peripherals Onboard LAN (*) Onboard Audio Š Supports the latest Intel® Pentium® 4 LGA775 CPU Š Supports 800/533MHz FSB Š L2 cache varies with ... Š Line In / 2 rear speaker(by s/w switch) Š Mic In / center& subwoofer(by s/w switch) Š Supports SPDIF In/Out connection Š CD In (*) Only for GA-8S648FX-775. GA-8S648FX-775(-C) Motherboard - 10 -
English 1-2 Feature Summary CPU Chipset Memory Slots IDE Connections FDD Connections Onboard SATA Peripherals Onboard LAN (*) Onboard Audio Š Supports the latest Intel® Pentium® 4 LGA775 CPU Š Supports 800/533MHz FSB Š L2 cache varies with ... Š Line In / 2 rear speaker(by s/w switch) Š Mic In / center& subwoofer(by s/w switch) Š Supports SPDIF In/Out connection Š CD In (*) Only for GA-8S648FX-775. GA-8S648FX-775(-C) Motherboard - 10 -
Manual
Page 11
... detection Š CPU temperature detection Š CPU / System fan speed detection Š CPU warning temperature Š CPU / Systemfan failure warning Onboard SATA RAID Š Onboard SiS964 chipset - supports a maximum of 2 SATA connections BIOS Š Use of up to 150 MB/s - Over voltage function is supported. supports data transfer rate of licensed AWARD...
... detection Š CPU temperature detection Š CPU / System fan speed detection Š CPU warning temperature Š CPU / Systemfan failure warning Onboard SATA RAID Š Onboard SiS964 chipset - supports a maximum of 2 SATA connections BIOS Š Use of up to 150 MB/s - Over voltage function is supported. supports data transfer rate of licensed AWARD...
Manual
Page 50
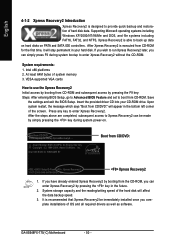
If you wish to run Xpress Recovery2 later, you can simply press F9 during system power-on PATA and SATA IDE controllers. Upon system restart, the message which says "Boot from CD/DVD: Press any key to enter Xpress Recovery2. After the steps above are..., Award Software, Inc. If you complete installations of hard disk data. At least 64M bytes of the hard disk will stay permanent in the future. 2. GA-8S648FX-775(-C) Motherboard - 50 - Supporting Microsoft operating systems including Windows XP/2000/NT/98/Me and DOS, and file systems including FAT16, FAT32, and NTFS, Xpress ...
If you wish to run Xpress Recovery2 later, you can simply press F9 during system power-on PATA and SATA IDE controllers. Upon system restart, the message which says "Boot from CD/DVD: Press any key to enter Xpress Recovery2. After the steps above are..., Award Software, Inc. If you complete installations of hard disk data. At least 64M bytes of the hard disk will stay permanent in the future. 2. GA-8S648FX-775(-C) Motherboard - 50 - Supporting Microsoft operating systems including Windows XP/2000/NT/98/Me and DOS, and file systems including FAT16, FAT32, and NTFS, Xpress ...
Manual
Page 51
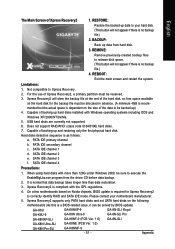
...-related issue, it can be solved by BIOS update) GA-K8U GA-K8U-9 GA-K8NXP-SLI GA-K8N Ultra-SLI GA-K8N Pro-SLI GA-K8NXP-9 GA-K8N Ultra-9 GA-K8NF-9 (PCB Ver. 1.0) GA-K8NE (PCB Ver. 1.0) GA-K8NMF-9 - 51 - SATA IDE channel 2 e. Xpress Recovery2 supports only PATA hard disks and not SATA hard disks on the following motherboards (As this is...
...-related issue, it can be solved by BIOS update) GA-K8U GA-K8U-9 GA-K8NXP-SLI GA-K8N Ultra-SLI GA-K8N Pro-SLI GA-K8NXP-9 GA-K8N Ultra-9 GA-K8NF-9 (PCB Ver. 1.0) GA-K8NE (PCB Ver. 1.0) GA-K8NMF-9 - 51 - SATA IDE channel 2 e. Xpress Recovery2 supports only PATA hard disks and not SATA hard disks on the following motherboards (As this is...
Manual
Page 62
... Integrated Systems Corp. Primary Master: Secondary Master: ST3120026AS ST3120026AS 111GB 111GB UDMA6 UDMA6 Figure 1 Press Ctrl-S. IDE, SCSI, or SATA. 3) Enter the motherboard BIOS and locate RAID setup (Please refer to the section on the steps below to make and storage...Utility * Current Created Raid * Disk Status [R] : Enter Raid setup utility [Q] : Exit current menu LocationModel Capacity Disk 1 Disk 2 ST3120026AS ST3120026AS GA-8S648FX-775(-C) Motherboard Mode 111GB 111GB RAID Type UDMA 6 UDMA 6 Single Single ¹Ï5 Figure 2 - 62 - Configuring the SiS RAID BIOS The...
... Integrated Systems Corp. Primary Master: Secondary Master: ST3120026AS ST3120026AS 111GB 111GB UDMA6 UDMA6 Figure 1 Press Ctrl-S. IDE, SCSI, or SATA. 3) Enter the motherboard BIOS and locate RAID setup (Please refer to the section on the steps below to make and storage...Utility * Current Created Raid * Disk Status [R] : Enter Raid setup utility [Q] : Exit current menu LocationModel Capacity Disk 1 Disk 2 ST3120026AS ST3120026AS GA-8S648FX-775(-C) Motherboard Mode 111GB 111GB RAID Type UDMA 6 UDMA 6 Single Single ¹Ï5 Figure 2 - 62 - Configuring the SiS RAID BIOS The...
Manual
Page 67
... driver file to be recognized during OS installation. Double-click the BootDrv folder icon and select MENU.exe (refer to install required driver for the SATA controller on all , you have to the floppy disk. Information on your motherboard from HDDs in the driver CD. Step 1: Find an available... CD to Figure 11), please select the proper chipset model. Without the driver, the hard disk may not be installed under Windows once for the SATA controller on -screen instructions to complete installation. (Each time you add a new hard drive to a RAID array, the RAID driver will have to...
... driver file to be recognized during OS installation. Double-click the BootDrv folder icon and select MENU.exe (refer to install required driver for the SATA controller on all , you have to the floppy disk. Information on your motherboard from HDDs in the driver CD. Step 1: Find an available... CD to Figure 11), please select the proper chipset model. Without the driver, the hard disk may not be installed under Windows once for the SATA controller on -screen instructions to complete installation. (Each time you add a new hard drive to a RAID array, the RAID driver will have to...


