Manual
Page 16
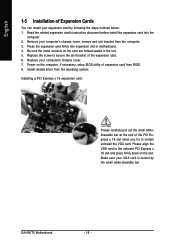
...chassis cover. 7. GA-8N775 Motherboard - 16 - Replace the screw to install/ uninstall the VGA card. Be sure the metal contacts on the slot. Please align the VGA card to the onboard PCI Express x 16 slot and press firmly down on the card are indeed seated in motherboard. 4. Replace your... computer's chassis cover, screws and slot bracket from the computer. 3. Install related driver from BIOS. 8. Make sure your expansion card by the small white-drawable bar. Press...
...chassis cover. 7. GA-8N775 Motherboard - 16 - Replace the screw to install/ uninstall the VGA card. Be sure the metal contacts on the slot. Please align the VGA card to the onboard PCI Express x 16 slot and press firmly down on the card are indeed seated in motherboard. 4. Replace your... computer's chassis cover, screws and slot bracket from the computer. 3. Install related driver from BIOS. 8. Make sure your expansion card by the small white-drawable bar. Press...
Manual
Page 49
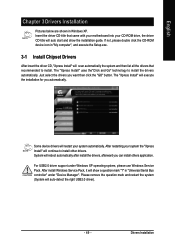
... Setup.exe. 3-1 Install Chipset Drivers After insert the driver CD, "Xpress Install" will continue to install. After restarting your system the "Xpress Install" will scan automatically the system and then list all the drivers that came with your motherboard into your system automatically. System... will auto start and show a question mark "?" in Windows XP. For USB2.0 driver support under "Device Manager". The "Xpress Install" uses the...
... Setup.exe. 3-1 Install Chipset Drivers After insert the driver CD, "Xpress Install" will continue to install. After restarting your system the "Xpress Install" will scan automatically the system and then list all the drivers that came with your motherboard into your system automatically. System... will auto start and show a question mark "?" in Windows XP. For USB2.0 driver support under "Device Manager". The "Xpress Install" uses the...
Manual
Page 50
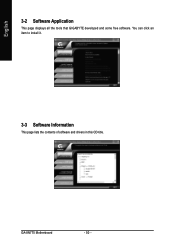
English 3-2 Software Application This page displays all the tools that GIGABYTE developed and some free software. GA-8N775 Motherboard - 50 - You can click an item to install it. 3-3 Software Information This page lists the contents of software and drivers in this CD-title.
English 3-2 Software Application This page displays all the tools that GIGABYTE developed and some free software. GA-8N775 Motherboard - 50 - You can click an item to install it. 3-3 Software Information This page lists the contents of software and drivers in this CD-title.
Manual
Page 51
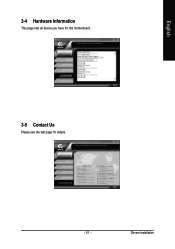
Drivers Installation English 3-4 Hardware Information This page lists all device you have for this motherboard. 3-5 Contact Us Please see the last page for details. - 51 -
Drivers Installation English 3-4 Hardware Information This page lists all device you have for this motherboard. 3-5 Contact Us Please see the last page for details. - 51 -
Manual
Page 53
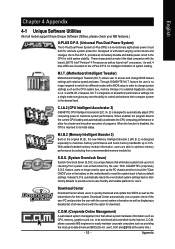
...and @BIOS at the same time.) - 53 - C.I.A.2 (CPU Intelligent Accelerator 2) GIGABYTE CPU Intelligent Accelerator 2(C.I .T.) allows user to access and change system settings such as the latest drivers for a faster and smoother execution of all platform performance settings into different modes within...eight-phase power circuit built for ultimate system protection. With added branded memory module information, users are mounted on the motherboard to reset the system back to factory default settings. allows corporate MIS engineers to easily maintain corporate computers such as ...
...and @BIOS at the same time.) - 53 - C.I.A.2 (CPU Intelligent Accelerator 2) GIGABYTE CPU Intelligent Accelerator 2(C.I .T.) allows user to access and change system settings such as the latest drivers for a faster and smoother execution of all platform performance settings into different modes within...eight-phase power circuit built for ultimate system protection. With added branded memory module information, users are mounted on the motherboard to reset the system back to factory default settings. allows corporate MIS engineers to easily maintain corporate computers such as ...
Manual
Page 56
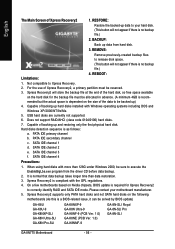
...Xpress Recovery2, a primary partition must be solved by BIOS update) GA-K8U GA-K8U-9 GA-K8NXP-SLI GA-K8N Ultra-SLI GA-K8N Pro-SLI GA-K8NXP-9 GA-K8N Ultra-9 GA-K8NF-9 (PCB Ver. 1.0) GA-K8NE (PCB Ver. 1.0) GA-K8NMF-9 GA-8N-SLI Royal GA-8N-SLI Pro GA-8N-SLI GA-8N775 Motherboard - 56 - SATA IDE channel 4 Precautions: 1. When using... DOS and Windows XP/2000/NT/9x/Me. 5. Xpress Recovery2 is as follows: a. RESTORE: Restore the backed-up data from the driver CD before data backup. 2. Xpress Recovery2 will store the backup file at the end of the hard disk, so free space available on...
...Xpress Recovery2, a primary partition must be solved by BIOS update) GA-K8U GA-K8U-9 GA-K8NXP-SLI GA-K8N Ultra-SLI GA-K8N Pro-SLI GA-K8NXP-9 GA-K8N Ultra-9 GA-K8NF-9 (PCB Ver. 1.0) GA-K8NE (PCB Ver. 1.0) GA-K8NMF-9 GA-8N-SLI Royal GA-8N-SLI Pro GA-8N-SLI GA-8N775 Motherboard - 56 - SATA IDE channel 4 Precautions: 1. When using... DOS and Windows XP/2000/NT/9x/Me. 5. Xpress Recovery2 is as follows: a. RESTORE: Restore the backed-up data from the driver CD before data backup. 2. Xpress Recovery2 will store the backup file at the end of the hard disk, so free space available on...
Manual
Page 66
...) (4) Make a floppy disk containing the SATA controller driver. (5) Install the SATA controller driver during POST (Power-On Self Test). In the example in Figure 1, make sure whether the SATA controller is enabled (Serial-ATAII 1 controls the SATAII0_1 connectors and Serial-ATAII 2 controls the SATAII2_3 connectors). GA-8N775 Motherboard - 66 - If you wish to create RAID...
...) (4) Make a floppy disk containing the SATA controller driver. (5) Install the SATA controller driver during POST (Power-On Self Test). In the example in Figure 1, make sure whether the SATA controller is enabled (Serial-ATAII 1 controls the SATAII0_1 connectors and Serial-ATAII 2 controls the SATAII2_3 connectors). GA-8N775 Motherboard - 66 - If you wish to create RAID...
Manual
Page 72
... No MediaShield RAID Utility Feb 8 2005 - English After that, the Array List screen displaying the RAID array you can proceed to install the SATA controller driver and operating system. Array Detail - message appears, press Y to confirm or N to the Array List screen. Now, you created will show Yes. GA-8N775 Motherboard - 72 -
... No MediaShield RAID Utility Feb 8 2005 - English After that, the Array List screen displaying the RAID array you can proceed to install the SATA controller driver and operating system. Array Detail - message appears, press Y to confirm or N to the Array List screen. Now, you created will show Yes. GA-8N775 Motherboard - 72 -
Manual
Page 73
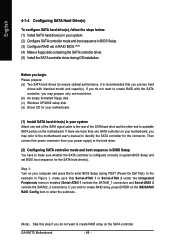
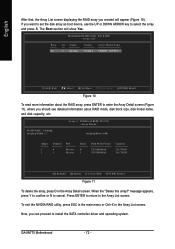
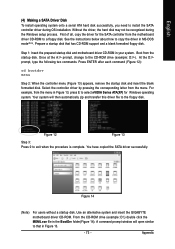
... a serial ATA hard disk successfully, you need to the floppy disk. First of all, copy the driver for Windows operating system. Step 1: Insert the prepared startup disk and motherboard driver CD-ROM in the BootDrv folder(Figure 14). Your system will open similar to select nVIDIA Series ATA(XP... Step 2: When the controller menu (Figure 13) appears, remove the startup disk and insert the blank formatted disk. Select the controller driver by pressing the corresponding letter from the menu in Figure 13. - 73 - Use an alternative system and insert the GIGABYTE motherboard driver CD-ROM.
... a serial ATA hard disk successfully, you need to the floppy disk. First of all, copy the driver for Windows operating system. Step 1: Insert the prepared startup disk and motherboard driver CD-ROM in the BootDrv folder(Figure 14). Your system will open similar to select nVIDIA Series ATA(XP... Step 2: When the controller menu (Figure 13) appears, remove the startup disk and insert the blank formatted disk. Select the controller driver by pressing the corresponding letter from the menu in Figure 13. - 73 - Use an alternative system and insert the GIGABYTE motherboard driver CD-ROM.

Manual
Page 74
... you see the "Press F6 if you need to install a third party SCSI or RAID driver. Windows Setup Press F6 if you need to install a 3rd party SCSI or RAID driver" message (Figure 15). Windows Setup Setup could not determine the type of Windows XP installation.... special disk controllers for use with Windows, including those for use with the driver. Figure 15 Step 2: When a screen similar to manually specify an adapter. S=Specify Additional Device ENTER=Continue F3=Exit Figure 16 GA-8N775 Motherboard - 74 - After pressing F6, there will load support for the following is...
... you see the "Press F6 if you need to install a third party SCSI or RAID driver. Windows Setup Press F6 if you need to install a 3rd party SCSI or RAID driver" message (Figure 15). Windows Setup Setup could not determine the type of Windows XP installation.... special disk controllers for use with Windows, including those for use with the driver. Figure 15 Step 2: When a screen similar to manually specify an adapter. S=Specify Additional Device ENTER=Continue F3=Exit Figure 16 GA-8N775 Motherboard - 74 - After pressing F6, there will load support for the following is...

Manual
Page 75
... following mass storage device(s): NVIDIA RAID CLASS DRIVER (required) * To specify additional SCSI adapters, CD-ROM drives, or special disk controllers for use with Windows, including those for which you have any device support disks from the motherboard driver CD. (Note) If you want to create... RAID, select both NVIDIA RAID CLASS DRIVER and then NVIDIA NForce Storage Controller. English Step 3: If Setup correctly recognizes the driver in the floppy disk, a controller menu similar to...
... following mass storage device(s): NVIDIA RAID CLASS DRIVER (required) * To specify additional SCSI adapters, CD-ROM drives, or special disk controllers for use with Windows, including those for which you have any device support disks from the motherboard driver CD. (Note) If you want to create... RAID, select both NVIDIA RAID CLASS DRIVER and then NVIDIA NForce Storage Controller. English Step 3: If Setup correctly recognizes the driver in the floppy disk, a controller menu similar to...
Manual
Page 76
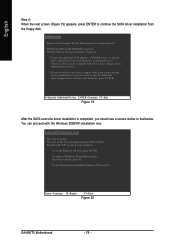
...those for use with the Windows 2000/XP installation now. S=Specify Additional Device ENTER=Continue F3=Exit Figure 19 After the SATA controller driver installation is completed, you do not have a device support disk from the floppy disk. WindowsXP Professional Setup Welcome to run on ... Windows XP installation using Recovery Console, press R. To quit Setup without installing Windows XP, press F3. Enter= Continue R=Repair F3=Exit Figure 20 GA-8N775 Motherboard - 76 - To set up Windows XP now, press ENTER. English Step 4: When the next screen (Figure 19) appears, press ENTER to ...
...those for use with the Windows 2000/XP installation now. S=Specify Additional Device ENTER=Continue F3=Exit Figure 19 After the SATA controller driver installation is completed, you do not have a device support disk from the floppy disk. WindowsXP Professional Setup Welcome to run on ... Windows XP installation using Recovery Console, press R. To quit Setup without installing Windows XP, press F3. Enter= Continue R=Repair F3=Exit Figure 20 GA-8N775 Motherboard - 76 - To set up Windows XP now, press ENTER. English Step 4: When the next screen (Figure 19) appears, press ENTER to ...
Manual
Page 80
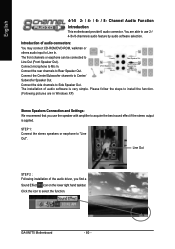
...to use the speaker with amplifier to Line In. Connect the Center/Subwoofer channels to select the function. The installation of the audio driver, you use 2-/ 4-/6-/8-channnels audio feature by audio software selection. Click the icon to Center/ Line In Line Out (Front Speaker ... Out. Line Out STEP 2 : Following installation of audio software is applied. Connect the side channels to "Line Out". GA-8N775 Motherboard - 80 - STEP 1: Connect the stereo speakers or earphone to Side Speaker Out. English 4-1-5 2- / 4- / 6- / 8- Channel Audio Function Introduction This...
...to use the speaker with amplifier to Line In. Connect the Center/Subwoofer channels to select the function. The installation of the audio driver, you use 2-/ 4-/6-/8-channnels audio feature by audio software selection. Click the icon to Center/ Line In Line Out (Front Speaker ... Out. Line Out STEP 2 : Following installation of audio software is applied. Connect the side channels to "Line Out". GA-8N775 Motherboard - 80 - STEP 1: Connect the stereo speakers or earphone to Side Speaker Out. English 4-1-5 2- / 4- / 6- / 8- Channel Audio Function Introduction This...

Manual
Page 82
... icon to "Center/Subwoofer Speaker Out". Front Speaker Out Rear Speaker Out Center/Subwoofer Speaker Out GA-8N775 Motherboard - 82 - STEP 3: Click "Speaker Configuration" then click on the lower right hand taskbar. STEP 2 : Following installation of the audio driver, you find a Sound Effect icon on the left selection bar and select "6CH Speaker" to...
... icon to "Center/Subwoofer Speaker Out". Front Speaker Out Rear Speaker Out Center/Subwoofer Speaker Out GA-8N775 Motherboard - 82 - STEP 3: Click "Speaker Configuration" then click on the lower right hand taskbar. STEP 2 : Following installation of the audio driver, you find a Sound Effect icon on the left selection bar and select "6CH Speaker" to...


