
User Manual
Page 6
...5 Features Summary 5 GA-8IPE1000 Series Motherboard Layout 8 Block Diagram 9 Chapter 2 Hardware Installation Process 11 Step 1: Install the Central Processing Unit (CPU 12 Step 1-1: CPU Installation 12 Step 1-2 : CPU Cooling Fan Installation 13 Step 2: Install memory modules 14 Step 3: Install expansion cards 17 Step 4: Connect ribbon cables, cabinet wires, and power supply 18 Step 4-1: I/O Back Panel Introduction 18 Step 4-2: Connectors & Jumper Setting Introduction 20 Chapter 3 BIOS Setup 35 The Main Menu (For example: BIOS Ver.: 8IPE1000 Pro-G.E1 36 Standard CMOS Features 38...
...5 Features Summary 5 GA-8IPE1000 Series Motherboard Layout 8 Block Diagram 9 Chapter 2 Hardware Installation Process 11 Step 1: Install the Central Processing Unit (CPU 12 Step 1-1: CPU Installation 12 Step 1-2 : CPU Cooling Fan Installation 13 Step 2: Install memory modules 14 Step 3: Install expansion cards 17 Step 4: Connect ribbon cables, cabinet wires, and power supply 18 Step 4-1: I/O Back Panel Introduction 18 Step 4-2: Connectors & Jumper Setting Introduction 20 Chapter 3 BIOS Setup 35 The Main Menu (For example: BIOS Ver.: 8IPE1000 Pro-G.E1 36 Standard CMOS Features 38...

User Manual
Page 7
... 51 Frequency/Voltage Control 53 Select Language 56 Load Fail-Safe Defaults 57 Load Optimized Defaults 58 Set Supervisor/User Password 59 Save & Exit Setup 60 Exit Without Saving 61 Chapter 4 Technical Reference 63 @ BIOSTM Introduction 63 Easy TuneTM 4 Introduction 64 Face-WizardTM Utilities Installation 65 Flash BIOS Method Introduction 66 2-/4-/6-/8-Channel Audio Function Introduction 87 Jack-Sensing(UAJ) Introduction 93 Xpress Recovery Introduction 95 Chapter 5 Appendix 99 (*) For GA-8IPE1000 Pro...
... 51 Frequency/Voltage Control 53 Select Language 56 Load Fail-Safe Defaults 57 Load Optimized Defaults 58 Set Supervisor/User Password 59 Save & Exit Setup 60 Exit Without Saving 61 Chapter 4 Technical Reference 63 @ BIOSTM Introduction 63 Easy TuneTM 4 Introduction 64 Face-WizardTM Utilities Installation 65 Flash BIOS Method Introduction 66 2-/4-/6-/8-Channel Audio Function Introduction 87 Jack-Sensing(UAJ) Introduction 93 Xpress Recovery Introduction 95 Chapter 5 Appendix 99 (*) For GA-8IPE1000 Pro...

User Manual
Page 9
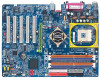
... Pro-G/GA-8IPE1000-G/GA-8IPE1000 - ICH5 I /O Control Slots On-Board IDE Serial ATA - 30.5cm x 23.0cm ATX size form factor, 4 layers PCB. - Due to 4 ATAPI devices - Introduction Support Intel® Pentium® 4 Processor with HT Technology - Support Intel® Pentium® 4 (Northwood, Prescott) processor - Supports Dual channel DDR400/DDR333/DDR266 DIMM - A FSB 400 Pentium 4 processor will only support DDR 266 memory module. - 5 - English Chapter 1 Introduction Features Summary Form Factor Motherboard CPU Chip set Memory I /O Controller Hub - 4 184-pin...
... Pro-G/GA-8IPE1000-G/GA-8IPE1000 - ICH5 I /O Control Slots On-Board IDE Serial ATA - 30.5cm x 23.0cm ATX size form factor, 4 layers PCB. - Due to 4 ATAPI devices - Introduction Support Intel® Pentium® 4 Processor with HT Technology - Support Intel® Pentium® 4 (Northwood, Prescott) processor - Supports Dual channel DDR400/DDR333/DDR266 DIMM - A FSB 400 Pentium 4 processor will only support DDR 266 memory module. - 5 - English Chapter 1 Introduction Features Summary Form Factor Motherboard CPU Chip set Memory I /O Controller Hub - 4 184-pin...

User Manual
Page 11
.../CPU/PCI) by BIOS - BIOS: A BIOS that supports HT Technology - Whether your system can run under these specific bus frequencies are not the standard specifications for CPU, chipset and most of the following platform components: - CPU: An Intel® Pentium 4 Processor with your processor's specifications. OS: An operation system that has optimizations for your hardware configurations, including CPU, Chipsets, Memory, Cards... .etc. (*) For GA-8IPE1000 Pro-G only. - 7 - AC Recovery - We don't recommend you to set the CPU host frequency...
.../CPU/PCI) by BIOS - BIOS: A BIOS that supports HT Technology - Whether your system can run under these specific bus frequencies are not the standard specifications for CPU, chipset and most of the following platform components: - CPU: An Intel® Pentium 4 Processor with your processor's specifications. OS: An operation system that has optimizations for your hardware configurations, including CPU, Chipsets, Memory, Cards... .etc. (*) For GA-8IPE1000 Pro-G only. - 7 - AC Recovery - We don't recommend you to set the CPU host frequency...

User Manual
Page 15
Continue with the BIOS/software installation. Install the Central Processing Unit (CPU) Step 2- Note: If the NorthBridge on the power supply or connect the power cable to the power outlet. English Chapter 2 Hardware Installation Process To set up your computer, you have accomplished the hardware installation! Hardware Installation Process Install expansion cards Step 4- Install memory modules Step 3- Turn on the motherboard has a fan sink, then the motherboard contains a NB_FAN connector. - 11 - Connect ribbon cables, cabinet wires, and power supply Step...
Continue with the BIOS/software installation. Install the Central Processing Unit (CPU) Step 2- Note: If the NorthBridge on the power supply or connect the power cable to the power outlet. English Chapter 2 Hardware Installation Process To set up your computer, you have accomplished the hardware installation! Hardware Installation Process Install expansion cards Step 4- Install memory modules Step 3- Turn on the motherboard has a fan sink, then the motherboard contains a NB_FAN connector. - 11 - Connect ribbon cables, cabinet wires, and power supply Step...
User Manual
Page 23
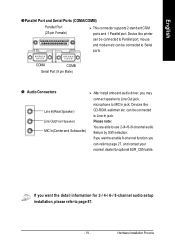
... Installation Process Device like CD-ROM, walkman etc. can be connected to Line-In jack. If you want to enable 8-channel function you want the detail information for optional SUR_CEN cable. Please note: You are able to Parallel port; English wParallel Port and Serial Ports (COMA/COMB) Parallel Port (25 pin Female) This connector supports 2 standard COM ports and 1 Parallel port. mouse and modem etc can be connected to use 2-/4-/6-/8-channel audio...
... Installation Process Device like CD-ROM, walkman etc. can be connected to Line-In jack. If you want to enable 8-channel function you want the detail information for optional SUR_CEN cable. Please note: You are able to Parallel port; English wParallel Port and Serial Ports (COMA/COMB) Parallel Port (25 pin Female) This connector supports 2 standard COM ports and 1 Parallel port. mouse and modem etc can be connected to use 2-/4-/6-/8-channel audio...

User Manual
Page 39
... ed Reserv ed Restore the previous CMOS value from CMOS, only for Option Page Setup Menu Load the file-safe default CMOS value from BIOS default table Load the Optimized Defaults Dual BIOS (*)/Q-Flash function System Information Save all the CMOS changes, only for Main Menu (*) For GA-8IPE1000 Pro-G only. - 35 - The program that it retains the Setup information when the power is an overview of information is stored in the right hand Enter Select item Main Menu -
... ed Reserv ed Restore the previous CMOS value from CMOS, only for Option Page Setup Menu Load the file-safe default CMOS value from BIOS default table Load the Optimized Defaults Dual BIOS (*)/Q-Flash function System Information Save all the CMOS changes, only for Main Menu (*) For GA-8IPE1000 Pro-G only. - 35 - The program that it retains the Setup information when the power is an overview of information is stored in the right hand Enter Select item Main Menu -

User Manual
Page 40
.... (*) For GA-8IPE1000 Pro-G only. CMOS Setup Utility -Copy right (C) 1984-2003 Aw ard Softw are }Standard CMOS Features * S e l e c t L a n g u a g e ( ) }Adv anced BIOS Features Load Fail-Safe Defaults }Integrated Peripherals Load Optimized Defaults }Pow er Management Setup Set Superv isor Passw ord }PnP/PCI Configurations Set User Passw ord }PC Health Status Sav e & Ex it Setup }Frequency /Voltage Control Ex it Without Sav ing ESC:Quit * F 3 : C h a n g e L a n g u a g e ( ) F8: Dual BIOS (*)/Q-Flash F10:Sav e & Ex it Setup Time, Date, Hard Disk Ty...
.... (*) For GA-8IPE1000 Pro-G only. CMOS Setup Utility -Copy right (C) 1984-2003 Aw ard Softw are }Standard CMOS Features * S e l e c t L a n g u a g e ( ) }Adv anced BIOS Features Load Fail-Safe Defaults }Integrated Peripherals Load Optimized Defaults }Pow er Management Setup Set Superv isor Passw ord }PnP/PCI Configurations Set User Passw ord }PC Health Status Sav e & Ex it Setup }Frequency /Voltage Control Ex it Without Sav ing ESC:Quit * F 3 : C h a n g e L a n g u a g e ( ) F8: Dual BIOS (*)/Q-Flash F10:Sav e & Ex it Setup Time, Date, Hard Disk Ty...
User Manual
Page 43
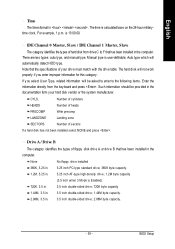
... the 24-hour militarytime clock. If y ou select User Type, related information will be provided in the computer. BIOS Setup The time is user-definable; IDE Channel 0 Master, Sl ave / IDE Channel 1 Master, Slave The category identifies the types of hard disk from the keyboard and press . There are two types: auto type, and manual type. Note that has been installed in the documentation form your drive must match with the...
... the 24-hour militarytime clock. If y ou select User Type, related information will be provided in the computer. BIOS Setup The time is user-definable; IDE Channel 0 Master, Sl ave / IDE Channel 1 Master, Slave The category identifies the types of hard disk from the keyboard and press . There are two types: auto type, and manual type. Note that has been installed in the documentation form your drive must match with the...
User Manual
Page 47
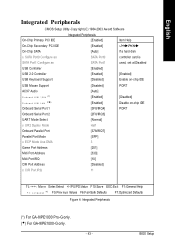
BIOS Setup English Integrated Peripherals CMOS Setup Utility -Copy right (C) 1984-2003 Aw ard Softw are On-Chip Primary PCI IDE On-Chip Secondary PCI IDE Integrated Peripherals [Enabled] [Enabled] Item Help MenuLevelu On-Chip SATA [Auto] If a hard disk x SATA Port0 Configure as SATA Port0 controller card is SATA Port1 Configure as SATA Port1 used, set at Disabled USB Controller [Enabled] USB 2.0 Controller USB Key board Support [Enabled] [Disabled] [Enabled] Enable on-chip IDE USB Mouse Support [Disabled] PORT AC97 Audio [Auto] * O n b o a r d H / W 1 3 9 4 ( ) [...
BIOS Setup English Integrated Peripherals CMOS Setup Utility -Copy right (C) 1984-2003 Aw ard Softw are On-Chip Primary PCI IDE On-Chip Secondary PCI IDE Integrated Peripherals [Enabled] [Enabled] Item Help MenuLevelu On-Chip SATA [Auto] If a hard disk x SATA Port0 Configure as SATA Port0 controller card is SATA Port1 Configure as SATA Port1 used, set at Disabled USB Controller [Enabled] USB 2.0 Controller USB Key board Support [Enabled] [Disabled] [Enabled] Enable on-chip IDE USB Mouse Support [Disabled] PORT AC97 Audio [Auto] * O n b o a r d H / W 1 3 9 4 ( ) [...
User Manual
Page 52
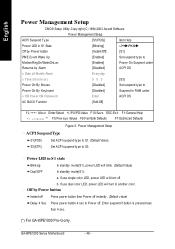
...) Set ACPI suspend ty pe to Pow er off. If use single color LED, pow er LED w ill turn to another color. GA-8IPE1000 Series Motherboard - 48 - If use dual color LED, pow er LED w ill turn off instantly . (Default v alue) Delay 4 Sec. Power LED i n S1 state Blinking In standby mode(S1), pow er LED w ill blink. (Default Value) Dual/OFF In standby mode(S1): a. Press pow er button 4 sec to S3. b. English Power Management Setup CMOS Setup Utility...
...) Set ACPI suspend ty pe to Pow er off. If use single color LED, pow er LED w ill turn to another color. GA-8IPE1000 Series Motherboard - 48 - If use dual color LED, pow er LED w ill turn off instantly . (Default v alue) Delay 4 Sec. Power LED i n S1 state Blinking In standby mode(S1), pow er LED w ill blink. (Default Value) Dual/OFF In standby mode(S1): a. Press pow er button 4 sec to S3. b. English Power Management Setup CMOS Setup Utility...

User Manual
Page 63
You may access all BIOS Setup program function. BIOS Setup Type the password again and press . To disable password, just press when you are }Standard CMOS Features * S e l e c t L a n g u a g e ( ) }Adv anced BIOS Features Load Fail-Safe Defaults }Integrated Peripherals Load Optimized Defaults }Pow er Management Setup Enter Password: }PnP/PCI Configurations Set Superv isor Passw ord Set User Passw ord }PC Health Status Sav e & Ex it Setup }Frequency /Voltage Control Ex it Without Sav ing ESC:Quit * F 3 : C h a n g e L a n g u a g e ( ) F8: Dual BIOS (*)/Q-Flash F10:Sav e &...
You may access all BIOS Setup program function. BIOS Setup Type the password again and press . To disable password, just press when you are }Standard CMOS Features * S e l e c t L a n g u a g e ( ) }Adv anced BIOS Features Load Fail-Safe Defaults }Integrated Peripherals Load Optimized Defaults }Pow er Management Setup Enter Password: }PnP/PCI Configurations Set Superv isor Passw ord Set User Passw ord }PC Health Status Sav e & Ex it Setup }Frequency /Voltage Control Ex it Without Sav ing ESC:Quit * F 3 : C h a n g e L a n g u a g e ( ) F8: Dual BIOS (*)/Q-Flash F10:Sav e &...
User Manual
Page 68
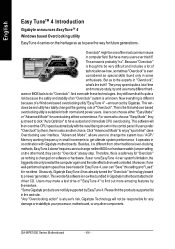
... 4doesn'trequire users tochange neitherBIOS norhardwareswitch/jumper setting; Overclock" mightbe oneofthe mostcommon issues in small increments to get ultimate system performance . This is the firstwindows based overclocking utility is unknown. "Advanced Mode", allows users to change the system bus / AGP / Memory working frequency in computer field. And even with Gigabyte motherboards. This windows based utilityhas totally changed on software or hardware. Obviously, Gigabyte EasyTune 4 has already turned the "Overclock" technology toward to...
... 4doesn'trequire users tochange neitherBIOS norhardwareswitch/jumper setting; Overclock" mightbe oneofthe mostcommon issues in small increments to get ultimate system performance . This is the firstwindows based overclocking utility is unknown. "Advanced Mode", allows users to change the system bus / AGP / Memory working frequency in computer field. And even with Gigabyte motherboards. This windows based utilityhas totally changed on software or hardware. Obviously, Gigabyte EasyTune 4 has already turned the "Overclock" technology toward to...

User Manual
Page 69
...? Itcan personalize boot-up logo with user-friendly interface thatallows users to change the boot-up logo to showyour unique style from Gigabyte Logo Gallery on board orfile in hard drive,floppydisk ,zip,MOorother storage devices and combine the compatible picture you have. English Face-WizardTM Utilities Installation (*) What is a windows based utility with picture from others,and neveragain looking atthe black and white bootup screen. 1.Click...
...? Itcan personalize boot-up logo with user-friendly interface thatallows users to change the boot-up logo to showyour unique style from Gigabyte Logo Gallery on board orfile in hard drive,floppydisk ,zip,MOorother storage devices and combine the compatible picture you have. English Face-WizardTM Utilities Installation (*) What is a windows based utility with picture from others,and neveragain looking atthe black and white bootup screen. 1.Click...
User Manual
Page 74
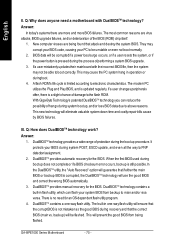
... manual recovery for the BIOS. GA-8IPE1000 Series Motherboard - 70 - The built-in flash utility, which can reduce the possibility of the BIOS (ROM) chip itself. 1. Ifa user mistakenly updates their mainboard with DualBIOSTM technology? Answer: 1. The most common reasons are more and more BIOS failures. This new technology will guarantee thatifeither the main BIOS or backup BIOS is not mistaken as the good BIOS during bootup does not complete or ifa BIOS checksum error...
... manual recovery for the BIOS. GA-8IPE1000 Series Motherboard - 70 - The built-in flash utility, which can reduce the possibility of the BIOS (ROM) chip itself. 1. Ifa user mistakenly updates their mainboard with DualBIOSTM technology? Answer: 1. The most common reasons are more and more BIOS failures. This new technology will guarantee thatifeither the main BIOS or backup BIOS is not mistaken as the good BIOS during bootup does not complete or ifa BIOS checksum error...
User Manual
Page 78
... keyboard and then Y button to Floppy Enter : Run hi:Mov e ES C:Reset Dual BIOS utility bar 256K 256K Q-FlashTM utility title bar F10:Power Off Action bar GA-8IPE1000 Series Motherboard - 74 - VERSION 2.00 (C ) 2001 A merican M egatrends, Inc. AMIBIOS SIMPLE SETUP UTILITY - All Rights Reserv ed STANDARD CMOS SETUP INTEGRATED PERIPHERALS BIOS FEATURES SETUP HARDWARE MONITOR & MISC SETUP CHIPSETFEATURES SETUP SUPERVISOR PASSWORD POWER M AN AGEM EN T SETU P USER PASSWORD PNP / PCI CONFIGEUNRTAETIORN DUAL BIOS/Q-FLASIHDEUHTDIDLIATUYTO(YDE/NTE)C ?TIOYN LOAD FAIL-SAFE...
... keyboard and then Y button to Floppy Enter : Run hi:Mov e ES C:Reset Dual BIOS utility bar 256K 256K Q-FlashTM utility title bar F10:Power Off Action bar GA-8IPE1000 Series Motherboard - 74 - VERSION 2.00 (C ) 2001 A merican M egatrends, Inc. AMIBIOS SIMPLE SETUP UTILITY - All Rights Reserv ed STANDARD CMOS SETUP INTEGRATED PERIPHERALS BIOS FEATURES SETUP HARDWARE MONITOR & MISC SETUP CHIPSETFEATURES SETUP SUPERVISOR PASSWORD POWER M AN AGEM EN T SETU P USER PASSWORD PNP / PCI CONFIGEUNRTAETIORN DUAL BIOS/Q-FLASIHDEUHTDIDLIATUYTO(YDE/NTE)C ?TIOYN LOAD FAIL-SAFE...

User Manual
Page 79
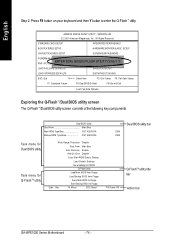
... Floppy Enter : Run hi:Mov e ES C:Reset F10:Power Off - 75 - Dual BIOS Utility Boot From Main Bios Main ROM Type/Size S ST 49LF003A Backup ROM Type/S ize S ST 49LF003A 256K 256K Wide Range Protection Disable Boot From Main Bios Auto Recovery E nable Halt On Error Disable Copy M ain RO M Data to Backup Load Default S ettings Sav e Settings to C MOS Q-Flash Utility Load M ain BIO S from Floppy Load Backup BI OS from Floppy" item in the "Before you begin Step 1 with "Save Main BIOS to your motherboard...
... Floppy Enter : Run hi:Mov e ES C:Reset F10:Power Off - 75 - Dual BIOS Utility Boot From Main Bios Main ROM Type/Size S ST 49LF003A Backup ROM Type/S ize S ST 49LF003A 256K 256K Wide Range Protection Disable Boot From Main Bios Auto Recovery E nable Halt On Error Disable Copy M ain RO M Data to Backup Load Default S ettings Sav e Settings to C MOS Q-Flash Utility Load M ain BIO S from Floppy Load Backup BI OS from Floppy" item in the "Before you begin Step 1 with "Save Main BIOS to your motherboard...
User Manual
Page 99
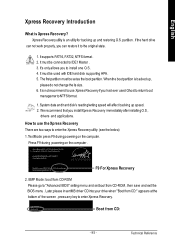
... to install one O.S . 4. Awar d Modular BIO S v6.00 PG, An Energy Star Ally Copyright (C) 1984-2002, Award Software, Inc. BMP Mode: bo ot from CD-ROM , then save and exit the BIOS menu . It mustbe connected to "Advanced BIOS" setting menu and setboot from CD-ROM Please go to IDE1 Master . 3. VerifyingDMIPoolData Boot fromCD: Boot from CD:" appears atthe bottom of the screen , press any key to enter SETUP/ Q-Flash...
... to install one O.S . 4. Awar d Modular BIO S v6.00 PG, An Energy Star Ally Copyright (C) 1984-2002, Award Software, Inc. BMP Mode: bo ot from CD-ROM , then save and exit the BIOS menu . It mustbe connected to "Advanced BIOS" setting menu and setboot from CD-ROM Please go to IDE1 Master . 3. VerifyingDMIPoolData Boot fromCD: Boot from CD:" appears atthe bottom of the screen , press any key to enter SETUP/ Q-Flash...
User Manual
Page 104
... USB device wake up S3 hang up issue in "Universal Serial Bus controller" under Windows XP operating system, please use . you to reboot system!! Item Description n Intel Chipset Software Installation Utility Tell the operating system how the chipset components will auto-detect the right USB2.0 driver). (*) For GA-8IPE1000 Pro-G only. (u) For GA-8IPE1000-G only. Please remove the question mark and restart the system (System will be configured. English Driver install finished!! in XP. GA-8IPE1000 Series Motherboard...
... USB device wake up S3 hang up issue in "Universal Serial Bus controller" under Windows XP operating system, please use . you to reboot system!! Item Description n Intel Chipset Software Installation Utility Tell the operating system how the chipset components will auto-detect the right USB2.0 driver). (*) For GA-8IPE1000 Pro-G only. (u) For GA-8IPE1000-G only. Please remove the question mark and restart the system (System will be configured. English Driver install finished!! in XP. GA-8IPE1000 Series Motherboard...
User Manual
Page 108
... Load BIOS Defaults) after updating BIOS? Question 6: Why does system seem unstable after flashing BIOS. If your board has a Clear CMOS jumper, please refer to MB again and turn on -board battery to leak voltage to the steps below: Steps: 1. Save changes and reboot the system. Answer: Please make them short for about 10 minutes (Or you don't need to change another speaker with an internal amplifier. Please refer to clear CMOS. GA-8IPE1000 Series Motherboard...
... Load BIOS Defaults) after updating BIOS? Question 6: Why does system seem unstable after flashing BIOS. If your board has a Clear CMOS jumper, please refer to MB again and turn on -board battery to leak voltage to the steps below: Steps: 1. Save changes and reboot the system. Answer: Please make them short for about 10 minutes (Or you don't need to change another speaker with an internal amplifier. Please refer to clear CMOS. GA-8IPE1000 Series Motherboard...


