Manual
Page 2
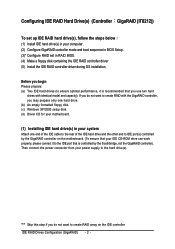
...connect it is controlled by the GigaRAID controller on the motherboard. (To ensure that you use two hard drives with the GigaRAID controller, you do not want to create RAID with identical model and capacity). "*" Skip this step if you may prepare only one hard drive. (b) An empty formatted floppy disk. (c) Windows XP/2000 setup disk. (d) Driver CD for your motherboard. (1) Installing IDE hard drive(s) in RAID BIOS. (4) Make a floppy disk containing the IDE RAID controller driver (5) Install the IDE RAID controller driver during OS installation. Ác Configuring IDE RAID Hard...
...connect it is controlled by the GigaRAID controller on the motherboard. (To ensure that you use two hard drives with the GigaRAID controller, you do not want to create RAID with identical model and capacity). "*" Skip this step if you may prepare only one hard drive. (b) An empty formatted floppy disk. (c) Windows XP/2000 setup disk. (d) Driver CD for your motherboard. (1) Installing IDE hard drive(s) in RAID BIOS. (4) Make a floppy disk containing the IDE RAID controller driver (5) Install the IDE RAID controller driver during OS installation. Ác Configuring IDE RAID Hard...
Manual
Page 4
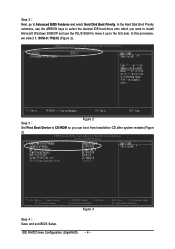
... Award Software Advanced BIOS Features : Move Enter: Select F5: Previous Values +/-/PU/PD: Value F10: Save F6: Fail-Safe Defaults Figure 3 ESC: Exit F1: General Help F7: Optimized Defaults Step 4 Save and exit BIOS Setup. SCSI-0: IT8212 (Figure 2). ¤å CMOS Setup Utility-Copyright (C) 1984-2004 Award Software Hard Disk Boot Priority Step 3 Figure 2 Set First Boot Device to CD-ROM so you want to install ¤¤ Microsoft Windows 2000/XP and use...
... Award Software Advanced BIOS Features : Move Enter: Select F5: Previous Values +/-/PU/PD: Value F10: Save F6: Fail-Safe Defaults Figure 3 ESC: Exit F1: General Help F7: Optimized Defaults Step 4 Save and exit BIOS Setup. SCSI-0: IT8212 (Figure 2). ¤å CMOS Setup Utility-Copyright (C) 1984-2004 Award Software Hard Disk Boot Priority Step 3 Figure 2 Set First Boot Device to CD-ROM so you want to install ¤¤ Microsoft Windows 2000/XP and use...
Manual
Page 14
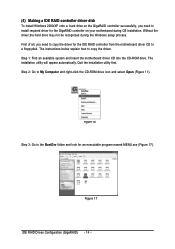
... available system and insert the motherboard driver CD into the CD-ROM drive. Quit the installation utility first. The installation utility will appear automatically. The instructions below explain how to My Computer and right-click the CD-ROM drive icon and select Open (Figure 11). Ác (4) Making a IDE RAID controller driver disk Åé To install Windows 2000/XP onto a hard drive on your motherboard during OS installation. Figure 17 IDE RAID Drives Configuration (GigaRAID) - 14 -
... available system and insert the motherboard driver CD into the CD-ROM drive. Quit the installation utility first. The installation utility will appear automatically. The instructions below explain how to My Computer and right-click the CD-ROM drive icon and select Open (Figure 11). Ác (4) Making a IDE RAID controller driver disk Åé To install Windows 2000/XP onto a hard drive on your motherboard during OS installation. Figure 17 IDE RAID Drives Configuration (GigaRAID) - 14 -
Manual
Page 6
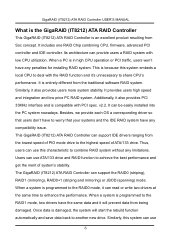
... is in high CPU operation or PCI traffic, users won't have the same data and it can use 6 Similarly, it also provides PCI 33MHz interface and is compatible with PCI spec. This GigaRAID (IT8212) ATA RAID Controller can be easily installed into the PC system nowadays. Once data is damaged, the system will prevent data from the lowest speed of PIO mode drive to achieve...
... is in high CPU operation or PCI traffic, users won't have the same data and it can use 6 Similarly, it also provides PCI 33MHz interface and is compatible with PCI spec. This GigaRAID (IT8212) ATA RAID Controller can be easily installed into the PC system nowadays. Once data is damaged, the system will prevent data from the lowest speed of PIO mode drive to achieve...
Manual
Page 8
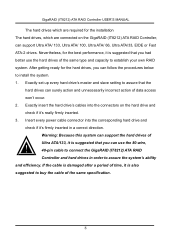
... suggested to establish your own RAID system. Warning: Because this system can use the hard drives of the same type and capacity to buy the cable of the same specification. 8 If the cable is damaged after a period of time, it 's really firmly inserted. 3. Insert every power cable connector into the connectors on the GigaRAID (IT8212) ATA RAID Controller, can support Ultra ATA/ 133, Ultra ATA...
... suggested to establish your own RAID system. Warning: Because this system can use the hard drives of the same type and capacity to buy the cable of the same specification. 8 If the cable is damaged after a period of time, it 's really firmly inserted. 3. Insert every power cable connector into the connectors on the GigaRAID (IT8212) ATA RAID Controller, can support Ultra ATA/ 133, Ultra ATA...
Manual
Page 12
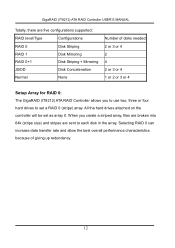
... 3 or 4 Setup Array for RAID 0: The GigaRAID (IT8212) ATA RAID Controller allows you create a striped array, files are broken into 64k (stripe size) and stripes are five configurations supported: RAID level/Type Configurations RAID 0 Disk Striping RAID 1 Disk Mirroring RAID 0+1 Disk Striping + Mirroring JBOD Disk Concatenation Normal None Number of giving up redundancy. 12 All the hard drives attached on the controller will be set a RAID 0 (stripe) array. GigaRAID (IT8212) ATA RAID Controller USER'S MANUAL Totally, there...
... 3 or 4 Setup Array for RAID 0: The GigaRAID (IT8212) ATA RAID Controller allows you create a striped array, files are broken into 64k (stripe size) and stripes are five configurations supported: RAID level/Type Configurations RAID 0 Disk Striping RAID 1 Disk Mirroring RAID 0+1 Disk Striping + Mirroring JBOD Disk Concatenation Normal None Number of giving up redundancy. 12 All the hard drives attached on the controller will be set a RAID 0 (stripe) array. GigaRAID (IT8212) ATA RAID Controller USER'S MANUAL Totally, there...
Manual
Page 36
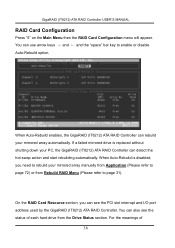
... hard drive from Rebuild RAID Menu (Please refer to page 31). You can also see the PCI slot interrupt and I/O port address used by the GigaRAID (IT8212) ATA RAID Controller. GigaRAID (IT8212) ATA RAID Controller USER'S MANUAL RAID Card Configuration Press "5" on the Main Menu then the RAID Card Configuration menu will appear. On the RAID Card Resource section, you need to rebuild your mirrored array manually from Application (Please refer to enable or disable Auto-Rebuild option. When Auto-Rebuild enables...
... hard drive from Rebuild RAID Menu (Please refer to page 31). You can also see the PCI slot interrupt and I/O port address used by the GigaRAID (IT8212) ATA RAID Controller. GigaRAID (IT8212) ATA RAID Controller USER'S MANUAL RAID Card Configuration Press "5" on the Main Menu then the RAID Card Configuration menu will appear. On the RAID Card Resource section, you need to rebuild your mirrored array manually from Application (Please refer to enable or disable Auto-Rebuild option. When Auto-Rebuild enables...
Manual
Page 38
... proper chipset model. Windows XP Windows 2000 Windows 98/ME Windows NT 4.0 For the Windows operating system (Win NT, WinXP, Win2000 ), for that hard drive. After that GigaRAID (IT8212) ATA RAID Controller has already been properly setup in "D:\BootDrv\menu.exe" 4) Information on all chipsets should be listed on -screen instructions to complete installation. (Each time you complete the steps, boot from the Windows CD to install the RAID drivers. GigaRAID (IT8212) ATA RAID Controller USER'S MANUAL Driver Installation This...
... proper chipset model. Windows XP Windows 2000 Windows 98/ME Windows NT 4.0 For the Windows operating system (Win NT, WinXP, Win2000 ), for that hard drive. After that GigaRAID (IT8212) ATA RAID Controller has already been properly setup in "D:\BootDrv\menu.exe" 4) Information on all chipsets should be listed on -screen instructions to complete installation. (Each time you complete the steps, boot from the Windows CD to install the RAID drivers. GigaRAID (IT8212) ATA RAID Controller USER'S MANUAL Driver Installation This...

Manual
Page 39
... devices, please designate them now. If you need to install third party SCSI or RAID driver" appears on the list. Start Windows XP installation. Press the key to continue. 5. Follow the instruction of the installation program to insert the GigaRAID (IT8212) ATA RAID Controller Driver diskette into the floppy disk drive then press the key to continue the installation of the ! GigaRAID (IT8212) ATA RAID Controller USER'S MANUAL Windows XP Install the driver during Windows XP installation 1. following installation...
... devices, please designate them now. If you need to install third party SCSI or RAID driver" appears on the list. Start Windows XP installation. Press the key to continue. 5. Follow the instruction of the installation program to insert the GigaRAID (IT8212) ATA RAID Controller Driver diskette into the floppy disk drive then press the key to continue the installation of the ! GigaRAID (IT8212) ATA RAID Controller USER'S MANUAL Windows XP Install the driver during Windows XP installation 1. following installation...

Manual
Page 45
... window then press the key to install third party SCSI or RAID driver" appears on the next window. After designating all the devices, please proceed to install, press the key. 4. GigaRAID (IT8212) ATA RAID Controller USER'S MANUAL Windows 2000 Install the driver during Windows 2000 installation 1. The installation will be listed on the bottom of the installation program to insert the GigaRAID (IT8212) ATA RAID Controller Driver diskette into the floppy disk drive then press the key to install...
... window then press the key to install third party SCSI or RAID driver" appears on the next window. After designating all the devices, please proceed to install, press the key. 4. GigaRAID (IT8212) ATA RAID Controller USER'S MANUAL Windows 2000 Install the driver during Windows 2000 installation 1. The installation will be listed on the bottom of the installation program to insert the GigaRAID (IT8212) ATA RAID Controller Driver diskette into the floppy disk drive then press the key to install...
Manual
Page 11
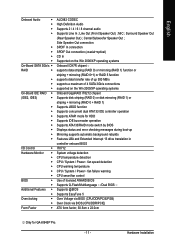
...for HDD Supports IDE bus master operation Supports ATA133/RAID mode switch by BIOS Displays status and error checking messages during boot-up Mirroring supports automatic background rebuilds Features LBA and Extended Interrupt 13 drive translation in controller onboard BIOS IT8712 System voltage detection CPU temperature detection CPU / System / Power fan speed detection CPU warning temperature CPU / System / Power fan failure warning CPU smart fan control Use of licensed AWARD BIOS Supports Q-Flash/Multilanguage /Dual BIOS Supports @BIOS Supports EasyTune 5 Over Voltage via BIOS (CPU/DDR/PCIE...
...for HDD Supports IDE bus master operation Supports ATA133/RAID mode switch by BIOS Displays status and error checking messages during boot-up Mirroring supports automatic background rebuilds Features LBA and Extended Interrupt 13 drive translation in controller onboard BIOS IT8712 System voltage detection CPU temperature detection CPU / System / Power fan speed detection CPU warning temperature CPU / System / Power fan failure warning CPU smart fan control Use of licensed AWARD BIOS Supports Q-Flash/Multilanguage /Dual BIOS Supports @BIOS Supports EasyTune 5 Over Voltage via BIOS (CPU/DDR/PCIE...
Manual
Page 22
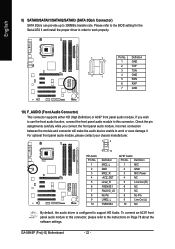
...'97 Audio: Pin No. GA-8I945P (Pro)(-G) Motherboard - 22 - To connect an AC97 front panel audio module to work properly. 1 7 7 1 Pin No. 1 2 3 4 5 6 7 Definition GND TXP TXN GND RXN RXP GND 10) F_AUDIO (Front Audio Connector) This connector supports either HD (High Definition) or AC97 front panel audio module. Please refer to the BIOS setting for the Serial ATA II and install the proper driver in order to the instructions on Page 78 about the software settings...
...'97 Audio: Pin No. GA-8I945P (Pro)(-G) Motherboard - 22 - To connect an AC97 front panel audio module to work properly. 1 7 7 1 Pin No. 1 2 3 4 5 6 7 Definition GND TXP TXN GND RXN RXP GND 10) F_AUDIO (Front Audio Connector) This connector supports either HD (High Definition) or AC97 front panel audio module. Please refer to the BIOS setting for the Serial ATA II and install the proper driver in order to the instructions on Page 78 about the software settings...
Manual
Page 32
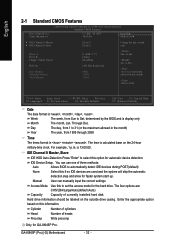
... manually input the correct settings Access Mode Use this option for faster system start up. The time is 13:00:00. Jan. Day The day, from 1 to set the access mode for GA-8I945P Pro. For example, 1 p.m. is calculated base on the 24-hour military-time clock. Hard drive information should be labeled on this if no IDE devices are : CHS/LBA/Large/Auto(default:Auto) Capacity Capacity of currently installed hard disk. GA-8I945P (Pro)(-G) Motherboard - 32 - Enter...
... manually input the correct settings Access Mode Use this option for faster system start up. The time is 13:00:00. Jan. Day The day, from 1 to set the access mode for GA-8I945P Pro. For example, 1 p.m. is calculated base on the 24-hour military-time clock. Hard drive information should be labeled on this if no IDE devices are : CHS/LBA/Large/Auto(default:Auto) Capacity Capacity of currently installed hard disk. GA-8I945P (Pro)(-G) Motherboard - 32 - Enter...
Manual
Page 48
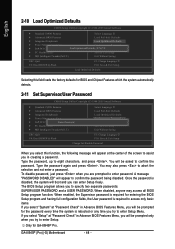
... User password is disabled, the system will boot and you can enter Setup freely. Only for GA-8I945P Pro. English 2-10 Load Optimized Defaults CMOS Setup Utility-Copyright (C) 1984-2005 Award Software ` Standard CMOS Features Select Language 1 ` Advanced BIOS Features Load Fail-Safe Defaults ` Integrated Peripherals Load Optimized Defaults ` Power Management Setup Set Supervisor Password ` PnP/PCI Configurations Load Optimized DefaultsS(eYt /UNs)e?rNPassword ` PC Health Status Save & Exit Setup ` MB Intelligent Tweaker(M.I.T.) Exit Without Saving ESC: Quit F8: Dual BIOS1...
... User password is disabled, the system will boot and you can enter Setup freely. Only for GA-8I945P Pro. English 2-10 Load Optimized Defaults CMOS Setup Utility-Copyright (C) 1984-2005 Award Software ` Standard CMOS Features Select Language 1 ` Advanced BIOS Features Load Fail-Safe Defaults ` Integrated Peripherals Load Optimized Defaults ` Power Management Setup Set Supervisor Password ` PnP/PCI Configurations Load Optimized DefaultsS(eYt /UNs)e?rNPassword ` PC Health Status Save & Exit Setup ` MB Intelligent Tweaker(M.I.T.) Exit Without Saving ESC: Quit F8: Dual BIOS1...

Manual
Page 55
... PC chassis and short-circuit the "Clear CMOS" pins or the battery on the original M.I.B., the new Memory Intelligent Booster 2 (M.I .B.2 (Memory Intelligent Booster 2) Built on the motherboard to reset the system back to change BIOS feature settings with relative speed and ease. When enabled, the program detects the current CPU loading and automatically accelerates the CPU computing performance to 10%. feature, users no longer required to switch into a single mode now...
... PC chassis and short-circuit the "Clear CMOS" pins or the battery on the original M.I.B., the new Memory Intelligent Booster 2 (M.I .B.2 (Memory Intelligent Booster 2) Built on the motherboard to reset the system back to change BIOS feature settings with relative speed and ease. When enabled, the program detects the current CPU loading and automatically accelerates the CPU computing performance to 10%. feature, users no longer required to switch into a single mode now...

Manual
Page 57
... simply press F9 during system power-on PATA and SATA IDE controllers. It is able to use the Xpress Recovery2 Initial access by booting from CD-ROM and subsequent access by pressing the key in your CD-ROM drive. Boot from CD/DVD:" will affect the data backup speed. 3. System requirements: 1. VESA-supported VGA cards How to back up data on hard disks on . . . Intel 945 BIOS for the first time...
... simply press F9 during system power-on PATA and SATA IDE controllers. It is able to use the Xpress Recovery2 Initial access by booting from CD-ROM and subsequent access by pressing the key in your CD-ROM drive. Boot from CD/DVD:" will affect the data backup speed. 3. System requirements: 1. VESA-supported VGA cards How to back up data on hard disks on . . . Intel 945 BIOS for the first time...

Manual
Page 59
a. CMOS Setup Utility-Copyright (C) 1984-2005 Award Software Standard CMOS Features Advanced BIOS Features Integrated Peripherals Power Management Setup PnP/PCI Configurations PC Health Status MB Intelligent Tweaker(M.I.T.) ESC: Quit F8: Dual BIOS1/Q-Flash Select Language 1 Load Fail-Safe Defaults Load Optimized Defaults Set Supervisor Password Set User Password Save & Exit Setup Exit Without Saving F3: Change Language 1 F10: Save & Exit Setup Time, Date, Hard Disk Type... Dual BIOS means that your PC will allow you to enter Award BIOS CMOS SETUP, then press to run stably...
a. CMOS Setup Utility-Copyright (C) 1984-2005 Award Software Standard CMOS Features Advanced BIOS Features Integrated Peripherals Power Management Setup PnP/PCI Configurations PC Health Status MB Intelligent Tweaker(M.I.T.) ESC: Quit F8: Dual BIOS1/Q-Flash Select Language 1 Load Fail-Safe Defaults Load Optimized Defaults Set Supervisor Password Set User Password Save & Exit Setup Exit Without Saving F3: Change Language 1 F10: Save & Exit Setup Time, Date, Hard Disk Type... Dual BIOS means that your PC will allow you to enter Award BIOS CMOS SETUP, then press to run stably...

Manual
Page 62
... Load Fail-Safe Defaults Load Optimized Defaults Set Supervisor Password Set User Password Save & Exit Setup Exit Without Saving F3: Change Language F10: Save & Exit Setup Time, Date, Hard Disk Type... Task menu for Dual BIOS utility Task menu for Dual BIOS utility: Contains the names of the task. Action bar: Contains the names of four actions needed to Floppy Enter : Run :Move ESC:Reset F10:Power Off Dual BIOS utility bar Q-FlashTM utility title bar Action bar Task menu for Q-FlashTM utility Dual BIOS Utility Boot From Main Bios Main ROM Type/Size...
... Load Fail-Safe Defaults Load Optimized Defaults Set Supervisor Password Set User Password Save & Exit Setup Exit Without Saving F3: Change Language F10: Save & Exit Setup Time, Date, Hard Disk Type... Task menu for Dual BIOS utility Task menu for Dual BIOS utility: Contains the names of the task. Action bar: Contains the names of four actions needed to Floppy Enter : Run :Move ESC:Reset F10:Power Off Dual BIOS utility bar Q-FlashTM utility title bar Action bar Task menu for Q-FlashTM utility Dual BIOS Utility Boot From Main Bios Main ROM Type/Size...
Manual
Page 76
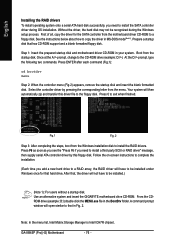
..., boot from the startup disk. Note: In the menu list, Intel Matrix Storage Manager is Intel ICH7R chipset. See the instructions below about how to copy the driver in the BootDrv folder. Once at the A:\> prompt, change to a floppy disk. Press F6 as soon as you see the "Press F6 if you need to install the SATA controller driver during the Windows setup process. After that hard drive. From...
..., boot from the startup disk. Note: In the menu list, Intel Matrix Storage Manager is Intel ICH7R chipset. See the instructions below about how to copy the driver in the BootDrv folder. Once at the A:\> prompt, change to a floppy disk. Press F6 as soon as you see the "Press F6 if you need to install the SATA controller driver during the Windows setup process. After that hard drive. From...
Manual
Page 81
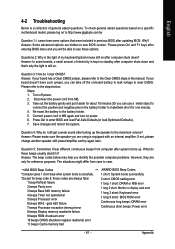
... 7 beeps Processor exception interrupt error 8 beeps Display memory read/write failure 9 beeps ROM checksum error 10 beeps CMOS shutdown register read/write error 11 beeps Cache memory bad AWARD BIOS Beep Codes 1 short: System boots successfully 2 short: CMOS setting error 1 long 1 short: DRAM or M/B error 1 long 2 short: Monitor or display card error 1 long 3 short: Keyboard error 1 long 9 short: BIOS ROM error Continuous long beeps: DRAM error Continuous short beeps: Power error - 81 - Please press Ctrl and F1 keys after entering BIOS menu and you will be able to http://www.gigabyte.com...
... 7 beeps Processor exception interrupt error 8 beeps Display memory read/write failure 9 beeps ROM checksum error 10 beeps CMOS shutdown register read/write error 11 beeps Cache memory bad AWARD BIOS Beep Codes 1 short: System boots successfully 2 short: CMOS setting error 1 long 1 short: DRAM or M/B error 1 long 2 short: Monitor or display card error 1 long 3 short: Keyboard error 1 long 9 short: BIOS ROM error Continuous long beeps: DRAM error Continuous short beeps: Power error - 81 - Please press Ctrl and F1 keys after entering BIOS menu and you will be able to http://www.gigabyte.com...


