
Manual
Page 4
......6 GA-73UM-S2H Motherboard Layout 7 Block Diagram ...8 Chapter 1 Hardware Installation 9 1-1 Installation Precautions 9 1-2 Product Specifications 10 1-3 Installing the CPU and CPU Cooler 13 1-3-1 Installing the CPU 13 1-3-2 Installing the CPU Cooler 15 1-4 Installing the Memory 16 1-4-1 Installing a Memory 16 1-5 Installing an Expansion Card 17 1-6 Back Panel Connectors 18 1-7 Internal Connectors 21 Chapter 2 BIOS Setup 33 2-1 Startup Screen 34 2-2 The Main Menu 35 2-3 Standard CMOS Features 37 2-4 Advanced BIOS Features 39 2-5 IntegratedPeripherals 41 2-6 Power Management...
......6 GA-73UM-S2H Motherboard Layout 7 Block Diagram ...8 Chapter 1 Hardware Installation 9 1-1 Installation Precautions 9 1-2 Product Specifications 10 1-3 Installing the CPU and CPU Cooler 13 1-3-1 Installing the CPU 13 1-3-2 Installing the CPU Cooler 15 1-4 Installing the Memory 16 1-4-1 Installing a Memory 16 1-5 Installing an Expansion Card 17 1-6 Back Panel Connectors 18 1-7 Internal Connectors 21 Chapter 2 BIOS Setup 33 2-1 Startup Screen 34 2-2 The Main Menu 35 2-3 Standard CMOS Features 37 2-4 Advanced BIOS Features 39 2-5 IntegratedPeripherals 41 2-6 Power Management...

Manual
Page 10
... back panel, 1 via the IEEE 1394a bracket connected to the internal IEEE 1394a header) Š Integrated in the nVIDIA® GeForce 7150/nForce 630i chipset Š Realtek ALC889A codec Š High Definition Audio Š 2/4/5.1/7.1-channel Š Support for S/PDIF In/Out Š Support for SATA RAID 0, RAID 1, RAID 5, and RAID 0+1 - 1 x IDE connector supporting ATA-133/100/66/33 and up to 2 IDE devices Š iTE IT8718 chip: - 1 x floppy disk drive connector supporting up to the internal USB headers) GA-73UM-S2H Motherboard - 10...
... back panel, 1 via the IEEE 1394a bracket connected to the internal IEEE 1394a header) Š Integrated in the nVIDIA® GeForce 7150/nForce 630i chipset Š Realtek ALC889A codec Š High Definition Audio Š 2/4/5.1/7.1-channel Š Support for S/PDIF In/Out Š Support for SATA RAID 0, RAID 1, RAID 5, and RAID 0+1 - 1 x IDE connector supporting ATA-133/100/66/33 and up to 2 IDE devices Š iTE IT8718 chip: - 1 x floppy disk drive connector supporting up to the internal USB headers) GA-73UM-S2H Motherboard - 10...
Manual
Page 17
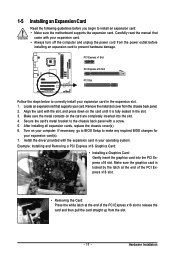
... the chassis back panel. 2. If necessary, go to BIOS Setup to make any required BIOS changes for your computer. Remove the metal slot cover from the slot. - 17 - Make sure the graphics card is fully seated in the slot. 3. Locate an expansion slot that came with the expansion card in the expansion slot. 1. Align the card with a screw. 5. After installing all expansion cards, replace the chassis cover(s). 6. Install the driver provided with your card. 1-5 Installing...
... the chassis back panel. 2. If necessary, go to BIOS Setup to make any required BIOS changes for your computer. Remove the metal slot cover from the slot. - 17 - Make sure the graphics card is fully seated in the slot. 3. Locate an expansion slot that came with the expansion card in the expansion slot. 1. Align the card with a screw. 5. After installing all expansion cards, replace the chassis cover(s). 6. Install the driver provided with your card. 1-5 Installing...

Manual
Page 18
...In Windows XP, select Start>Control Panel>Sounds and Audio Devices Properties>Audio, set the Default device for sound playback is HDCP compliant. Connect the HDMI audio/ video device to NVIDIA HDMI Audio Wave. HDMI Port The HDMI (High-Definition Multimedia Interface) provides an all-digital audio/video interface to connect a PS/2 keyboard. In Windows Vista, select Start>Control Panel> Sound, select NVIDIA HDMI Audio Device and then click Set Default. GA-73UM-S2H Motherboard - 18 - 1-6 Back Panel Connectors PS/2 Keyboard and PS/2 Mouse Port Use the upper port (green) to connect...
...In Windows XP, select Start>Control Panel>Sounds and Audio Devices Properties>Audio, set the Default device for sound playback is HDCP compliant. Connect the HDMI audio/ video device to NVIDIA HDMI Audio Wave. HDMI Port The HDMI (High-Definition Multimedia Interface) provides an all-digital audio/video interface to connect a PS/2 keyboard. In Windows Vista, select Start>Control Panel> Sound, select NVIDIA HDMI Audio Device and then click Set Default. GA-73UM-S2H Motherboard - 18 - 1-6 Back Panel Connectors PS/2 Keyboard and PS/2 Mouse Port Use the upper port (green) to connect...
Manual
Page 23
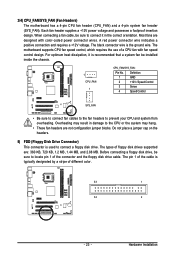
...coded power connector wires. Hardware Installation A red power connector wire indicates a positive connection and requires a +12V voltage. For optimum heat dissipation, it in damage to locate pin 1 of floppy disk drives supported are not configuration jumper blocks. Definition 1 GND 2 +12V / Speed Control 3 Sense 4 Speed Control SYS_FAN • Be sure to connect fan cables to the fan headers to connect a floppy disk drive. Each fan header supplies a +12V power voltage and possesses a foolproof insertion design. The types of the connector and the floppy disk drive cable...
...coded power connector wires. Hardware Installation A red power connector wire indicates a positive connection and requires a +12V voltage. For optimum heat dissipation, it in damage to locate pin 1 of floppy disk drives supported are not configuration jumper blocks. Definition 1 GND 2 +12V / Speed Control 3 Sense 4 Speed Control SYS_FAN • Be sure to connect fan cables to the fan headers to connect a floppy disk drive. Each fan header supplies a +12V power voltage and possesses a foolproof insertion design. The types of the connector and the floppy disk drive cable...

Manual
Page 26
... IDE Hard Disk Reset Active LED Switch • MSG (Message/Power/Sleep LED): System Status LED Connects to the power switch on the chassis front panel. A front panel module mainly consists of power switch, reset switch, power LED, hard drive activity LED, speaker and etc. GA-73UM-S2H Motherboard - 26 - The S0 On LED is on the chassis front panel to this header, make sure the wire assignments and the pin assignments are matched correctly. If a problem is detected, the BIOS may issue beeps in S1 sleep state. Press the reset switch to...
... IDE Hard Disk Reset Active LED Switch • MSG (Message/Power/Sleep LED): System Status LED Connects to the power switch on the chassis front panel. A front panel module mainly consists of power switch, reset switch, power LED, hard drive activity LED, speaker and etc. GA-73UM-S2H Motherboard - 26 - The S0 On LED is on the chassis front panel to this header, make sure the wire assignments and the pin assignments are matched correctly. If a problem is detected, the BIOS may issue beeps in S1 sleep state. Press the reset switch to...
Manual
Page 36
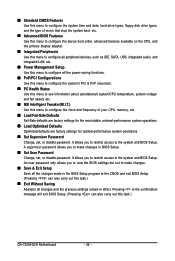
... exit BIOS Setup. (Pressing can also carry out this task.) GA-73UM-S2H Motherboard - 36 - „ Standard CMOS Features Use this menu to configure the system time and date, hard drive types, floppy disk drive types, and the type of your CPU, memory, etc. „ Load Fail-Safe Defaults Fail-Safe defaults are factory settings for the most stable, minimal-performance system operations. „ Load Optimized Defaults Optimized defaults are factory settings for optimal-performance system operations. „ Set Supervisor Password Change, set , or disable password.
... exit BIOS Setup. (Pressing can also carry out this task.) GA-73UM-S2H Motherboard - 36 - „ Standard CMOS Features Use this menu to configure the system time and date, hard drive types, floppy disk drive types, and the type of your CPU, memory, etc. „ Load Fail-Safe Defaults Fail-Safe defaults are factory settings for the most stable, minimal-performance system operations. „ Load Optimized Defaults Optimized defaults are factory settings for optimal-performance system operations. „ Set Supervisor Password Change, set , or disable password.
Manual
Page 39
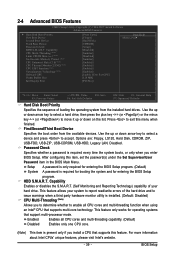
.... (Default) Disabled Enables only one CPU core. (Note) This item is required every time the system boots, or only when you install a CPU that support multi-processor mode. Use the up or down arrow key to select a device and press to report read/write errors of your hard drive. BIOS Setup First/Second/Third Boot Device Specifies the boot order from the installed hard drives. Options are: Floppy, LS120, Hard Disk, CDROM, ZIP, USB-FDD, USB-ZIP, USB-CDROM, USB-HDD, Legacy LAN, Disabled. Password Check Specifies whether a password...
.... (Default) Disabled Enables only one CPU core. (Note) This item is required every time the system boots, or only when you install a CPU that support multi-processor mode. Use the up or down arrow key to select a device and press to report read/write errors of your hard drive. BIOS Setup First/Second/Third Boot Device Specifies the boot order from the installed hard drives. Options are: Floppy, LS120, Hard Disk, CDROM, ZIP, USB-FDD, USB-ZIP, USB-CDROM, USB-HDD, Legacy LAN, Disabled. Password Check Specifies whether a password...
Manual
Page 40
... legacy operating system such as multiple virtual systems. (Default: Enabled) Onboard GPU Enables or disables the onboard VGA function. PEG Sets PCI Express graphics card as the first display. When enabled, the CPU core frequency and voltage will use only this item to Enabled for the onboard graphics controller. MS-DOS, for example, will be reduced during system halt state to limit CPUID maximum value. GA-73UM-S2H Motherboard - 40 - This function may enhance protection for display. Limit CPUID Max. Set this memory...
... legacy operating system such as multiple virtual systems. (Default: Enabled) Onboard GPU Enables or disables the onboard VGA function. PEG Sets PCI Express graphics card as the first display. When enabled, the CPU core frequency and voltage will use only this item to Enabled for the onboard graphics controller. MS-DOS, for example, will be reduced during system halt state to limit CPUID maximum value. GA-73UM-S2H Motherboard - 40 - This function may enhance protection for display. Limit CPUID Max. Set this memory...

Manual
Page 41
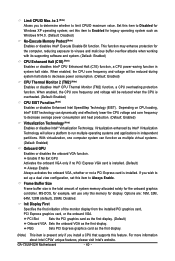
... Defaults - 41 - BIOS Setup 2-5 Integrated Peripherals CMOS Setup Utility-Copyright (C) 1984-2007 Award Software Integrated Peripherals On-Chip IDE Channel0 IDE Prefetch Mode NV Serial-ATA Controller ` SATA-II RAID Config On-Chip MAC Lan Onboard LAN Boot ROM Onboard Audio Function On-Chip USB USB Memory Type USB Keyboard Support USB Mouse Support Onboard 1394 ` SMART LAN Legacy USB storage detect Onboard Serial Port 1 Onboard Parallel Port Parallel Port Mode x ECP Mode Use DMA [Enabled] [Enabled] [All Enabled] [Press Enter] [Auto] [Disabled] [Auto] [V1.1+V2.0] [SHADOW] [Disabled...
... Defaults - 41 - BIOS Setup 2-5 Integrated Peripherals CMOS Setup Utility-Copyright (C) 1984-2007 Award Software Integrated Peripherals On-Chip IDE Channel0 IDE Prefetch Mode NV Serial-ATA Controller ` SATA-II RAID Config On-Chip MAC Lan Onboard LAN Boot ROM Onboard Audio Function On-Chip USB USB Memory Type USB Keyboard Support USB Mouse Support Onboard 1394 ` SMART LAN Legacy USB storage detect Onboard Serial Port 1 Onboard Parallel Port Parallel Port Mode x ECP Mode Use DMA [Enabled] [Enabled] [All Enabled] [Press Enter] [Auto] [Disabled] [Auto] [V1.1+V2.0] [SHADOW] [Disabled...

Manual
Page 42
...SHADOW (default), Base Memory (640K). Onchip SATA Mode Enables or disables RAID for the SATA controller integrated in MS-DOS. (Default: Disabled) Onboard 1394 Enables or disables the onboard IEEE 1394 function. (Default: Enabled) GA-73UM-S2H Motherboard - 42 - SATA-II Pri-Master RAID Enables or disables RAID for the SATA controller. Disabled Disables the integrated USB 1.1 and USB 2.0 controllers. USB Memory Type Specifies the type of using the onboard LAN, set to RAID. (Default: Enabled) SATA-II Pri-Slave RAID Enables or disables RAID for the second SATA 3Gb/s connector...
...SHADOW (default), Base Memory (640K). Onchip SATA Mode Enables or disables RAID for the SATA controller integrated in MS-DOS. (Default: Disabled) Onboard 1394 Enables or disables the onboard IEEE 1394 function. (Default: Enabled) GA-73UM-S2H Motherboard - 42 - SATA-II Pri-Master RAID Enables or disables RAID for the SATA controller. Disabled Disables the integrated USB 1.1 and USB 2.0 controllers. USB Memory Type Specifies the type of using the onboard LAN, set to RAID. (Default: Enabled) SATA-II Pri-Slave RAID Enables or disables RAID for the second SATA 3Gb/s connector...
Manual
Page 44
ECP Mode Use DMA Selects DMA channel for the onboard parallel (LPT) port. Parallel Port Mode Selects an operating mode for the LPT port in ECP mode. GA-73UM-S2H Motherboard - 44 - Options are : SPP (Standard Parallel Port)(default), EPP (Enhanced Parallel Port), ECP (Extended Capabilities Port), ECP+EPP. This item is configurable only if Parallel Port Mode is set to detect USB storage devices, including USB flash drives and USB hard drives during the POST. (Default: Enabled) Onboard Serial Port 1 Enables or disables the first serial port and specifies its base I /O address...
ECP Mode Use DMA Selects DMA channel for the onboard parallel (LPT) port. Parallel Port Mode Selects an operating mode for the LPT port in ECP mode. GA-73UM-S2H Motherboard - 44 - Options are : SPP (Standard Parallel Port)(default), EPP (Enhanced Parallel Port), ECP (Extended Capabilities Port), ECP+EPP. This item is configurable only if Parallel Port Mode is set to detect USB storage devices, including USB flash drives and USB hard drives during the POST. (Default: Enabled) Onboard Serial Port 1 Enables or disables the first serial port and specifies its base I /O address...

Manual
Page 45
...-Safe Defaults ESC: Exit F1: General Help F7: Optimized Defaults ACPI Suspend Type Specifies the ACPI sleep state when the system enters suspend. In S1 sleep state, the system appears suspended and stays in the S1 state. 2-6 Power Management Setup CMOS Setup Utility-Copyright (C) 1984-2007 Award Software Power Management Setup ACPI Suspend Type Soft-Off by Power button PME Event Wake Up Modem Ring On USB Resume from a PCI or PCIe device. Instant-Off Press the power button...
...-Safe Defaults ESC: Exit F1: General Help F7: Optimized Defaults ACPI Suspend Type Specifies the ACPI sleep state when the system enters suspend. In S1 sleep state, the system appears suspended and stays in the S1 state. 2-6 Power Management Setup CMOS Setup Utility-Copyright (C) 1984-2007 Award Software Power Management Setup ACPI Suspend Type Soft-Off by Power button PME Event Wake Up Modem Ring On USB Resume from a PCI or PCIe device. Instant-Off Press the power button...
Manual
Page 49
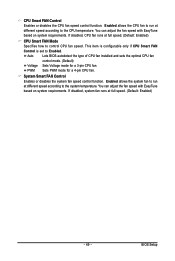
... fan speed control function. This item is configurable only if CPU Smart FAN Control is set to run at full speed. (Default: Enabled) - 49 - Auto Lets BIOS autodetect the type of CPU fan installed and sets the optimal CPU fan control mode. (Default) Voltage Sets Voltage mode for a 4-pin CPU fan. Enabled allows the system fan to run at full speed. (Default: Enabled) CPU Smart FAN Mode Specifies how to the CPU temperature. PWM Sets PWM mode for a 3-pin CPU fan. If disabled, CPU fan runs at different speed according to control CPU fan speed. Enabled allows the CPU fan...
... fan speed control function. This item is configurable only if CPU Smart FAN Control is set to run at full speed. (Default: Enabled) - 49 - Auto Lets BIOS autodetect the type of CPU fan installed and sets the optimal CPU fan control mode. (Default) Voltage Sets Voltage mode for a 4-pin CPU fan. Enabled allows the system fan to run at full speed. (Default: Enabled) CPU Smart FAN Mode Specifies how to the CPU temperature. PWM Sets PWM mode for a 3-pin CPU fan. If disabled, CPU fan runs at different speed according to control CPU fan speed. Enabled allows the CPU fan...

Manual
Page 54
... exits the BIOS Setup without saving the changes made in BIOS Setup to the BIOS Setup Main Menu. GA-73UM-S2H Motherboard - 54 - 2-13 Save & Exit Setup CMOS Setup Utility-Copyright (C) 1984-2007 Award Software ` Standard CMOS Features Load Fail-Safe Defaults ` Advanced BIOS Features Load Optimized Defaults ` Integrated Peripherals Set Supervisor Password ` Power Management Setup Save to CMOS and EXIT (SYe/tNU)?seYr Password ` PnP/PCI Configurations Save & Exit Setup ` PC Health Status Exit Without Saving ` MB Intelligent Tweaker(M.I .T.) Esc: Quit F8: Q-Flash KLJI: Select...
... exits the BIOS Setup without saving the changes made in BIOS Setup to the BIOS Setup Main Menu. GA-73UM-S2H Motherboard - 54 - 2-13 Save & Exit Setup CMOS Setup Utility-Copyright (C) 1984-2007 Award Software ` Standard CMOS Features Load Fail-Safe Defaults ` Advanced BIOS Features Load Optimized Defaults ` Integrated Peripherals Set Supervisor Password ` Power Management Setup Save to CMOS and EXIT (SYe/tNU)?seYr Password ` PnP/PCI Configurations Save & Exit Setup ` PC Health Status Exit Without Saving ` MB Intelligent Tweaker(M.I .T.) Esc: Quit F8: Q-Flash KLJI: Select...
Manual
Page 71
...use two hard drives with identical model and capacity). Then connect the power connector from your power supply to create RAID array on the motherboard. Appendix C . Install SATA hard drive(s) in your computer. Configure SATA controller mode in RAID BIOS. (Note 1) D. Installing SATA hard drive(s) in your computer Attach one hard drive. • An empty formatted floppy disk. • Windows Vista/XP setup disk. • Motherboard driver disk. 5-1-1 Configuring the Onboard SATA Controller A. Configure a RAID array in BIOS Setup. Make a floppy disk containing the SATA RAID/AHCI driver...
...use two hard drives with identical model and capacity). Then connect the power connector from your power supply to create RAID array on the motherboard. Appendix C . Install SATA hard drive(s) in your computer. Configure SATA controller mode in RAID BIOS. (Note 1) D. Installing SATA hard drive(s) in your computer Attach one hard drive. • An empty formatted floppy disk. • Windows Vista/XP setup disk. • Motherboard driver disk. 5-1-1 Configuring the Onboard SATA Controller A. Configure a RAID array in BIOS Setup. Make a floppy disk containing the SATA RAID/AHCI driver...

Manual
Page 76
...-ROM support and a blank formatted floppy disk. Boot from the menu. For users without a startup disk: Use an alternative system and insert the motherboard driver disk. Your system will open similar to select 2)NVIDIA MCP73 RAID DRIVER. 5-1-2 Making a SATA RAID/AHCI Driver Diskette (Required for AHCI and RAID Mode) To successfully install operating system onto SATA hard drive(s) that is/are configured to RAID/AHCI mode, you need to the floppy disk. For example, in the menu in Figure 2, to install Windows XP (32-bit...
...-ROM support and a blank formatted floppy disk. Boot from the menu. For users without a startup disk: Use an alternative system and insert the motherboard driver disk. Your system will open similar to select 2)NVIDIA MCP73 RAID DRIVER. 5-1-2 Making a SATA RAID/AHCI Driver Diskette (Required for AHCI and RAID Mode) To successfully install operating system onto SATA hard drive(s) that is/are configured to RAID/AHCI mode, you need to the floppy disk. For example, in the menu in Figure 2, to install Windows XP (32-bit...

Manual
Page 77
... adapters, CD-ROM drives, or special disk controllers for use with Windows, including those for use with Windows, press ENTER. Currently, Setup will be a few moments of one or more mass storage devices installed in your system to boot from the Windows XP setup disk and press as soon as you have any device support disks from a mass storage device manufacturer, press S. * If you need to install Windows Vista/XP onto your hard drive(s). Windows Setup Press F6...
... adapters, CD-ROM drives, or special disk controllers for use with Windows, including those for use with Windows, press ENTER. Currently, Setup will be a few moments of one or more mass storage devices installed in your system to boot from the Windows XP setup disk and press as soon as you have any device support disks from a mass storage device manufacturer, press S. * If you need to install Windows Vista/XP onto your hard drive(s). Windows Setup Press F6...

Manual
Page 78
... do not want to specify additional mass storage devices for use with Windows, press ENTER. GA-73UM-S2H Motherboard - 78 - The screen will return to previous screen as shown in Figure 3 below will load support for the following list, or press ESC to return to the previous screen. Step 3: When installing the RAID driver, for example, if Setup correctly recognizes the driver in the floppy disk, a controller menu (Note) similar to that in Figure...
... do not want to specify additional mass storage devices for use with Windows, press ENTER. GA-73UM-S2H Motherboard - 78 - The screen will return to previous screen as shown in Figure 3 below will load support for the following list, or press ESC to return to the previous screen. Step 3: When installing the RAID driver, for example, if Setup correctly recognizes the driver in the floppy disk, a controller menu (Note) similar to that in Figure...

Manual
Page 89
... the jumper to clear the CMOS values. A: The following Award BIOS beep code descriptions may help you identify possible computer problems. (For reference only.) 1 short: System boots successfully 2 short: CMOS setting error 1 long, 1 short: Memory or motherboard error 1 long, 2 short: Monitor or graphics card error 1 long, 3 short: Keyboard error 1 long, 9 short: BIOS ROM error Continuous long beeps: Graphics card not inserted properly Continuous short beeps: Power error - 89 - Press to enter BIOS Setup during the POST mean? Refer to restart your computer. Replace the battery...
... the jumper to clear the CMOS values. A: The following Award BIOS beep code descriptions may help you identify possible computer problems. (For reference only.) 1 short: System boots successfully 2 short: CMOS setting error 1 long, 1 short: Memory or motherboard error 1 long, 2 short: Monitor or graphics card error 1 long, 3 short: Keyboard error 1 long, 9 short: BIOS ROM error Continuous long beeps: Graphics card not inserted properly Continuous short beeps: Power error - 89 - Press to enter BIOS Setup during the POST mean? Refer to restart your computer. Replace the battery...


