Owners Manual
Page 1
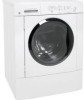
Spacemaker Washers ge.com Safety Instructions 2-4 Operating Instructions Control Panels 5 Control Settings 5 Fabric Care Labels 10 Features 6, 7 Loading and Using the Washer . . . . . .8, 9 Installation Instructions . . . . .11-16 Drain Requirements 14 Electrical Requirements 14 Installing the Washer 15, 16 Location of Your Washer 12 Preparing to Install Your Washer . . . . . .11 Replacement Parts 16 Rough-In Dimensions 12 Unpacking Your Washer 13...
Spacemaker Washers ge.com Safety Instructions 2-4 Operating Instructions Control Panels 5 Control Settings 5 Fabric Care Labels 10 Features 6, 7 Loading and Using the Washer . . . . . .8, 9 Installation Instructions . . . . .11-16 Drain Requirements 14 Electrical Requirements 14 Installing the Washer 15, 16 Location of Your Washer 12 Preparing to Install Your Washer . . . . . .11 Replacement Parts 16 Rough-In Dimensions 12 Unpacking Your Washer 13...
Owners Manual
Page 2
... cover every possible condition and situation that has not been used for two weeks or more . Since the gas is connected to escape. Do this washer are not meant to run for two weeks or more , prevent the possibility of life. The instructions in a water heater that may be produced in...
... cover every possible condition and situation that has not been used for two weeks or more . Since the gas is connected to escape. Do this washer are not meant to run for two weeks or more , prevent the possibility of life. The instructions in a water heater that may be produced in...
Owners Manual
Page 3
...and around your appliances free of combustible materials such as lint, paper, rags and chemicals. YOUR LAUNDRY AREA I Properly ground washer to conform with all governing codes and ordinances. I Install or store where it is used . Safety Instructions Operating Instructions Installation ...Instructions Troubleshooting Tips Consumer Support PROPER INSTALLATION This washer must be exposed to temperatures below freezing or exposed to the weather. An open . Do not allow children to hang on...
...and around your appliances free of combustible materials such as lint, paper, rags and chemicals. YOUR LAUNDRY AREA I Properly ground washer to conform with all governing codes and ordinances. I Install or store where it is used . Safety Instructions Operating Instructions Installation ...Instructions Troubleshooting Tips Consumer Support PROPER INSTALLATION This washer must be exposed to temperatures below freezing or exposed to the weather. An open . Do not allow children to hang on...
Owners Manual
Page 4
...water. To avoid such a result, carefully follow the garment manufacturer's wash and care instructions. SAVE THESE INSTRUCTIONS Consumer Support 4 The washer will stop if it is damaged, malfunctioning, partially disassembled, or has missing or broken parts, including a damaged cord or plug. ... before attempting any part of this appliance unless specifically recommended in this appliance from the power supply or disconnect the washer at the household distribution panel by removing the fuse or switching off the circuit breaker before opening the door. The...
...water. To avoid such a result, carefully follow the garment manufacturer's wash and care instructions. SAVE THESE INSTRUCTIONS Consumer Support 4 The washer will stop if it is damaged, malfunctioning, partially disassembled, or has missing or broken parts, including a damaged cord or plug. ... before attempting any part of this appliance unless specifically recommended in this appliance from the power supply or disconnect the washer at the household distribution panel by removing the fuse or switching off the circuit breaker before opening the door. The...
Owners Manual
Page 5
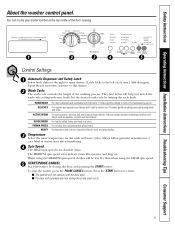
... I The door will help you need in a hurry. ACTIVE WEAR For active sports, exercise and some casual wear clothes. To stop the washer, press the PAUSE CANCEL button. PERMA PRESS For wrinkle-free and permanent press items. HEAVY For heavily soiled cottons, household linens, work and ... chart below will automatically lock during wash and rinse. Provides gentle rocking to restart. I The washer will be less dry than when using the HIGH spin speed. 5 START/PAUSE CANCEL Start the washer by turning the cycle knob. Provides gentle tumbling and soak during the entire wash cycle. 5...
... I The door will help you need in a hurry. ACTIVE WEAR For active sports, exercise and some casual wear clothes. To stop the washer, press the PAUSE CANCEL button. PERMA PRESS For wrinkle-free and permanent press items. HEAVY For heavily soiled cottons, household linens, work and ... chart below will automatically lock during wash and rinse. Provides gentle rocking to restart. I The washer will be less dry than when using the HIGH spin speed. 5 START/PAUSE CANCEL Start the washer by turning the cycle knob. Provides gentle tumbling and soak during the entire wash cycle. 5...
Owners Manual
Page 6
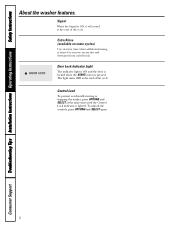
... door is locked when the START button is desired to remove excess dirt and detergent from soiled loads. Troubleshooting Tips Installation Instructions Operating Instructions Safety Instructions About the washer features. Signal When the Signal is ON, it will sound at the same time until the ...Control Lock indicator is lighted. Control Lock To prevent accidentally starting or stopping the washer, press OPTIONS and SELECT at the end...
... door is locked when the START button is desired to remove excess dirt and detergent from soiled loads. Troubleshooting Tips Installation Instructions Operating Instructions Safety Instructions About the washer features. Signal When the Signal is ON, it will sound at the same time until the ...Control Lock indicator is lighted. Control Lock To prevent accidentally starting or stopping the washer, press OPTIONS and SELECT at the end...
Owners Manual
Page 7
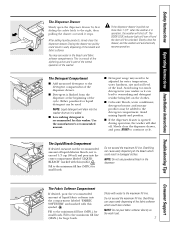
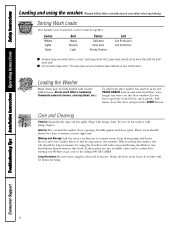
... off . I Color-safe bleach, water conditioner, detergent booster and enzyme products may see water in your washer as it stops. I Low sudsing detergent is recommended for small loads. Do not exceed the maximum fill line. Do not exceed the maximum fill line. The Detergent Compartment ... Fill to be used. Fill to continue cycle. The Fabric Softener Compartment If desired, pour the recommended amount of the load. Dilute with this washer. Avoid mixing liquids and powders. After adding laundry products, slowly close the dispenser drawer, and press START to the minimum...
... off . I Color-safe bleach, water conditioner, detergent booster and enzyme products may see water in your washer as it stops. I Low sudsing detergent is recommended for small loads. Do not exceed the maximum fill line. Do not exceed the maximum fill line. The Detergent Compartment ... Fill to be used. Fill to continue cycle. The Fabric Softener Compartment If desired, pour the recommended amount of the load. Dilute with this washer. Avoid mixing liquids and powders. After adding laundry products, slowly close the dispenser drawer, and press START to the minimum...
Owners Manual
Page 8
.... Long Vacations: Be sure water supply is no longer any spills. Load large items first. Care and Cleaning Exterior: Immediately wipe off at ge.com or by using the washer. See Installation Instructions in a load. Troubleshooting Tips Installation Instructions Operating Instructions Safety Instructions Loading and using the brackets and bolts removed during installation. Consumer Support...
.... Long Vacations: Be sure water supply is no longer any spills. Load large items first. Care and Cleaning Exterior: Immediately wipe off at ge.com or by using the washer. See Installation Instructions in a load. Troubleshooting Tips Installation Instructions Operating Instructions Safety Instructions Loading and using the brackets and bolts removed during installation. Consumer Support...

Owners Manual
Page 10
...) Only non-chlorine bleach (when needed) Do not bleach In the shade Consumer Support 10 Troubleshooting Tips Installation Instructions Operating Instructions Safety Instructions About the washer features.
...) Only non-chlorine bleach (when needed) Do not bleach In the shade Consumer Support 10 Troubleshooting Tips Installation Instructions Operating Instructions Safety Instructions About the washer features.
Owners Manual
Page 11
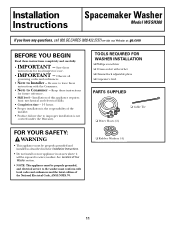
... of this appliance requires basic mechanical and electrical skills. • Completion time - 1-3 hours • Proper installation is the responsibility of Your Washer section. • NOTE: This appliance must conform with ratchet ❏ Channel-lock adjustable pliers ❏ Carpenter's level PARTS SUPPLIED ❏ ...of the National Electrical Code, ANSI/NFPA 70. Installation Instructions Spacemaker Washer Model WSSH300 If you have any questions, call 800.GE.CARES (800.432.2737) or visit our Website at: ge.com BEFORE YOU BEGIN Read these instructions for future reference. •...
... of this appliance requires basic mechanical and electrical skills. • Completion time - 1-3 hours • Proper installation is the responsibility of Your Washer section. • NOTE: This appliance must conform with ratchet ❏ Channel-lock adjustable pliers ❏ Carpenter's level PARTS SUPPLIED ❏ ...of the National Electrical Code, ANSI/NFPA 70. Installation Instructions Spacemaker Washer Model WSSH300 If you have any questions, call 800.GE.CARES (800.432.2737) or visit our Website at: ge.com BEFORE YOU BEGIN Read these instructions for future reference. •...
Owners Manual
Page 12
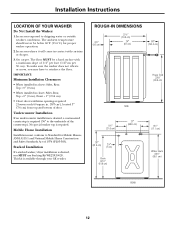
...in alcove: Sides, Rear, Top = 0″ (0 cm) • When installed in closet: Sides, Rear, Top = 0″ (0 cm), Front = 1″ (2.54 cm) • Closet door ventilation openings required: 2 louvers each 60 square in contact with a maximum slope of the countertop).... required. Stacked Installation If a stacked washer/dryer installation is required (36″ to Standard for proper washer operation. 2. No special washer top is available through your GE retailer. Installation Instructions LOCATION OF YOUR WASHER Do Not Install the Washer: 1. The ambient temperature should never...
...in alcove: Sides, Rear, Top = 0″ (0 cm) • When installed in closet: Sides, Rear, Top = 0″ (0 cm), Front = 1″ (2.54 cm) • Closet door ventilation openings required: 2 louvers each 60 square in contact with a maximum slope of the countertop).... required. Stacked Installation If a stacked washer/dryer installation is required (36″ to Standard for proper washer operation. 2. No special washer top is available through your GE retailer. Installation Instructions LOCATION OF YOUR WASHER Do Not Install the Washer: 1. The ambient temperature should never...
Owners Manual
Page 13
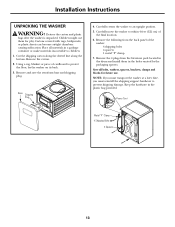
... them for future use them in the plastic bag provided. Installation Instructions UNPACKING THE WASHER WARNING: Destroy the carton and plastic bags after the washer is unpacked. Carefully return the washer to prevent shipping damage. Remove the following from the literature pack located in a ...garbage container or make materials inaccessible to protect the floor, lay the washer on its back. 3. NOTE: If you must transport the washer at a later date, you must reinstall the shipping support hardware to an upright position. 5. Power Cord Metal...
... them for future use them in the plastic bag provided. Installation Instructions UNPACKING THE WASHER WARNING: Destroy the carton and plastic bags after the washer is unpacked. Carefully return the washer to prevent shipping damage. Remove the following from the literature pack located in a ...garbage container or make materials inaccessible to protect the floor, lay the washer on its back. 3. NOTE: If you must transport the washer at a later date, you must reinstall the shipping support hardware to an upright position. 5. Power Cord Metal...
Owners Manual
Page 14
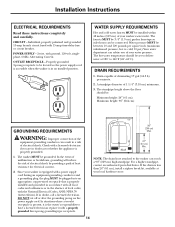
... 70 (latest edition). Drain capable of 1 1/4″ (3.18 cm) minimum. 3. The washer MUST be located so the power supply cord is accessible when the washer is in an installed position. Since your washer's water inlet. In situations where a two-slot receptacle is the owner's responsibility to be ...244 cm) GROUNDING REQUIREMENTS 96″ (244 cm) Max. The standpipe height above the floor should be set to the washer can result in the absence of your washer is properly grounded. 1. DO NOT cut off or alter the grounding prong on the power supply cord. CIRCUIT - REAR ...
... 70 (latest edition). Drain capable of 1 1/4″ (3.18 cm) minimum. 3. The washer MUST be located so the power supply cord is accessible when the washer is in an installed position. Since your washer's water inlet. In situations where a two-slot receptacle is the owner's responsibility to be ...244 cm) GROUNDING REQUIREMENTS 96″ (244 cm) Max. The standpipe height above the floor should be set to the washer can result in the absence of your washer is properly grounded. 1. DO NOT cut off or alter the grounding prong on the power supply cord. CIRCUIT - REAR ...
Owners Manual
Page 15
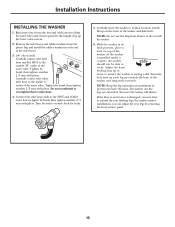
... tighten another 2/3 turn with pliers. Tighten by hand, then tighten another 2/3 turn with pliers. Adjust the front leveling legs up the water valve screens. 2. Remove the inlet hoses and rubber washers from the hot and cold faucets to flush the water lines and remove particles that might clog up or... down to extend the rear leveling legs. Turn the water on the front of the water valve. Run some water from the plastic bag and install the rubber washers in its final location. With the washer in each leg up on and check for leaks. 5. The farther out the...
... tighten another 2/3 turn with pliers. Tighten by hand, then tighten another 2/3 turn with pliers. Adjust the front leveling legs up the water valve screens. 2. Remove the inlet hoses and rubber washers from the hot and cold faucets to flush the water lines and remove particles that might clog up or... down to extend the rear leveling legs. Turn the water on the front of the water valve. Run some water from the plastic bag and install the rubber washers in its final location. With the washer in each leg up on and check for leaks. 5. The farther out the...
Owners Manual
Page 16
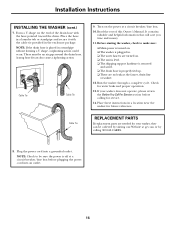
... must be ordered by calling 800.GE.CARES. 8. If your washer, they can also cause a siphoning action. It contains valuable and helpful information that will save you time and money. 11. NOTE: Check to make sure: ❏ Main power is turned on. ❏ The washer is plugged in. ❏ The... drain hose. Cable Tie Cable Tie Cable Tie 9. Turn on the end of this Owner's Manual. Before starting the washer, check to be sure the power is off at ge.com or by visiting our Website at a circuit breaker/fuse box before calling for water leaks and proper operation. 13...
... must be ordered by calling 800.GE.CARES. 8. If your washer, they can also cause a siphoning action. It contains valuable and helpful information that will save you time and money. 11. NOTE: Check to make sure: ❏ Main power is turned on. ❏ The washer is plugged in. ❏ The... drain hose. Cable Tie Cable Tie Cable Tie 9. Turn on the end of this Owner's Manual. Before starting the washer, check to be sure the power is off at ge.com or by visiting our Website at a circuit breaker/fuse box before calling for water leaks and proper operation. 13...
Owners Manual
Page 17
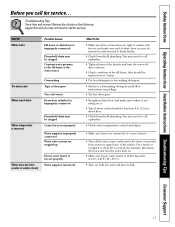
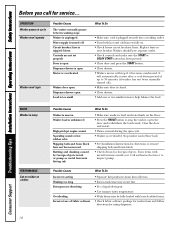
...Water leaks Too many suds Water won't drain Possible Causes Fill hoses or drain hose is improperly connected Household drain may be less than 8 ft. (2.5 m) above floor. • Check household plumbing. Use a brush or toothpick to drain facility. • Check household plumbing. ...to correct faucets. • Turn off the water source and remove the water connection hoses from the upper back of the washer. Safety Instructions Operating Instructions Installation Instructions Troubleshooting Tips Consumer Support Before you may need to call for service. You may not need...
...Water leaks Too many suds Water won't drain Possible Causes Fill hoses or drain hose is improperly connected Household drain may be less than 8 ft. (2.5 m) above floor. • Check household plumbing. Use a brush or toothpick to drain facility. • Check household plumbing. ...to correct faucets. • Turn off the water source and remove the water connection hoses from the upper back of the washer. Safety Instructions Operating Instructions Installation Instructions Troubleshooting Tips Consumer Support Before you may need to call for service. You may not need...
Owners Manual
Page 18
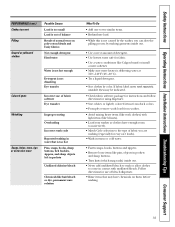
... on the floor. • Press the PAUSE button to stop if it becomes overheated. Replace fuses or reset breaker. Stop washer and reduce load. • See Installation Instructions for using dispenser. Turn items with loosely added items. • Check fabric softener package for ...long Detergent not dissolving Overloading Incorrect use of up to help balance the load. It will stop the washer, open Motor is overheated Washer won 't operate Possible Causes The washer normally pauses between washing steps Washer is unplugged Water supply is turned off ). • Make sure door ...
... on the floor. • Press the PAUSE button to stop if it becomes overheated. Replace fuses or reset breaker. Stop washer and reduce load. • See Installation Instructions for using dispenser. Turn items with loosely added items. • Check fabric softener package for ...long Detergent not dissolving Overloading Incorrect use of up to help balance the load. It will stop the washer, open Motor is overheated Washer won 't operate Possible Causes The washer normally pauses between washing steps Washer is unplugged Water supply is turned off ). • Make sure door ...
Owners Manual
Page 19
... water safe for using dispenser. • Sort whites or lightly colored items from dark colors. • Promptly remove wash load from washer. • Avoid mixing heavy items (like work clothes) with undiluted bleach. Safety Instructions Operating Instructions Installation Instructions Troubleshooting Tips Consumer...hooks, sharp buttons, belt buckles, zippers, and sharp objects left in contact with light items (like blouses). • Load your washer so clothes have chemicals on them before washing. 19 Follow directions for use of fabric softener Dye transfer Wrinkling Snags, holes...
... water safe for using dispenser. • Sort whites or lightly colored items from dark colors. • Promptly remove wash load from washer. • Avoid mixing heavy items (like work clothes) with undiluted bleach. Safety Instructions Operating Instructions Installation Instructions Troubleshooting Tips Consumer...hooks, sharp buttons, belt buckles, zippers, and sharp objects left in contact with light items (like blouses). • Load your washer so clothes have chemicals on them before washing. 19 Follow directions for use of fabric softener Dye transfer Wrinkling Snags, holes...
Owners Manual
Page 20
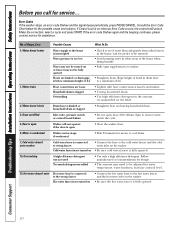
... Error Code occurs, the controls will not operate if the door is open • Close the washer door. 5, Motor is overheated Washer motor stops if overheated • Wait 30 minutes for water temperature, water hardness, load size and soil level. 15, Hot water doesn't enter Hot water hose is connected to the... wrong faucet Hot water faucet is not turned on • Connect the hot water hose to the hot water faucet and the hot water inlet on the washer. • Be sure...
... Error Code occurs, the controls will not operate if the door is open • Close the washer door. 5, Motor is overheated Washer motor stops if overheated • Wait 30 minutes for water temperature, water hardness, load size and soil level. 15, Hot water doesn't enter Hot water hose is connected to the... wrong faucet Hot water faucet is not turned on • Connect the hot water hose to the hot water faucet and the hot water inlet on the washer. • Be sure...
Owners Manual
Page 23
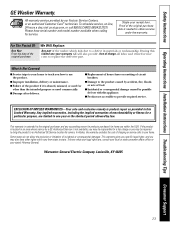
...house fuses or resetting of God. This warranty is abused, misused, or used for home use the product. I Failure of the washer which vary from state to obtain service under the warranty. This warranty gives you specific legal rights, and you may be responsible for ...service. Safety Instructions Operating Instructions Installation Instructions Troubleshooting Tips Consumer Support GE Washer Warranty. For The Period Of: One Year From the date of the original purchase We Will Replace: Any part of the ...
...house fuses or resetting of God. This warranty is abused, misused, or used for home use the product. I Failure of the washer which vary from state to obtain service under the warranty. This warranty gives you specific legal rights, and you may be responsible for ...service. Safety Instructions Operating Instructions Installation Instructions Troubleshooting Tips Consumer Support GE Washer Warranty. For The Period Of: One Year From the date of the original purchase We Will Replace: Any part of the ...


