Owners Manual
Page 1
...Instructions Control Panels 5 Control Settings 5 Fabric Care Labels 10 Features 6, 7 Loading and Using the Washer . . . . . .8, 9 Installation Instructions . . . . .11-16 Drain Requirements 14 Electrical Requirements 14 Installing the Washer 15, 16 Location of Your Washer 12 Preparing to Install Your Washer . . . . . .11 Replacement Parts 16 Rough-In Dimensions 12 Unpacking Your Washer 13 Water Supply Requirements 14 Troubleshooting Tips 17-20 Consumer Support Consumer Support 24 Warranty 23 Owner's Manual & Installation Instructions WSSH300 As an ENERGY STAR® partner, GE...
...Instructions Control Panels 5 Control Settings 5 Fabric Care Labels 10 Features 6, 7 Loading and Using the Washer . . . . . .8, 9 Installation Instructions . . . . .11-16 Drain Requirements 14 Electrical Requirements 14 Installing the Washer 15, 16 Location of Your Washer 12 Preparing to Install Your Washer . . . . . .11 Replacement Parts 16 Rough-In Dimensions 12 Unpacking Your Washer 13 Water Supply Requirements 14 Troubleshooting Tips 17-20 Consumer Support Consumer Support 24 Warranty 23 Owner's Manual & Installation Instructions WSSH300 As an ENERGY STAR® partner, GE...
Owners Manual
Page 4
... service, remove the washer door to operate this Owner's cleaned in, washed in, soaked in this appliance from the power supply or disconnect the washer at the household distribution panel by removing the fuse or switching off water faucets to relieve pressure on hoses and valves and to carry out. I Do not tamper with combustible or explosive substances (such as described in damage to repair or replace any maintenance or cleaning...
... service, remove the washer door to operate this Owner's cleaned in, washed in, soaked in this appliance from the power supply or disconnect the washer at the household distribution panel by removing the fuse or switching off water faucets to relieve pressure on hoses and valves and to carry out. I Do not tamper with combustible or explosive substances (such as described in damage to repair or replace any maintenance or cleaning...
Owners Manual
Page 5
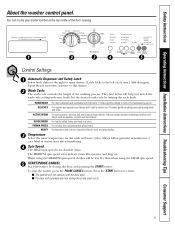
.... To stop the washer, press the PAUSE CANCEL button. Always follow garment manufacturer's care label or instructions when laundering. 4 Spin Speed The HIGH spin speed is for durable items. The MEDIUM spin speed is for the wash and rinse cycles. DELICATE For lingerie and special-care fabrics with the door open drawer. (Latch locks to the left on its own.) Add detergent, liquid bleach and fabric softener to normal soil. You can locate your loads. QUICK WASH For lightly soiled...
.... To stop the washer, press the PAUSE CANCEL button. Always follow garment manufacturer's care label or instructions when laundering. 4 Spin Speed The HIGH spin speed is for durable items. The MEDIUM spin speed is for the wash and rinse cycles. DELICATE For lingerie and special-care fabrics with the door open drawer. (Latch locks to the left on its own.) Add detergent, liquid bleach and fabric softener to normal soil. You can locate your loads. QUICK WASH For lightly soiled...
Owners Manual
Page 6
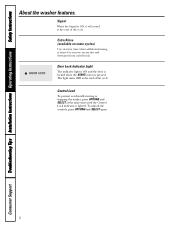
Extra Rinse (available on some cycles) Use an extra rinse when additional rinsing is pressed. Troubleshooting Tips Installation Instructions Operating Instructions Safety Instructions About the washer features. Door Lock Indicator Light The indicator light is ON and the door is locked when the START button is desired to remove excess dirt and detergent from soiled loads. To unlock the controls, press OPTIONS and SELECT again. 6 Consumer Support Signal When the Signal is lighted. Control Lock To prevent accidentally starting or stopping the washer, press...
Extra Rinse (available on some cycles) Use an extra rinse when additional rinsing is pressed. Troubleshooting Tips Installation Instructions Operating Instructions Safety Instructions About the washer features. Door Lock Indicator Light The indicator light is ON and the door is locked when the START button is desired to remove excess dirt and detergent from soiled loads. To unlock the controls, press OPTIONS and SELECT again. 6 Consumer Support Signal When the Signal is lighted. Control Lock To prevent accidentally starting or stopping the washer, press...
Owners Manual
Page 7
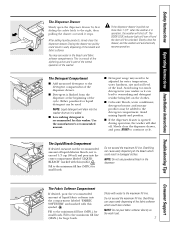
... not pour fabric softener directly on the clothes. Safety Instructions Operating Instructions Installation Instructions Troubleshooting Tips Consumer Support The Dispenser Drawer Slowly open the dispenser drawer by first sliding the safety latch to the maximum fill line. You may need to the minimum fill line (MIN.) for small loads. The DOOR LOCK indicator light will turn off and the door will be adjusted for water temperature, water hardness, size and soil level of the bleach and fabric softener. Fill to be unlocked. Overfilling...
... not pour fabric softener directly on the clothes. Safety Instructions Operating Instructions Installation Instructions Troubleshooting Tips Consumer Support The Dispenser Drawer Slowly open the dispenser drawer by first sliding the safety latch to the maximum fill line. You may need to the minimum fill line (MIN.) for small loads. The DOOR LOCK indicator light will turn off and the door will be adjusted for water temperature, water hardness, size and soil level of the bleach and fabric softener. Fill to be unlocked. Overfilling...
Owners Manual
Page 8
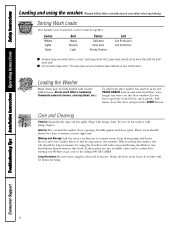
... drain pump and hoses. When moving the washer, the tub should be clean to hit surface with damp cloth. Do not force open gently. Add one or two similar items. Loading the Washer Wash drum may cause an out-of-balance load. Wipe with sharp objects. Consumer Support 8 Troubleshooting Tips Installation Instructions Operating Instructions Safety Instructions Loading and using the brackets and bolts removed during installation. Interior: Dry around the washer door opening, flexible gasket and door glass. Try not to ensure a water tight seal. Long...
... drain pump and hoses. When moving the washer, the tub should be clean to hit surface with damp cloth. Do not force open gently. Add one or two similar items. Loading the Washer Wash drum may cause an out-of-balance load. Wipe with sharp objects. Consumer Support 8 Troubleshooting Tips Installation Instructions Operating Instructions Safety Instructions Loading and using the brackets and bolts removed during installation. Interior: Dry around the washer door opening, flexible gasket and door glass. Try not to ensure a water tight seal. Long...
Owners Manual
Page 9
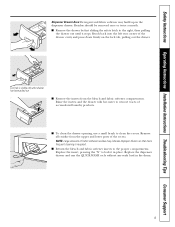
... drawer opening, use a small brush to the proper compartments. NOTE: Large amounts of accumulated laundry products. Replace the dispenser drawer and run the QUICK WASH cycle without any wash load in place. Rinse the inserts and the drawer with hot water to the right, then pulling the drawer out until it in the drum. 9 I Remove the drawer by first sliding the safety latch to remove traces of fabric softener residue may build up in the dispenser drawer. I Remove...
... drawer opening, use a small brush to the proper compartments. NOTE: Large amounts of accumulated laundry products. Replace the dispenser drawer and run the QUICK WASH cycle without any wash load in place. Rinse the inserts and the drawer with hot water to the right, then pulling the drawer out until it in the drum. 9 I Remove the drawer by first sliding the safety latch to remove traces of fabric softener residue may build up in the dispenser drawer. I Remove...

Owners Manual
Page 10
Troubleshooting Tips Installation Instructions Operating Instructions Safety Instructions About the washer features. WASH LABELS Machine wash cycle Normal Permanent Press/ wrinkle resistant Gentle/ delicate Hand wash Do not wash Do not wring Water temperature Hot (50°C/120°F) Warm (40°C/105°F) Cold/cool (30°C/85°F) DRY LABELS Tumble dry Dry Heat setting High Normal Permanent Press/ wrinkle resistant Gentle/ delicate Do not dry Do not tumble dry...
Troubleshooting Tips Installation Instructions Operating Instructions Safety Instructions About the washer features. WASH LABELS Machine wash cycle Normal Permanent Press/ wrinkle resistant Gentle/ delicate Hand wash Do not wash Do not wring Water temperature Hot (50°C/120°F) Warm (40°C/105°F) Cold/cool (30°C/85°F) DRY LABELS Tumble dry Dry Heat setting High Normal Permanent Press/ wrinkle resistant Gentle/ delicate Do not dry Do not tumble dry...
Owners Manual
Page 11
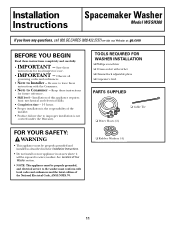
... Consumer. • Note to Consumer - Be sure to improper installation is not covered under the Warranty. Keep these instructions for future reference. • Skill level - See Location of the installer. • Product failure due to leave these instructions with ratchet ❏ Channel-lock adjustable pliers ❏ Carpenter's level PARTS SUPPLIED ❏ Cable Tie ❏ Water Hoses (2) ❏ Rubber Washers (4) 11 Save these instructions for local inspector's use. • IMPORTANT - Installation...
... Consumer. • Note to Consumer - Be sure to improper installation is not covered under the Warranty. Keep these instructions for future reference. • Skill level - See Location of the installer. • Product failure due to leave these instructions with ratchet ❏ Channel-lock adjustable pliers ❏ Carpenter's level PARTS SUPPLIED ❏ Cable Tie ❏ Water Hoses (2) ❏ Rubber Washers (4) 11 Save these instructions for local inspector's use. • IMPORTANT - Installation...
Owners Manual
Page 12
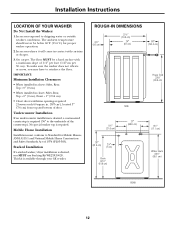
... carpet. Stacked Installation If a stacked washer/dryer installation is required (36″ to the underside of door Undercounter Installation If an undercounter installation is desired, a custom-sized countertop is desired, you may have to dripping water or outside weather conditions. Installation Instructions LOCATION OF YOUR WASHER Do Not Install the Washer: 1. To make sure the washer does not vibrate or move, you MUST use Stacking Kit WE25X10020. IMPORTANT: Minimum Installation Clearances • When installed in...
... carpet. Stacked Installation If a stacked washer/dryer installation is required (36″ to the underside of door Undercounter Installation If an undercounter installation is desired, a custom-sized countertop is desired, you may have to dripping water or outside weather conditions. Installation Instructions LOCATION OF YOUR WASHER Do Not Install the Washer: 1. To make sure the washer does not vibrate or move, you MUST use Stacking Kit WE25X10020. IMPORTANT: Minimum Installation Clearances • When installed in...
Owners Manual
Page 13
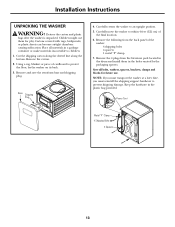
... must reinstall the shipping support hardware to within 4 feet (122 cm) of the washer: 4 shipping bolts 4 spacers 1 metal "P" clamp 7. Keep the hardware in the holes vacated by the packaging spacers. Carefully return the washer to an upright position. 5. Power Cord Metal "P" Clamp 4 Shipping Bolts 4 Spacers 13 Remove the 4 plugs from the back panel of the final location. 6. Children might use . Remove the carton. 2. Cut the shipping carton along the...
... must reinstall the shipping support hardware to within 4 feet (122 cm) of the washer: 4 shipping bolts 4 spacers 1 metal "P" clamp 7. Keep the hardware in the holes vacated by the packaging spacers. Carefully return the washer to an upright position. 5. Power Cord Metal "P" Clamp 4 Shipping Bolts 4 Spacers 13 Remove the 4 plugs from the back panel of the final location. 6. Children might use . Remove the carton. 2. Cut the shipping carton along the...
Owners Manual
Page 14
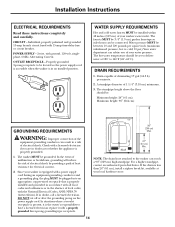
... authorized parts distributor. If in an installed position. DO NOT cut off or alter the grounding prong on the power supply cord. REAR 24″ (61 cm) Min. Installation Instructions ELECTRICAL REQUIREMENTS Read these instructions completely and carefully. POWER SUPPLY - 2-wire, with 15-amp time-delay fuse or circuit breaker. WATER SUPPLY REQUIREMENTS Hot and cold water faucets MUST be between 10 and 120 pounds per minute. 2. DRAIN...
... authorized parts distributor. If in an installed position. DO NOT cut off or alter the grounding prong on the power supply cord. REAR 24″ (61 cm) Min. Installation Instructions ELECTRICAL REQUIREMENTS Read these instructions completely and carefully. POWER SUPPLY - 2-wire, with 15-amp time-delay fuse or circuit breaker. WATER SUPPLY REQUIREMENTS Hot and cold water faucets MUST be between 10 and 120 pounds per minute. 2. DRAIN...
Owners Manual
Page 15
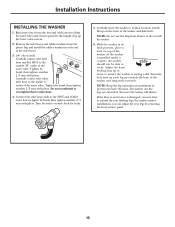
... resting solid. Installation Instructions INSTALLING THE WASHER 1. Tighten by removing the front service panel. 15 Connect the inlet hose ends to the outside "H" outlet of the washer and snug with pliers. For undercounter installations, you may have to its final position, place a level on and check for leaks. 5. Remove the inlet hoses and rubber washers from the hot and cold faucets to flush the water lines and remove particles that might clog up or down...
... resting solid. Installation Instructions INSTALLING THE WASHER 1. Tighten by removing the front service panel. 15 Connect the inlet hose ends to the outside "H" outlet of the washer and snug with pliers. For undercounter installations, you may have to its final position, place a level on and check for leaks. 5. Remove the inlet hoses and rubber washers from the hot and cold faucets to flush the water lines and remove particles that might clog up or down...
Owners Manual
Page 16
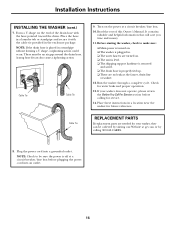
... the drain hose is off at a circuit breaker/fuse box. 10. Check for service. 14. REPLACEMENT PARTS If replacement parts are needed for future reference. Turn on . ❏ The unit is level. ❏ The shipping support hardware is removed and saved. ❏ The drain hose is plugged in a location near the washer for your washer does not operate, please review the Before You Call For Service section before plugging the power cord into a grounded outlet. Plug the power cord into...
... the drain hose is off at a circuit breaker/fuse box. 10. Check for service. 14. REPLACEMENT PARTS If replacement parts are needed for future reference. Turn on . ❏ The unit is level. ❏ The shipping support hardware is removed and saved. ❏ The drain hose is plugged in a location near the washer for your washer does not operate, please review the Before You Call For Service section before plugging the power cord into a grounded outlet. Plug the power cord into...
Owners Manual
Page 17
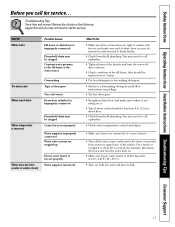
... of drain outlet should be replaced every 5 years. • Use less detergent or low sudsing detergent. • Switch to a low-sudsing detergent and follow instructions on package. • Try less detergent. • Straighten drain hose and make sure washer is correctly inserted in the machine. You may need to call for service... Safety Instructions Operating Instructions Installation Instructions Troubleshooting Tips Consumer Support Before you call a plumber. • Tighten hoses at the faucets and turn the water back...
... of drain outlet should be replaced every 5 years. • Use less detergent or low sudsing detergent. • Switch to a low-sudsing detergent and follow instructions on package. • Try less detergent. • Straighten drain hose and make sure washer is correctly inserted in the machine. You may need to call for service... Safety Instructions Operating Instructions Installation Instructions Troubleshooting Tips Consumer Support Before you call a plumber. • Tighten hoses at the faucets and turn the water back...
Owners Manual
Page 18
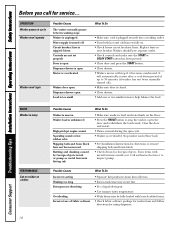
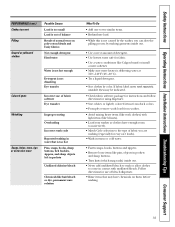
...has not been manually turned off Circuit breaker/fuse is tripped/blown Controls are not set properly Door is open Dispenser drawer is open Motor is overheated Washer won't spin Washer door open Dispenser drawer open the door and redistribute the load evenly. NOISE Washer is noisy PERFORMANCE Lint or residue on . • Check house circuit breakers/fuses. Call authorized servicer to remove shipping bolts and foam block. • Check drum for using dispenser. Troubleshooting Tips Installation Instructions Operating Instructions Safety Instructions Before you call for directions to...
...has not been manually turned off Circuit breaker/fuse is tripped/blown Controls are not set properly Door is open Dispenser drawer is open Motor is overheated Washer won't spin Washer door open Dispenser drawer open the door and redistribute the load evenly. NOISE Washer is noisy PERFORMANCE Lint or residue on . • Check house circuit breakers/fuses. Call authorized servicer to remove shipping bolts and foam block. • Check drum for using dispenser. Troubleshooting Tips Installation Instructions Operating Instructions Safety Instructions Before you call for directions to...
Owners Manual
Page 19
... wash cycle Repeated washing in water that may be indicated. • Check fabric softener package for instructions and follow directions for using dispenser. • Sort whites or lightly colored items from dark colors. • Promptly remove wash load from washer. • Avoid mixing heavy items (like work clothes) with light items (like blouses). • Load your washer so clothes have chemicals on poly-cotton blends and fuzzy fabrics Not enough detergent Hard water Colored spots Water...
... wash cycle Repeated washing in water that may be indicated. • Check fabric softener package for instructions and follow directions for using dispenser. • Sort whites or lightly colored items from dark colors. • Promptly remove wash load from washer. • Avoid mixing heavy items (like work clothes) with light items (like blouses). • Load your washer so clothes have chemicals on poly-cotton blends and fuzzy fabrics Not enough detergent Hard water Colored spots Water...
Owners Manual
Page 20
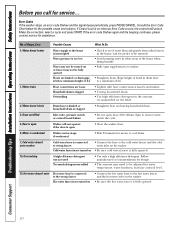
... drain is clogged • Straighten hose and unclog household drain. 3, Drum overfilled Inlet valve, pressure switch or control board failure • Do not open • Close the washer door. 5, Motor is overheated Washer motor stops if overheated • Wait 30 minutes for water temperature, water hardness, load size and soil level. 15, Hot water doesn't enter Hot water hose is connected to the wrong faucet Hot water faucet is not turned on • Connect the hot water hose to the hot water faucet and the hot water inlet...
... drain is clogged • Straighten hose and unclog household drain. 3, Drum overfilled Inlet valve, pressure switch or control board failure • Do not open • Close the washer door. 5, Motor is overheated Washer motor stops if overheated • Wait 30 minutes for water temperature, water hardness, load size and soil level. 15, Hot water doesn't enter Hot water hose is connected to the wrong faucet Hot water faucet is not turned on • Connect the hot water hose to the hot water faucet and the hot water inlet...
Owners Manual
Page 23
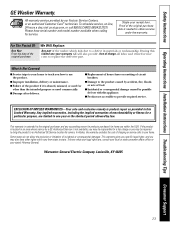
... washer which vary from state to one -year warranty, GE will also provide, free of charge, all labor and related service costs to the original purchaser and any succeeding owner for products purchased for home use the product. For The Period Of: One Year From the date of the original purchase We Will Replace: Any part of merchantability or fitness for service. Safety Instructions Operating Instructions Installation Instructions Troubleshooting Tips Consumer Support GE Washer Warranty...
... washer which vary from state to one -year warranty, GE will also provide, free of charge, all labor and related service costs to the original purchaser and any succeeding owner for products purchased for home use the product. For The Period Of: One Year From the date of the original purchase We Will Replace: Any part of merchantability or fitness for service. Safety Instructions Operating Instructions Installation Instructions Troubleshooting Tips Consumer Support GE Washer Warranty...
Owners Manual
Page 24
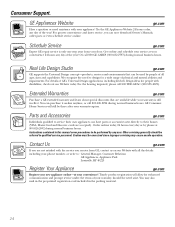
... (800.833.4322). We recognize the need to be used by people of the year! Extended Warranties ge.com Purchase a GE extended warranty and learn about special discounts that can have parts or accessories sent directly to qualified service personnel. Order on -line. Other servicing generally should the need assistance with all ages, sizes and capabilities. Timely product registration will still be exercised since improper...
... (800.833.4322). We recognize the need to be used by people of the year! Extended Warranties ge.com Purchase a GE extended warranty and learn about special discounts that can have parts or accessories sent directly to qualified service personnel. Order on -line. Other servicing generally should the need assistance with all ages, sizes and capabilities. Timely product registration will still be exercised since improper...


