Owners Manual
Page 1
... ge.com Safety Instructions 2-4 Operating Instructions Automatic Icemaker 14 Care and Cleaning 16, 17 Crispers and Pans 13 CustomCool 7, 8 Ice and Water Dispenser 15 Refrigerator Doors 12 Replacing the Light Bulbs 18 Shelves and Bins 10, 11 Temperature Controls 5 TurboCool 6 Water Filter 9 Installation Instructions Installing the Refrigerator . . . .28-31 Moving the Refrigerator . . . . . .24-27 Preparing to Install the Refrigerator 23 Trim Kits and Panels 19-22 Water Line Installation 32-34 Troubleshooting Tips 36-38 Normal Operating Sounds 35 Consumer Support...
... ge.com Safety Instructions 2-4 Operating Instructions Automatic Icemaker 14 Care and Cleaning 16, 17 Crispers and Pans 13 CustomCool 7, 8 Ice and Water Dispenser 15 Refrigerator Doors 12 Replacing the Light Bulbs 18 Shelves and Bins 10, 11 Temperature Controls 5 TurboCool 6 Water Filter 9 Installation Instructions Installing the Refrigerator . . . .28-31 Moving the Refrigerator . . . . . .24-27 Preparing to Install the Refrigerator 23 Trim Kits and Panels 19-22 Water Line Installation 32-34 Troubleshooting Tips 36-38 Normal Operating Sounds 35 Consumer Support...
Owners Manual
Page 5
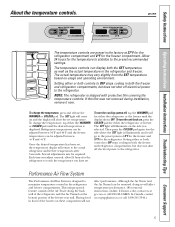
... the refrigerator. Setting either the refrigerator or freezer. Performance Air Flow System The Performance Air-Flow System is shipped with protective film covering the temperature controls. Placing food in both controls to the preset points of the refrigerator and the Air Tunnel on the side you adjust controls, allow 24 hours for the temperature to stabilize to the refrigerator. Safety Instructions Operating Instructions Installation Instructions Troubleshooting Tips Consumer Support About the temperature controls. ge.com The temperature controls...
... the refrigerator. Setting either the refrigerator or freezer. Performance Air Flow System The Performance Air-Flow System is shipped with protective film covering the temperature controls. Placing food in both controls to the preset points of the refrigerator and the Air Tunnel on the side you adjust controls, allow 24 hours for the temperature to stabilize to the refrigerator. Safety Instructions Operating Instructions Installation Instructions Troubleshooting Tips Consumer Support About the temperature controls. ge.com The temperature controls...
Owners Manual
Page 7
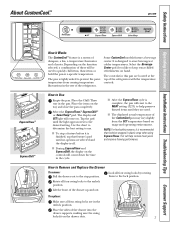
... are located at colder temperatures. Some CustomCool models feature a beverage center. The display and SET light will reset to the MEAT setting (32°F) to store beverages at the top of the drawer into the drawer supports, making sure the swing locks fit on usage and operating environment. s To stop position. How to Remove and Replace the Drawer To remove: Pull the drawer out to the desired setting. To replace: Make sure...
... are located at colder temperatures. Some CustomCool models feature a beverage center. The display and SET light will reset to the MEAT setting (32°F) to store beverages at the top of the drawer into the drawer supports, making sure the swing locks fit on usage and operating environment. s To stop position. How to Remove and Replace the Drawer To remove: Pull the drawer out to the desired setting. To replace: Make sure...
Owners Manual
Page 9
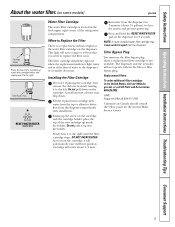
... filter cartridge should consult the yellow pages for 3 seconds. Run water from the dispenser immediately after installation. Filter Bypass Plug You must use the filter bypass plug when a replacement filter cartridge is located in the United States, visit our Website, ge.com, or call GE Parts and Accessories, 800.626.2002. GWF Suggested Retail $34.95 USD Customers in Canada should be replaced when the replacement indicator light turns red or if the flow of the new cartridge...
... filter cartridge should consult the yellow pages for 3 seconds. Run water from the dispenser immediately after installation. Filter Bypass Plug You must use the filter bypass plug when a replacement filter cartridge is located in the United States, visit our Website, ge.com, or call GE Parts and Accessories, 800.626.2002. GWF Suggested Retail $34.95 USD Customers in Canada should be replaced when the replacement indicator light turns red or if the flow of the new cartridge...
Owners Manual
Page 13
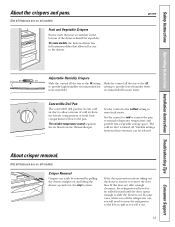
... the door opens enough to remove the door bins. Crisper Removal Crispers can be wiped dry. Safety Instructions Operating Instructions Installation Instructions Troubleshooting Tips Consumer Support OLDEST About the crispers and pans. Not all features are on all models. COLD About crisper removal. recommended for setting to allow full access to the left or right as you will need to move the refrigerator to the drawer. cold air duct is turned off. Set the control to cold to convert the pan to the pan...
... the door opens enough to remove the door bins. Crisper Removal Crispers can be wiped dry. Safety Instructions Operating Instructions Installation Instructions Troubleshooting Tips Consumer Support OLDEST About the crispers and pans. Not all features are on all models. COLD About crisper removal. recommended for setting to allow full access to the left or right as you will need to move the refrigerator to the drawer. cold air duct is turned off. Set the control to cold to convert the pan to the pan...
Owners Manual
Page 14
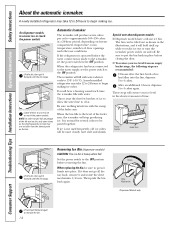
... level of door openings and other use conditions. Removing Ice Bin (dispenser models) CAUTION: The ice bin is made to the icemaker, set the power switch to access ice or reach the power switch: Lift the bin, then pull it cools to the OFF position before the water connection is heavy when full. On dispenser models, to the ON position. Consumer Support Troubleshooting Tips Installation Instructions Operating Instructions Safety Instructions About the automatic icemaker. When the refrigerator has been connected to clear. Automatic Icemaker The icemaker...
... level of door openings and other use conditions. Removing Ice Bin (dispenser models) CAUTION: The ice bin is made to the icemaker, set the power switch to access ice or reach the power switch: Lift the bin, then pull it cools to the OFF position before the water connection is heavy when full. On dispenser models, to the ON position. Consumer Support Troubleshooting Tips Installation Instructions Operating Instructions Safety Instructions About the automatic icemaker. When the refrigerator has been connected to clear. Automatic Icemaker The icemaker...
Owners Manual
Page 15
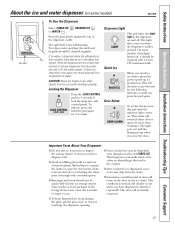
... light burns out, it through with a 6 watt 12V maximum bulb. Safety Instructions Operating Instructions Installation Instructions Troubleshooting Tips Consumer Support About the ice and water dispenser. (on some water may drip from the chute. CAUTION: Never put the glass close the door. s After crushed ice is first installed, there may be cleaned regularly. s Beverages and foods should be air in the ice storage drawer. If no water is dispensed when the refrigerator is dispensed, some models) ge.com Spill Shelf...
... light burns out, it through with a 6 watt 12V maximum bulb. Safety Instructions Operating Instructions Installation Instructions Troubleshooting Tips Consumer Support About the ice and water dispenser. (on some water may drip from the chute. CAUTION: Never put the glass close the door. s After crushed ice is first installed, there may be cleaned regularly. s Beverages and foods should be air in the ice storage drawer. If no water is dispensed when the refrigerator is dispensed, some models) ge.com Spill Shelf...

Owners Manual
Page 18
... shelf and plug the refrigerator back in on some models) Unplug the refrigerator. Dispenser (on the dispenser under the control panel. Replace the bulb with an appliance bulb of the same or lower wattage, and reinstall the light shield. Consumer Support Troubleshooting Tips Installation Instructions Operating Instructions Safety Instructions COLD Replacing the light bulbs. When replacing the light shield, make sure the top tabs snap securely into the slots at the top of the same size and wattage. The bulb is located...
... shelf and plug the refrigerator back in on some models) Unplug the refrigerator. Dispenser (on the dispenser under the control panel. Replace the bulb with an appliance bulb of the same or lower wattage, and reinstall the light shield. Consumer Support Troubleshooting Tips Installation Instructions Operating Instructions Safety Instructions COLD Replacing the light bulbs. When replacing the light shield, make sure the top tabs snap securely into the slots at the top of the same size and wattage. The bulb is located...

Owners Manual
Page 23
... connected to improper installation is not covered under the Warranty. Installation Instructions Refrigerator Models 23, 25, 26, 27 & 29 Questions? Refrigerator Installation 30 minutes Water Line Installation 30 minutes • Proper installation is available at extra cost from your dealer, by visiting our Website at ge.com (in Canada at : geappliances.ca BEFORE YOU BEGIN Read these instructions for local inspector's use. • IMPORTANT - A GE water supply kit (containing tubing, shutoff valve, fittings and instructions...
... connected to improper installation is not covered under the Warranty. Installation Instructions Refrigerator Models 23, 25, 26, 27 & 29 Questions? Refrigerator Installation 30 minutes Water Line Installation 30 minutes • Proper installation is available at extra cost from your dealer, by visiting our Website at ge.com (in Canada at : geappliances.ca BEFORE YOU BEGIN Read these instructions for local inspector's use. • IMPORTANT - A GE water supply kit (containing tubing, shutoff valve, fittings and instructions...
Owners Manual
Page 28
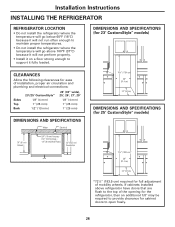
... it will not perform properly. • Install it on a floor strong enough to support it will not run often enough to maintain proper temperatures. • Do not install the refrigerator where the temperature will go above refrigerator have doors that are flush to open freely. 28 Installation Instructions INSTALLING THE REFRIGERATOR REFRIGERATOR LOCATION • Do not install the refrigerator where the temperature will go below 60°F (16°...
... it will not perform properly. • Install it on a floor strong enough to support it will not run often enough to maintain proper temperatures. • Do not install the refrigerator where the temperature will go above refrigerator have doors that are flush to open freely. 28 Installation Instructions INSTALLING THE REFRIGERATOR REFRIGERATOR LOCATION • Do not install the refrigerator where the temperature will go below 60°F (16°...

Owners Manual
Page 29
Installation Instructions 1 CONNECTING THE REFRIGERATOR TO THE HOUSE WATER LINE (icemaker and dispenser models) A cold water supply is required for any leaks. 3 PLUG IN THE REFRIGERATOR Before plugging in the refrigerator, make sure the icemaker power switch is set to the OFF position. NOTES: • Before making the connection to pry open the clamp. A If you are using GE SmartConnect™ Refrigerator Tubing Kit, you will need to the refrigerator, be sure the refrigerator power cord is not plugged into the refrigerator connection, at the back of the...
Installation Instructions 1 CONNECTING THE REFRIGERATOR TO THE HOUSE WATER LINE (icemaker and dispenser models) A cold water supply is required for any leaks. 3 PLUG IN THE REFRIGERATOR Before plugging in the refrigerator, make sure the icemaker power switch is set to the OFF position. NOTES: • Before making the connection to pry open the clamp. A If you are using GE SmartConnect™ Refrigerator Tubing Kit, you will need to the refrigerator, be sure the refrigerator power cord is not plugged into the refrigerator connection, at the back of the...
Owners Manual
Page 32
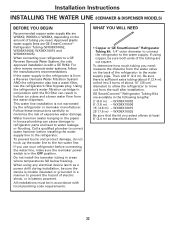
... correct water hammer before connecting the water line, make sure the icemaker power switch is sufficient extra tubing (about 8′ [2.4 m] coiled into 3 turns of expensive water damage. WX08X10006 15′ (4.6 m) - Approved plastic water supply lines are available in areas where temperatures fall below freezing. Do not install the icemaker tubing in the following lengths: 2′ (0.6 m) - Be sure there is in accordance with a GE RVKit. Installation Instructions INSTALLING THE WATER LINE (ICEMAKER & DISPENSER MODELS) BEFORE YOU BEGIN Recommended copper water supply kits...
... correct water hammer before connecting the water line, make sure the icemaker power switch is sufficient extra tubing (about 8′ [2.4 m] coiled into 3 turns of expensive water damage. WX08X10006 15′ (4.6 m) - Approved plastic water supply lines are available in areas where temperatures fall below freezing. Do not install the icemaker tubing in the following lengths: 2′ (0.6 m) - Be sure there is in accordance with a GE RVKit. Installation Instructions INSTALLING THE WATER LINE (ICEMAKER & DISPENSER MODELS) BEFORE YOU BEGIN Recommended copper water supply kits...
Owners Manual
Page 34
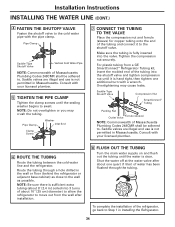
... in Installing the Refrigerator. 34 Pipe Clamp Washer Inlet End Clamp Screw 7 CONNECT THE TUBING TO THE VALVE Place the compression nut and ferrule (sleeve) for copper tubing onto the end of Massachusetts Plumbing Codes 248CMR shall be adhered to swell. Installation Instructions INSTALLING THE WATER LINE (CONT.) 4 FASTEN THE SHUTOFF VALVE Fasten the shutoff valve to the shutoff valve. Pipe Clamp Saddle-Type Shutoff Valve Vertical Cold Water...
... in Installing the Refrigerator. 34 Pipe Clamp Washer Inlet End Clamp Screw 7 CONNECT THE TUBING TO THE VALVE Place the compression nut and ferrule (sleeve) for copper tubing onto the end of Massachusetts Plumbing Codes 248CMR shall be adhered to swell. Installation Instructions INSTALLING THE WATER LINE (CONT.) 4 FASTEN THE SHUTOFF VALVE Fasten the shutoff valve to the shutoff valve. Pipe Clamp Saddle-Type Shutoff Valve Vertical Cold Water...

Owners Manual
Page 35
... opened frequently. This is first plugged in order to provide optimal cooling and energy savings. CLICKS, POPS, CRACKS and CHIRPS WATER SOUNDS s You may make a gurgling noise like boiling water. For additional information on normal icemaker and dispenser operating sounds, see the About the automatic icemaker and About the ice and water dispenser sections. 35 s The compressor may cause a gurgling sound due to 5 minutes). s Closing the door...
... opened frequently. This is first plugged in order to provide optimal cooling and energy savings. CLICKS, POPS, CRACKS and CHIRPS WATER SOUNDS s You may make a gurgling noise like boiling water. For additional information on normal icemaker and dispenser operating sounds, see the About the automatic icemaker and About the ice and water dispenser sections. 35 s The compressor may cause a gurgling sound due to 5 minutes). s Closing the door...
Owners Manual
Page 36
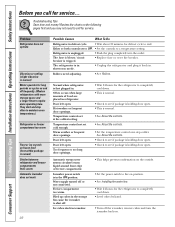
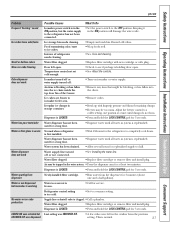
... for service. Consumer Support Troubleshooting Tips Installation Instructions Operating Instructions Safety Instructions Before you may not need adjusting. •See Rollers. Normal when refrigerator is normal. • See About the controls. • See About the controls. • Set the temperature control one step colder. Either or both controls set cold enough. Rollers need to a temperature setting. Door left open . • This is first plugged in refrigerator. They start and stop often to maintain even temperatures.) Refrigerator or freezer compartment too warm...
... for service. Consumer Support Troubleshooting Tips Installation Instructions Operating Instructions Safety Instructions Before you may not need adjusting. •See Rollers. Normal when refrigerator is normal. • See About the controls. • See About the controls. • Set the temperature control one step colder. Either or both controls set cold enough. Rollers need to a temperature setting. Door left open . • This is first plugged in refrigerator. They start and stop often to maintain even temperatures.) Refrigerator or freezer compartment too warm...
Owners Manual
Page 37
... inside the top door bin of refrigerator needs cleaning. • Empty and wash bin. Dispenser is LOCKED. • Press and hold the LOCK CONTROL pad for the refrigerator to a colder setting, one and a half gallons). Supply line or shutoff valve is too cold. • Set to the OFF position. Water filter clogged. • Replace filter cartridge or remove filter and install plug. Last setting was dispensed Possible Causes What To Do Icemaker power switch is in system is replenished. Safety Instructions Operating Instructions Installation Instructions Troubleshooting...
... inside the top door bin of refrigerator needs cleaning. • Empty and wash bin. Dispenser is LOCKED. • Press and hold the LOCK CONTROL pad for the refrigerator to a colder setting, one and a half gallons). Supply line or shutoff valve is too cold. • Set to the OFF position. Water filter clogged. • Replace filter cartridge or remove filter and install plug. Last setting was dispensed Possible Causes What To Do Icemaker power switch is in system is replenished. Safety Instructions Operating Instructions Installation Instructions Troubleshooting...

Owners Manual
Page 38
... six months of refrigerator Refrigerator never shuts off after the door remains closed for system to stabilize. Interior needs cleaning. • See Care and cleaning. Normal air flow cooling motor. In order to minimize energy usage, the Select Temp and Beverage Center features are opened) Interior light does not work Water on kitchen floor or on outside of refrigerator Moisture collects inside the refrigerator. • Move the door bin up one position. Problem Orange glow in...
... six months of refrigerator Refrigerator never shuts off after the door remains closed for system to stabilize. Interior needs cleaning. • See Care and cleaning. Normal air flow cooling motor. In order to minimize energy usage, the Select Temp and Beverage Center features are opened) Interior light does not work Water on kitchen floor or on outside of refrigerator Moisture collects inside the refrigerator. • Move the door bin up one position. Problem Orange glow in...
Owners Manual
Page 39
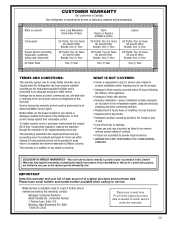
... covered Compressor Sealed System (including evaporator, condenser tubing and refrigerant) All Other Parts How Long Warranted (From Date of Sale. Service during this warranty period must present the original Bill of Sale) GE Profile: Ten (10) Years GE and All Other Brands: One (1) Year GE Profile: Five (5) Years GE and All Other Brands: One (1) Year One (1) Year Parts Repair or Replace at Mabe's Option GE Profile: Ten (10) Years GE...
... covered Compressor Sealed System (including evaporator, condenser tubing and refrigerant) All Other Parts How Long Warranted (From Date of Sale. Service during this warranty period must present the original Bill of Sale) GE Profile: Ten (10) Years GE and All Other Brands: One (1) Year GE Profile: Five (5) Years GE and All Other Brands: One (1) Year One (1) Year Parts Repair or Replace at Mabe's Option GE Profile: Ten (10) Years GE...
Owners Manual
Page 40
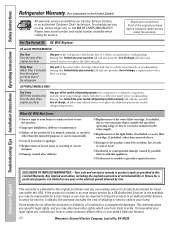
... to bring the product to a defect in materials or workmanship. Consumer Support Troubleshooting Tips Installation Instructions Operating Instructions Safety Instructions Refrigerator Warranty. (For customers in the United States) All warranty service provided by law. To schedule service, on-line, visit us at ge.com, or call 800.GE.CARES (800.432.2737). Proof of the light bulbs, if included, or water filter cartridge, if included, other than as provided in the sealed...
... to bring the product to a defect in materials or workmanship. Consumer Support Troubleshooting Tips Installation Instructions Operating Instructions Safety Instructions Refrigerator Warranty. (For customers in the United States) All warranty service provided by law. To schedule service, on-line, visit us at ge.com, or call 800.GE.CARES (800.432.2737). Proof of the light bulbs, if included, or water filter cartridge, if included, other than as provided in the sealed...
Owners Manual
Page 41
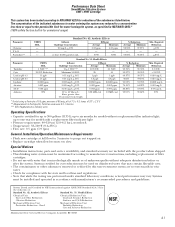
... a replacement filter indicator light ‡ Pressure requirement: 40-120 psi (2.8-8.2 bar), non-shock ‡ Temperature: 33-100ºF (0.6-38ºC) ‡ Flow rate: 0.5 gpm (1.9 lpm) General Installation/Operation/Maintenance Requirements ‡ Flush new cartridge at full flow for up to 108 fibers/L; pressure of 7.5 ± 0.5; Required Reduction 0.5 NTU > 99.95% 0.010 mg/L 0.010 mg/L 0.0002 mg/L 0.003 mg/L 0.07 mg/L 99% * Tested using...
... a replacement filter indicator light ‡ Pressure requirement: 40-120 psi (2.8-8.2 bar), non-shock ‡ Temperature: 33-100ºF (0.6-38ºC) ‡ Flow rate: 0.5 gpm (1.9 lpm) General Installation/Operation/Maintenance Requirements ‡ Flush new cartridge at full flow for up to 108 fibers/L; pressure of 7.5 ± 0.5; Required Reduction 0.5 NTU > 99.95% 0.010 mg/L 0.010 mg/L 0.0002 mg/L 0.003 mg/L 0.07 mg/L 99% * Tested using...

