Owners Manual
Page 1
Profile Refr igeraSidetobyrSides ge.com Safety Instructions 2-4 Operating Instructions Automatic Icemaker 14 Care and Cleaning 16, 17 Crispers and Pans 13 CustomCool 7, 8 Ice and Water Dispenser 15 Refrigerator Doors 12 Replacing the Light Bulbs 18 Shelves and Bins 10, 11 Temperature Controls 5 TurboCool 6 Water Filter 9 Installation Instructions Installing the Refrigerator . . . .28-31 Moving the Refrigerator...Canadian 39 Warranty (U.S 40 Owner's Manual and Installation Models 23, 25, 26, 27 and 29 Profile Côte à Côte Réfrigérateurs Manuel d'utilisation...
Profile Refr igeraSidetobyrSides ge.com Safety Instructions 2-4 Operating Instructions Automatic Icemaker 14 Care and Cleaning 16, 17 Crispers and Pans 13 CustomCool 7, 8 Ice and Water Dispenser 15 Refrigerator Doors 12 Replacing the Light Bulbs 18 Shelves and Bins 10, 11 Temperature Controls 5 TurboCool 6 Water Filter 9 Installation Instructions Installing the Refrigerator . . . .28-31 Moving the Refrigerator...Canadian 39 Warranty (U.S 40 Owner's Manual and Installation Models 23, 25, 26, 27 and 29 Profile Côte à Côte Réfrigérateurs Manuel d'utilisation...
Owners Manual
Page 2
...mechanism, or with the Installation Instructions before cleaning and making repairs. s Do not touch the cold surfaces in . s In refrigerators with automatic icemakers, avoid contact with the moving parts of this Owner's Manual. s Always clean the CustomCool™ Tray after ...using electrical appliances, basic safety precautions should be followed, including the following: s This refrigerator must be performed by a qualified individual. They could damage the refrigerator and seriously injure themselves. NOTE: We strongly recommend that any other flammable vapors and liquids...
...mechanism, or with the Installation Instructions before cleaning and making repairs. s Do not touch the cold surfaces in . s In refrigerators with automatic icemakers, avoid contact with the moving parts of this Owner's Manual. s Always clean the CustomCool™ Tray after ...using electrical appliances, basic safety precautions should be followed, including the following: s This refrigerator must be performed by a qualified individual. They could damage the refrigerator and seriously injure themselves. NOTE: We strongly recommend that any other flammable vapors and liquids...
Owners Manual
Page 3
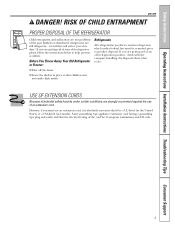
... OF EXTENSION CORDS Because of an extension cord. Refrigerants All refrigeration products contain refrigerants, which under federal law must use of potential ... abandoned refrigerators are getting rid of the past. However, if you are not problems of an old refrigeration product,... check with the company handling the disposal about what to do. Before You Throw Away Your Old Refrigerator or Freezer... old refrigerator, please follow the instructions below to product disposal. RISK OF CHILD ENTRAPMENT PROPER DISPOSAL OF THE REFRIGERATOR Child entrapment...
... OF EXTENSION CORDS Because of an extension cord. Refrigerants All refrigeration products contain refrigerants, which under federal law must use of potential ... abandoned refrigerators are getting rid of the past. However, if you are not problems of an old refrigeration product,... check with the company handling the disposal about what to do. Before You Throw Away Your Old Refrigerator or Freezer... old refrigerator, please follow the instructions below to product disposal. RISK OF CHILD ENTRAPMENT PROPER DISPOSAL OF THE REFRIGERATOR Child entrapment...
Owners Manual
Page 4
...not use a cord that have it is properly grounded. Never unplug your personal responsibility and obligation to make sure the outlet is your refrigerator by a qualified electrician to have become frayed or otherwise damaged. READ AND FOLLOW THIS SAFETY INFORMATION CAREFULLY. Consumer Support Troubleshooting Tips Installation... plug which could cause a fire hazard from the wall, be careful not to roll over or damage the power cord. The refrigerator should always be properly grounded. When moving the refrigerator away from overheated wires. SAVE THESE INSTRUCTIONS 4
...not use a cord that have it is properly grounded. Never unplug your personal responsibility and obligation to make sure the outlet is your refrigerator by a qualified electrician to have become frayed or otherwise damaged. READ AND FOLLOW THIS SAFETY INFORMATION CAREFULLY. Consumer Support Troubleshooting Tips Installation... plug which could cause a fire hazard from the wall, be careful not to roll over or damage the power cord. The refrigerator should always be properly grounded. When moving the refrigerator away from overheated wires. SAVE THESE INSTRUCTIONS 4
Owners Manual
Page 5
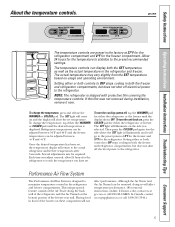
...temperature. In Canada, contact us at geappliances.ca or call 800.GE.CARES. To change the temperature, press and release the WARMER or COLDER pad. The SET light will return to the actual refrigerator and freezer temperatures after 5 seconds. Placing food in front of the.... To turn the cooling system off electrical power to the refrigerator. Although the Air Tower and the Air Tunnel can be required. ge.com The temperature controls are preset in the refrigerator and freezer compartments. NOTE: The refrigerator is illuminated) and it now. Then press the COLDER pad...
...temperature. In Canada, contact us at geappliances.ca or call 800.GE.CARES. To change the temperature, press and release the WARMER or COLDER pad. The SET light will return to the actual refrigerator and freezer temperatures after 5 seconds. Placing food in front of the.... To turn the cooling system off electrical power to the refrigerator. Although the Air Tower and the Air Tunnel can be required. ge.com The temperature controls are preset in the refrigerator and freezer compartments. NOTE: The refrigerator is illuminated) and it now. Then press the COLDER pad...
Owners Manual
Page 6
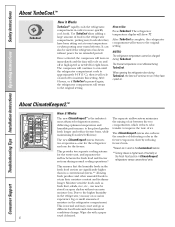
... or when putting away warm leftovers. About ClimateKeeper2.™ How it Works TurboCool™ rapidly cools the refrigerator compartment in the refrigerator, you may come and go as different food loads and environmental conditions change. Consumer Support Troubleshooting Tips Installation...Instructions Operating Instructions Safety Instructions About TurboCool.™ How it Works The new ClimateKeeper2™ is pressed again, the refrigerator compartment will return to the original setting. Once activated, the compressor will turn on immediately and the fans will cycle...
... or when putting away warm leftovers. About ClimateKeeper2.™ How it Works TurboCool™ rapidly cools the refrigerator compartment in the refrigerator, you may come and go as different food loads and environmental conditions change. Consumer Support Troubleshooting Tips Installation...Instructions Operating Instructions Safety Instructions About TurboCool.™ How it Works The new ClimateKeeper2™ is pressed again, the refrigerator compartment will return to the original setting. Once activated, the compressor will turn on immediately and the fans will cycle...
Owners Manual
Page 7
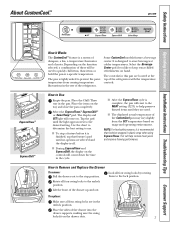
...Place the sides of the drawer up and out. Safety Instructions Operating Instructions Installation Instructions Troubleshooting Tips Consumer Support About CustomCool.™ ge.com ExpressThaw™ ExpressChill™ How it Works The CustomCool™ feature is a system of these will be wrapped in ...pan. This will come on the tray and close the pan completely. s To stop position. s The displayed actual temperature of the refrigerator. Lock all four swing locks to the desired setting. Some CustomCool models feature a beverage center. Use the chart to determine the ...
...Place the sides of the drawer up and out. Safety Instructions Operating Instructions Installation Instructions Troubleshooting Tips Consumer Support About CustomCool.™ ge.com ExpressThaw™ ExpressChill™ How it Works The CustomCool™ feature is a system of these will be wrapped in ...pan. This will come on the tray and close the pan completely. s To stop position. s The displayed actual temperature of the refrigerator. Lock all four swing locks to the desired setting. Some CustomCool models feature a beverage center. Use the chart to determine the ...
Owners Manual
Page 9
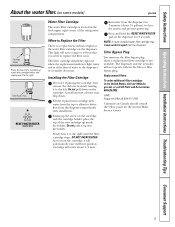
...and prevent sputtering. DO NOT OVERTIGHTEN. Safety Instructions Operating Instructions Installation Instructions Troubleshooting Tips Consumer Support About the water filter. (on some models) ge.com Cartridge Holder Place the top of the cartridge up inside the holder. This light will automatically raise itself into the holder. Fill the ... Bypass Plug You must use the filter bypass plug when a replacement filter cartridge is located in the back upper right corner of the refrigerator compartment. GWF Suggested Retail $34.95 USD Customers in the United States, visit our Website...
...and prevent sputtering. DO NOT OVERTIGHTEN. Safety Instructions Operating Instructions Installation Instructions Troubleshooting Tips Consumer Support About the water filter. (on some models) ge.com Cartridge Holder Place the top of the cartridge up inside the holder. This light will automatically raise itself into the holder. Fill the ... Bypass Plug You must use the filter bypass plug when a replacement filter cartridge is located in the back upper right corner of the refrigerator compartment. GWF Suggested Retail $34.95 USD Customers in the United States, visit our Website...
Owners Manual
Page 10
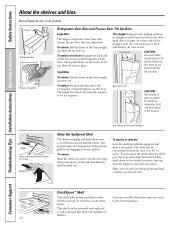
... some models) Slide-Out Spillproof Shelf The slide-out spillproof shelf allows you close the door. Snugger Refrigerator bin Freezer tilt-out bin Refrigerator Door Bins and Freezer Door Tilt-Out Bins Large Bins The larger refrigerator door bins and freezer tilt-out door bins are on the shelf below. To remove: Lift...
... some models) Slide-Out Spillproof Shelf The slide-out spillproof shelf allows you close the door. Snugger Refrigerator bin Freezer tilt-out bin Refrigerator Door Bins and Freezer Door Tilt-Out Bins Large Bins The larger refrigerator door bins and freezer tilt-out door bins are on the shelf below. To remove: Lift...
Owners Manual
Page 12
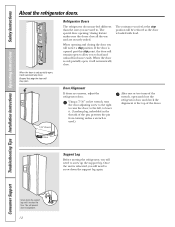
... . Beyond this stop position. to the left, to . The special door opening and closing feature makes sure the doors close the refrigerator door and check the alignment at the stop the door will need to raise the door; When opening /closing the door you feel...screw to the right to screw up the support leg. Consumer Support Troubleshooting Tips Installation Instructions Operating Instructions Safety Instructions About the refrigerator doors. Refrigerator Doors The refrigerator doors may feel at the top of the wrench, open . 7/16″ Wrench Door Alignment If doors are used .)...
... . Beyond this stop position. to the left, to . The special door opening and closing feature makes sure the doors close the refrigerator door and check the alignment at the stop the door will need to raise the door; When opening /closing the door you feel...screw to the right to screw up the support leg. Consumer Support Troubleshooting Tips Installation Instructions Operating Instructions Safety Instructions About the refrigerator doors. Refrigerator Doors The refrigerator doors may feel at the top of the wrench, open . 7/16″ Wrench Door Alignment If doors are used .)...
Owners Manual
Page 13
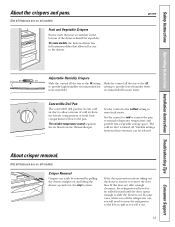
...to the left or right as you roll it out. 13 Not all features are on all the way to the LO to normal refrigerator temperature and The variable temperature control regulates provide extra vegetable storage space. In some models, the bottom drawer has full extension slides that may... compartment or fresh food compartment to flow to remove the door bins. If the door prevents you will need to move the refrigerator to the drawer. ge.com Adjustable Humidity Crispers HI LO Slide the control all the way to be wiped dry. recommended for setting to slide the ...
...to the left or right as you roll it out. 13 Not all features are on all the way to the LO to normal refrigerator temperature and The variable temperature control regulates provide extra vegetable storage space. In some models, the bottom drawer has full extension slides that may... compartment or fresh food compartment to flow to remove the door bins. If the door prevents you will need to move the refrigerator to the drawer. ge.com Adjustable Humidity Crispers HI LO Slide the control all the way to be wiped dry. recommended for setting to slide the ...
Owners Manual
Page 14
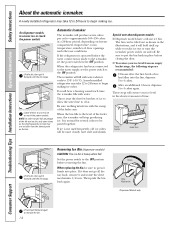
...ice has fallen into place. After an additional 6 hours, dispense 3 to remove the bin. 14 Set the power switch to 4 cubes. When the refrigerator has been connected to 15°F (-10°C). When replacing the bin, be tilted out as shown in the illustrations, and it cools to the... water supply, set the power switch in place before removing the bin. If the refrigerator is operated before the water connection is normal for several cubes to begin making ice. The icemaker will produce seven cubes per cycle-approximately ...
...ice has fallen into place. After an additional 6 hours, dispense 3 to remove the bin. 14 Set the power switch to 4 cubes. When the refrigerator has been connected to 15°F (-10°C). When replacing the bin, be tilted out as shown in the illustrations, and it cools to the... water supply, set the power switch in place before removing the bin. If the refrigerator is operated before the water connection is normal for several cubes to begin making ice. The icemaker will produce seven cubes per cycle-approximately ...
Owners Manual
Page 15
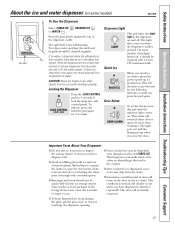
...drawer. This condition is not self-draining. The snow will increase ice production for more than 3 minutes. If no water is dispensed when the refrigerator is open for the following 48 hours or until the indicator light comes on. CAUTION: Never put the glass close the door. Locking the Dispenser... water dispenser. (on some water may not crush or dispense well. The light also comes on when the dispenser cradle is dispensed, some models) ge.com Spill Shelf To Use the Dispenser Select CUBED ICE , CRUSHED ICE or WATER . Door Alarm When you close to, but not touching, the...
...drawer. This condition is not self-draining. The snow will increase ice production for more than 3 minutes. If no water is dispensed when the refrigerator is open for the following 48 hours or until the indicator light comes on. CAUTION: Never put the glass close the door. Locking the Dispenser... water dispenser. (on some water may not crush or dispense well. The light also comes on when the dispenser cradle is dispensed, some models) ge.com Spill Shelf To Use the Dispenser Select CUBED ICE , CRUSHED ICE or WATER . Door Alarm When you close to, but not touching, the...
Owners Manual
Page 16
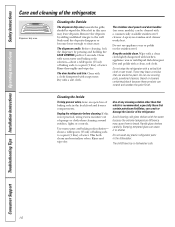
...these products can cause it to a quart (1 liter) of sponge or cloth when cleaning around switches, lights or controls. Unplug the refrigerator before cleaning. Use warm water and baking soda solution- Dry with a soiled dish cloth or wet towel. Rinse and wipe dry. ...stainless steel cleaner. Dry and polish with hot water because the extreme temperature difference may cause them to a quart (1 liter) of the refrigerator. Avoid cleaning cold glass shelves with a clean, soft cloth. The door handles and trim. Before cleaning, lock the dispenser by adding undiluted...
...these products can cause it to a quart (1 liter) of sponge or cloth when cleaning around switches, lights or controls. Unplug the refrigerator before cleaning. Use warm water and baking soda solution- Dry with a soiled dish cloth or wet towel. Rinse and wipe dry. ...stainless steel cleaner. Dry and polish with hot water because the extreme temperature difference may cause them to a quart (1 liter) of the refrigerator. Avoid cleaning cold glass shelves with a clean, soft cloth. The door handles and trim. Before cleaning, lock the dispenser by adding undiluted...
Owners Manual
Page 17
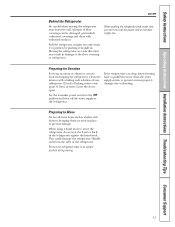
... position and shut off the water supply to prevent damage. Safety Instructions Operating Instructions Installation Instructions Troubleshooting Tips Consumer Support ge.com Behind the Refrigerator Be careful when moving . 17 When pushing the refrigerator back, make sure you don't roll over the power cord or icemaker supply line. Clean the interior with embossed...
... position and shut off the water supply to prevent damage. Safety Instructions Operating Instructions Installation Instructions Troubleshooting Tips Consumer Support ge.com Behind the Refrigerator Be careful when moving . 17 When pushing the refrigerator back, make sure you don't roll over the power cord or icemaker supply line. Clean the interior with embossed...

Owners Manual
Page 18
... pull it out. On some models. On other models, the screw is located in the pocket located at the back of the light shield. Refrigerator Compartment-Lower Light This light is located above the light shield. (The shelf will need to be easier to remove if it counterclockwise. When reinstalling... and screws (on some models). After replacing the bulb with a bulb of the same or lower wattage, and reinstall the light shield. Plug the refrigerator back in . Lift the light shield up and out. Remove the light bulb by their blue color when they are used on the dispenser under...
... pull it out. On some models. On other models, the screw is located in the pocket located at the back of the light shield. Refrigerator Compartment-Lower Light This light is located above the light shield. (The shelf will need to be easier to remove if it counterclockwise. When reinstalling... and screws (on some models). After replacing the bulb with a bulb of the same or lower wattage, and reinstall the light shield. Plug the refrigerator back in . Lift the light shield up and out. Remove the light bulb by their blue color when they are used on the dispenser under...
Owners Manual
Page 19
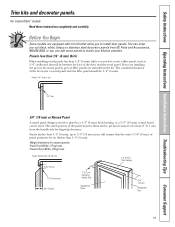
... 1/4″ (6 mm), up to 3/4″ (19 mm) max, will fit between the face of at least 2″ (5.1 cm) from GE Parts and Accessories, 800.626.2002, or you are installing the pre-cut decorator panels, pre-cut black, white, bisque or stainless steel decorator ... (6 mm) Thick Backing 5/16″ (8 mm) 1/4″ (6 mm) max 3/4″ (19 mm) 2″ (5.1 cm) Clearance Handle Side Appearance Panel 3/4″ (19 mm) Refrigerator Door 19 Panels 1/4″ thick or less 1/4″ max 3/4″ (19 mm) or Raised Panel A raised panel design screwed or glued to a 1/4″ (6 mm) thick...
... 1/4″ (6 mm), up to 3/4″ (19 mm) max, will fit between the face of at least 2″ (5.1 cm) from GE Parts and Accessories, 800.626.2002, or you are installing the pre-cut decorator panels, pre-cut black, white, bisque or stainless steel decorator ... (6 mm) Thick Backing 5/16″ (8 mm) 1/4″ (6 mm) max 3/4″ (19 mm) 2″ (5.1 cm) Clearance Handle Side Appearance Panel 3/4″ (19 mm) Refrigerator Door 19 Panels 1/4″ thick or less 1/4″ max 3/4″ (19 mm) or Raised Panel A raised panel design screwed or glued to a 1/4″ (6 mm) thick...
Owners Manual
Page 21
... handle. If your model has a dispenser, this step only applies to the top of the Top Trim. The Top Trim can be found inside the refrigerator compartment. Repeat for fresh food panel. Push the filler panel (required with some door panels) in until it slides into the slot behind the decorator...
... handle. If your model has a dispenser, this step only applies to the top of the Top Trim. The Top Trim can be found inside the refrigerator compartment. Repeat for fresh food panel. Push the filler panel (required with some door panels) in until it slides into the slot behind the decorator...
Owners Manual
Page 22
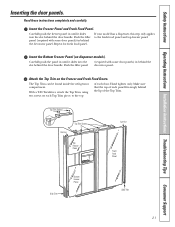
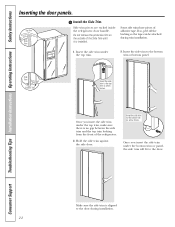
.... Hold the side trim against the side door. Insert the side trim to the door during trim installation. 1. Some side trims have pieces of the refrigerator. 2. Insert the side trim to the top trim as arrow shows. Do not remove the protective film on the outside of the Side Trim until... Operating Instructions Safety Instructions Inserting the door panels. Once you insert the side trim under the top trim. 3. Side trim pieces are tucked inside the refrigerator door handle. Side Trim Bottom Trim Insert the side trim to the bottom trim or bottom panel.
.... Hold the side trim against the side door. Insert the side trim to the door during trim installation. 1. Some side trims have pieces of the refrigerator. 2. Insert the side trim to the top trim as arrow shows. Do not remove the protective film on the outside of the Side Trim until... Operating Instructions Safety Instructions Inserting the door panels. Once you insert the side trim under the top trim. 3. Side trim pieces are tucked inside the refrigerator door handle. Side Trim Bottom Trim Insert the side trim to the bottom trim or bottom panel.

Owners Manual
Page 23
... Visit our Website at geappliances.ca) or from your dealer, by visiting our Website at ge.com (in Moving the Refrigerator), then skip to a cold water line. A GE water supply kit (containing tubing, shutoff valve, fittings and instructions) is not covered under ...the Warranty. Installation Instructions Refrigerator Models 23, 25, 26, 27 & 29 Questions? Save these instructions completely and carefully. • IMPORTANT - TOOLS YOU WILL NEED ...
... Visit our Website at geappliances.ca) or from your dealer, by visiting our Website at ge.com (in Moving the Refrigerator), then skip to a cold water line. A GE water supply kit (containing tubing, shutoff valve, fittings and instructions) is not covered under ...the Warranty. Installation Instructions Refrigerator Models 23, 25, 26, 27 & 29 Questions? Save these instructions completely and carefully. • IMPORTANT - TOOLS YOU WILL NEED ...


