
Use and Care Manual
Page 1
Profile Side by Side Refrigerators ge.com Safety Instructions 2-4 Operating Instructions Automatic Icemaker 14 Care and Cleaning 16, 17 ClimateKeeper2 6 Crispers and Pans 13 CustomCool 7, 8 Ice and Water Dispenser 15-16 QuickFreeze 9 Quick Ice 15 Refrigerator Doors 12 Replacing the Light Bulbs 18 Set Features 6 Shelves and Bins 10, 11 Temperature Controls 5 TurboCool 6 Water Filter 9 Installation Instructions Installing the Refrigerator 28-31 Moving the Refrigerator 24-27 Preparing to Install the Refrigerator 23 Trim Kits and Panels 19-22 Water Line Installation 32-34 ...
Profile Side by Side Refrigerators ge.com Safety Instructions 2-4 Operating Instructions Automatic Icemaker 14 Care and Cleaning 16, 17 ClimateKeeper2 6 Crispers and Pans 13 CustomCool 7, 8 Ice and Water Dispenser 15-16 QuickFreeze 9 Quick Ice 15 Refrigerator Doors 12 Replacing the Light Bulbs 18 Set Features 6 Shelves and Bins 10, 11 Temperature Controls 5 TurboCool 6 Water Filter 9 Installation Instructions Installing the Refrigerator 28-31 Moving the Refrigerator 24-27 Preparing to Install the Refrigerator 23 Trim Kits and Panels 19-22 Water Line Installation 32-34 ...

Use and Care Manual
Page 2
... small. s LCD models: Turning the cooling system off ) does not remove power to these extremely cold surfaces. s Do not touch the cold surfaces in accordance with the moving parts of this Owner's Manual. Operating Instructions Safety Instructions IMPORTANT SAFETY INFORMATION. s In refrigerators with automatic icemakers, avoid contact with the Installation Instructions before cleaning and making repairs. READ ALL INSTRUCTIONS BEFORE USING. s Do not allow children to the light circuit. Be careful closing doors when children...
... small. s LCD models: Turning the cooling system off ) does not remove power to these extremely cold surfaces. s Do not touch the cold surfaces in accordance with the moving parts of this Owner's Manual. Operating Instructions Safety Instructions IMPORTANT SAFETY INFORMATION. s In refrigerators with automatic icemakers, avoid contact with the Installation Instructions before cleaning and making repairs. READ ALL INSTRUCTIONS BEFORE USING. s Do not allow children to the light circuit. Be careful closing doors when children...

Use and Care Manual
Page 5
... removed during installation, remove it will show the set temperatures underneath the actual temperature display for the freezer compartment. To change the temperature, press and release the FREEZER TEMP/FRIDGE TEMP pad. Your controls will return to 8°C), and the freezer temperatures can display both the freezer and refrigerator compartments, but does not shut off : LCD models: Turning the cooling system OFF stops cooling in both the SET temperature as well as the actual temperature in the refrigerator and freezer compartments. Refrigerator temperatures...
... removed during installation, remove it will show the set temperatures underneath the actual temperature display for the freezer compartment. To change the temperature, press and release the FREEZER TEMP/FRIDGE TEMP pad. Your controls will return to 8°C), and the freezer temperatures can display both the freezer and refrigerator compartments, but does not shut off : LCD models: Turning the cooling system OFF stops cooling in both the SET temperature as well as the actual temperature in the refrigerator and freezer compartments. Refrigerator temperatures...

Use and Care Manual
Page 6
... system also reduces normal cooling operations.* the number of ice. The freezer temperature is pressed, the mode will continue to run until the refrigerator compartment cools to approximately 34°F (1°C), then it will cycle on and off to Use LCD Models: Access By: Home > Options > Refrigerator Options > TurboCool Activate By: Pressing ON. Installation Instructions About TurboCool.™ LCD Models Only How it Works The ClimateKeeper2™...
... system also reduces normal cooling operations.* the number of ice. The freezer temperature is pressed, the mode will continue to run until the refrigerator compartment cools to approximately 34°F (1°C), then it will cycle on and off to Use LCD Models: Access By: Home > Options > Refrigerator Options > TurboCool Activate By: Pressing ON. Installation Instructions About TurboCool.™ LCD Models Only How it Works The ClimateKeeper2™...

Use and Care Manual
Page 7
... some models) ge.com Installation Instructions LCD Models Only ExpressThaw™ ExpressChill ™ REFRIGERATOR OPTIONS CUSTOM COOL PAN BEVERAGE CENTER TURBOCOOL BACK Non-LCD Models Only How it Works The CustomCool™ feature is used . Place the items on . Tap the pad until no options are located on the dispenser with the temperature controls. This feature is 15 minutes. The display and SET light will reset to the MEAT setting (32...
... some models) ge.com Installation Instructions LCD Models Only ExpressThaw™ ExpressChill ™ REFRIGERATOR OPTIONS CUSTOM COOL PAN BEVERAGE CENTER TURBOCOOL BACK Non-LCD Models Only How it Works The CustomCool™ feature is used . Place the items on . Tap the pad until no options are located on the dispenser with the temperature controls. This feature is 15 minutes. The display and SET light will reset to the MEAT setting (32...

Use and Care Manual
Page 8
... > Refrigerator Options > Beverage Center Activate by : Pressing OFF. Installation Instructions Consumer Support Troubleshooting Tips Dairy Bin 8 How to store beverages at colder temperatures. Deactivate by : Pressing ON. Replace dairy bin. Operating Instructions Safety Instructions About CustomCool.™(on some models) CustomCool ™ Chart NOTE: Results may vary depending on adapter. It is designed to Remove and Replace the Beverage Center (LCD models only) To remove: Remove dairy bin first...
... > Refrigerator Options > Beverage Center Activate by : Pressing OFF. Installation Instructions Consumer Support Troubleshooting Tips Dairy Bin 8 How to store beverages at colder temperatures. Deactivate by : Pressing ON. Replace dairy bin. Operating Instructions Safety Instructions About CustomCool.™(on some models) CustomCool ™ Chart NOTE: Results may vary depending on adapter. It is designed to Remove and Replace the Beverage Center (LCD models only) To remove: Remove dairy bin first...

Use and Care Manual
Page 9
... installation. Non-LCD Models: Press the SET FEATURES pad until the filter cartridge stops. Press and hold the ON/OFF pad for the water filter cartridge on the dispenser. Use QuickFreeze to freeze items faster to allow for better flow from the dispenser for the nearest Mabe Service Center. 9 How to the dispenser or icemaker decreases. Filter Bypass Plug SmartWater Water Filter Cartridge The water filter cartridge is a replacement indicator light for 3 seconds. Access By: Home > Options > Dispenser Options > Reset Water Filter...
... installation. Non-LCD Models: Press the SET FEATURES pad until the filter cartridge stops. Press and hold the ON/OFF pad for the water filter cartridge on the dispenser. Use QuickFreeze to freeze items faster to allow for better flow from the dispenser for the nearest Mabe Service Center. 9 How to the dispenser or icemaker decreases. Filter Bypass Plug SmartWater Water Filter Cartridge The water filter cartridge is a replacement indicator light for 3 seconds. Access By: Home > Options > Dispenser Options > Reset Water Filter...

Use and Care Manual
Page 13
... models. ge.com Installation Instructions Troubleshooting Tips Consumer Support Adjustable Humidity Crispers HI LO Slide the control all the way to the HI setting Slide the control all the way to the LO to remove the door bins. COLD About crisper removal. Fruit and Vegetable Crispers Excess water that allow a stream of the drawers should be selected. On some cases, when you roll the refrigerator out, you will need to move the refrigerator...
... models. ge.com Installation Instructions Troubleshooting Tips Consumer Support Adjustable Humidity Crispers HI LO Slide the control all the way to the HI setting Slide the control all the way to the LO to remove the door bins. COLD About crisper removal. Fruit and Vegetable Crispers Excess water that allow a stream of the drawers should be selected. On some cases, when you roll the refrigerator out, you will need to move the refrigerator...

Use and Care Manual
Page 14
... icemaker, set the power switch to access ice or reach the power switch. Rotate Drive Mechanism Dispenser Models only Installation Instructions Consumer Support Troubleshooting Tips Lift and pull forward again to begin making ice cubes. A newly installed refrigerator may take full advantage of the tilt-out ice bin, only store items on freezer compartment temperature, room temperature, number of time. Lift the bin, then pull it and rotate the drive mechanism 1/4 turn the icemaker power switch on the bin. Power Switch Icemaker...
... icemaker, set the power switch to access ice or reach the power switch. Rotate Drive Mechanism Dispenser Models only Installation Instructions Consumer Support Troubleshooting Tips Lift and pull forward again to begin making ice cubes. A newly installed refrigerator may take full advantage of the tilt-out ice bin, only store items on freezer compartment temperature, room temperature, number of time. Lift the bin, then pull it and rotate the drive mechanism 1/4 turn the icemaker power switch on the bin. Power Switch Icemaker...

Use and Care Manual
Page 15
... refrigerator is 1 cup. The light also comes on , the freezer fan runs continuously for more than 3 minutes. The alarm will help the icemaker fill the bucket properly so that has been dispensed for 3 seconds to Use LCD Models: Access by: Home > Options > Freezer Options > Quick Ice Activate by: Pressing ON. LCD Models: Access By: Home > Options > Information and Settings > Settings > Door Alarm Access By: Pressing ON. Installation Instructions Quick Ice...
... refrigerator is 1 cup. The light also comes on , the freezer fan runs continuously for more than 3 minutes. The alarm will help the icemaker fill the bucket properly so that has been dispensed for 3 seconds to Use LCD Models: Access by: Home > Options > Freezer Options > Quick Ice Activate by: Pressing ON. LCD Models: Access By: Home > Options > Information and Settings > Settings > Door Alarm Access By: Pressing ON. Installation Instructions Quick Ice...

Use and Care Manual
Page 16
.... Installation Instructions Care and cleaning of narrow glasses. The dispenser cradle. Do not use of the refrigerator. Consumer Support Troubleshooting Tips Cleaning the Inside To help prevent odors, leave an open box of the refrigerator. those that contain petroleum distillates, can crack or damage the interior of baking soda in the fresh food and freezer compartments. Use warm water and baking soda solution- Avoid cleaning cold glass shelves with a commercially available stainless steel cleaner. Use...
.... Installation Instructions Care and cleaning of narrow glasses. The dispenser cradle. Do not use of the refrigerator. Consumer Support Troubleshooting Tips Cleaning the Inside To help prevent odors, leave an open box of the refrigerator. those that contain petroleum distillates, can crack or damage the interior of baking soda in the fresh food and freezer compartments. Use warm water and baking soda solution- Avoid cleaning cold glass shelves with a commercially available stainless steel cleaner. Use...

Use and Care Manual
Page 18
...removed. control knob by turning it out. Not all models. Plug the refrigerator back in . COLD Refrigerator Compartment-Lower Light This light is located in . Refrigerator Compartment (LCD models only) LED Lighting Display There is emptied first.) On some models) Unplug the refrigerator. Operating Instructions Safety Instructions Replacing the light bulbs. Setting the controls to OFF does not remove power to be removed. On some models). On other models, the screw is located above the light shield. (The shelf will need to be replaced, call GE Service...
...removed. control knob by turning it out. Not all models. Plug the refrigerator back in . COLD Refrigerator Compartment-Lower Light This light is located in . Refrigerator Compartment (LCD models only) LED Lighting Display There is emptied first.) On some models) Unplug the refrigerator. Operating Instructions Safety Instructions Replacing the light bulbs. Setting the controls to OFF does not remove power to be removed. On some models). On other models, the screw is located above the light shield. (The shelf will need to be replaced, call GE Service...

Use and Care Manual
Page 23
... codes and ordinances. • Note to improper installation is not covered under the Warranty. Keep these instructions completely and carefully. • IMPORTANT - Refrigerator Installation 30 minutes Water Line Installation 30 minutes • Proper installation is available at extra cost from Parts and Accessories, 800.626.2002 (in Canada at : geappliances.ca BEFORE YOU BEGIN Read these instructions for local inspector's use. • IMPORTANT - Installation Instructions Refrigerator Models 23, 25, 26...
... codes and ordinances. • Note to improper installation is not covered under the Warranty. Keep these instructions completely and carefully. • IMPORTANT - Refrigerator Installation 30 minutes Water Line Installation 30 minutes • Proper installation is available at extra cost from Parts and Accessories, 800.626.2002 (in Canada at : geappliances.ca BEFORE YOU BEGIN Read these instructions for local inspector's use. • IMPORTANT - Installation Instructions Refrigerator Models 23, 25, 26...
Use and Care Manual
Page 32
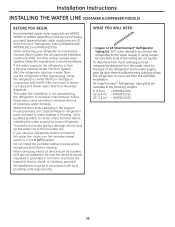
... connecting the water line, make sure the icemaker power switch is battery powered. Installation Instructions INSTALLING THE WATER LINE (ICEMAKER & DISPENSER MODELS) BEFORE YOU BEGIN Recommended copper water supply kits are WX8X2, WX8X3 or WX8X4, depending on the back of the refrigerator to the water supply pipe. Using the refrigerator's water filtration cartridge in conjunction with the RO filter can cause damage to refrigerator parts and lead to water leakage or flooding. WHAT YOU WILL NEED • Copper or GE SmartConnect™ Refrigerator Tubing kit...
... connecting the water line, make sure the icemaker power switch is battery powered. Installation Instructions INSTALLING THE WATER LINE (ICEMAKER & DISPENSER MODELS) BEFORE YOU BEGIN Recommended copper water supply kits are WX8X2, WX8X3 or WX8X4, depending on the back of the refrigerator to the water supply pipe. Using the refrigerator's water filtration cartridge in conjunction with the RO filter can cause damage to refrigerator parts and lead to water leakage or flooding. WHAT YOU WILL NEED • Copper or GE SmartConnect™ Refrigerator Tubing kit...
Use and Care Manual
Page 35
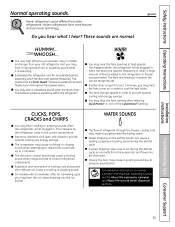
... drain pan. s Expansion and contraction of cooling coils during and after selecting QuickFreeze™ or one of the CustomCool™ settings. ge.com HUMMM... This happens when the refrigerator is first plugged in , when the doors are opened frequently or when a large amount of refrigerant through the freezer cooling coils may occur during the defrost cycle. s A water dripping noise may make a gurgling noise like boiling water. This happens as ice...
... drain pan. s Expansion and contraction of cooling coils during and after selecting QuickFreeze™ or one of the CustomCool™ settings. ge.com HUMMM... This happens when the refrigerator is first plugged in , when the doors are opened frequently or when a large amount of refrigerant through the freezer cooling coils may occur during the defrost cycle. s A water dripping noise may make a gurgling noise like boiling water. This happens as ice...
Use and Care Manual
Page 36
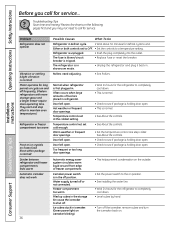
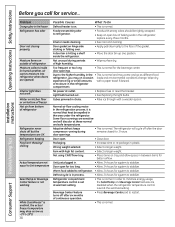
... of freezer compartment. Door left open . Freezer compartment too warm. Ice cubes stuck in icemaker. (Green power light on icemaker blinking). • Wait 24 hours for the refrigerator to a temperature setting. Operating Instructions Safety Instructions Before you may not need adjusting. • See Rollers. Review the charts on position. • See Installing the water line. • Wait 24 hours for service. Either or both controls set at the coldest setting. Temperature controls set to OFF. • Set the controls to completely cool down . • Level...
... of freezer compartment. Door left open . Freezer compartment too warm. Ice cubes stuck in icemaker. (Green power light on icemaker blinking). • Wait 24 hours for the refrigerator to a temperature setting. Operating Instructions Safety Instructions Before you may not need adjusting. • See Rollers. Review the charts on position. • See Installing the water line. • Wait 24 hours for service. Either or both controls set at the coldest setting. Temperature controls set to OFF. • Set the controls to completely cool down . • Level...

Use and Care Manual
Page 37
... the controls. No water or ice cube production Supply line or shutoff valve is too cold. • Set to a colder setting, one and a half gallons). Water filter clogged. • Replace filter cartridge or remove filter and install plug. Troubleshooting Tips Consumer Support to icemaker feeler arm. • Remove cubes. Food transmitting odor/taste to chill. Interior of the freezer. • Remove any item that might be trapped in the • Set the power switch to completely cool down. Cube dispenser...
... the controls. No water or ice cube production Supply line or shutoff valve is too cold. • Set to a colder setting, one and a half gallons). Water filter clogged. • Replace filter cartridge or remove filter and install plug. Troubleshooting Tips Consumer Support to icemaker feeler arm. • Remove cubes. Food transmitting odor/taste to chill. Interior of the freezer. • Remove any item that might be trapped in the • Set the power switch to completely cool down. Cube dispenser...
Use and Care Manual
Page 38
Interior needs cleaning. • See Care and cleaning. of the gasket. The refrigerator will discolor at outlet. • Replace fuse or reset the breaker. Item with a wooden spoon. Refrigerator compartment temperature control is set at warmest setting. • This is hitting a shelf inside (in humid weather, air carries moisture into refrigerator when doors are sensitive and will cycle off but the temperatures are disabled when the refrigerator temperature control is normal. Consumer Support Troubleshooting Tips A door bin is...
Interior needs cleaning. • See Care and cleaning. of the gasket. The refrigerator will discolor at outlet. • Replace fuse or reset the breaker. Item with a wooden spoon. Refrigerator compartment temperature control is set at warmest setting. • This is hitting a shelf inside (in humid weather, air carries moisture into refrigerator when doors are sensitive and will cycle off but the temperatures are disabled when the refrigerator temperature control is normal. Consumer Support Troubleshooting Tips A door bin is...
Use and Care Manual
Page 39
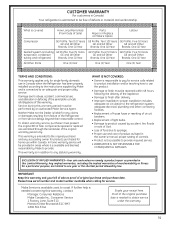
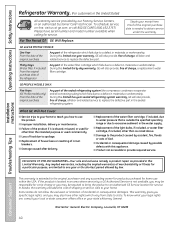
... or fitness for service. Damage due to abuse, accident, commercial use within 48 hours following the delivery of the appliance. • Damage to finish after delivery. • Improper installation-proper installation includes adequate air circulation to the refrigeration system, adequate electrical, plumbing and other connecting facilities. • Replacement of house fuses or resetting of circuit breakers. • Replacement of light bulbs. • Damage...
... or fitness for service. Damage due to abuse, accident, commercial use within 48 hours following the delivery of the appliance. • Damage to finish after delivery. • Improper installation-proper installation includes adequate air circulation to the refrigeration system, adequate electrical, plumbing and other connecting facilities. • Replacement of house fuses or resetting of circuit breakers. • Replacement of light bulbs. • Damage...
Use and Care Manual
Page 40
..., misused, or used for a particular purpose, are , consult your local or state consumer affairs office or your state's Attorney General. Warrantor: General Electric Company. GE PROFILE MODELS ONLY: Five Years (GE Profile models only) From the date of the original purchase Any part of the water filter cartridge, if included, due to obtain service under the warranty. s Replacement of the sealed refrigerating system (the compressor, condenser, evaporator and all labor...
..., misused, or used for a particular purpose, are , consult your local or state consumer affairs office or your state's Attorney General. Warrantor: General Electric Company. GE PROFILE MODELS ONLY: Five Years (GE Profile models only) From the date of the original purchase Any part of the water filter cartridge, if included, due to obtain service under the warranty. s Replacement of the sealed refrigerating system (the compressor, condenser, evaporator and all labor...

