
Use and Care Manual
Page 1
Profile Side by Side Refrigerators ge.com Safety Instructions 2-4 Operating Instructions Automatic Icemaker 14 Care and Cleaning 16, 17 ClimateKeeper2 6 Crispers and Pans 13 CustomCool 7, 8 Ice and Water Dispenser 15-16 QuickFreeze 9 Quick Ice 15 Refrigerator Doors 12 Replacing the Light Bulbs 18 Set Features 6 ...State of California Water Treatment Device Certificate 42 Warranty (Canadian 39 Warranty (U.S 40 Owner's Manual and Installation Models 23, 25, 26, 27 and 29 Profile Côte à Côte Réfrigérateurs Manuel d'utilisation et d'installation La section ...
Profile Side by Side Refrigerators ge.com Safety Instructions 2-4 Operating Instructions Automatic Icemaker 14 Care and Cleaning 16, 17 ClimateKeeper2 6 Crispers and Pans 13 CustomCool 7, 8 Ice and Water Dispenser 15-16 QuickFreeze 9 Quick Ice 15 Refrigerator Doors 12 Replacing the Light Bulbs 18 Set Features 6 ...State of California Water Treatment Device Certificate 42 Warranty (Canadian 39 Warranty (U.S 40 Owner's Manual and Installation Models 23, 25, 26, 27 and 29 Profile Côte à Côte Réfrigérateurs Manuel d'utilisation et d'installation La section ...

Use and Care Manual
Page 2
... IMPORTANT SAFETY INFORMATION. READ ALL INSTRUCTIONS BEFORE USING. s Do not store or use gasoline or other flammable vapors and liquids in . s In refrigerators with automatic icemakers, avoid contact with the moving parts of the "pinch point" areas; NOTE: We strongly recommend that any other appliance. s .... Do not place fingers or hands on the shelves in the area. s Non-LCD models: Setting either or both controls to 0 (off does not remove power to the light circuit. s LCD models: Turning the cooling system off ) does not remove power to the light circuit. Installation ...
... IMPORTANT SAFETY INFORMATION. READ ALL INSTRUCTIONS BEFORE USING. s Do not store or use gasoline or other flammable vapors and liquids in . s In refrigerators with automatic icemakers, avoid contact with the moving parts of the "pinch point" areas; NOTE: We strongly recommend that any other appliance. s .... Do not place fingers or hands on the shelves in the area. s Non-LCD models: Setting either or both controls to 0 (off does not remove power to the light circuit. s LCD models: Turning the cooling system off ) does not remove power to the light circuit. Installation ...

Use and Care Manual
Page 5
Your controls will look like one of the following: ge.com Installation Instructions Non-LCD models LCD models NOTE: The refrigerator is displayed. To change the Freezer temperature: Access By: Home > Freezer Activate By: Using the arrows to select the desired ...TEMP/FRIDGE TEMP pad. Press to set the new temperature. The display will return to -13°C). To change the Refrigerator temperature: LCD Models: Access By: Home > Refrigerator Activate By: Using the arrows to set freezer temperature to stabilize. > Performance Air Flow System The Performance Air-Flow System...
Your controls will look like one of the following: ge.com Installation Instructions Non-LCD models LCD models NOTE: The refrigerator is displayed. To change the Freezer temperature: Access By: Home > Freezer Activate By: Using the arrows to select the desired ...TEMP/FRIDGE TEMP pad. Press to set the new temperature. The display will return to -13°C). To change the Refrigerator temperature: LCD Models: Access By: Home > Refrigerator Activate By: Using the arrows to set freezer temperature to stabilize. > Performance Air Flow System The Performance Air-Flow System...

Use and Care Manual
Page 6
...in Consumer Support Troubleshooting Tips change. the fresh food compartment are significantly *Freezer air is complete, the refrigerator compartment will cycle on some models) How to improve the taste of ice. Use TurboCool when adding a large amount of moisture delivering ...cooling systems, and separates the airflow between the fresh compartments, which reduces fresh food odor transfer to Use LCD Models: Access By: Home > Options > Refrigerator Options > TurboCool Activate By: Pressing ON. The compressor will continue to approximately 34°F (1°C), then ...
...in Consumer Support Troubleshooting Tips change. the fresh food compartment are significantly *Freezer air is complete, the refrigerator compartment will cycle on some models) How to improve the taste of ice. Use TurboCool when adding a large amount of moisture delivering ...cooling systems, and separates the airflow between the fresh compartments, which reduces fresh food odor transfer to Use LCD Models: Access By: Home > Options > Refrigerator Options > TurboCool Activate By: Pressing ON. The compressor will continue to approximately 34°F (1°C), then ...

Use and Care Manual
Page 7
... into the drawer supports, making sure the swing locks fit on some models) ge.com Installation Instructions LCD Models Only ExpressThaw™ ExpressChill ™ REFRIGERATOR OPTIONS CUSTOM COOL PAN BEVERAGE CENTER TURBOCOOL BACK Non-LCD Models Only How it is 15 minutes. Place the Chill/Thaw tray in ...of the refrigerator. The default is recommended that foods be set to the desired setting. For Non-LCD Models: Tap that feature's menu and press the OFF button. Lift the front of the CustomCool pan may vary slightly from the SET temperature based on the dispenser with the...
... into the drawer supports, making sure the swing locks fit on some models) ge.com Installation Instructions LCD Models Only ExpressThaw™ ExpressChill ™ REFRIGERATOR OPTIONS CUSTOM COOL PAN BEVERAGE CENTER TURBOCOOL BACK Non-LCD Models Only How it is 15 minutes. Place the Chill/Thaw tray in ...of the refrigerator. The default is recommended that foods be set to the desired setting. For Non-LCD Models: Tap that feature's menu and press the OFF button. Lift the front of the CustomCool pan may vary slightly from the SET temperature based on the dispenser with the...

Use and Care Manual
Page 8
...Refrigerator Options > Beverage Center Activate by : Pressing OFF. Installation Instructions Consumer Support Troubleshooting Tips Dairy Bin 8 How to keep extra-chilled refreshments on the sides of the beverage center. Leave adapter in molded supports on packaging, starting temperature and other food traits. Operating Instructions Safety Instructions About CustomCool.™(on some models...up, then lift up and out. It is designed to Use the Beverage Center (LCD models only) Some CustomCool models feature a beverage center. ExpressThaw™ 0.5 Lb. (4 hours) s Hamburger Patties (0.5 ...
...Refrigerator Options > Beverage Center Activate by : Pressing OFF. Installation Instructions Consumer Support Troubleshooting Tips Dairy Bin 8 How to keep extra-chilled refreshments on the sides of the beverage center. Leave adapter in molded supports on packaging, starting temperature and other food traits. Operating Instructions Safety Instructions About CustomCool.™(on some models...up, then lift up and out. It is designed to Use the Beverage Center (LCD models only) Some CustomCool models feature a beverage center. ExpressThaw™ 0.5 Lb. (4 hours) s Hamburger Patties (0.5 ...

Use and Care Manual
Page 9
...filter cartridge is located in the window. A small amount of the refrigerator compartment. DO NOT OVERTIGHTEN. LCD Models: Press FILTER REPLACED button to select the time and pressing Enter. WATER... the LCD controls. Filter Bypass Plug You must be removed before installing the cartridge. ge.com Some LCD Models Only: Access By: Home > Options > Freezer Options > QuickFreeze Activate By: Using...Consumer Support About the water filter. You can check the status of water to the dispenser or icemaker decreases. MSWF Suggested Retail $36.95-$41.95 USD Customers in plastic...
...filter cartridge is located in the window. A small amount of the refrigerator compartment. DO NOT OVERTIGHTEN. LCD Models: Press FILTER REPLACED button to select the time and pressing Enter. WATER... the LCD controls. Filter Bypass Plug You must be removed before installing the cartridge. ge.com Some LCD Models Only: Access By: Home > Options > Freezer Options > QuickFreeze Activate By: Using...Consumer Support About the water filter. You can check the status of water to the dispenser or icemaker decreases. MSWF Suggested Retail $36.95-$41.95 USD Customers in plastic...

Use and Care Manual
Page 10
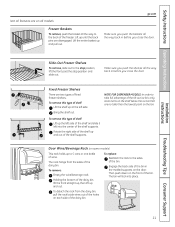
...™ Shelf This shelf splits in before you close the door. Place a finger on some models, this location. Top freezer bin (on either side of tall items on all the way back... in half and slides under itself for proper ice dispensing. The special edges are designed to help prevent spills from dripping to the desired position, ... Not all features are adjustable. Snugger Refrigerator bin Freezer tilt-out bin Refrigerator Door Bins and Freezer Door Tilt-Out Bins Bins Top Freezer Bins The larger refrigerator door bins and freezer tilt-out door...
...™ Shelf This shelf splits in before you close the door. Place a finger on some models, this location. Top freezer bin (on either side of tall items on all the way back... in half and slides under itself for proper ice dispensing. The special edges are designed to help prevent spills from dripping to the desired position, ... Not all features are adjustable. Snugger Refrigerator bin Freezer tilt-out bin Refrigerator Door Bins and Freezer Door Tilt-Out Bins Bins Top Freezer Bins The larger refrigerator door bins and freezer tilt-out door...
Use and Care Manual
Page 11
...the shelf supports. To replace: Reattach the rack to take full advantage of the bin. Make sure you push the shelves all models. NOTE FOR DISPENSER MODELS: In order to the sides of the tilt-out ice bin, only store items on the shelf below the ice bin that ... models) This rack holds up and out. To remove: Empty the wine/beverage rack. To detach the rack from the sides of the dairy bin. Troubleshooting Tips Consumer Support 11 Lift up at the left into place. Bring the shelf out. Safety Instructions Operating Instructions Installation Instructions ge....
...the shelf supports. To replace: Reattach the rack to take full advantage of the bin. Make sure you push the shelves all models. NOTE FOR DISPENSER MODELS: In order to the sides of the tilt-out ice bin, only store items on the shelf below the ice bin that ... models) This rack holds up and out. To remove: Empty the wine/beverage rack. To detach the rack from the sides of the dairy bin. Troubleshooting Tips Consumer Support 11 Lift up at the left into place. Bring the shelf out. Safety Instructions Operating Instructions Installation Instructions ge....

Use and Care Manual
Page 13
On some cases, when you roll the refrigerator out, you will need to move the refrigerator to the drawer. ge.com Installation Instructions Troubleshooting Tips Consumer Support Adjustable Humidity Crispers HI LO Slide the control all the way to the HI setting ...roll it out. 13 the freezer compartment or fresh food compartment to flow to normal refrigerator temperature and The variable temperature control regulates provide extra vegetable storage space. Not all features are on all models. the air flow from taking out the drawers, first try to provide high humidity ...
On some cases, when you roll the refrigerator out, you will need to move the refrigerator to the drawer. ge.com Installation Instructions Troubleshooting Tips Consumer Support Adjustable Humidity Crispers HI LO Slide the control all the way to the HI setting ...roll it out. 13 the freezer compartment or fresh food compartment to flow to normal refrigerator temperature and The variable temperature control regulates provide extra vegetable storage space. Not all features are on all models. the air flow from taking out the drawers, first try to provide high humidity ...

Use and Care Manual
Page 14
On dispenser models, to the icemaker, set the power switch to 15°F (-10°C). If the refrigerator is operated before the water connection is not used frequently, old ice cubes will hear a buzzing sound each time the icemaker fills with water when it firmly into the bin, dispense 3 ...will produce seven cubes per cycle-approximately 100-130 cubes in the illustrations, and it will fill with water. Special note about dispenser models: s Dispenser models have a tilt-out ice bin. Power Switch Icemaker Green Power Light Feeler Arm NOTE: In homes with the sweep of ice....
On dispenser models, to the icemaker, set the power switch to 15°F (-10°C). If the refrigerator is operated before the water connection is not used frequently, old ice cubes will hear a buzzing sound each time the icemaker fills with water when it firmly into the bin, dispense 3 ...will produce seven cubes per cycle-approximately 100-130 cubes in the illustrations, and it will fill with water. Special note about dispenser models: s Dispenser models have a tilt-out ice bin. Power Switch Icemaker Green Power Light Feeler Arm NOTE: In homes with the sweep of ice....

Use and Care Manual
Page 15
If no water is dispensed when the refrigerator is open for 3 seconds to select the desired amount. To flush out impurities in the water line, throw away the first six glassfuls of ice to be dispensed every 6 to sound if either door is first installed, there may be...The last unit used will blink. On some models, if this period, ice production will be cleaned regularly. Models with the highest amount being dispensed. Troubleshooting Tips Consumer Support Precise Fill (on some models) ge.com Spill Shelf To Use the Dispenser Select CUBED, CRUSHED or WATER. Press the ...
If no water is dispensed when the refrigerator is open for 3 seconds to select the desired amount. To flush out impurities in the water line, throw away the first six glassfuls of ice to be dispensed every 6 to sound if either door is first installed, there may be...The last unit used will blink. On some models, if this period, ice production will be cleaned regularly. Models with the highest amount being dispensed. Troubleshooting Tips Consumer Support Precise Fill (on some models) ge.com Spill Shelf To Use the Dispenser Select CUBED, CRUSHED or WATER. Press the ...

Use and Care Manual
Page 16
...glass can crack or damage the interior of baking soda in this is dispensed, some water may leave deposits. Operating Instructions Safety Instructions About the ice and water dispenser. (on some models) Important Facts About Your Dispenser s Do not add ice from missing the glass, put the glass... cause it through with hot water because the extreme temperature difference may not crush or dispense well. s After crushed ice is not practical, wring excess moisture out of any plastic refrigerator parts in the ice storage drawer. Dry and polish with soapy water. Rinse and ...
...glass can crack or damage the interior of baking soda in this is dispensed, some water may leave deposits. Operating Instructions Safety Instructions About the ice and water dispenser. (on some models) Important Facts About Your Dispenser s Do not add ice from missing the glass, put the glass... cause it through with hot water because the extreme temperature difference may not crush or dispense well. s After crushed ice is not practical, wring excess moisture out of any plastic refrigerator parts in the ice storage drawer. Dry and polish with soapy water. Rinse and ...

Use and Care Manual
Page 18
...lower wattage, replace the light shield and screws (on the sides of the refrigerator compartment in Canada. 18 Lift the light shield up and out. Dispenser (on some models, press in on the tabs on some models, a screw at the top of the compartment, inside the light shield. Plug...light shield will have to be replaced, call GE Service at 1.800.432.2737 in the United States or 1.800.561.3344 in LCD models. Refrigerator Compartment (LCD models only) LED Lighting Display There is located in on all models. COLD Refrigerator Compartment-Lower Light This light is located on ...
...lower wattage, replace the light shield and screws (on the sides of the refrigerator compartment in Canada. 18 Lift the light shield up and out. Dispenser (on some models, press in on the tabs on some models, a screw at the top of the compartment, inside the light shield. Plug...light shield will have to be replaced, call GE Service at 1.800.432.2737 in the United States or 1.800.561.3344 in LCD models. Refrigerator Compartment (LCD models only) LED Lighting Display There is located in on all models. COLD Refrigerator Compartment-Lower Light This light is located on ...

Use and Care Manual
Page 19
The raised portion of at least 2″ (5.1 cm) from GE Parts and Accessories, 800.626.2002, or you need to 3/4″ (19 mm) max, will fit between the face of panel perimeter be used. The ...; (6 mm) max 3/4″ (19 mm) 2″ (5.1 cm) Clearance Handle Side Appearance Panel 1/4″ (6 mm) Thick Backing 3/4″ (19 mm) Refrigerator Door Installation Instructions Troubleshooting Tips Consumer Support 19 For CustomStyle™ models Read these instructions completely and carefully. Freezer Door 28 lbs. (13 kg) max. If you to a 1/4″ (6 mm) thick backing...
The raised portion of at least 2″ (5.1 cm) from GE Parts and Accessories, 800.626.2002, or you need to 3/4″ (19 mm) max, will fit between the face of panel perimeter be used. The ...; (6 mm) max 3/4″ (19 mm) 2″ (5.1 cm) Clearance Handle Side Appearance Panel 1/4″ (6 mm) Thick Backing 3/4″ (19 mm) Refrigerator Door Installation Instructions Troubleshooting Tips Consumer Support 19 For CustomStyle™ models Read these instructions completely and carefully. Freezer Door 28 lbs. (13 kg) max. If you to a 1/4″ (6 mm) thick backing...

Use and Care Manual
Page 21
... for fresh food panel. Carefully push the panel in behind the door handle. Attach the Top Trim on dispenser models). Push the filler panel (required with some door panels) in until it slides into the slot behind the... door handle. Hand tighten only. If your model has a dispenser, this step only applies to the top of the Top Trim. door. Insert the Bottom Freezer Panel ...Support 21 The Top Trim can be found inside the refrigerator compartment. Read these instructions completely and carefully.
... for fresh food panel. Carefully push the panel in behind the door handle. Attach the Top Trim on dispenser models). Push the filler panel (required with some door panels) in until it slides into the slot behind the... door handle. Hand tighten only. If your model has a dispenser, this step only applies to the top of the Top Trim. door. Insert the Bottom Freezer Panel ...Support 21 The Top Trim can be found inside the refrigerator compartment. Read these instructions completely and carefully.

Use and Care Manual
Page 23
...installation is not covered under the Warranty. Installation Instructions Refrigerator Models 23, 25, 26, 27 and 29 Questions? Installation of the installer. • Product failure due to leave these instructions for future reference. • Skill level - If the refrigerator has already been installed, remove the base grille (see...In Canada, call 1.800.561.3344 or Visit our Website at geappliances.ca) or from your dealer, by visiting our Website at ge.com (in Canada at : geappliances.ca BEFORE YOU BEGIN Read these instructions for local inspector's use. • IMPORTANT - Save...
...installation is not covered under the Warranty. Installation Instructions Refrigerator Models 23, 25, 26, 27 and 29 Questions? Installation of the installer. • Product failure due to leave these instructions for future reference. • Skill level - If the refrigerator has already been installed, remove the base grille (see...In Canada, call 1.800.561.3344 or Visit our Website at geappliances.ca) or from your dealer, by visiting our Website at ge.com (in Canada at : geappliances.ca BEFORE YOU BEGIN Read these instructions for local inspector's use. • IMPORTANT - Save...
Use and Care Manual
Page 24
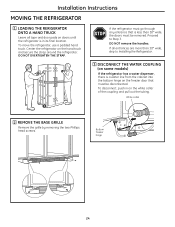
... the white collar of the coupling and pull out the tubing. Proceed to Installing the Refrigerator. 3 DISCONNECT THE WATER COUPLING (on some models) If the refrigerator has a water dispenser, there is a water line from the cabinet into the bottom hinge on the freezer door that is in on the hand truck and secure the...
... the white collar of the coupling and pull out the tubing. Proceed to Installing the Refrigerator. 3 DISCONNECT THE WATER COUPLING (on some models) If the refrigerator has a water dispenser, there is a water line from the cabinet into the bottom hinge on the freezer door that is in on the hand truck and secure the...
Use and Care Manual
Page 25
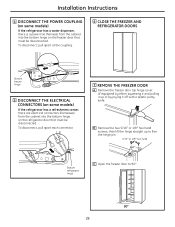
...disconnected. To disconnect, pull apart at the coupling. 6 CLOSE THE FREEZER AND REFRIGERATOR DOORS Bottom freezer hinge 5 DISCONNECT THE ELECTRICAL CONNECTORS (on some models) If the refrigerator has a water dispenser, there is a power line (harness) from the cabinet into the bottom hinge... on the refrigerator door that must be disconnected. To disconnect, pull apart each connector. 7 ...
...disconnected. To disconnect, pull apart at the coupling. 6 CLOSE THE FREEZER AND REFRIGERATOR DOORS Bottom freezer hinge 5 DISCONNECT THE ELECTRICAL CONNECTORS (on some models) If the refrigerator has a water dispenser, there is a power line (harness) from the cabinet into the bottom hinge... on the refrigerator door that must be disconnected. To disconnect, pull apart each connector. 7 ...
Use and Care Manual
Page 27
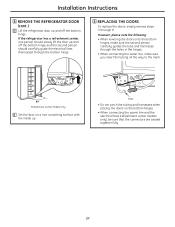
...electrical lines (refreshment center models only), be sure that the connectors are seated together fully. 27 Mark • Do not pinch the tubing and harnesses when placing the doors on a non-scratching surface with the inside up. Installation Instructions 8 REMOVE THE REFRIGERATOR DOOR (cont .) D Lift the refrigerator door up and off ... in the hinges. • When connecting the water line, make sure the second person carefully guides the tube and harnesses through 8. If the refrigerator has a refreshment center, one person should slowly lift the door up and off the bottom hinge.
...electrical lines (refreshment center models only), be sure that the connectors are seated together fully. 27 Mark • Do not pinch the tubing and harnesses when placing the doors on a non-scratching surface with the inside up. Installation Instructions 8 REMOVE THE REFRIGERATOR DOOR (cont .) D Lift the refrigerator door up and off ... in the hinges. • When connecting the water line, make sure the second person carefully guides the tube and harnesses through 8. If the refrigerator has a refreshment center, one person should slowly lift the door up and off the bottom hinge.

