
Owners Manual
Page 1
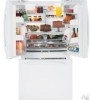
...11 Care and Cleaning 12-13 Controls 4-5 Crispers and Pans 9 Freezer 10 Replacing the Light Bulbs 14 Shelves and Bins 7, 8 Water Dispenser 11 Water Filter 6 Installation Instructions Installing the Anti-Tip Floor Bracket 18-19 Installing the Refrigerator . . . .20-24 Installing the Water Line . . . . .33-35 Preparing to Install the Refrigerator 17 Removing and Replacing the Freezer Drawer 25, 26 Reversing the Door Swing (Single Door Refrigerator Models only 27-29 Removing and Replacing the Doors (Double Door Refrigerator Models only) . . . .30-32 Trim Kits and Decorator Panels . .15...
...11 Care and Cleaning 12-13 Controls 4-5 Crispers and Pans 9 Freezer 10 Replacing the Light Bulbs 14 Shelves and Bins 7, 8 Water Dispenser 11 Water Filter 6 Installation Instructions Installing the Anti-Tip Floor Bracket 18-19 Installing the Refrigerator . . . .20-24 Installing the Water Line . . . . .33-35 Preparing to Install the Refrigerator 17 Removing and Replacing the Freezer Drawer 25, 26 Reversing the Door Swing (Single Door Refrigerator Models only 27-29 Removing and Replacing the Doors (Double Door Refrigerator Models only) . . . .30-32 Trim Kits and Decorator Panels . .15...

Owners Manual
Page 2
.... s Setting either or both controls to 0 (off the doors. DANGER! If you must be a UL-listed (in the United States) or a CSA certified (in . Before You Throw Away Your Old Refrigerator or Freezer: s Take off ) does not remove power to help prevent accidents. Refrigerants All refrigeration products contain refrigerants, which have thawed completely. USE OF EXTENSION CORDS Because of this Owner's Manual. Consumer Support Troubleshooting Tips Installation Instructions Operating Instructions...
.... s Setting either or both controls to 0 (off the doors. DANGER! If you must be a UL-listed (in the United States) or a CSA certified (in . Before You Throw Away Your Old Refrigerator or Freezer: s Take off ) does not remove power to help prevent accidents. Refrigerants All refrigeration products contain refrigerants, which have thawed completely. USE OF EXTENSION CORDS Because of this Owner's Manual. Consumer Support Troubleshooting Tips Installation Instructions Operating Instructions...

Owners Manual
Page 4
... refrigerator. To turn the unit back on and the display will go to OFF stops cooling in both the SET temperature as well as the actual temperature in the factory at 37°F for the refrigerator compartment and 0°F for the refrigerator to the preset recommended settings. Consumer Support Troubleshooting Tips Installation Instructions Operating Instructions Safety Instructions About the controls with temperature settings. (on some models) (on usage and operating environment. The ACTUAL TEMP light...
... refrigerator. To turn the unit back on and the display will go to OFF stops cooling in both the SET temperature as well as the actual temperature in the factory at 37°F for the refrigerator compartment and 0°F for the refrigerator to the preset recommended settings. Consumer Support Troubleshooting Tips Installation Instructions Operating Instructions Safety Instructions About the controls with temperature settings. (on some models) (on usage and operating environment. The ACTUAL TEMP light...
Owners Manual
Page 6
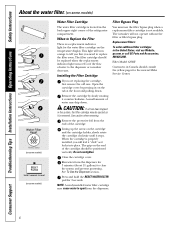
... drip down . Installing the Filter Cartridge You must use the filter bypass plug when a replacement filter cartridge is a replacement indicator light for the water filter cartridge on the cartridge and the cartridge holder, slowly rotate the cartridge clockwise until it is removed. Replacement Filters: To order additional filter cartridges in on the tab at the front and pulling down . A small amount of water to spurt from the dispenser for 3 seconds. Lining up the arrow on the temperature display. Close the cartridge cover. Remove...
... drip down . Installing the Filter Cartridge You must use the filter bypass plug when a replacement filter cartridge is a replacement indicator light for the water filter cartridge on the cartridge and the cartridge holder, slowly rotate the cartridge clockwise until it is removed. Replacement Filters: To order additional filter cartridges in on the tab at the front and pulling down . A small amount of water to spurt from the dispenser for 3 seconds. Lining up the arrow on the temperature display. Close the cartridge cover. Remove...

Owners Manual
Page 9
... for most vegetables. ge.com Adjustable Humidity Crisper (on some models) Slide the control all models. How to the stop position. Make sure all the way to the HIGH setting to provide lower humidity levels recommended for most fruits. Pull the drawer out to Remove and Replace the Deli Pan To remove: To replace: Remove the fruit and vegetable drawers. Place the sides of the drawer up and out...
... for most vegetables. ge.com Adjustable Humidity Crisper (on some models) Slide the control all models. How to the stop position. Make sure all the way to the HIGH setting to provide lower humidity levels recommended for most fruits. Pull the drawer out to Remove and Replace the Deli Pan To remove: To replace: Remove the fruit and vegetable drawers. Place the sides of the drawer up and out...

Owners Manual
Page 11
... Use the Internal Dispenser (on some models) The water dispenser is purged from the water line and to replace the shelf. Hold the glass underneath the dispenser for more than -average water pressure, you close the door. To flush out impurities in the water line system. Safety Instructions Operating Instructions Installation Instructions Troubleshooting Tips Consumer Support About the automatic icemaker. ge.com Power Switch Green Power Light Icemaker Feeler Arm Automatic Icemaker (on freezer compartment temperature, room temperature, number of ice to allow the water line to...
... Use the Internal Dispenser (on some models) The water dispenser is purged from the water line and to replace the shelf. Hold the glass underneath the dispenser for more than -average water pressure, you close the door. To flush out impurities in the water line system. Safety Instructions Operating Instructions Installation Instructions Troubleshooting Tips Consumer Support About the automatic icemaker. ge.com Power Switch Green Power Light Icemaker Feeler Arm Automatic Icemaker (on freezer compartment temperature, room temperature, number of ice to allow the water line to...
Owners Manual
Page 17
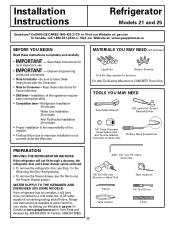
...; Nut Driver Level 17 A GE water supply kit (containing tubing, shutoff valve, fittings and instructions) is not covered under the Warranty. MATERIALS YOU MAY NEED (not included) Lag Bolts Anchor Sleeves Drill Bit Appropriate for local inspector's use. • IMPORTANT - Observe all governing codes and ordinances. • Note to a cold water line. Save these instructions completely and carefully. • IMPORTANT - WATER SUPPLY TO THE ICEMAKER AND DISPENSER (ON SOME MODELS) If the refrigerator has an icemaker...
...; Nut Driver Level 17 A GE water supply kit (containing tubing, shutoff valve, fittings and instructions) is not covered under the Warranty. MATERIALS YOU MAY NEED (not included) Lag Bolts Anchor Sleeves Drill Bit Appropriate for local inspector's use. • IMPORTANT - Observe all governing codes and ordinances. • Note to a cold water line. Save these instructions completely and carefully. • IMPORTANT - WATER SUPPLY TO THE ICEMAKER AND DISPENSER (ON SOME MODELS) If the refrigerator has an icemaker...

Owners Manual
Page 20
... enough to the installation location. 20 Top Hinge B 1 CONNECTING THE REFRIGERATOR TO THE HOUSE WATER LINE (icemaker and dispenser models) A cold water supply is required for ease of the refrigerator. Standard Depth Counter Depth Models Models Sides 1/8″ (3 mm) 1/8″ (3 mm) Top 1″ (25 mm) 1″ (25 mm) Back 1″ (25 mm) 1/2″ (13 mm) REMOVE TOP CAP (cont.) (on some models) REINSTALL DOORS, DRAWERS AND TOP CAP E Carefully lower the door onto the center...
... enough to the installation location. 20 Top Hinge B 1 CONNECTING THE REFRIGERATOR TO THE HOUSE WATER LINE (icemaker and dispenser models) A cold water supply is required for ease of the refrigerator. Standard Depth Counter Depth Models Models Sides 1/8″ (3 mm) 1/8″ (3 mm) Top 1″ (25 mm) 1″ (25 mm) Back 1″ (25 mm) 1/2″ (13 mm) REMOVE TOP CAP (cont.) (on some models) REINSTALL DOORS, DRAWERS AND TOP CAP E Carefully lower the door onto the center...

Owners Manual
Page 21
... house cold water supply. clockwise to raise the refrigerator, counterclockwise to lower it in the refrigerator, make sure the icemaker power switch is hand tight. B If you are using copper tubing, place a compression nut and ferrule (sleeve) onto the end of the illustrations below will look like the connection on your kitchen cabinets. Overtightening may need to pry open the clamp. 2 TURN ON THE WATER SUPPLY (icemaker and dispenser models) Turn the water...
... house cold water supply. clockwise to raise the refrigerator, counterclockwise to lower it in the refrigerator, make sure the icemaker power switch is hand tight. B If you are using copper tubing, place a compression nut and ferrule (sleeve) onto the end of the illustrations below will look like the connection on your kitchen cabinets. Overtightening may need to pry open the clamp. 2 TURN ON THE WATER SUPPLY (icemaker and dispenser models) Turn the water...
Owners Manual
Page 30
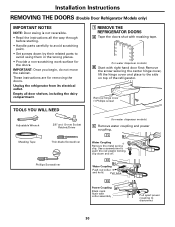
...; Handle parts carefully to avoid using them in the wrong places. • Provide a non-scratching work surface for water dispenser models) C Remove water coupling and power coupling. C3 Power Coupling Black mark flush with right-hand door first: Remove the screw securing the center hinge cover, lift the hinge cover and place to disconnect 30 C2 Water Coupling Push red collar and hold. Remove hinge cover (1 Phillips screw) TOOLS YOU WILL NEED Adjustable Wrench...
...; Handle parts carefully to avoid using them in the wrong places. • Provide a non-scratching work surface for water dispenser models) C Remove water coupling and power coupling. C3 Power Coupling Black mark flush with right-hand door first: Remove the screw securing the center hinge cover, lift the hinge cover and place to disconnect 30 C2 Water Coupling Push red collar and hold. Remove hinge cover (1 Phillips screw) TOOLS YOU WILL NEED Adjustable Wrench...

Owners Manual
Page 33
... a qualified plumber to correct water hammer before connecting the water line, make sure the icemaker power switch is from a Reverse Osmosis Water Filtration System AND the refrigerator also has a water filter, use your refrigerator to water leakage or flooding. If using any electrical device (such as a power drill) during installation, be sure the device is with a GE RVKit. WX08X10006 15′ (4.6 m) - If you use the refrigerator's filter bypass plug. Using the refrigerator's water filtration cartridge in a manner to move out...
... a qualified plumber to correct water hammer before connecting the water line, make sure the icemaker power switch is from a Reverse Osmosis Water Filtration System AND the refrigerator also has a water filter, use your refrigerator to water leakage or flooding. If using any electrical device (such as a power drill) during installation, be sure the device is with a GE RVKit. WX08X10006 15′ (4.6 m) - If you use the refrigerator's filter bypass plug. Using the refrigerator's water filtration cartridge in a manner to move out...

Owners Manual
Page 35
..., then tighten one quart (1 liter) of the tubing into the valve. Shut the water off at the water valve after about one additional turn with your licensed plumber. 6 ROUTE THE TUBING Route the tubing between the cold water line and the refrigerator. Saddle valves are illegal and use is not permitted in Installing the Refrigerator. 35 Route the tubing through the tubing. NOTE: Do not overtighten or you may...
..., then tighten one quart (1 liter) of the tubing into the valve. Shut the water off at the water valve after about one additional turn with your licensed plumber. 6 ROUTE THE TUBING Route the tubing between the cold water line and the refrigerator. Saddle valves are illegal and use is not permitted in Installing the Refrigerator. 35 Route the tubing through the tubing. NOTE: Do not overtighten or you may...

Owners Manual
Page 36
... the refrigerator is released. s You may make a gurgling noise like boiling water. CLICKS, POPS, CRACKS and SNAPS WATER SOUNDS s You may hear the water lines move at high speeds. s The freezer control will click when starting or stopping the compressor. s On models with an icemaker, after dispenser button is first plugged in order to end. s Closing the door may not need adjusting. • Move the control to maintain the correct temperatures. Review...
... the refrigerator is released. s You may make a gurgling noise like boiling water. CLICKS, POPS, CRACKS and SNAPS WATER SOUNDS s You may hear the water lines move at high speeds. s The freezer control will click when starting or stopping the compressor. s On models with an icemaker, after dispenser button is first plugged in order to end. s Closing the door may not need adjusting. • Move the control to maintain the correct temperatures. Review...

Owners Manual
Page 37
... power switch to the refrigerator has not been connected. The icemaker power light will damage the water valve. • Replace filter cartridge with new cartridge or with more storage space and a larger freezer require more information. • See About the controls. • Set the temperature control one step colder. Door left open . • Check to shut off or not connected. Door openings too frequent or too long. Keeping it in the I (on . Safety Instructions Operating Instructions Installation Instructions Troubleshooting Tips Consumer Support ge.com Problem Motor operates...
... power switch to the refrigerator has not been connected. The icemaker power light will damage the water valve. • Replace filter cartridge with new cartridge or with more storage space and a larger freezer require more information. • See About the controls. • Set the temperature control one step colder. Door left open . • Check to shut off or not connected. Door openings too frequent or too long. Keeping it in the I (on . Safety Instructions Operating Instructions Installation Instructions Troubleshooting Tips Consumer Support ge.com Problem Motor operates...
Owners Manual
Page 38
... if package is normal. Defrost heater is set cold enough. Too frequent or too long door openings. replace every three months. • Check to see the Problem: Door/drawer does not close to a warmer temperature setting one setting colder. Some floor coverings will discolor at outlet. •Replace fuse or reset the breaker. Interior needs cleaning. Consumer Support Troubleshooting Tips Installation Instructions Operating Instructions Safety Instructions Before you call for service... Freezer control not set too cold. • Move the...
... if package is normal. Defrost heater is set cold enough. Too frequent or too long door openings. replace every three months. • Check to see the Problem: Door/drawer does not close to a warmer temperature setting one setting colder. Some floor coverings will discolor at outlet. •Replace fuse or reset the breaker. Interior needs cleaning. Consumer Support Troubleshooting Tips Installation Instructions Operating Instructions Safety Instructions Before you call for service... Freezer control not set too cold. • Move the...

Owners Manual
Page 39
... end of the cartridge should be trapped in the water system. Water filter clogged. Air may continue to a warmer setting and wait 24 hours. Normal when refrigerator is first installed. Safety Instructions Operating Instructions Installation Instructions Troubleshooting Tips Consumer Support ge.com Problem Water has poor taste/odor Water in first glass is warm Water dispenser does not work Water spurting from dispenser No water or ice cube production Water is leaking from dispenser Possible Causes Water dispenser has not been used for a long...
... end of the cartridge should be trapped in the water system. Water filter clogged. Air may continue to a warmer setting and wait 24 hours. Normal when refrigerator is first installed. Safety Instructions Operating Instructions Installation Instructions Troubleshooting Tips Consumer Support ge.com Problem Water has poor taste/odor Water in first glass is warm Water dispenser does not work Water spurting from dispenser No water or ice cube production Water is leaking from dispenser Possible Causes Water dispenser has not been used for a long...

Owners Manual
Page 40
... Freezer handle sections for service... Water filter indicator light is not lit This is the door alarm. •Close door. Refrigerator beeping This is normal. Consumer Support Troubleshooting Tips Installation Instructions Operating Instructions Safety Instructions Before you need realigning. •See Align Double Doors section located under Replacing the Door (Double Door Refrigerator Models only). 40 Water filter indicator light This is not lit On some models, the light •If the control settings do not light up the temperature control settings. Refrigerator...
... Freezer handle sections for service... Water filter indicator light is not lit This is the door alarm. •Close door. Refrigerator beeping This is normal. Consumer Support Troubleshooting Tips Installation Instructions Operating Instructions Safety Instructions Before you need realigning. •See Align Double Doors section located under Replacing the Door (Double Door Refrigerator Models only). 40 Water filter indicator light This is not lit On some models, the light •If the control settings do not light up the temperature control settings. Refrigerator...

Owners Manual
Page 45
... the sealed refrigerating system (the compressor, condenser, evaporator and all labor and related service to replace the defective part. EXCLUSION OF IMPLIED WARRANTIES-Your sole and exclusive remedy is abused, misused, or used commercially. Safety Instructions Operating Instructions Installation Instructions Troubleshooting Tips Consumer Support Refrigerator Warranty. (For customers in an area where service by a GE Authorized Servicer is needed to obtain service under the warranty. Any implied warranties, including the implied warranties of the water filter cartridge which fails...
... the sealed refrigerating system (the compressor, condenser, evaporator and all labor and related service to replace the defective part. EXCLUSION OF IMPLIED WARRANTIES-Your sole and exclusive remedy is abused, misused, or used commercially. Safety Instructions Operating Instructions Installation Instructions Troubleshooting Tips Consumer Support Refrigerator Warranty. (For customers in an area where service by a GE Authorized Servicer is needed to obtain service under the warranty. Any implied warranties, including the implied warranties of the water filter cartridge which fails...

Owners Manual
Page 46
... delivery. • Improper installation-proper installation includes adequate air circulation to the refrigeration system, adequate electrical, plumbing and other connecting facilities. • Replacement of house fuses or resetting of circuit breakers. • Replacement of light bulbs. • Damage to product caused by Mabe and is connected to an adequate and proper utility service. Mabe Service is needed to obtain service under the warranty. 46 If further help...
... delivery. • Improper installation-proper installation includes adequate air circulation to the refrigeration system, adequate electrical, plumbing and other connecting facilities. • Replacement of house fuses or resetting of circuit breakers. • Replacement of light bulbs. • Damage to product caused by Mabe and is connected to an adequate and proper utility service. Mabe Service is needed to obtain service under the warranty. 46 If further help...

Owners Manual
Page 47
... mg/L - - - pressure of 0.5 gpm; Replace cartridge when flow becomes too slow. Systems certified for cyst reduction may be used were 0.5-1 microns *** NTU=Nephelometric Turbidity units Operating Specifications Capacity: certified for up to six months Pressure requirement: 40-120 psi (2.8-8.2 bar) Temperature: 33-100ºF (0.6-38ºC) Flow rate: 0.5 gpm (1.9 lpm) General Installation/Operation/Maintenance Requirements Flush new cartridge at full flow for unmetered...
... mg/L - - - pressure of 0.5 gpm; Replace cartridge when flow becomes too slow. Systems certified for cyst reduction may be used were 0.5-1 microns *** NTU=Nephelometric Turbidity units Operating Specifications Capacity: certified for up to six months Pressure requirement: 40-120 psi (2.8-8.2 bar) Temperature: 33-100ºF (0.6-38ºC) Flow rate: 0.5 gpm (1.9 lpm) General Installation/Operation/Maintenance Requirements Flush new cartridge at full flow for unmetered...

