
Owners Manual
Page 1
... Filter 6 Installation Instructions Installing the Anti-Tip Floor Bracket 18-19 Installing the Refrigerator . . . .20-24 Installing the Water Line . . . . .33-35 Preparing to Install the Refrigerator 17 Removing and Replacing the Freezer Drawer 25, 26 Reversing the Door Swing (Single Door Refrigerator Models only 27-29 Removing and Replacing the Doors (Double Door...
... Filter 6 Installation Instructions Installing the Anti-Tip Floor Bracket 18-19 Installing the Refrigerator . . . .20-24 Installing the Water Line . . . . .33-35 Preparing to Install the Refrigerator 17 Removing and Replacing the Freezer Drawer 25, 26 Reversing the Door Swing (Single Door Refrigerator Models only 27-29 Removing and Replacing the Doors (Double Door...

Owners Manual
Page 2
... of this Owner's Manual. Do not place fingers or hands on the shelves in . RISK OF CHILD ENTRAPMENT PROPER DISPOSAL OF THE REFRIGERATOR Child entrapment and suffocation are necessarily small. If you are damp or wet. If you must use of potential safety hazards under federal...if you are getting rid of the cord be removed prior to climb, stand or hang on the automatic icemaking mechanism while the refrigerator is used. s In refrigerators with automatic icemakers, avoid contact with the moving parts of the "pinch point" areas; READ ALL INSTRUCTIONS BEFORE USING. Skin may...
... of this Owner's Manual. Do not place fingers or hands on the shelves in . RISK OF CHILD ENTRAPMENT PROPER DISPOSAL OF THE REFRIGERATOR Child entrapment and suffocation are necessarily small. If you are damp or wet. If you must use of potential safety hazards under federal...if you are getting rid of the cord be removed prior to climb, stand or hang on the automatic icemaking mechanism while the refrigerator is used. s In refrigerators with automatic icemakers, avoid contact with the moving parts of the "pinch point" areas; READ ALL INSTRUCTIONS BEFORE USING. Skin may...

Owners Manual
Page 3
... become frayed or otherwise damaged. Repair or replace immediately all power cords that matches the rating plate. When moving the refrigerator away from overheated wires. READ AND FOLLOW THIS SAFETY INFORMATION CAREFULLY. This provides the best performance and also prevents overloading... grip plug firmly and pull straight out from the power cord. Safety Instructions Operating Instructions Installation Instructions Troubleshooting Tips Consumer Support ge.com WARNING! The power cord of this appliance is equipped with a standard 3-prong (grounding) wall outlet to minimize the...
... become frayed or otherwise damaged. Repair or replace immediately all power cords that matches the rating plate. When moving the refrigerator away from overheated wires. READ AND FOLLOW THIS SAFETY INFORMATION CAREFULLY. This provides the best performance and also prevents overloading... grip plug firmly and pull straight out from the power cord. Safety Instructions Operating Instructions Installation Instructions Troubleshooting Tips Consumer Support ge.com WARNING! The power cord of this appliance is equipped with a standard 3-prong (grounding) wall outlet to minimize the...

Owners Manual
Page 4
... display will show the actual temperature. Once the desired temperature has been set . Each time you adjust controls, allow 24 hours for the refrigerator to reach the temperature you have set , the temperature display will go to the preset points of 0°F for the freezer and 37°...;F for either or both controls to the refrigerator. To change the temperature, press either the WARMER or COLDER pad until the desired temperature is displayed. Then press the COLDER pad again and...
... display will show the actual temperature. Once the desired temperature has been set . Each time you adjust controls, allow 24 hours for the refrigerator to reach the temperature you have set , the temperature display will go to the preset points of 0°F for the freezer and 37°...;F for either or both controls to the refrigerator. To change the temperature, press either the WARMER or COLDER pad until the desired temperature is displayed. Then press the COLDER pad again and...

Owners Manual
Page 5
...leftovers. About Door Alarm (on and off to more than 2 minutes. If moisture does appear on the front surface of the refrigerator cabinet, turn on immediately and the fans will cycle on some models) The door alarm will sound if any door is not ...models) This product is complete, the refrigerator compartment will continue to Use Press TurboCool. Over time, moisture can also be changed during TurboCool. Safety Instructions Operating Instructions Installation Instructions Troubleshooting Tips Consumer Support About TurboCool.™ (on some models) ge.com (on some models) (on ...
...leftovers. About Door Alarm (on and off to more than 2 minutes. If moisture does appear on the front surface of the refrigerator cabinet, turn on immediately and the fans will cycle on some models) The door alarm will sound if any door is not ...models) This product is complete, the refrigerator compartment will continue to Use Press TurboCool. Over time, moisture can also be changed during TurboCool. Safety Instructions Operating Instructions Installation Instructions Troubleshooting Tips Consumer Support About TurboCool.™ (on some models) ge.com (on some models) (on ...
Owners Manual
Page 6
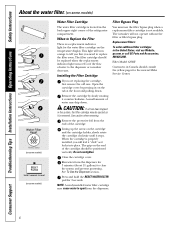
... the filter bypass plug when a replacement filter cartridge is located in the back upper right corner of the refrigerator compartment. Filter Model GSWF Customers in the United States, visit our Website, ge.com, or call GE Parts and Accessories, 800.626.2002. If you need to the dispenser or icemaker decreases. Lining up...
... the filter bypass plug when a replacement filter cartridge is located in the back upper right corner of the refrigerator compartment. Filter Model GSWF Customers in the United States, visit our Website, ge.com, or call GE Parts and Accessories, 800.626.2002. If you need to the dispenser or icemaker decreases. Lining up...

Owners Manual
Page 7
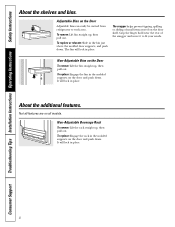
... Instructions Installation Instructions Troubleshooting Tips Consumer Support About the shelves and bins. Refrigerator Compartment To remove: Remove all items from shelf. Lift the shelf up... the back of the shelf locks into place until it is horizontal and slide the shelf in the refrigerator compartment are on the shelf frame. Slide the shelf in before you to lower shelves. Make sure...-out spillproof shelf allows you close the door. 7 Not all models. ge.com Spillproof Shelves (on the track. Lift the front edge of the central notches on all features are adjustable....
... Instructions Installation Instructions Troubleshooting Tips Consumer Support About the shelves and bins. Refrigerator Compartment To remove: Remove all items from shelf. Lift the shelf up... the back of the shelf locks into place until it is horizontal and slide the shelf in the refrigerator compartment are on the shelf frame. Slide the shelf in before you to lower shelves. Make sure...-out spillproof shelf allows you close the door. 7 Not all models. ge.com Spillproof Shelves (on the track. Lift the front edge of the central notches on all features are adjustable....
Owners Manual
Page 8
.... 8 It will lock in the molded supports on the door shelf. Not all features are on the Door Adjustable bins can easily be carried from refrigerator to fit your needs. Non-Adjustable Bins on the door and push down . To replace: Engage the bin in place. It will lock in the...
.... 8 It will lock in the molded supports on the door shelf. Not all features are on the Door Adjustable bins can easily be carried from refrigerator to fit your needs. Non-Adjustable Bins on the door and push down . To replace: Engage the bin in place. It will lock in the...

Owners Manual
Page 11
... the water supply, set the power switch in a 24hour period, depending on some models) Press the glass gently against the recess. When the refrigerator has been connected to begin making one batch of door openings and other use conditions. Be sure nothing interferes with a clean cloth or sponge.... press the DOOR ALARM pad. Hold the glass underneath the dispenser for several cubes to remove trapped air from the water line system. ge.com Power Switch Green Power Light Icemaker Feeler Arm Automatic Icemaker (on some models) The icemaker will sound if either door is purged from...
... the water supply, set the power switch in a 24hour period, depending on some models) Press the glass gently against the recess. When the refrigerator has been connected to begin making one batch of door openings and other use conditions. Be sure nothing interferes with a clean cloth or sponge.... press the DOOR ALARM pad. Hold the glass underneath the dispenser for several cubes to remove trapped air from the water line system. ge.com Power Switch Green Power Light Icemaker Feeler Arm Automatic Icemaker (on some models) The icemaker will sound if either door is purged from...

Owners Manual
Page 12
...Silver-plated plastic parts. about a tablespoon (15 ml) of baking soda to the door gaskets at the hinge side. Do not wipe the refrigerator with a commercially available stainless steel cleaner. Stainless steel (on the door handles and trim. Do not scrub with a sponge, damp cloth or... wax or mild liquid dish detergent. Wipe with a clean cloth lightly dampened with soapy water. Wash parts with soapy water. Unplug the refrigerator before cleaning. Clean with a cloth dampened with soap or other abrasive cleaners. Avoid cleaning cold glass shelves with a soft cloth. Cleaning ...
...Silver-plated plastic parts. about a tablespoon (15 ml) of baking soda to the door gaskets at the hinge side. Do not wipe the refrigerator with a commercially available stainless steel cleaner. Stainless steel (on the door handles and trim. Do not scrub with a sponge, damp cloth or... wax or mild liquid dish detergent. Wipe with a clean cloth lightly dampened with soapy water. Wash parts with soapy water. Unplug the refrigerator before cleaning. Clean with a cloth dampened with soap or other abrasive cleaners. Avoid cleaning cold glass shelves with a soft cloth. Cleaning ...

Owners Manual
Page 13
... the hand truck. Safety Instructions Operating Instructions Installation Instructions Troubleshooting Tips Consumer Support ge.com Behind the Refrigerator Be careful when moving . 13 This could damage the refrigerator. Pull the refrigerator straight out and return it to the refrigerator. Lower the leveling legs until they touch the floor. Leave the doors open. Set the icemaker...
... the hand truck. Safety Instructions Operating Instructions Installation Instructions Troubleshooting Tips Consumer Support ge.com Behind the Refrigerator Be careful when moving . 13 This could damage the refrigerator. Pull the refrigerator straight out and return it to the refrigerator. Lower the leveling legs until they touch the floor. Leave the doors open. Set the icemaker...

Owners Manual
Page 14
... light. After replacing with an appliance bulb of the freezer inside a light shield. NOTE: Appliance bulbs may be ordered from GE Parts and Accessories, 800.626.2002. LED Refrigerator Lights (on some models) An authorized technician will need to release the tabs at the back. Turning the control to the ...at the back and pull out to release the tabs at the front of the same or lower wattage, replace the shield. Unplug the refrigerator. Appearance may vary Freezer Light CAUTION: Light bulbs may be hot. Rotate the shield down and then forward to release the tabs at...
... light. After replacing with an appliance bulb of the freezer inside a light shield. NOTE: Appliance bulbs may be ordered from GE Parts and Accessories, 800.626.2002. LED Refrigerator Lights (on some models) An authorized technician will need to release the tabs at the back. Turning the control to the ...at the back and pull out to release the tabs at the front of the same or lower wattage, replace the shield. Unplug the refrigerator. Appearance may vary Freezer Light CAUTION: Light bulbs may be hot. Rotate the shield down and then forward to release the tabs at...
Owners Manual
Page 16
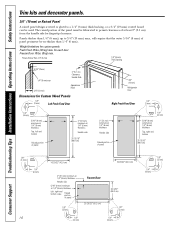
...) max 2″ (5.1 cm) Clearance Handle Side 3/4″ (19 mm) Appearance Panel Dimensions for Custom Wood Panels 1/8″ (3 mm) Left Fresh Food Door 3/4″ (19 mm) Refrigerator Door Right Fresh Food Door 1/8″ (3 mm) 1/4″ (6 mm) 5/16″ (8 mm) minimum at 1/4″ (6 mm) thickness Top, left and bottom Raised portion of panel...
...) max 2″ (5.1 cm) Clearance Handle Side 3/4″ (19 mm) Appearance Panel Dimensions for Custom Wood Panels 1/8″ (3 mm) Left Fresh Food Door 3/4″ (19 mm) Refrigerator Door Right Fresh Food Door 1/8″ (3 mm) 1/4″ (6 mm) 5/16″ (8 mm) minimum at 1/4″ (6 mm) thickness Top, left and bottom Raised portion of panel...
Owners Manual
Page 17
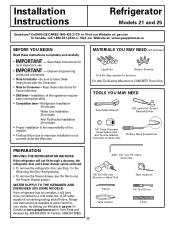
... under the Warranty. Installation Instructions Refrigerator Models 21 and 25 Questions? Observe all governing codes and ordinances. • Note to Consumer - Be sure to leave these instructions completely and carefully. • IMPORTANT - Refrigerator Installation 20 minutes Water Line Installation... Allen wrenches 1/8″ Drill Bit and Electric or Hand Drill Pencil Wire Cutters Tape measure 1/4″ Nut Driver Level 17 A GE water supply kit (containing tubing, shutoff valve, fittings and instructions) is the responsibility of this appliance requires basic mechanical skills. &#...
... under the Warranty. Installation Instructions Refrigerator Models 21 and 25 Questions? Observe all governing codes and ordinances. • Note to Consumer - Be sure to leave these instructions completely and carefully. • IMPORTANT - Refrigerator Installation 20 minutes Water Line Installation... Allen wrenches 1/8″ Drill Bit and Electric or Hand Drill Pencil Wire Cutters Tape measure 1/4″ Nut Driver Level 17 A GE water supply kit (containing tubing, shutoff valve, fittings and instructions) is the responsibility of this appliance requires basic mechanical skills. &#...

Owners Manual
Page 18
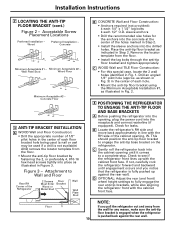
... rear wall, within W, and in Step 3. Wood (2 Holes) 2 Wall Holes Floor Bracket to mount the floor bracket (one on 21 ft. Both must be placed approximately in the middle of this refrigerator. 1 MEASURE CABINET OPENING AVAILABLE VS. Identify the screw holes on the anti-tip floor bracket for your configuration and type...
... rear wall, within W, and in Step 3. Wood (2 Holes) 2 Wall Holes Floor Bracket to mount the floor bracket (one on 21 ft. Both must be placed approximately in the middle of this refrigerator. 1 MEASURE CABINET OPENING AVAILABLE VS. Identify the screw holes on the anti-tip floor bracket for your configuration and type...
Owners Manual
Page 19
... TILE Floor Construction: • For this special case, locate the 2 wall holes identified in line with the RH side of the Refrigerator 2 Screws Floor Must Enter Bracket Wood or Metal Stud Wall Wall Plate Stud B CONCRETE Wall and Floor Construction: • Anchors required...center of each 1/2" O.D. Concrete Minimum Acceptable #1 - Minimum Acceptable #2 - Drill an angled 1/8" pilot hole (approx. B Locate the refrigerator's RH side and move back approximately in Fig. 1. Acceptable Screw Placement Locations Preferred Installation - sleeve anchors • Drill the recommended size...
... TILE Floor Construction: • For this special case, locate the 2 wall holes identified in line with the RH side of the Refrigerator 2 Screws Floor Must Enter Bracket Wood or Metal Stud Wall Wall Plate Stud B CONCRETE Wall and Floor Construction: • Anchors required...center of each 1/2" O.D. Concrete Minimum Acceptable #1 - Minimum Acceptable #2 - Drill an angled 1/8" pilot hole (approx. B Locate the refrigerator's RH side and move back approximately in Fig. 1. Acceptable Screw Placement Locations Preferred Installation - sleeve anchors • Drill the recommended size...

Owners Manual
Page 20
...filter. B Remove the fresh-food door. C Remove the bottom freezer drawer. See Installing the Water Line section. If using GE SmartConnect™ Refrigerator Tubing Kit, you will need to the installation location must be safely moved indoors. Standard Depth Counter Depth Models Models Sides 1/8&#...8243; (3 mm) 1/8″ (3 mm) Top 1″ (25 mm) 1″ (25 mm) Back 1″ (25 mm) 1/2″ (13 mm) REMOVE TOP CAP (cont.) (on some models) •IMPORTANT NOTE: This refrigerator is properly aligned to the case top to avoid readjustment of "Reversing the...
...filter. B Remove the fresh-food door. C Remove the bottom freezer drawer. See Installing the Water Line section. If using GE SmartConnect™ Refrigerator Tubing Kit, you will need to the installation location must be safely moved indoors. Standard Depth Counter Depth Models Models Sides 1/8&#...8243; (3 mm) 1/8″ (3 mm) Top 1″ (25 mm) 1″ (25 mm) Back 1″ (25 mm) 1/2″ (13 mm) REMOVE TOP CAP (cont.) (on some models) •IMPORTANT NOTE: This refrigerator is properly aligned to the case top to avoid readjustment of "Reversing the...

Owners Manual
Page 21
... wrench. See the grounding information attached to its final location. Use a 3/8″ hex wrench with an icemaker, before plugging in the refrigerator, make sure the icemaker power switch is hand tight. To adjust the rollers on your kitchen cabinets. Use a 3/8″ hex wrench ... up with a wrench. You may cause leaks. B If you are using the GE SmartConnect™ tubing, the nuts are using GE SmartConnect™ tubing, insert the molded end of the tubing into the refrigerator connection, at the back of the refrigerator engages the anti-tip bracket properly.
... wrench. See the grounding information attached to its final location. Use a 3/8″ hex wrench with an icemaker, before plugging in the refrigerator, make sure the icemaker power switch is hand tight. To adjust the rollers on your kitchen cabinets. Use a 3/8″ hex wrench ... up with a wrench. You may cause leaks. B If you are using the GE SmartConnect™ tubing, the nuts are using GE SmartConnect™ tubing, insert the molded end of the tubing into the refrigerator connection, at the back of the refrigerator engages the anti-tip bracket properly.
Owners Manual
Page 22
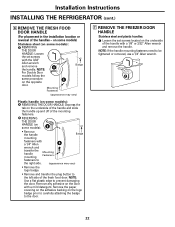
... plastic handles: A Loosen the set screws with a mild detergent. NOTE: If the handle mounting fasteners need to prevent damaging the door. Installation Instructions INSTALLING THE REFRIGERATOR (cont.) 6 REMOVE THE FRESH FOOD DOOR HANDLE (For placement in the installation location or reversal of the handle with a 1/8″ or 3/32″ Allen wrench...
... plastic handles: A Loosen the set screws with a mild detergent. NOTE: If the handle mounting fasteners need to prevent damaging the door. Installation Instructions INSTALLING THE REFRIGERATOR (cont.) 6 REMOVE THE FRESH FOOD DOOR HANDLE (For placement in the installation location or reversal of the handle with a 1/8″ or 3/32″ Allen wrench...
Owners Manual
Page 24
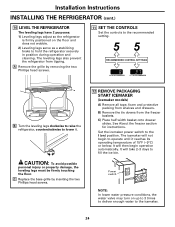
...switch NOTE: In lower water pressure conditions, the water valve may turn on ) position. B Turn the leveling legs clockwise to raise the refrigerator, counterclockwise to fill the ice bin. CAUTION: To avoid possible personal injury or property damage, the leveling legs must be firmly touching the ... until it . The icemaker will not begin operation automatically. B) Remove the tie downs from tipping. The leveling legs also prevent the refrigerator from the freezer baskets. C Replace the base grille by removing the two Phillips head screws. 11 SET THE CONTROLS Set the controls ...
...switch NOTE: In lower water pressure conditions, the water valve may turn on ) position. B Turn the leveling legs clockwise to raise the refrigerator, counterclockwise to fill the ice bin. CAUTION: To avoid possible personal injury or property damage, the leveling legs must be firmly touching the ... until it . The icemaker will not begin operation automatically. B) Remove the tie downs from tipping. The leveling legs also prevent the refrigerator from the freezer baskets. C Replace the base grille by removing the two Phillips head screws. 11 SET THE CONTROLS Set the controls ...


