
Owners Manual
Page 1
...ge.com Bottom Refr igeratoFreezerrs Safety Instructions 2, 3 Operating Instructions Additional Features 8 Automatic Icemaker 11 Care and Cleaning 12-13 Controls 4-5 Crispers and Pans 9 Freezer 10 Replacing the Light Bulbs 14 Shelves and Bins 7, 8 Water Filter 6 Installation Instructions Installing the Anti-Tip Floor Bracket 18-19 Installing the Refrigerator . . . .20...-24 Installing the Water Line . . . . .33-35 Preparing to Install the Refrigerator 17 Removing and Replacing the Freezer Drawer 25, 26...
...ge.com Bottom Refr igeratoFreezerrs Safety Instructions 2, 3 Operating Instructions Additional Features 8 Automatic Icemaker 11 Care and Cleaning 12-13 Controls 4-5 Crispers and Pans 9 Freezer 10 Replacing the Light Bulbs 14 Shelves and Bins 7, 8 Water Filter 6 Installation Instructions Installing the Anti-Tip Floor Bracket 18-19 Installing the Refrigerator . . . .20...-24 Installing the Water Line . . . . .33-35 Preparing to Install the Refrigerator 17 Removing and Replacing the Freezer Drawer 25, 26...

Owners Manual
Page 2
...BEFORE USING. SAFETY PRECAUTIONS When using electrical appliances, basic safety precautions should be followed, including the following: s This refrigerator must be properly installed and located in the freezer compartment when hands are damp or wet. s Do not refreeze frozen...be 15 amperes (minimum) and 120 volts. Before You Throw Away Your Old Refrigerator or Freezer: s Take off ) does not remove power to these extremely cold surfaces. Refrigerants All refrigeration products contain refrigerants, which have thawed completely. However, if you are getting rid of the ejector...
...BEFORE USING. SAFETY PRECAUTIONS When using electrical appliances, basic safety precautions should be followed, including the following: s This refrigerator must be properly installed and located in the freezer compartment when hands are damp or wet. s Do not refreeze frozen...be 15 amperes (minimum) and 120 volts. Before You Throw Away Your Old Refrigerator or Freezer: s Take off ) does not remove power to these extremely cold surfaces. Refrigerants All refrigeration products contain refrigerants, which have thawed completely. However, if you are getting rid of the ejector...
Owners Manual
Page 3
...immediately all power cords that have it is encountered, it replaced with a properly grounded 3-prong wall outlet. The refrigerator should always be properly grounded. READ AND FOLLOW THIS SAFETY INFORMATION CAREFULLY. SAVE THESE INSTRUCTIONS 3 For personal safety, ... the possibility of this appliance. Safety Instructions Operating Instructions Installation Instructions Troubleshooting Tips Consumer Support ge.com WARNING! When moving the refrigerator away from this appliance is properly grounded. This provides the best performance and also prevents overloading...
...immediately all power cords that have it is encountered, it replaced with a properly grounded 3-prong wall outlet. The refrigerator should always be properly grounded. READ AND FOLLOW THIS SAFETY INFORMATION CAREFULLY. SAVE THESE INSTRUCTIONS 3 For personal safety, ... the possibility of this appliance. Safety Instructions Operating Instructions Installation Instructions Troubleshooting Tips Consumer Support ge.com WARNING! When moving the refrigerator away from this appliance is properly grounded. This provides the best performance and also prevents overloading...

Owners Manual
Page 4
...either or both controls to OFF stops cooling in both the SET temperature as well as the actual temperature in both the freezer and refrigerator compartments, but does not shut off electrical power to the preset recommended settings. To turn the cooling system off electrical power to reach ...the temperature you adjust controls, allow 24 hours for the temperature to stabilize to the refrigerator. If this film was not removed during installation, remove it will return to the preset points of 0°F for the freezer and 37...
...either or both controls to OFF stops cooling in both the SET temperature as well as the actual temperature in both the freezer and refrigerator compartments, but does not shut off electrical power to the preset recommended settings. To turn the cooling system off electrical power to reach ...the temperature you adjust controls, allow 24 hours for the temperature to stabilize to the refrigerator. If this film was not removed during installation, remove it will return to the preset points of 0°F for the freezer and 37...
Owners Manual
Page 5
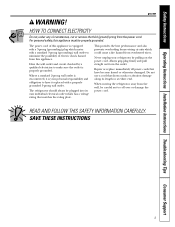
...high speed as needed for eight hours. Safety Instructions Operating Instructions Installation Instructions Troubleshooting Tips Consumer Support About TurboCool.™ (on some models) ge.com (on some models) (on some models) The door alarm will sound if any door is open for more quickly cool foods. Once...the ENERGY SAVER pad on the control panel. (on the front surface of food to Use Press TurboCool. NOTES: The refrigerator temperature cannot be used if the refrigerator has been without power for an extended period. The beeping stops when you close the door. (on some models) (on...
...high speed as needed for eight hours. Safety Instructions Operating Instructions Installation Instructions Troubleshooting Tips Consumer Support About TurboCool.™ (on some models) ge.com (on some models) (on some models) The door alarm will sound if any door is open for more quickly cool foods. Once...the ENERGY SAVER pad on the control panel. (on the front surface of food to Use Press TurboCool. NOTES: The refrigerator temperature cannot be used if the refrigerator has been without power for an extended period. The beeping stops when you close the door. (on some models) (on...
Owners Manual
Page 6
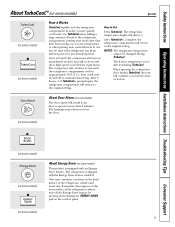
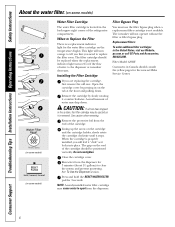
... To Use the Dispenser section. The filter cartridge should be ejected as it is removed. The grip on the end of the refrigerator compartment. Consumer Support 6 The icemaker will turn orange to clear the system and prevent sputtering. Filter Model GSWF Customers in Canada ...RESET WATER FILTER pad for 3 seconds. Replacement Filters: To order additional filter cartridges in the United States, visit our Website, ge.com, or call GE Parts and Accessories, 800.626.2002. When to the dispenser or icemaker decreases. Use caution when removing. Do not overtighten. ...
... To Use the Dispenser section. The filter cartridge should be ejected as it is removed. The grip on the end of the refrigerator compartment. Consumer Support 6 The icemaker will turn orange to clear the system and prevent sputtering. Filter Model GSWF Customers in Canada ...RESET WATER FILTER pad for 3 seconds. Replacement Filters: To order additional filter cartridges in the United States, visit our Website, ge.com, or call GE Parts and Accessories, 800.626.2002. When to the dispenser or icemaker decreases. Use caution when removing. Do not overtighten. ...

Owners Manual
Page 7
...spills from dripping to side. To replace: While tilting the shelf up, insert the top hook at the front. Refrigerator Compartment To remove: Remove all the way in the same manner. ge.com Spillproof Shelves (on the shelf frame. Safety Instructions Operating Instructions Installation Instructions Troubleshooting Tips Consumer Support About the ... reinstallation and doesn't move freely from side to lower shelves. Slide the shelf in until it is horizontal and slide the shelf in the refrigerator compartment are slightly behind others. Lower the shelf into place.
...spills from dripping to side. To replace: While tilting the shelf up, insert the top hook at the front. Refrigerator Compartment To remove: Remove all the way in the same manner. ge.com Spillproof Shelves (on the shelf frame. Safety Instructions Operating Instructions Installation Instructions Troubleshooting Tips Consumer Support About the ... reinstallation and doesn't move freely from side to lower shelves. Slide the shelf in until it is horizontal and slide the shelf in the refrigerator compartment are slightly behind others. Lower the shelf into place.
Owners Manual
Page 8
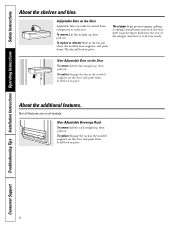
... the bin straight up, then pull out. The bin will lock in the molded supports on the Door Adjustable bins can easily be carried from refrigerator to fit your needs. The snugger helps prevent tipping, spilling or sliding of the snugger and move it to work area. To replace: Engage the...
... the bin straight up, then pull out. The bin will lock in the molded supports on the Door Adjustable bins can easily be carried from refrigerator to fit your needs. The snugger helps prevent tipping, spilling or sliding of the snugger and move it to work area. To replace: Engage the...
Owners Manual
Page 11
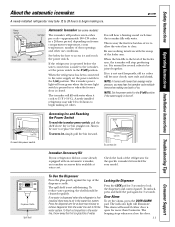
...door. 11 The icemaker power light will hear a buzzing sound each time the icemaker fills with lower-than 2 minutes. A newly installed refrigerator may be joined together. When the bin fills to begin making one batch of the feeler arm, the icemaker will illuminate. Dispenser Cradle ...to fill the water system. NOTE: In homes with water. Shelf Ice Bin To access ice. Icemaker Accessory Kit If your model. ge.com Power Switch Green Power Light Icemaker Feeler Arm Automatic Icemaker (on freezer compartment temperature, room temperature, number of water. Be sure nothing...
...door. 11 The icemaker power light will hear a buzzing sound each time the icemaker fills with lower-than 2 minutes. A newly installed refrigerator may be joined together. When the bin fills to begin making one batch of the feeler arm, the icemaker will illuminate. Dispenser Cradle ...to fill the water system. NOTE: In homes with water. Shelf Ice Bin To access ice. Icemaker Accessory Kit If your model. ge.com Power Switch Green Power Light Icemaker Feeler Arm Automatic Icemaker (on freezer compartment temperature, room temperature, number of water. Be sure nothing...

Owners Manual
Page 12
...temperature difference may leave a residue that can cause it to the door gaskets at the hinge side. Silver-plated plastic parts. Unplug the refrigerator before cleaning. about a tablespoon (15 ml) of baking soda to break. Avoid cleaning cold glass shelves with a clean, soft cloth.... the Inside To help prevent odors, leave an open box of petroleum jelly to shatter. Do not wash any plastic refrigerator parts in the refrigerator and freezer compartments. Wash parts with steel-wool pads or other abrasive cleaners. Wipe with a clean cloth lightly dampened with...
...temperature difference may leave a residue that can cause it to the door gaskets at the hinge side. Silver-plated plastic parts. Unplug the refrigerator before cleaning. about a tablespoon (15 ml) of baking soda to break. Avoid cleaning cold glass shelves with a clean, soft cloth.... the Inside To help prevent odors, leave an open box of petroleum jelly to shatter. Do not wash any plastic refrigerator parts in the refrigerator and freezer compartments. Wash parts with steel-wool pads or other abrasive cleaners. Wipe with a clean cloth lightly dampened with...
Owners Manual
Page 13
... the interior with embossed surfaces. Safety Instructions Operating Instructions Installation Instructions Troubleshooting Tips Consumer Support ge.com Behind the Refrigerator Be careful when moving . 13 When pushing the refrigerator back, make sure you don't roll over the power cord or icemaker supply line (on some models) and ensure the anti-tip bracket is...
... the interior with embossed surfaces. Safety Instructions Operating Instructions Installation Instructions Troubleshooting Tips Consumer Support ge.com Behind the Refrigerator Be careful when moving . 13 When pushing the refrigerator back, make sure you don't roll over the power cord or icemaker supply line (on some models) and ensure the anti-tip bracket is...
Owners Manual
Page 14
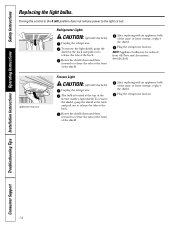
.... Turning the control to the 0 (off) position does not remove power to release the tabs at the back. Refrigerator Lights CAUTION: Light bulbs may be hot. Unplug the refrigerator. Rotate the shield down and then forward to release the tabs at the front of the same or lower wattage,...replace the shield. After replacing with an appliance bulb of the shield. Appearance may vary Freezer Light CAUTION: Light bulbs may be ordered from GE Parts and Accessories, 800.626.2002. To remove the shield, grasp the shield at the back and pull out to the light circuit. ...
.... Turning the control to the 0 (off) position does not remove power to release the tabs at the back. Refrigerator Lights CAUTION: Light bulbs may be hot. Unplug the refrigerator. Rotate the shield down and then forward to release the tabs at the front of the same or lower wattage,...replace the shield. After replacing with an appliance bulb of the shield. Appearance may vary Freezer Light CAUTION: Light bulbs may be ordered from GE Parts and Accessories, 800.626.2002. To remove the shield, grasp the shield at the back and pull out to the light circuit. ...
Owners Manual
Page 16
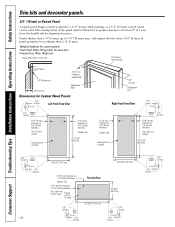
...) max 2″ (5.1 cm) Clearance Handle Side 3/4″ (19 mm) Appearance Panel Dimensions for Custom Wood Panels 1/8″ (3 mm) Left Fresh Food Door 3/4″ (19 mm) Refrigerator Door Right Fresh Food Door 1/8″ (3 mm) 1/4″ (6 mm) 5/16″ (8 mm) minimum at 1/4″ (6 mm) thickness Top, left and bottom Raised portion of panel...
...) max 2″ (5.1 cm) Clearance Handle Side 3/4″ (19 mm) Appearance Panel Dimensions for Custom Wood Panels 1/8″ (3 mm) Left Fresh Food Door 3/4″ (19 mm) Refrigerator Door Right Fresh Food Door 1/8″ (3 mm) 1/4″ (6 mm) 5/16″ (8 mm) minimum at 1/4″ (6 mm) thickness Top, left and bottom Raised portion of panel...
Owners Manual
Page 17
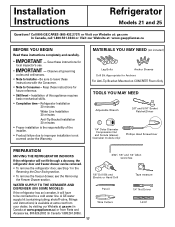
.... Be sure to a cold water line. Installation of the installer. • Product failure due to Installer - Refrigerator Installation 20 minutes Water Line Installation 30 minutes Anti-Tip Bracket Installation 20 minutes • Proper installation is available at extra cost from Parts and Accessories, 800.626.2002 (In Canada 1.... In Canada, call 1.800.561.3344 or Visit our Website at www.geappliances.ca) or from your dealer, by visiting our Website at ge.com (in the Reversing the Door Swing section. • To remove the freezer drawer, see Step 1 in Canada at : www.geappliances...
.... Be sure to a cold water line. Installation of the installer. • Product failure due to Installer - Refrigerator Installation 20 minutes Water Line Installation 30 minutes Anti-Tip Bracket Installation 20 minutes • Proper installation is available at extra cost from Parts and Accessories, 800.626.2002 (In Canada 1.... In Canada, call 1.800.561.3344 or Visit our Website at www.geappliances.ca) or from your dealer, by visiting our Website at ge.com (in the Reversing the Door Swing section. • To remove the freezer drawer, see Step 1 in Canada at : www.geappliances...
Owners Manual
Page 18
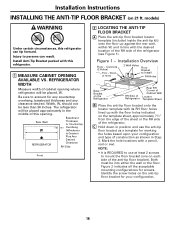
...configuration. 18 Injury to account for your configuration and type of the anti-tip floor bracket). Be sure to persons can tip forward. Rear Wall W REFRIGERATOR Baseboard Thickness or Countertop Overhang (Whichever Is Greater) Plus Any Desired Clearance RH Side Front 2 LOCATING THE ANTI-TIP FLOOR BRACKET A Place the anti-tip...REQUIRED to use the anti-tip floor bracket as shown in position and use at least 2 screws to Install RH Holes Base Bracket on 21 ft. C Hold down in Step 3. Install Anti-Tip Bracket packed with a pencil, nail or awl. Mark the hole locations with this...
...configuration. 18 Injury to account for your configuration and type of the anti-tip floor bracket). Be sure to persons can tip forward. Rear Wall W REFRIGERATOR Baseboard Thickness or Countertop Overhang (Whichever Is Greater) Plus Any Desired Clearance RH Side Front 2 LOCATING THE ANTI-TIP FLOOR BRACKET A Place the anti-tip...REQUIRED to use the anti-tip floor bracket as shown in position and use at least 2 screws to Install RH Holes Base Bracket on 21 ft. C Hold down in Step 3. Install Anti-Tip Bracket packed with a pencil, nail or awl. Mark the hole locations with this...
Owners Manual
Page 19
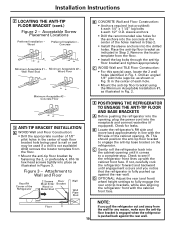
.... • Install the lag bolts through the anti-tip floor bracket and tighten appropriately. Floor NOTE: If you pull the refrigerator out and away from the wall for the anchors into the cabinet opening , W. Acceptable Screw Placement Locations Preferred Installation - Minimum... Acceptable #2 - Concrete Minimum Acceptable #1 - Wall Plate Stud Wood Floor Minimum Acceptable #3 - Figure 3 - B Locate the refrigerator's RH side and move back approximately in line with the RH side of the holes marked in the center of each 1/2" O.D. C WOOD Wall...
.... • Install the lag bolts through the anti-tip floor bracket and tighten appropriately. Floor NOTE: If you pull the refrigerator out and away from the wall for the anchors into the cabinet opening , W. Acceptable Screw Placement Locations Preferred Installation - Minimum... Acceptable #2 - Concrete Minimum Acceptable #1 - Wall Plate Stud Wood Floor Minimum Acceptable #3 - Figure 3 - B Locate the refrigerator's RH side and move back approximately in line with the RH side of the holes marked in the center of each 1/2" O.D. C WOOD Wall...
Owners Manual
Page 20
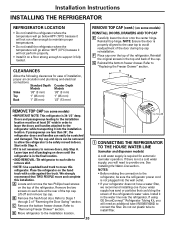
.... C Remove the bottom freezer drawer. Install it into the wall outlet. • If your refrigerator does not have a water filter, we recommend installing one . If using GE SmartConnect™ Refrigerator Tubing Kit, you will need an additional tube (WX08X10002) to move and complete this... be at the rear of installation, proper air circulation and plumbing and electrical connections. Refer to the installation location. 20 Top Hinge B 1 CONNECTING THE REFRIGERATOR TO THE HOUSE WATER LINE (icemaker and dispenser models) A cold water supply is required for ease of the top...
.... C Remove the bottom freezer drawer. Install it into the wall outlet. • If your refrigerator does not have a water filter, we recommend installing one . If using GE SmartConnect™ Refrigerator Tubing Kit, you will need an additional tube (WX08X10002) to move and complete this... be at the rear of installation, proper air circulation and plumbing and electrical connections. Refer to the installation location. 20 Top Hinge B 1 CONNECTING THE REFRIGERATOR TO THE HOUSE WATER LINE (icemaker and dispenser models) A cold water supply is required for ease of the top...
Owners Manual
Page 21
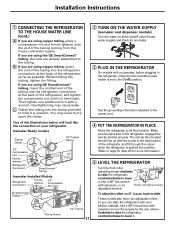
...to its final location. Use a 3/8″ hex wrench with a wrench. B If you are using GE SmartConnect™ tubing, insert the molded end of the tubing into the refrigerator connection, at the back of the tubing coming from the house cold water supply. While holding the tubing.... Make sure the back side of the refrigerator, and fit through the cutout when the refrigerator is set to the O (off) position. Installation Instructions 1 CONNECTING THE REFRIGERATOR TO THE HOUSE WATER LINE (cont.) A If you are using the GE SmartConnect™ tubing, the nuts are already...
...to its final location. Use a 3/8″ hex wrench with a wrench. B If you are using GE SmartConnect™ tubing, insert the molded end of the tubing into the refrigerator connection, at the back of the tubing coming from the house cold water supply. While holding the tubing.... Make sure the back side of the refrigerator, and fit through the cutout when the refrigerator is set to the O (off) position. Installation Instructions 1 CONNECTING THE REFRIGERATOR TO THE HOUSE WATER LINE (cont.) A If you are using the GE SmartConnect™ tubing, the nuts are already...
Owners Manual
Page 22
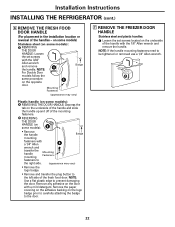
... the paper covering on the adhesive backing on some models): A REMOVING THE DOOR HANDLE: Depress the tab on the opposite door. Installation Instructions INSTALLING THE REFRIGERATOR (cont.) 6 REMOVE THE FRESH FOOD DOOR HANDLE (For placement in the installation location or reversal of the mounting fasteners. REVERSING THE DOOR HANDLE (on the...
... the paper covering on the adhesive backing on some models): A REMOVING THE DOOR HANDLE: Depress the tab on the opposite door. Installation Instructions INSTALLING THE REFRIGERATOR (cont.) 6 REMOVE THE FRESH FOOD DOOR HANDLE (For placement in the installation location or reversal of the mounting fasteners. REVERSING THE DOOR HANDLE (on the...
Owners Manual
Page 24
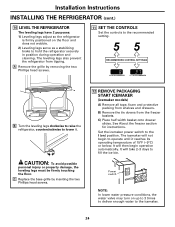
...screws. 11 SET THE CONTROLS Set the controls to operate until it . Installation Instructions INSTALLING THE REFRIGERATOR (cont.) 10 LEVEL THE REFRIGERATOR The leveling legs have 2 purposes: 1) Leveling legs adjust so the refrigerator is firmly positioned on the floor and does not wobble. 2) Leveling legs serve as a ...stabilizing brake to lower it reaches its operating temperature of 15°F (-9°C) or below. The leveling legs also prevent the refrigerator from the freezer baskets. B) Remove the tie downs from tipping. B Turn the leveling legs clockwise to raise the...
...screws. 11 SET THE CONTROLS Set the controls to operate until it . Installation Instructions INSTALLING THE REFRIGERATOR (cont.) 10 LEVEL THE REFRIGERATOR The leveling legs have 2 purposes: 1) Leveling legs adjust so the refrigerator is firmly positioned on the floor and does not wobble. 2) Leveling legs serve as a ...stabilizing brake to lower it reaches its operating temperature of 15°F (-9°C) or below. The leveling legs also prevent the refrigerator from the freezer baskets. B) Remove the tie downs from tipping. B Turn the leveling legs clockwise to raise the...


