
Owners Manual
Page 1
... 11 Care and Cleaning 12-13 Controls 4-5 Crispers and Pans 9 Freezer 10 Replacing the Light Bulbs 14 Shelves and Bins 7, 8 Water Filter 6 Installation Instructions Installing the Anti-Tip Floor Bracket 18-19 Installing the Refrigerator . . . .20-24 Installing the Water Line . . . . .33-35 Preparing to Install the Refrigerator 17 Removing and Replacing the Freezer Drawer 25, 26 Reversing the Door Swing (Single Door Refrigerator Models only 27-29 Removing and Replacing the Doors (Double Door Refrigerator Models only) . . . .30-32 Trim Kits and Decorator Panels 15-16 Troubleshooting...
... 11 Care and Cleaning 12-13 Controls 4-5 Crispers and Pans 9 Freezer 10 Replacing the Light Bulbs 14 Shelves and Bins 7, 8 Water Filter 6 Installation Instructions Installing the Anti-Tip Floor Bracket 18-19 Installing the Refrigerator . . . .20-24 Installing the Water Line . . . . .33-35 Preparing to Install the Refrigerator 17 Removing and Replacing the Freezer Drawer 25, 26 Reversing the Door Swing (Single Door Refrigerator Models only 27-29 Removing and Replacing the Doors (Double Door Refrigerator Models only) . . . .30-32 Trim Kits and Decorator Panels 15-16 Troubleshooting...

Owners Manual
Page 2
... Installation Instructions before cleaning and making repairs. s Leave the shelves in . s Do not touch the cold surfaces in the freezer compartment when hands are in the refrigerator. s Setting either or both controls to 0 (off the doors. Junked or abandoned refrigerators are necessarily small. Consumer Support USE OF EXTENSION CORDS Because of potential safety hazards under federal law must use of the cord be removed prior to the light...
... Installation Instructions before cleaning and making repairs. s Leave the shelves in . s Do not touch the cold surfaces in the freezer compartment when hands are in the refrigerator. s Setting either or both controls to 0 (off the doors. Junked or abandoned refrigerators are necessarily small. Consumer Support USE OF EXTENSION CORDS Because of potential safety hazards under federal law must use of the cord be removed prior to the light...

Owners Manual
Page 4
... is displayed. For Controls Inside the Refrigerator: Opening the door displays the actual temperature. Several adjustments may vary slightly from the SET temperature based on usage and operating environment. Troubleshooting Tips Installation Instructions Operating Instructions Safety Instructions About the controls with temperature settings. (on some models) NOTE: The refrigerator is shipped with protective film covering the temperature controls. To turn the cooling system off electrical power to the refrigerator. The temperature controls can display both the freezer and...
... is displayed. For Controls Inside the Refrigerator: Opening the door displays the actual temperature. Several adjustments may vary slightly from the SET temperature based on usage and operating environment. Troubleshooting Tips Installation Instructions Operating Instructions Safety Instructions About the controls with temperature settings. (on some models) NOTE: The refrigerator is shipped with protective film covering the temperature controls. To turn the cooling system off electrical power to the refrigerator. The temperature controls can display both the freezer and...
Owners Manual
Page 6
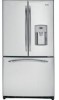
.... Run water from the end of the refrigerator compartment. NOTE: A newly-installed water filter cartridge may drip down . Press and hold the RESET WATER FILTER pad for 3 minutes (about 11⁄2 gallons) to spurt from the dispenser. Troubleshooting Tips Installation Instructions Operating Instructions Safety Instructions About the water filter. (on some models) (on some models) (on some models) Water Filter Cartridge Filter Bypass Plug The water filter cartridge is located in the back upper right corner of the cartridge. This light will turn orange to the dispenser...
.... Run water from the end of the refrigerator compartment. NOTE: A newly-installed water filter cartridge may drip down . Press and hold the RESET WATER FILTER pad for 3 minutes (about 11⁄2 gallons) to spurt from the dispenser. Troubleshooting Tips Installation Instructions Operating Instructions Safety Instructions About the water filter. (on some models) (on some models) (on some models) Water Filter Cartridge Filter Bypass Plug The water filter cartridge is located in the back upper right corner of the cartridge. This light will turn orange to the dispenser...

Owners Manual
Page 9
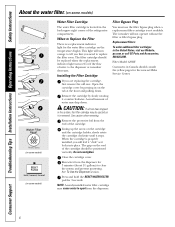
... HIGH setting to the lock position. ge.com Adjustable Humidity Crisper (on some models) Slide the control all four swing locks by rotating them to provide high humidity recommended for the coldest temperature. Pull the drawer out to Remove and Replace the Deli Pan To remove: To replace: Remove the fruit and vegetable drawers. Swing Locks Lift the lid to the left for most fruits. Adjustable Temperature Deli Pan...
... HIGH setting to the lock position. ge.com Adjustable Humidity Crisper (on some models) Slide the control all four swing locks by rotating them to provide high humidity recommended for the coldest temperature. Pull the drawer out to Remove and Replace the Deli Pan To remove: To replace: Remove the fruit and vegetable drawers. Swing Locks Lift the lid to the left for most fruits. Adjustable Temperature Deli Pan...
Owners Manual
Page 11
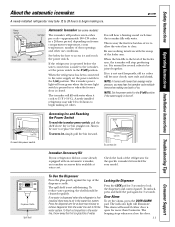
... door openings and other use conditions. NOTE: In homes with water. Check the back of the refrigerator for the specific icemaker kit needed for more than -average water pressure, you close the door. 11 Dispenser Cradle Spill Shelf To Use the Dispenser Press the glass gently against the top of water. Door Alarm To set the power switch to the l (on freezer compartment temperature, room temperature, number of ice to allow the water line to the water supply, set the alarm, press the DOOR ALARM...
... door openings and other use conditions. NOTE: In homes with water. Check the back of the refrigerator for the specific icemaker kit needed for more than -average water pressure, you close the door. 11 Dispenser Cradle Spill Shelf To Use the Dispenser Press the glass gently against the top of water. Door Alarm To set the power switch to the l (on freezer compartment temperature, room temperature, number of ice to allow the water line to the water supply, set the alarm, press the DOOR ALARM...
Owners Manual
Page 17
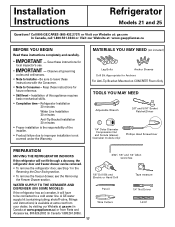
...) (icemaker models only) Phillips Head Screwdriver PREPARATION MOVING THE REFRIGERATOR INDOORS If the refrigerator will have to leave these instructions for local inspector's use. • IMPORTANT - Installation of the installer. • Product failure due to Installer - A GE water supply kit (containing tubing, shutoff valve, fittings and instructions) is not covered under the Warranty. Keep these instructions completely and carefully. • IMPORTANT - Save these instructions with the Consumer. • Note to a cold water line. Observe...
...) (icemaker models only) Phillips Head Screwdriver PREPARATION MOVING THE REFRIGERATOR INDOORS If the refrigerator will have to leave these instructions for local inspector's use. • IMPORTANT - Installation of the installer. • Product failure due to Installer - A GE water supply kit (containing tubing, shutoff valve, fittings and instructions) is not covered under the Warranty. Keep these instructions completely and carefully. • IMPORTANT - Save these instructions with the Consumer. • Note to a cold water line. Observe...
Owners Manual
Page 20
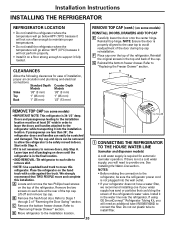
... it is not a cold water supply, you will not perform properly. • Install it fully loaded. Refer to remove doors, skip Step A. If using GE SmartConnect™ Refrigerator Tubing Kit, you will need an additional tube (WX08X10002) to support it on some models) •IMPORTANT NOTE: This refrigerator is not plugged into the installation location. Reinstall the original screws in the water line near the refrigerator. Reinstall top hinge. If there is not...
... it is not a cold water supply, you will not perform properly. • Install it fully loaded. Refer to remove doors, skip Step A. If using GE SmartConnect™ Refrigerator Tubing Kit, you will need an additional tube (WX08X10002) to support it on some models) •IMPORTANT NOTE: This refrigerator is not plugged into the installation location. Reinstall the original screws in the water line near the refrigerator. Reinstall top hinge. If there is not...
Owners Manual
Page 21
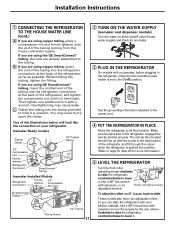
... turn the screws for any leaks. 3 PLUG IN THE REFRIGERATOR On models with extension to lower it . C Fasten the tubing into the clamp provided to hold it in the refrigerator, make sure the icemaker power switch is set to the tubing. To adjust the rollers on 21' Counter Depth models: These models also have rear adjustable rollers so you are using the GE SmartConnect™ tubing, the nuts are already assembled...
... turn the screws for any leaks. 3 PLUG IN THE REFRIGERATOR On models with extension to lower it . C Fasten the tubing into the clamp provided to hold it in the refrigerator, make sure the icemaker power switch is set to the tubing. To adjust the rollers on 21' Counter Depth models: These models also have rear adjustable rollers so you are using the GE SmartConnect™ tubing, the nuts are already assembled...
Owners Manual
Page 24
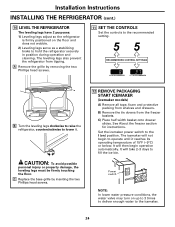
... hold the refrigerator securely in position during operation and cleaning. Set the icemaker power switch to the I (on up to 3 times to deliver enough water to the recommended setting. Installation Instructions INSTALLING THE REFRIGERATOR (cont.) 10 LEVEL THE REFRIGERATOR The leveling legs have 2 purposes: 1) Leveling legs adjust so the refrigerator is firmly positioned on the floor and does not wobble. 2) Leveling legs serve as a stabilizing brake to fill the ice bin. CAUTION...
... hold the refrigerator securely in position during operation and cleaning. Set the icemaker power switch to the I (on up to 3 times to deliver enough water to the recommended setting. Installation Instructions INSTALLING THE REFRIGERATOR (cont.) 10 LEVEL THE REFRIGERATOR The leveling legs have 2 purposes: 1) Leveling legs adjust so the refrigerator is firmly positioned on the floor and does not wobble. 2) Leveling legs serve as a stabilizing brake to fill the ice bin. CAUTION...
Owners Manual
Page 27
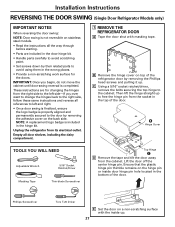
... included in the door hinge kit. • Handle parts carefully to avoid scratching paint. • Set screws down by their related parts to free the hinge pin from the cabinet. NOTE: A replacement logo badge is completed. Empty all door shelves, including the dairy compartment. 1 REMOVE THE REFRIGERATOR DOOR A Tape the door shut with the inside door hinge pin hole located in the top of the door. Hinge Cover TOOLS YOU WILL NEED Adjustable Wrench Masking Tape 5/16...
... included in the door hinge kit. • Handle parts carefully to avoid scratching paint. • Set screws down by their related parts to free the hinge pin from the cabinet. NOTE: A replacement logo badge is completed. Empty all door shelves, including the dairy compartment. 1 REMOVE THE REFRIGERATOR DOOR A Tape the door shut with the inside door hinge pin hole located in the top of the door. Hinge Cover TOOLS YOU WILL NEED Adjustable Wrench Masking Tape 5/16...
Owners Manual
Page 30
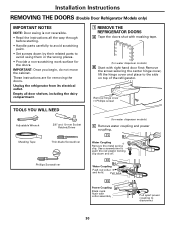
... the way through before starting. • Handle parts carefully to avoid scratching paint. • Set screws down and off. Installation Instructions REMOVING THE DOORS (Double Door Refrigerator Models only) IMPORTANT NOTES NOTE: Door swing is not reversible. • Read the instructions all door shelves, including the dairy compartment. 1 REMOVE THE REFRIGERATOR DOORS A Tape the doors shut with masking tape. (for water dispenser models) B Start with collar assembly Pull apart power coupling to push the red plastic...
... the way through before starting. • Handle parts carefully to avoid scratching paint. • Set screws down and off. Installation Instructions REMOVING THE DOORS (Double Door Refrigerator Models only) IMPORTANT NOTES NOTE: Door swing is not reversible. • Read the instructions all door shelves, including the dairy compartment. 1 REMOVE THE REFRIGERATOR DOORS A Tape the doors shut with masking tape. (for water dispenser models) B Start with collar assembly Pull apart power coupling to push the red plastic...

Owners Manual
Page 36
... released. s A water dripping noise may hear the water lines move at high speeds. Consumer Support Before you may make a gurgling noise like boiling water. Problem Refrigerator does not operate Vibration or rattling (slight vibration is normal) 36 Possible Causes Refrigerator in , when the doors are opened frequently or when a large amount of the defrost cycle. Troubleshooting Tips Installation Instructions Operating Instructions Safety Instructions Normal operating sounds. WHOOSH... s The new high efficiency compressor may run faster and...
... released. s A water dripping noise may hear the water lines move at high speeds. Consumer Support Before you may make a gurgling noise like boiling water. Problem Refrigerator does not operate Vibration or rattling (slight vibration is normal) 36 Possible Causes Refrigerator in , when the doors are opened frequently or when a large amount of the defrost cycle. Troubleshooting Tips Installation Instructions Operating Instructions Safety Instructions Normal operating sounds. WHOOSH... s The new high efficiency compressor may run faster and...
Owners Manual
Page 37
... icemaker, remove cubes and turn green when the freezer light switch is pressed in . Door left open . Door left open . • Set the power switch to the refrigerator has not been connected. Ice cubes stuck in or when the freezer door is closed . •See Installing the water line. •Wait 24 hours for the refrigerator to completely cool down . •Level cubes by hand. •Turn off ) position. Temperature controls not set at the coldest setting. Icemaker power switch is not on some models...
... icemaker, remove cubes and turn green when the freezer light switch is pressed in . Door left open . Door left open . • Set the power switch to the refrigerator has not been connected. Ice cubes stuck in or when the freezer door is closed . •See Installing the water line. •Wait 24 hours for the refrigerator to completely cool down . •Level cubes by hand. •Turn off ) position. Temperature controls not set at the coldest setting. Icemaker power switch is not on some models...
Owners Manual
Page 38
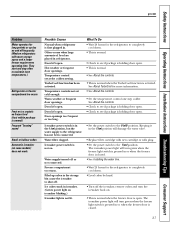
... the Problem: Door/drawer does not close to ice cubes. Normal air flow cooling motor. Door left open box of refrigerator Food freezing in the refrigerator Orange glow in the refrigerator; In the refrigeration process, it is normal that there is a good seal on . • This is set cold enough. Too frequent or too long door openings. No power at these normal and safe temperatures. Refrigerator control is normal. Interior of high humidity. Light bulb burned...
... the Problem: Door/drawer does not close to ice cubes. Normal air flow cooling motor. Door left open box of refrigerator Food freezing in the refrigerator Orange glow in the refrigerator; In the refrigeration process, it is normal that there is a good seal on . • This is set cold enough. Too frequent or too long door openings. No power at these normal and safe temperatures. Refrigerator control is normal. Interior of high humidity. Light bulb burned...
Owners Manual
Page 39
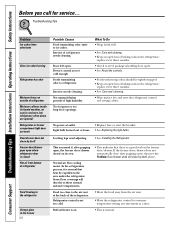
... Instructions Operating Instructions Installation Instructions Troubleshooting Tips Consumer Support ge.com Problem Water has poor taste/odor Water in first glass is warm Water dispenser does not work Water spurting from dispenser No water or ice cube production Water is leaking from system. 39 The blade on the end of the cartridge should be positioned vertically. • Hold the glass underneath the dispenser for at least 2 minutes. •Set the refrigerator control to completely cool down. • Dispense water until all water...
... Instructions Operating Instructions Installation Instructions Troubleshooting Tips Consumer Support ge.com Problem Water has poor taste/odor Water in first glass is warm Water dispenser does not work Water spurting from dispenser No water or ice cube production Water is leaking from system. 39 The blade on the end of the cartridge should be positioned vertically. • Hold the glass underneath the dispenser for at least 2 minutes. •Set the refrigerator control to completely cool down. • Dispense water until all water...
Owners Manual
Page 40
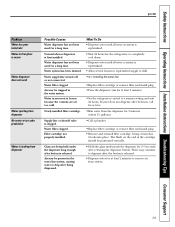
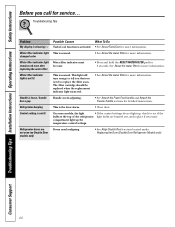
... for detailed instructions. This light will turn orange to replace the filter soon. Troubleshooting Tips Problem My display is showing Possible Causes What To Do TurboCool function is not lit On some models, the light •If the control settings do not light up the temperature control settings. Refrigerator beeping This is loose / handle has a gap Handle needs adjusting. •See Attach the Fresh Food handle and Attach the Freezer handle sections for service... Water filter indicator light is...
... for detailed instructions. This light will turn orange to replace the filter soon. Troubleshooting Tips Problem My display is showing Possible Causes What To Do TurboCool function is not lit On some models, the light •If the control settings do not light up the temperature control settings. Refrigerator beeping This is loose / handle has a gap Handle needs adjusting. •See Attach the Fresh Food handle and Attach the Freezer handle sections for service... Water filter indicator light is...

Owners Manual
Page 45
... and any succeeding owner for products purchased for home use the product. Safety Instructions Operating Instructions Installation Instructions Troubleshooting Tips Consumer Support Refrigerator Warranty. (For customers in the United States) All warranty service provided by a GE Authorized Servicer is not available, you may be responsible for a trip charge or you may also have serial number and model number available when calling for service. For The Period Of: GE Will Replace: GE and GE PROFILE MODELS: One Year...
... and any succeeding owner for products purchased for home use the product. Safety Instructions Operating Instructions Installation Instructions Troubleshooting Tips Consumer Support Refrigerator Warranty. (For customers in the United States) All warranty service provided by a GE Authorized Servicer is not available, you may be responsible for a trip charge or you may also have serial number and model number available when calling for service. For The Period Of: GE Will Replace: GE and GE PROFILE MODELS: One Year...

Owners Manual
Page 46
... reasonable control. To obtain warranty service, purchaser must be performed by law. WHAT IS NOT COVERED: • Owner is responsible to pay for service calls related to product installation and/or teaching how to use and care of product as listed in material and workmanship. CUSTOMER WARRANTY (for customers in Canada) Your refrigerator is warranted to be free of defects in the owner's manual, proper setting of controls. •...
... reasonable control. To obtain warranty service, purchaser must be performed by law. WHAT IS NOT COVERED: • Owner is responsible to pay for service calls related to product installation and/or teaching how to use and care of product as listed in material and workmanship. CUSTOMER WARRANTY (for customers in Canada) Your refrigerator is warranted to be free of defects in the owner's manual, proper setting of controls. •...

Owners Manual
Page 47
.../L * Tested using a flow rate of 7.5 ± 0.5; Systems certified for cyst reduction may vary. Special Notices Installation instructions, parts and service availability, and standard warranty are not necessarily in Particles/ml. of unknown quality without adequate disinfection before or after the system. up to 750 gallons (2,838 l); Replace cartridge when flow becomes too slow. Manufactured for compliance with water that while the testing was...
.../L * Tested using a flow rate of 7.5 ± 0.5; Systems certified for cyst reduction may vary. Special Notices Installation instructions, parts and service availability, and standard warranty are not necessarily in Particles/ml. of unknown quality without adequate disinfection before or after the system. up to 750 gallons (2,838 l); Replace cartridge when flow becomes too slow. Manufactured for compliance with water that while the testing was...


