Use and Care Manual
Page 1
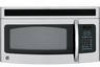
Models: JVM1540 JNM1541 HVM1540 LVM1540 Spacemaker Microwave Oven Owner's Manual Important Safety Instructions 2 Precautions to Avoid Possible Exposure to Excessive Microwave Energy 2 Special Notes About Microwaving 5 ... 24 Oven Shelf 29 Helpful Information 30 Microwave Terms 30 Care and Cleaning 31 If Something Goes Wrong 36 Before You Call For Service 36 GE Service Numbers 38 Warranty Back Cover Write the model and serial numbers here: Model Serial Find these numbers on a label inside the oven. GEAppliances.com
Models: JVM1540 JNM1541 HVM1540 LVM1540 Spacemaker Microwave Oven Owner's Manual Important Safety Instructions 2 Precautions to Avoid Possible Exposure to Excessive Microwave Energy 2 Special Notes About Microwaving 5 ... 24 Oven Shelf 29 Helpful Information 30 Microwave Terms 30 Care and Cleaning 31 If Something Goes Wrong 36 Before You Call For Service 36 GE Service Numbers 38 Warranty Back Cover Write the model and serial numbers here: Model Serial Find these numbers on a label inside the oven. GEAppliances.com
Use and Care Manual
Page 10
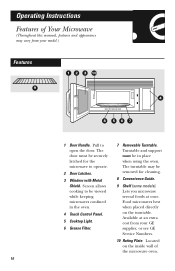
...Cooktop Light. 6 Grease Filter. 7 Removable Turntable. The door must be securely latched for cleaning. 8 Convenience Guide. 9 Shelf (some models). The turntable may vary from your model.) Features 1 2 3 10 9 4 8 567 1 Door Handle. Available at once. Lets you microwave several foods at an extra cost... from your GE supplier, or see GE Service Numbers. 10 Rating Plate. Pull to operate. 2 Door Latches. 3 Window ...
...Cooktop Light. 6 Grease Filter. 7 Removable Turntable. The door must be securely latched for cleaning. 8 Convenience Guide. 9 Shelf (some models). The turntable may vary from your model.) Features 1 2 3 10 9 4 8 567 1 Door Handle. Available at once. Lets you microwave several foods at an extra cost... from your GE supplier, or see GE Service Numbers. 10 Rating Plate. Pull to operate. 2 Door Latches. 3 Window ...
Use and Care Manual
Page 11
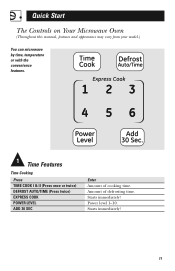
Amount of cooking time. Starts immediately! 11 Starts immediately! Quick Start The Controls on Your Microwave Oven (Throughout this manual, features and appearance may vary from your model.) You can microwave by time, temperature or with the convenience features. 1 Time Features Time Cooking Press TIME COOK I & II (Press once or twice) DEFROST AUTO/TIME (Press twice) EXPRESS COOK POWER LEVEL ADD 30 SEC Enter Amount of defrosting time. Power level 1-10.
Amount of cooking time. Starts immediately! 11 Starts immediately! Quick Start The Controls on Your Microwave Oven (Throughout this manual, features and appearance may vary from your model.) You can microwave by time, temperature or with the convenience features. 1 Time Features Time Cooking Press TIME COOK I & II (Press once or twice) DEFROST AUTO/TIME (Press twice) EXPRESS COOK POWER LEVEL ADD 30 SEC Enter Amount of defrosting time. Power level 1-10.
Use and Care Manual
Page 12
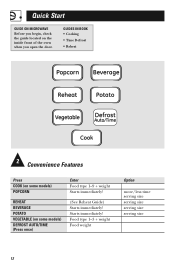
GUIDES IN BOOK • Cooking • Time Defrost • Reheat 2 Convenience Features Press COOK (on some models) POPCORN REHEAT BEVERAGE POTATO VEGETABLE (on the inside front of the oven when you begin, check the guide located on some models) DEFROST AUTO/TIME (Press once) Enter Food type 1-9 + weight Starts immediately! (See Reheat Guide) Starts immediately! Starts immediately! Food type 1-3 + weight Food weight Option more/less time serving size serving size serving size serving size 12 Quick Start GUIDE ON MICROWAVE Before you open the door.
GUIDES IN BOOK • Cooking • Time Defrost • Reheat 2 Convenience Features Press COOK (on some models) POPCORN REHEAT BEVERAGE POTATO VEGETABLE (on the inside front of the oven when you begin, check the guide located on some models) DEFROST AUTO/TIME (Press once) Enter Food type 1-9 + weight Starts immediately! (See Reheat Guide) Starts immediately! Starts immediately! Food type 1-3 + weight Food weight Option more/less time serving size serving size serving size serving size 12 Quick Start GUIDE ON MICROWAVE Before you open the door.
Use and Care Manual
Page 20
... food type and remaining cook time. Cover with lid or vented plastic wrap. Follow package instructions to a layer. Operating Instructions Convenience Features Cook (On some models) The Cook feature automatically sets the cooking times and power levels for microwaving. Use microwave-safe casserole or bowl. Use oblong, square or round dish...
... food type and remaining cook time. Cover with lid or vented plastic wrap. Follow package instructions to a layer. Operating Instructions Convenience Features Cook (On some models) The Cook feature automatically sets the cooking times and power levels for microwaving. Use microwave-safe casserole or bowl. Use oblong, square or round dish...
Use and Care Manual
Page 21
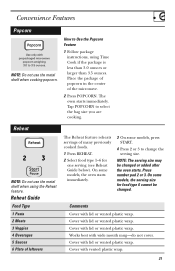
Tap POPCORN to Use the Popcorn Feature 1 Follow package instructions, using the Reheat feature. On some models, the oven starts immediately. 3 On some models, the serving size for one serving (see Reheat Guide below). The oven starts immediately. Reheat NOTE: Do not use the metal shelf when cooking popcorn. ... REHEAT. 2 Select food type 1-6 for food type 6 cannot be changed . NOTE: The serving size may be changed or added after the oven starts. On some models, press START. 4 Press 2 or 3 to 3.5 ounces.
Tap POPCORN to Use the Popcorn Feature 1 Follow package instructions, using the Reheat feature. On some models, the oven starts immediately. 3 On some models, the serving size for one serving (see Reheat Guide below). The oven starts immediately. Reheat NOTE: Do not use the metal shelf when cooking popcorn. ... REHEAT. 2 Select food type 1-6 for food type 6 cannot be changed . NOTE: The serving size may be changed or added after the oven starts. On some models, press START. 4 Press 2 or 3 to 3.5 ounces.
Use and Care Manual
Page 22
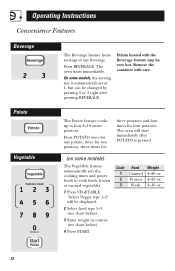
... Beverage feature may be very hot. Code 1 2 3 Food Canned Frozen Fresh Weight 4-20 oz. 4-20 oz. 4-16 oz. 22 On some models, the serving size is pressed. (on some models) The Vegetable feature automatically sets the cooking times and power levels to four 8-10 ounce potatoes. Drinks heated with care. The oven...
... Beverage feature may be very hot. Code 1 2 3 Food Canned Frozen Fresh Weight 4-20 oz. 4-20 oz. 4-16 oz. 22 On some models, the serving size is pressed. (on some models) The Vegetable feature automatically sets the cooking times and power levels to four 8-10 ounce potatoes. Drinks heated with care. The oven...
Use and Care Manual
Page 24
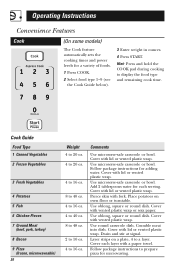
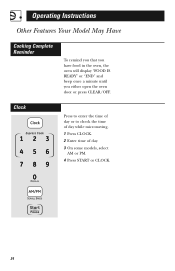
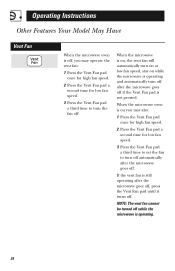
Clock Press to enter the time of day or to check the time of day while microwaving. 1 Press CLOCK. 2 Enter time of day. 3 On some models, select AM or PM. 4 Press START or CLOCK. 24 Operating Instructions Other Features Your Model May Have Cooking Complete Reminder To remind you that you have food in the oven, the oven will display "FOOD IS READY" or "END" and beep once a minute until you either open the oven door or press CLEAR/OFF.
Clock Press to enter the time of day or to check the time of day while microwaving. 1 Press CLOCK. 2 Enter time of day. 3 On some models, select AM or PM. 4 Press START or CLOCK. 24 Operating Instructions Other Features Your Model May Have Cooking Complete Reminder To remind you that you have food in the oven, the oven will display "FOOD IS READY" or "END" and beep once a minute until you either open the oven door or press CLEAR/OFF.
Use and Care Manual
Page 25
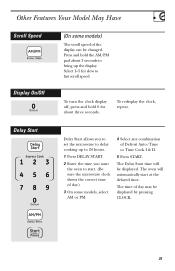
... the delayed time. Delay Start Delay Start allows you to set the microwave to delay cooking up the display. Other Features Your Model May Have Scroll Speed (On some models, select AM or PM. 4 Select any combination of day may be displayed by pressing CLOCK. 25 The Delay Start time will ...automatically start . (Be sure the microwave clock shows the correct time of day.) 3 On some models) The scroll speed of the display can be ...
... the delayed time. Delay Start Delay Start allows you to set the microwave to delay cooking up the display. Other Features Your Model May Have Scroll Speed (On some models, select AM or PM. 4 Select any combination of day may be displayed by pressing CLOCK. 25 The Delay Start time will ...automatically start . (Be sure the microwave clock shows the correct time of day.) 3 On some models) The scroll speed of the display can be ...
Use and Care Manual
Page 26
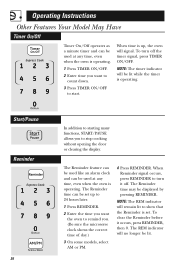
... addition to starting many functions, START/PAUSE allows you to remind you. (Be sure the microwave clock shows the correct time of day.) 3 On some models, select AM or PM. 4 Press REMINDER. When time is up to 24 hours later. 1 Press REMINDER. 2 Enter the time you want the oven to stop... cooking without opening the door or clearing the display. The Reminder time can be set . Operating Instructions Other Features Your Model May Have Timer On/Off Timer On/Off operates as a minute timer and can be used at any time, even when the oven is operating...
... addition to starting many functions, START/PAUSE allows you to remind you. (Be sure the microwave clock shows the correct time of day.) 3 On some models, select AM or PM. 4 Press REMINDER. When time is up to 24 hours later. 1 Press REMINDER. 2 Enter the time you want the oven to stop... cooking without opening the door or clearing the display. The Reminder time can be set . Operating Instructions Other Features Your Model May Have Timer On/Off Timer On/Off operates as a minute timer and can be used at any time, even when the oven is operating...
Use and Care Manual
Page 27
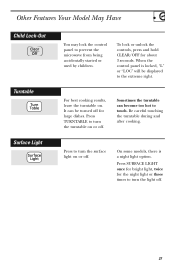
... light or three times to the extreme right. To lock or unlock the controls, press and hold CLEAR/OFF for large dishes. On some models, there is locked, "L" or "LOC" will be turned off . Press TURNTABLE to prevent the microwave from being accidentally started or used by... children. Other Features Your Model May Have Child Lock-Out Turntable Surface Light You may lock the control panel to turn the turntable on . Be careful touching the turntable during...
... light or three times to the extreme right. To lock or unlock the controls, press and hold CLEAR/OFF for large dishes. On some models, there is locked, "L" or "LOC" will be turned off . Press TURNTABLE to prevent the microwave from being accidentally started or used by... children. Other Features Your Model May Have Child Lock-Out Turntable Surface Light You may lock the control panel to turn the turntable on . Be careful touching the turntable during...
Use and Care Manual
Page 28
Operating Instructions Other Features Your Model May Have Vent Fan When the microwave oven is operating. 28 When the microwave is on, the vent fan will automatically turn on at low ...
Operating Instructions Other Features Your Model May Have Vent Fan When the microwave oven is operating. 28 When the microwave is on, the vent fan will automatically turn on at low ...
Use and Care Manual
Page 29
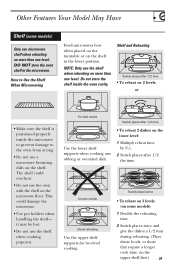
... best results Switch places after 1/2 the time. Uneven results 2-level reheating Use the upper shelf supports for two-level cooking. Other Features Your Model May Have Shelf (some models) 1 Double the reheating time. 2 Switch places twice and give the dishes a 1/2 turn during reheating. (Place dense foods, or those ... when placed on the turntable or on the shelf in the microwave. Switch places twice • To reheat on 3 levels (on some models) Only use the oven with the shelf on more than one level. The shelf could damage the microwave. • Use pot holders when...
... best results Switch places after 1/2 the time. Uneven results 2-level reheating Use the upper shelf supports for two-level cooking. Other Features Your Model May Have Shelf (some models) 1 Double the reheating time. 2 Switch places twice and give the dishes a 1/2 turn during reheating. (Place dense foods, or those ... when placed on the turntable or on the shelf in the microwave. Switch places twice • To reheat on 3 levels (on some models) Only use the oven with the shelf on more than one level. The shelf could damage the microwave. • Use pot holders when...
Use and Care Manual
Page 32
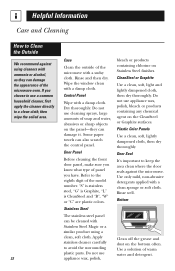
... wax, polish, bleach or products containing chlorine on the bottom often. Rinse well. Door Seal It's important to use cleaning sprays, large amounts of the model number. Do not use a common household cleaner, first apply the cleaner directly to a clean cloth, then wipe the soiled area. 32 Case Clean the outside...
... wax, polish, bleach or products containing chlorine on the bottom often. Rinse well. Door Seal It's important to use cleaning sprays, large amounts of the model number. Do not use a common household cleaner, first apply the cleaner directly to a clean cloth, then wipe the soiled area. 32 Case Clean the outside...
Use and Care Manual
Page 34
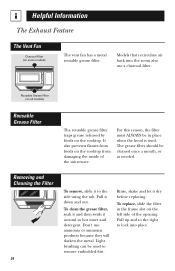
... and Cleaning the Filter 34 To remove, slide it dry before replacing. Don't use a charcoal filter. Reusable Grease Filter (on all models) Reusable Grease Filter The reusable grease filter traps grease released by foods on the cooktop from foods on the cooktop. Rinse, shake and ...because they will darken the metal. For this reason, the filter must ALWAYS be in the frame slot on some models) The vent fan has a metal reusable grease filter. Models that recirculate air back into place. Helpful Information The Exhaust Feature The Vent Fan Charcoal Filter (on the left side...
... and Cleaning the Filter 34 To remove, slide it dry before replacing. Don't use a charcoal filter. Reusable Grease Filter (on all models) Reusable Grease Filter The reusable grease filter traps grease released by foods on the cooktop from foods on the cooktop. Rinse, shake and ...because they will darken the metal. For this reason, the filter must ALWAYS be in the frame slot on some models) The vent fan has a metal reusable grease filter. Models that recirculate air back into place. Helpful Information The Exhaust Feature The Vent Fan Charcoal Filter (on the left side...

Use and Care Manual
Page 35
.... Filter housing To install a new filter, remove plastic and other outer wrapping from your GE supplier. Charcoal Filter (on hood usage). To Install Charcoal Filter If the model is noticeably dirty or discolored (usually after 6-12 months, depending on some models) The charcoal filter cannot be cleaned. Slide the filter down and out.
.... Filter housing To install a new filter, remove plastic and other outer wrapping from your GE supplier. Charcoal Filter (on hood usage). To Install Charcoal Filter If the model is noticeably dirty or discolored (usually after 6-12 months, depending on some models) The charcoal filter cannot be cleaned. Slide the filter down and out.
Use and Care Manual
Page 40
...breakers. • Replacement of the cooktop light bulbs. • Failure of charge, all labor and related service costs to an Authorized GE Service Location for home use the product. • Improper installation, delivery or maintenance. This warranty is abused, misused (for example,...implied warranties, including the implied warranties of incidental or consequential damages, so the above limitation or exclusion may also have serial and model numbers available when calling for a particular purpose, are in Malaysia MICROWAVE OVEN WARRANTY Staple sales slip or cancelled check here. ...
...breakers. • Replacement of the cooktop light bulbs. • Failure of charge, all labor and related service costs to an Authorized GE Service Location for home use the product. • Improper installation, delivery or maintenance. This warranty is abused, misused (for example,...implied warranties, including the implied warranties of incidental or consequential damages, so the above limitation or exclusion may also have serial and model numbers available when calling for a particular purpose, are in Malaysia MICROWAVE OVEN WARRANTY Staple sales slip or cancelled check here. ...
Installation Instructions
Page 7
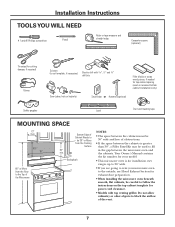
.... • If the space between the cabinets is for installation over ranges up to 36″ wide. • If you are going to vent your model. • This microwave oven is greater than 30″, a Filler Panel Kit may be 30″ or More from the Floor to the Top of... the vent. 7 Your Owner's Manual contains the kit number for your microwave oven to the outside, see Hood Exhaust Section for power cord clearance. • Models with 3⁄16″, 1⁄2″ and 5⁄8″ drill bits Filler blocks or scrap wood pieces, if needed for top cabinet spacing (used to...
.... • If the space between the cabinets is for installation over ranges up to 36″ wide. • If you are going to vent your model. • This microwave oven is greater than 30″, a Filler Panel Kit may be 30″ or More from the Floor to the Top of... the vent. 7 Your Owner's Manual contains the kit number for your microwave oven to the outside, see Hood Exhaust Section for power cord clearance. • Models with 3⁄16″, 1⁄2″ and 5⁄8″ drill bits Filler blocks or scrap wood pieces, if needed for top cabinet spacing (used to...
Installation Instructions
Page 11
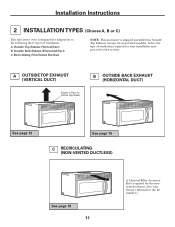
... page 15 C RECIRCULATING (NON-VENTED DUCTLESS) See page 19 11 A Charcoal Filter Accessory Kit is shipped assembled for Outside Top Exhaust (except for non-vented models). Outside Back Exhaust (Horizontal Duct) C.
... page 15 C RECIRCULATING (NON-VENTED DUCTLESS) See page 19 11 A Charcoal Filter Accessory Kit is shipped assembled for Outside Top Exhaust (except for non-vented models). Outside Back Exhaust (Horizontal Duct) C.


