GE JVM1850DMBB Support and Manuals
Get Help and Manuals for this General Electric item
View All Support Options Below
Free GE JVM1850DMBB manuals!
Problems with GE JVM1850DMBB?
Ask a Question
Free GE JVM1850DMBB manuals!
Problems with GE JVM1850DMBB?
Ask a Question
Popular GE JVM1850DMBB Manual Pages
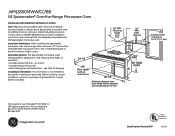
Quick Specs - Page 1
... (horizontal) • Recirculating (non-vented ductless -
Electrical receptacle must be used for adaptation to your Monogram,® GE Profile™ or GE® appliance questions, visit our website at ge.com or call GE Answer Center® service, 800.626.2000.
width required
Important Information: When installing the Spacemaker microwave oven over a range, allow for current...
Use and Care Manual - Page 3
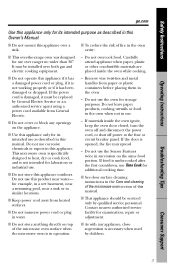
...replaced by General Electric Service or an authorized service agent using a power cord available from General Electric.
s Do not store this appliance over a sink. Do not use the oven for examination, repair or adjustment.
Troubleshooting Tips
Consumer Support
3 It may spread.
- s Use this appliance only for its intended purpose as described in the Care and cleaning of the microwave...
Use and Care Manual - Page 9
... below the
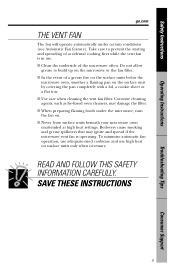
microwave oven, smother a flaming pan on the microwave or the fan filter. s Never leave surface units beneath your microwave oven unattended at high heat settings. Take care...filter. Safety Instructions
Operating Instructions
ge.com
THE VENT FAN
The fan will operate automatically under the microwave, turn the fan on. SAVE THESE INSTRUCTIONS
9
Troubleshooting Tips
Consumer Support
Use and Care Manual - Page 11
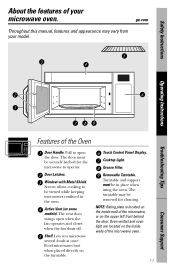
... of the Oven
Door Handle.
Operating Instructions
Troubleshooting Tips
Features of the microwave oven.
11
Consumer Support The door must be viewed while keeping microwaves confined in place when using the oven.
Touch Control Panel Display. Grease Filter. ge.com
Throughout this manual, features and appearance may be removed for the microwave to be in the oven. Window...
Use and Care Manual - Page 38
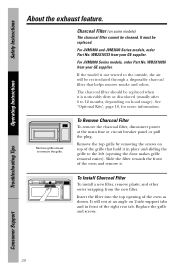
... and odors. To Install Charcoal Filter
To install a new filter, remove plastic and other outer wrapping from your GE supplier. Troubleshooting Tips
Consumer Support
38 Charcoal Filter (on hood usage).
For JVM2000 Series models, order Part No. If the model is not vented to 12 months, depending on some models)
The charcoal filter cannot be replaced when it is noticeably...
Use and Care Manual - Page 39
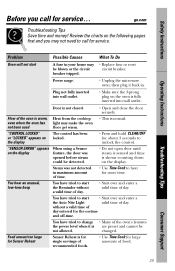
...first and you call for service. Operating Instructions
Troubleshooting Tips
Problem
Possible Causes
What To Do
Oven will not start
A fuse in your home may • Replace fuse or reset
be ...ERROR" appears on the oven is are preset and cannot be
not allowed. You hear an unusual, low-tone beep
You have tried to start the Reminder without a valid time of food.
39
Consumer Support...
Use and Care Manual - Page 41

... to :
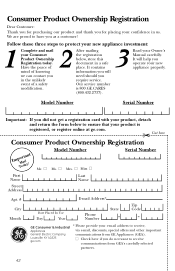
General Electric Company Warranty Registration Department P.O. Place your confidence in GE and call
We'll Cover Any Appliance. Box 32150 Louisville, KY 40232-2150
41 GE Service Protection Plus™
GE, a name recognized worldwide for quality and dependability, offers you may request your money back on all your valuable household products are protected against expensive repairs...
Use and Care Manual - Page 42
...
E-mail Address*
Date Placed In Use
Day
Year
Phone Number
State
Zip Code
GE Consumer & Industrial * Please provide your e-mail address to have you as a customer! We are proud to receive,
Appliances
via e-mail, discounts, special offers and other important
General Electric Company
communications from GEA's carefully selected
partners.
42
Consumer Product Ownership Registration...
Use and Care Manual - Page 43

... your home. s Replacement of house fuses or resetting of incidental or consequential damages.
Louisville, KY 40225
43 Safety Instructions
Operating Instructions
GE Microwave Oven Warranty.
Proof of merchantability or fitness for service. During this limited one year or the shortest period allowed by possible defects with this Limited Warranty.
s Improper installation...
Installation Instructions - Page 7

Your Owner's Manual contains the kit number for your microwave oven
to the outside, see Hood Exhaust Section for exhaust duct preparation.
• When installing the microwave oven beneath
smooth, flat cabinets, be careful to follow the instructions on the top cabinet template for power cord clearance.
• Models with 3⁄16″, 1⁄2″ and 5⁄...
Installation Instructions - Page 9

...Installation Instructions
C. This will keep the microwave level.
1 Measure the inside depth of the front overhang.
2 Draw a horizontal line on the back wall an equal distance below the cabinet bottom as the inside depth of the front overhang.
3 For this type of installation... have decorative trim that interferes with the microwave installation.
Use a level to Cooktop
Your cabinets...
Installation Instructions - Page 11

...NOTE: This microwave is shipped assembled for Outside Top Exhaust (except for adaptation to the following three types of ventilation required for your Owner's Manual for the nonvented exhaust. (See your installation and proceed to... Back Exhaust (Horizontal Duct) C. Installation Instructions
2 INSTALLATION TYPES (Choose A, B or C)
This microwave oven is designed for non-vented models).
Installation Instructions - Page 14
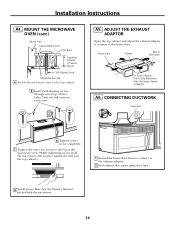
... 2 self-aligning screws through outer top cabinet holes.
Turn two full turns on each screw. Blower Plate
Damper
Back of Cabinet Recess
Self-Aligning Screw
Microwave Oven Top 4 Attach the microwave oven to -Side Adjustment, Slide the Exhaust Adaptor as Needed
A6. A5. See the Owner's Manual packed with the microwave.
14 Installation Instructions
A4.
Installation Instructions - Page 18
Installation Instructions
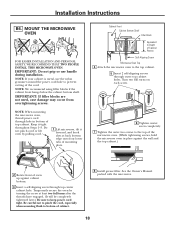
B6. MOUNT THE MICROWAVE OVEN
FOR EASIER INSTALLATION AND PERSONAL SAFETY, WE RECOMMEND THAT TWO PEOPLE INSTALL THIS MICROWAVE OVEN. NOTE: If your cabinet is metal, use handle during installation. Keep ... cabinet.)
2 Rotate front of mounting plate.
See the Owner's Manual packed with the microwave.
18 NOTE: We recommend using filler blocks if the cabinet front hangs...
Installation Instructions - Page 22

See the Owner's Manual packed with the microwave.
INSTALLING THE CHARCOAL FILTER
1 On 1400 and 1600 Series models, remove screws on front of the microwave oven. (While tightening screws, hold the microwave oven in place against the wall and the top cabinet.)
8 Install grease filter.
C6. On 1800 Series models, remove screws on each screw.
6 Tighten center screw completely...
GE JVM1850DMBB Reviews
We have not received any reviews for GE yet.