GE JNM1851DMWW Support and Manuals
Get Help and Manuals for this General Electric item
View All Support Options Below
Free GE JNM1851DMWW manuals!
Problems with GE JNM1851DMWW?
Ask a Question
Free GE JNM1851DMWW manuals!
Problems with GE JNM1851DMWW?
Ask a Question
Popular GE JNM1851DMWW Manual Pages
Quick Specs - Page 1
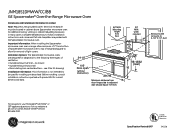
... our website at ge.com or call GE Answer Center® service, 800.626.2000. Mounting
height from floor
30" MIN. Listed by Underwriters Laboratories
Specification Revised 8/07
340138 JNM1851DMWW/CC/BB
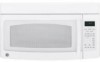
GE Spacemaker® Over-the-Range MicrowavDOeivmeOer-vntheseino-nRsa(ningeinMchicerso)wave Oven
Dimensions and Installation Information (in cabinet above Spacemaker microwave oven. No...
Use and Care Manual - Page 1
Owner's Manual
JVM1850 JVM1851 JVM1870 JVM1871 JVM2050 JVM3670 HDM1853 EMO4000
Write the model and serial numbers here: Model Serial
Find these numbers on a label inside the oven.
Microwave Spacemaker Oven
ge.com
Safety Instructions . . . .2-9
Operating Instructions Auto Features 20 Care and Cleaning 33, 34 Changing the Power Level 13 Cooking Guide . . . . .15, 16 Defrosting Guide . ...
Use and Care Manual - Page 9
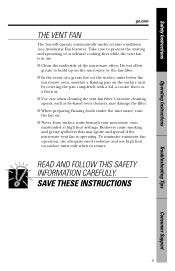
... on surface units only when necessary. s Use care when cleaning the vent fan filter. SAVE THESE INSTRUCTIONS
9
Troubleshooting Tips
Consumer Support s In the event of a grease fire on the surface units below the
microwave oven, smother a flaming pan on the microwave or the fan filter. s When preparing flaming foods under certain conditions (see Automatic Fan feature). s Clean...
Use and Care Manual - Page 11

... located on the inside wall of your model. Pull to operate. Window with Metal Shield. Food microwaves best when placed directly on some models). Operating Instructions
Troubleshooting Tips
Features of the microwave oven.
11
Consumer Support Door Latches. Shelf.
Grease Filter. The turntable may vary from your
microwave oven. Removable Turntable. Screen allows cooking to...
Use and Care Manual - Page 43

... For The Period Of: GE Will Replace:
For GE and GE Profile Models:
One Year From the date of the original purchase
Any part of the microwave oven which vary from wire... specific legal rights, and you will also provide, free of God. Warrantor: General Electric Company.
s Incidental or consequential damage caused by a GE Authorized Servicer is extended to replace the defective part....
Installation Instructions - Page 1
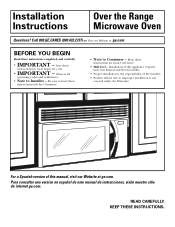
Installation Instructions
Over the Range Microwave Oven
Questions?
Para consultar una version en español de este manual de instrucciones, visite nuestro sitio de internet ge.com. Keep these
instructions with the Consumer.
• Note to improper installation is the responsibility of this appliance requires basic mechanical and electrical skills.
• Proper installation is...
Installation Instructions - Page 2

Installation Instructions
CONTENTS
General information
Important Safety Instructions 3 Electrical Requirements 3 Hood Exhaust 4, 5 Damage - Shipment/Installation 6 Parts Included 6 Tools You Will Need 7 Mounting Space 7
C Recirculating 19-22
Attach Mounting Plate to Wall 19 Preparation of Top Cabinet 19 Check Microwave Assembly 20 Adapting Microwave Blower for Recirculation 20, 21 ...
Installation Instructions - Page 3

... properly grounded, or if the outlet box does not meet electrical requirements noted (under ELECTRICAL REQUIREMENTS), a qualified electrician should be installed by a qualified electrician to a supply circuit of electric shock hazard from this kilowatt rating.
Installation Instructions
IMPORTANT SAFETY INSTRUCTIONS
This product requires a three-prong grounded outlet. IMPORTANT -
Installation Instructions - Page 7

... necessary)
Electric drill with top venting grilles: Do not allow
cabinetry or other objects to
be 30″ or More from the Floor to the Top of the Microwave
Bottom Edge of Cabinet Needs to block the airflow of obstructions.
• If the space between the microwave oven and the cabinets. Installation Instructions
TOOLS YOU...
Installation Instructions - Page 11

...)
See page 19
11
A Charcoal Filter Accessory Kit is designed for adaptation to that section. Installation Instructions
2 INSTALLATION TYPES (Choose A, B or C)
This microwave oven is required for the nonvented exhaust. (See your installation and proceed to the following three types of ventilation required for non-vented models). Outside Back Exhaust (Horizontal Duct) C. Select...
Installation Instructions - Page 13
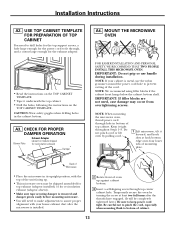
... drill holes for the top support screws, a hole large enough for the power cord to assure proper
alignment with your cabinet is installed.
2 Rotate front of top cabinet. Installation Instructions
A2. MOUNT THE MICROWAVE OVEN
FOR EASIER INSTALLATION AND PERSONAL SAFETY, WE RECOMMEND THAT TWO PEOPLE INSTALL THIS MICROWAVE OVEN.
NOTE: When mounting the microwave oven, thread power cord...
Installation Instructions - Page 18
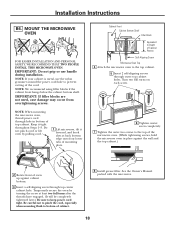
...place against the wall and the top cabinet.)
2 Rotate front of cabinet.
8 Install grease filter. Turn two full turns on each screw.
6 Tighten center screw completely.
7 ...Manual packed with the microwave.
18
Temporarily secure the oven by pulling cord.
1 Lift microwave, tilt it tight throughout Steps 1-3.
Installation Instructions
B6. MOUNT THE MICROWAVE OVEN
FOR EASIER INSTALLATION...
Installation Instructions - Page 20

...
3 Slide exhaust adaptor to microwave. CHECK MICROWAVE ASSEMBLY
Exhaust Adaptor (absent on models shipped for recirculating models. C4. BEFORE: Fan Blade Openings Facing Up
Roll
AFTER: Fan Blade Openings Facing Forward
4 Remove and save screw that holds the blower motor to adjust the blower unit. Installation Instructions
C3. ADAPTING MICROWAVE BLOWER FOR RECIRCULATION
1 Remove and...
Installation Instructions - Page 22

... Replace the grille and the screws. 6 Close the door. Charcoal Filter
4 Install the charcoal filter. See the Owner's Manual packed with the microwave. When properly installed, the wire mesh of grille using a #2 Phillips screwdriver.
2 Open the door. 3 Remove the grille.
On 1800 Series models, slide the grille to the top of grille using a #1 Phillips screwdriver. Installation Instructions...
Installation Instructions - Page 23
...
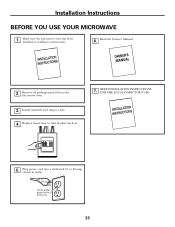
23 Make sure the microwave oven has been installed according to 20-amp
electrical outlet. Read the Owner's Manual.
2. to instructions.
6. Install turntable and ring in cavity. 4. KEEP INSTALLATION INSTRUCTIONS FOR THE LOCAL INSPECTOR'S USE.
5. Remove all packing material from the
microwave oven.
3. Installation Instructions
BEFORE YOU USE YOUR MICROWAVE
1. Replace house fuse or turn...
GE JNM1851DMWW Reviews
We have not received any reviews for GE yet.