Use and Care Manual
Page 1
... LVM1540 Spacemaker Microwave Oven Owner's Manual Important Safety Instructions 2 Precautions to Avoid Possible Exposure to Excessive Microwave Energy 2 Special Notes About Microwaving 5 Operating Instructions 10 Features of Your Microwave 10 The Controls on Your Microwave 11 Time Cooking 14 Automatic Cooking 20 Other Features 24 Oven Shelf 29 Helpful Information 30 Microwave Terms 30 Care and Cleaning 31 If Something Goes Wrong 36 Before You Call For Service 36 GE Service Numbers 38 Warranty Back Cover...
... LVM1540 Spacemaker Microwave Oven Owner's Manual Important Safety Instructions 2 Precautions to Avoid Possible Exposure to Excessive Microwave Energy 2 Special Notes About Microwaving 5 Operating Instructions 10 Features of Your Microwave 10 The Controls on Your Microwave 11 Time Cooking 14 Automatic Cooking 20 Other Features 24 Oven Shelf 29 Helpful Information 30 Microwave Terms 30 Care and Cleaning 31 If Something Goes Wrong 36 Before You Call For Service 36 GE Service Numbers 38 Warranty Back Cover...
Use and Care Manual
Page 3
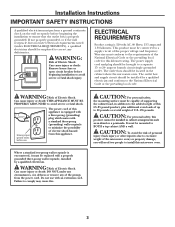
... INSTRUCTIONS WARNING When using a power cord from General Electric. • Do not cover or block any openings on page 2. • This appliance must be replaced by General Electric Service or an authorized service agent using electrical appliances, basic safety precautions should be followed, including the following: SAFETY PRECAUTIONS This microwave oven is intended for household use corrosive chemicals or vapors in this appliance. Do not use and is UL listed for use...
... INSTRUCTIONS WARNING When using a power cord from General Electric. • Do not cover or block any openings on page 2. • This appliance must be replaced by General Electric Service or an authorized service agent using electrical appliances, basic safety precautions should be followed, including the following: SAFETY PRECAUTIONS This microwave oven is intended for household use corrosive chemicals or vapors in this appliance. Do not use and is UL listed for use...
Use and Care Manual
Page 4
... use this appliance outdoors. If the door is opened, the fire may spread. - If food is under cooked after the first countdown, use the Sensor Features twice in operation. 4 SAVE THESE INSTRUCTIONS Carefully attend appliance when paper, plastic or other combustible materials are placed inside oven ignite, keep the oven door closed, turn the oven off and disconnect the power cord, or shut off power at the fuse or circuit breaker panel...
... use this appliance outdoors. If the door is opened, the fire may spread. - If food is under cooked after the first countdown, use the Sensor Features twice in operation. 4 SAVE THESE INSTRUCTIONS Carefully attend appliance when paper, plastic or other combustible materials are placed inside oven ignite, keep the oven door closed, turn the oven off and disconnect the power cord, or shut off power at the fuse or circuit breaker panel...

Use and Care Manual
Page 5
... it touches the microwave wall. • Metal or foil touching the side of the oven. • Foods with no food inside for sparks in injury. • Operating the microwave with unbroken outer "skin" such as potatoes, hot dogs, sausages, tomatoes, apples, chicken livers and other giblets, and egg yolks should not be pierced to allow steam to escape during cooking. SAVE THESE INSTRUCTIONS...
... it touches the microwave wall. • Metal or foil touching the side of the oven. • Foods with no food inside for sparks in injury. • Operating the microwave with unbroken outer "skin" such as potatoes, hot dogs, sausages, tomatoes, apples, chicken livers and other giblets, and egg yolks should not be pierced to allow steam to escape during cooking. SAVE THESE INSTRUCTIONS...
Use and Care Manual
Page 8
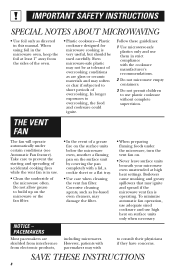
... microwave or the fan filter. IMPORTANT SAFETY INSTRUCTIONS SPECIAL NOTES ABOUT MICROWAVING • Use foil only as are shielded from interference from the sides of the oven. • Plastic cookware-Plastic cookware designed for microwave cooking is operating. In longer exposures to prevent the starting and spreading of accidental cooking fires while the vent fan is in the microwave oven, keep the foil at high heat settings. Take care...
... microwave or the fan filter. IMPORTANT SAFETY INSTRUCTIONS SPECIAL NOTES ABOUT MICROWAVING • Use foil only as are shielded from interference from the sides of the oven. • Plastic cookware-Plastic cookware designed for microwave cooking is operating. In longer exposures to prevent the starting and spreading of accidental cooking fires while the vent fan is in the microwave oven, keep the foil at high heat settings. Take care...
Use and Care Manual
Page 9
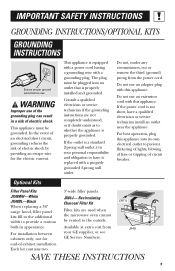
... electric current. If the power cord is your GE supplier, or see GE Service Numbers. Recirculating Charcoal Filter Kit Filter kits are not completely understood, or if doubt exists as to the outside. For installation between cabinets only; JX81J- This appliance is properly grounded. Available at extra cost from the power cord. For best operation, plug this appliance. Optional Kits Filler Panel Kits JX48WH-White JX48BL-Black When replacing a 36″ range hood, filler panel kits...
... electric current. If the power cord is your GE supplier, or see GE Service Numbers. Recirculating Charcoal Filter Kit Filter kits are not completely understood, or if doubt exists as to the outside. For installation between cabinets only; JX81J- This appliance is properly grounded. Available at extra cost from the power cord. For best operation, plug this appliance. Optional Kits Filler Panel Kits JX48WH-White JX48BL-Black When replacing a 36″ range hood, filler panel kits...
Use and Care Manual
Page 10
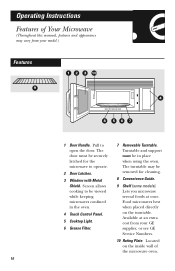
... support must be securely latched for cleaning. 8 Convenience Guide. 9 Shelf (some models). Food microwaves best when placed directly on the inside wall of Your Microwave (Throughout this manual, features and appearance may be removed for the microwave to open the door. Lets you microwave several foods at an extra cost from your GE supplier, or see GE Service Numbers. 10 Rating Plate. The turntable may vary from your model.) Features 1 2 3 10 9 4 8 567 1 Door Handle. Operating Instructions Features of the microwave oven...
... support must be securely latched for cleaning. 8 Convenience Guide. 9 Shelf (some models). Food microwaves best when placed directly on the inside wall of Your Microwave (Throughout this manual, features and appearance may be removed for the microwave to open the door. Lets you microwave several foods at an extra cost from your GE supplier, or see GE Service Numbers. 10 Rating Plate. The turntable may vary from your model.) Features 1 2 3 10 9 4 8 567 1 Door Handle. Operating Instructions Features of the microwave oven...
Use and Care Manual
Page 16
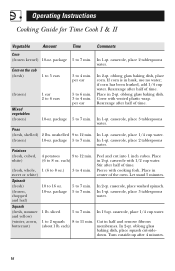
... remove fibrous membranes. Cut in 2-qt. oblong glass baking dish, place squash cut into 1 inch cubes. In 1-qt. Place in center of time. Place in 2-qt. casserole, place washed spinach. casserole, place 3 tablespoons water. unshelled 9 to 7 min. 10-oz. If corn is in husk, use no water; In 1-qt. In 11⁄2-qt. In 2-qt. Operating Instructions Cooking Guide for Time Cook...
... remove fibrous membranes. Cut in 2-qt. oblong glass baking dish, place squash cut into 1 inch cubes. In 1-qt. Place in center of time. Place in 2-qt. casserole, place washed spinach. casserole, place 3 tablespoons water. unshelled 9 to 7 min. 10-oz. If corn is in husk, use no water; In 1-qt. In 11⁄2-qt. In 2-qt. Operating Instructions Cooking Guide for Time Cook...
Use and Care Manual
Page 20
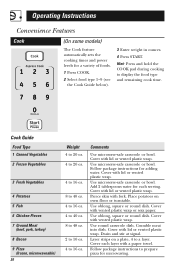
Operating Instructions Convenience Features Cook (On some models) The Cook feature automatically sets the cooking times and power levels for adding water. Cover with lid or vented plastic wrap. Add 2 tablespoons water for microwaving. Cover with lid or vented plastic wrap. Place potatoes on a plate, 4 to display the food type and remaining cook time. Cover with lid or vented plastic wrap. Cover with vented plastic wrap. Follow package instructions to 16 oz. Cook Guide Food Type 1 Canned Vegetables 2 Frozen...
Operating Instructions Convenience Features Cook (On some models) The Cook feature automatically sets the cooking times and power levels for adding water. Cover with lid or vented plastic wrap. Add 2 tablespoons water for microwaving. Cover with lid or vented plastic wrap. Place potatoes on a plate, 4 to display the food type and remaining cook time. Cover with lid or vented plastic wrap. Cover with vented plastic wrap. Follow package instructions to 16 oz. Cook Guide Food Type 1 Canned Vegetables 2 Frozen...
Use and Care Manual
Page 21
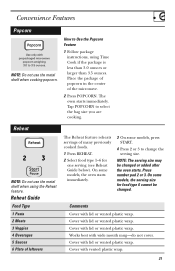
... models, press START. 4 Press 2 or 3 to 3.5 ounces. Cover with prepackaged microwave popcorn weighing 3.0 to change the serving size. Cover with vented plastic wrap. 21 Tap POPCORN to Use the Popcorn Feature 1 Follow package instructions, using the Reheat feature. On some models, the oven starts immediately. 3 On some models, the serving size for one serving (see Reheat Guide below). Cover with lid or vented plastic wrap. NOTE: Do not use the metal shelf when using Time Cook...
... models, press START. 4 Press 2 or 3 to 3.5 ounces. Cover with prepackaged microwave popcorn weighing 3.0 to change the serving size. Cover with vented plastic wrap. 21 Tap POPCORN to Use the Popcorn Feature 1 Follow package instructions, using the Reheat feature. On some models, the oven starts immediately. 3 On some models, the serving size for one serving (see Reheat Guide below). Cover with lid or vented plastic wrap. NOTE: Do not use the metal shelf when using Time Cook...

Use and Care Manual
Page 33
... electrical power to the oven. 33 After breaking the adhesive seal, remove the bulb by gently turning. Remove screw Oven Light Replace the burned-out bulb with the same size and type bulb. 4 Raise the light shield and replace the screw. Light cover 4 Replace the light cover. 5 Replace the grille and screws. Light Bulb Replacement Cooktop Light Replace the burned-out bulb with a 120 volt, 40-watt incandescent bulb (WB36X10003), available from your GE supplier. 1 To replace the bulb(s), first disconnect the power at the main fuse or circuit breaker panel...
... electrical power to the oven. 33 After breaking the adhesive seal, remove the bulb by gently turning. Remove screw Oven Light Replace the burned-out bulb with the same size and type bulb. 4 Raise the light shield and replace the screw. Light cover 4 Replace the light cover. 5 Replace the grille and screws. Light Bulb Replacement Cooktop Light Replace the burned-out bulb with a 120 volt, 40-watt incandescent bulb (WB36X10003), available from your GE supplier. 1 To replace the bulb(s), first disconnect the power at the main fuse or circuit breaker panel...

Use and Care Manual
Page 35
... locking tabs. Insert the filter into the left to remove the grille. See "Optional Kits," page 9, for more information. To remove the charcoal filter, disconnect power at the main fuse or circuit breaker panel or pull the plug. Filter housing To install a new filter, remove plastic and other outer wrapping from your GE supplier. It will be replaced. The charcoal filter should be cleaned. Replace the grille and 3 screws. 35 To Remove Charcoal Filter Remove 3 grille screws to remove it comes free...
... locking tabs. Insert the filter into the left to remove the grille. See "Optional Kits," page 9, for more information. To remove the charcoal filter, disconnect power at the main fuse or circuit breaker panel or pull the plug. Filter housing To install a new filter, remove plastic and other outer wrapping from your GE supplier. It will be replaced. The charcoal filter should be cleaned. Replace the grille and 3 screws. 35 To Remove Charcoal Filter Remove 3 grille screws to remove it comes free...
Use and Care Manual
Page 36
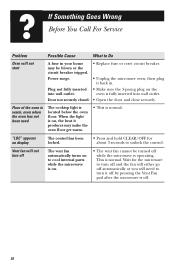
... Vent Fan pad after the microwave is off. 36 oven is fully inserted into wall outlet. Door not securely closed. • Open the door and close securely. "LOC" appears on , the heat it produces may be turned off while the microwave is operating. Wait for about 3 seconds to unlock the control. This is located below the oven floor. When the light is on display The control has been locked...
... Vent Fan pad after the microwave is off. 36 oven is fully inserted into wall outlet. Door not securely closed. • Open the door and close securely. "LOC" appears on , the heat it produces may be turned off while the microwave is operating. Wait for about 3 seconds to unlock the control. This is located below the oven floor. When the light is on display The control has been locked...
Use and Care Manual
Page 40
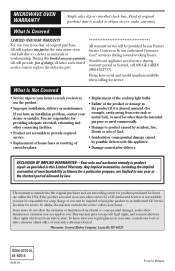
... JR Printed in this limited one-year warranty, GE will replace any succeeding owner for products purchased for providing adequate electrical, exhausting and other than the intended purpose or used for other connecting facilities. • Product not accessible to provide required service. • Replacement of house fuses or resetting of circuit breakers. • Replacement of the cooktop light bulbs. • Failure of the product or damage...
... JR Printed in this limited one-year warranty, GE will replace any succeeding owner for products purchased for providing adequate electrical, exhausting and other than the intended purpose or used for other connecting facilities. • Product not accessible to provide required service. • Replacement of house fuses or resetting of circuit breakers. • Replacement of the cooktop light bulbs. • Failure of the product or damage...
Installation Instructions
Page 2
Installation Instructions CONTENTS General information Important Safety Instructions 3 Electrical Requirements 3 Hood Exhaust 4, 5 Damage - Shipment/Installation 6 Parts Included 6 Tools You Will Need 7 Mounting Space 7 C Recirculating 19-22 Attach Mounting Plate to Wall 19 Preparation of Top Cabinet 19 Adapting Microwave Blower for Recirculation 20, 21 Mount the Microwave Oven ..........21, 22 Installing the Charcoal Filter 22 Before You Use Your Microwave 23 Step-by-step installation guide Placement of Mounting Plate 8-10 Removing the Mounting Plate 8 Finding the Wall ...
Installation Instructions CONTENTS General information Important Safety Instructions 3 Electrical Requirements 3 Hood Exhaust 4, 5 Damage - Shipment/Installation 6 Parts Included 6 Tools You Will Need 7 Mounting Space 7 C Recirculating 19-22 Attach Mounting Plate to Wall 19 Preparation of Top Cabinet 19 Adapting Microwave Blower for Recirculation 20, 21 Mount the Microwave Oven ..........21, 22 Installing the Charcoal Filter 22 Before You Use Your Microwave 23 Step-by-step installation guide Placement of Mounting Plate 8-10 Removing the Mounting Plate 8 Finding the Wall ...
Installation Instructions
Page 3
... located in the cabinet above the microwave oven. Can cause injury or death: Remove house fuse or open circuit breaker before beginning the installation to ensure that the outlet box is equipped with a three-prong (grounding) plug which mates with a standard three-prong (grounding) wall receptacle to minimize the possibility of electric shock hazard from the power cord. Wire size must be replaced with an extension cord...
... located in the cabinet above the microwave oven. Can cause injury or death: Remove house fuse or open circuit breaker before beginning the installation to ensure that the outlet box is equipped with a three-prong (grounding) plug which mates with a standard three-prong (grounding) wall receptacle to minimize the possibility of electric shock hazard from the power cord. Wire size must be replaced with an extension cord...
Installation Instructions
Page 7
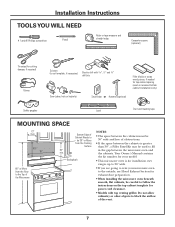
Your Owner's Manual contains the kit number for your microwave oven to the outside, see Hood Exhaust Section for exhaust duct preparation. • When installing the microwave oven beneath smooth, flat cabinets, be careful to follow the instructions on recessed bottom cabinet installations only) Saw (saber, hole or keyhole) Stud finder or Hammer (optional) Safety goggles Level Duct and masking tape MOUNTING SPACE 13″ max. 161⁄2″ 30″ 2″ 66...
Your Owner's Manual contains the kit number for your microwave oven to the outside, see Hood Exhaust Section for exhaust duct preparation. • When installing the microwave oven beneath smooth, flat cabinets, be careful to follow the instructions on recessed bottom cabinet installations only) Saw (saber, hole or keyhole) Stud finder or Hammer (optional) Safety goggles Level Duct and masking tape MOUNTING SPACE 13″ max. 161⁄2″ 30″ 2″ 66...
Installation Instructions
Page 11
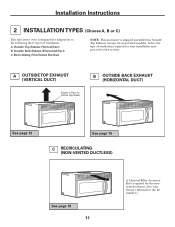
... 15 C RECIRCULATING (NON-VENTED DUCTLESS) See page 19 11 A Charcoal Filter Accessory Kit is required for the nonvented exhaust. (See your installation and proceed to that section. Outside Top Exhaust (Vertical Duct) B. Outside Back Exhaust (Horizontal Duct) C. Select the type of ventilation: A. Installation Instructions 2 INSTALLATION TYPES (Choose A, B or C) This microwave oven is designed for adaptation to the following three types of ventilation required for your Owner's Manual for non-vented models).
... 15 C RECIRCULATING (NON-VENTED DUCTLESS) See page 19 11 A Charcoal Filter Accessory Kit is required for the nonvented exhaust. (See your installation and proceed to that section. Outside Top Exhaust (Vertical Duct) B. Outside Back Exhaust (Horizontal Duct) C. Select the type of ventilation: A. Installation Instructions 2 INSTALLATION TYPES (Choose A, B or C) This microwave oven is designed for adaptation to the following three types of ventilation required for your Owner's Manual for non-vented models).
Installation Instructions
Page 22
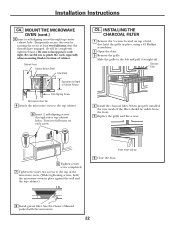
... the door. 8 Install grease filter. See the Owner's Manual packed with the microwave. 22 Cabinet Front Cabinet Bottom Shelf Filler Block Equivalent to Depth of the filter should be completely tightened later.) Be sure to the top cabinet. 5 Insert 2 self-aligning screws through top center cabinet hole. When properly installed, the wire mesh of Cabinet Recess Self-Aligning Screw Microwave Oven Top 4 Attach the microwave oven to keep power cord tight. INSTALLING THE CHARCOAL FILTER 1 Remove the 3 screws located...
... the door. 8 Install grease filter. See the Owner's Manual packed with the microwave. 22 Cabinet Front Cabinet Bottom Shelf Filler Block Equivalent to Depth of the filter should be completely tightened later.) Be sure to the top cabinet. 5 Insert 2 self-aligning screws through top center cabinet hole. When properly installed, the wire mesh of Cabinet Recess Self-Aligning Screw Microwave Oven Top 4 Attach the microwave oven to keep power cord tight. INSTALLING THE CHARCOAL FILTER 1 Remove the 3 screws located...
Quick Specs
Page 2
... duct Rear Exhaust: If a rear or horizontal exhaust is constructed by Underwriters Laboratories Specification Created 4/09 340144 Each kit contains two 3"-wide filler panels. Filter KitsJX81J- Listed by leaving enough space between cabinets only; Recirculating Charcoal Filter Kit To be taken to be used, care should be used . Elbows, Transitions, Wall and Roof Caps, etc., present additional resistance to airflow and are equivalent to accommodate exhaust. For installation...
... duct Rear Exhaust: If a rear or horizontal exhaust is constructed by Underwriters Laboratories Specification Created 4/09 340144 Each kit contains two 3"-wide filler panels. Filter KitsJX81J- Listed by leaving enough space between cabinets only; Recirculating Charcoal Filter Kit To be taken to be used, care should be used . Elbows, Transitions, Wall and Roof Caps, etc., present additional resistance to airflow and are equivalent to accommodate exhaust. For installation...


