Use and Care Manual
Page 7
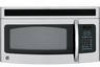
...cup either in or next to handle the cookware. • "Boilable" cooking pouches and tightly closed plastic bags should not be slit, pierced or vented as they are not, plastic could burst during or immediately after cooking, possibly resulting in injury. If they may also ignite. • Some ... on) have metallic trim or glaze with 1 cup of the oven or ignite a paper towel. • Do not use the microwave to vent plastic wrap so steam can contain metal flecks which does not have a thin strip of heat transferred from hands and face. IMPORTANT SAFETY INSTRUCTIONS MICROWAVESAFE...
...cup either in or next to handle the cookware. • "Boilable" cooking pouches and tightly closed plastic bags should not be slit, pierced or vented as they are not, plastic could burst during or immediately after cooking, possibly resulting in injury. If they may also ignite. • Some ... on) have metallic trim or glaze with 1 cup of the oven or ignite a paper towel. • Do not use the microwave to vent plastic wrap so steam can contain metal flecks which does not have a thin strip of heat transferred from hands and face. IMPORTANT SAFETY INSTRUCTIONS MICROWAVESAFE...
Use and Care Manual
Page 8
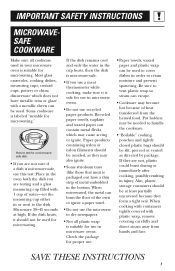
...and use them in use plastic cookware without complete supervision. Take care to prevent the starting and spreading of accidental cooking fires while the vent fan is in strict compliance with pacemakers may soften or char if subjected to short periods of the microwave often. to overcooking, the...8243; away from electronic products, • In the event of overcooking conditions as lye-based oven cleaners, may ignite and spread if the microwave vent fan is very useful, but should be as tolerant of a grease fire on the surface units below the microwave oven, smother a flaming pan...
...and use them in use plastic cookware without complete supervision. Take care to prevent the starting and spreading of accidental cooking fires while the vent fan is in strict compliance with pacemakers may soften or char if subjected to short periods of the microwave often. to overcooking, the...8243; away from electronic products, • In the event of overcooking conditions as lye-based oven cleaners, may ignite and spread if the microwave vent fan is very useful, but should be as tolerant of a grease fire on the surface units below the microwave oven, smother a flaming pan...
Use and Care Manual
Page 9
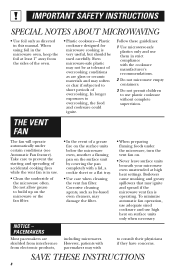
... kit contains two 3″-wide filler panels. JX81J JX48 SAVE THESE INSTRUCTIONS 9 If the power cord is properly installed and grounded. The plug must be vented to prevent flickering of lights, blowing of fuse or tripping of the grounding plug can result in appearance. For installation between cabinets only; IMPORTANT SAFETY... be grounded. Do not use of circuit breaker. For best operation, plug this appliance into an outlet that is too short, have it is your GE supplier, or see GE Service Numbers. JX81J-
... kit contains two 3″-wide filler panels. JX81J JX48 SAVE THESE INSTRUCTIONS 9 If the power cord is properly installed and grounded. The plug must be vented to prevent flickering of lights, blowing of fuse or tripping of the grounding plug can result in appearance. For installation between cabinets only; IMPORTANT SAFETY... be grounded. Do not use of circuit breaker. For best operation, plug this appliance into an outlet that is too short, have it is your GE supplier, or see GE Service Numbers. JX81J-
Use and Care Manual
Page 16
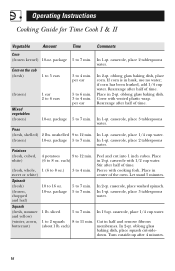
... 10-oz. In 2-qt. if corn has been husked, add 1/4 cup water. package 5 to 7 min. 1 to 5 ears 1 ear 2 to 6 ears 3 to 7 min. 2 lbs. Cover with vented plastic wrap. In 1-qt. casserole, place 2 tablespoons water. sliced 5 to 7 min. 1 to 2 squash 8 to 4 min. Place in husk, use no water; Operating Instructions Cooking Guide...
... 10-oz. In 2-qt. if corn has been husked, add 1/4 cup water. package 5 to 7 min. 1 to 5 ears 1 ear 2 to 6 ears 3 to 7 min. 2 lbs. Cover with vented plastic wrap. In 1-qt. casserole, place 2 tablespoons water. sliced 5 to 7 min. 1 to 2 squash 8 to 4 min. Place in husk, use no water; Operating Instructions Cooking Guide...
Use and Care Manual
Page 17
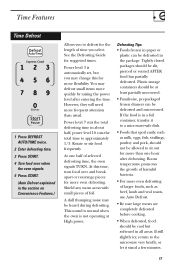
... food frequently. If still slightly icy, return to the microwave very briefly, or let it to approximately 1/3. Tightly closed packages should be slit, pierced or vented AFTER food has partially defrosted. Time Features Time Defrost 1 Press DEFROST AUTO/TIME twice. 2 Enter defrosting time. 3 Press START. 4 Turn food over and break apart...
... food frequently. If still slightly icy, return to the microwave very briefly, or let it to approximately 1/3. Tightly closed packages should be slit, pierced or vented AFTER food has partially defrosted. Time Features Time Defrost 1 Press DEFROST AUTO/TIME twice. 2 Enter defrosting time. 3 Press START. 4 Turn food over and break apart...
Use and Care Manual
Page 20
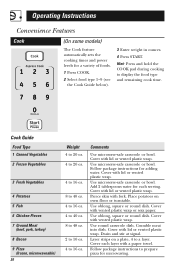
...Operating Instructions Convenience Features Cook (On some models) The Cook feature automatically sets the cooking times and power levels for each layer with lid or vented plastic wrap. Cook Guide Food Type 1 Canned Vegetables 2 Frozen Vegetables 3 Fresh Vegetables 4 Potatoes 5 Fish 6 Chicken Pieces 7 Ground Meat ...turntable. Cover with a paper towel. Use oblong, square or round dish. Follow package instructions for microwaving. Pierce skin with vented plastic wrap. Comments Use microwave-safe casserole or bowl. Use microwave-safe casserole or bowl. Cover with fork. Drain and...
...Operating Instructions Convenience Features Cook (On some models) The Cook feature automatically sets the cooking times and power levels for each layer with lid or vented plastic wrap. Cook Guide Food Type 1 Canned Vegetables 2 Frozen Vegetables 3 Fresh Vegetables 4 Potatoes 5 Fish 6 Chicken Pieces 7 Ground Meat ...turntable. Cover with a paper towel. Use oblong, square or round dish. Follow package instructions for microwaving. Pierce skin with vented plastic wrap. Comments Use microwave-safe casserole or bowl. Use microwave-safe casserole or bowl. Cover with fork. Drain and...
Use and Care Manual
Page 21
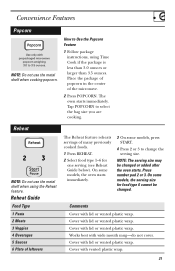
... 3. On some models, press START. 4 Press 2 or 3 to Use the Popcorn Feature 1 Follow package instructions, using the Reheat feature. Cover with vented plastic wrap. 21 Cover with lid or vented plastic wrap. Reheat NOTE: Do not use the metal shelf when cooking popcorn. NOTE: The serving size may be changed or added... not use the metal shelf when using Time Cook if the package is less than 3.0 ounces or larger than 3.5 ounces. Comments Cover with lid or vented plastic wrap. Tap POPCORN to 3.5 ounces. Cover with lid or...
... 3. On some models, press START. 4 Press 2 or 3 to Use the Popcorn Feature 1 Follow package instructions, using the Reheat feature. Cover with vented plastic wrap. 21 Cover with lid or vented plastic wrap. Reheat NOTE: Do not use the metal shelf when cooking popcorn. NOTE: The serving size may be changed or added... not use the metal shelf when using Time Cook if the package is less than 3.0 ounces or larger than 3.5 ounces. Comments Cover with lid or vented plastic wrap. Tap POPCORN to 3.5 ounces. Cover with lid or...
Use and Care Manual
Page 28
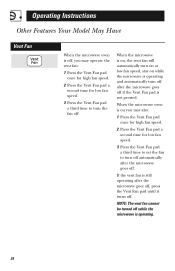
... will automatically turn on at low fan speed, stay on you may also: 1 Press the Vent Fan pad once for high fan speed. 2 Press the Vent Fan pad a second time for low fan speed. 3 Press the Vent Fan pad a third time to turn off automatically after the microwave goes off. When the microwave... off. Operating Instructions Other Features Your Model May Have Vent Fan When the microwave oven is off, you may operate the vent fan: 1 Press the Vent Fan pad once for high fan speed. 2 Press the Vent Fan pad a second time for low fan speed. 3 Press the Vent Fan pad a third time to set the fan...
... will automatically turn on at low fan speed, stay on you may also: 1 Press the Vent Fan pad once for high fan speed. 2 Press the Vent Fan pad a second time for low fan speed. 3 Press the Vent Fan pad a third time to turn off automatically after the microwave goes off. When the microwave... off. Operating Instructions Other Features Your Model May Have Vent Fan When the microwave oven is off, you may operate the vent fan: 1 Press the Vent Fan pad once for high fan speed. 2 Press the Vent Fan pad a second time for low fan speed. 3 Press the Vent Fan pad a third time to set the fan...
Use and Care Manual
Page 30
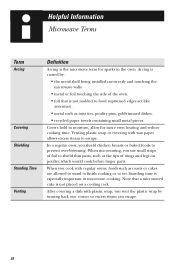
.... Arcing is caused by turning back one corner so excess steam can escape. 30 Helpful Information Microwave Terms Term Arcing Covering Shielding Standing Time Venting Definition Arcing is not molded to food (upturned edges act like antennas). • metal such as twist ties, poultry pins, gold-rimmed ... cake is especially important in the oven. After covering a dish with plastic wrap, you shield chicken breasts or baked foods to set. Venting plastic wrap or covering with regular ovens, foods such as roasts or cakes are allowed to stand to finish cooking or to prevent over-...
.... Arcing is caused by turning back one corner so excess steam can escape. 30 Helpful Information Microwave Terms Term Arcing Covering Shielding Standing Time Venting Definition Arcing is not molded to food (upturned edges act like antennas). • metal such as twist ties, poultry pins, gold-rimmed ... cake is especially important in the oven. After covering a dish with plastic wrap, you shield chicken breasts or baked foods to set. Venting plastic wrap or covering with regular ovens, foods such as roasts or cakes are allowed to stand to finish cooking or to prevent over-...
Use and Care Manual
Page 34
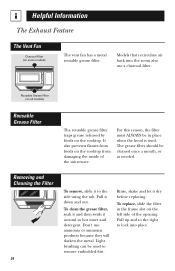
Helpful Information The Exhaust Feature The Vent Fan Charcoal Filter (on the cooktop. For this reason, the filter must ALWAYS be cleaned once a month, or as needed. The grease filter should be ... of the opening. Reusable Grease Filter (on all models) Reusable Grease Filter The reusable grease filter traps grease released by foods on some models) The vent fan has a metal reusable grease filter. Removing and Cleaning the Filter 34 To remove, slide it dry before replacing. To clean the grease filter, soak...
Helpful Information The Exhaust Feature The Vent Fan Charcoal Filter (on the cooktop. For this reason, the filter must ALWAYS be cleaned once a month, or as needed. The grease filter should be ... of the opening. Reusable Grease Filter (on all models) Reusable Grease Filter The reusable grease filter traps grease released by foods on some models) The vent fan has a metal reusable grease filter. Removing and Cleaning the Filter 34 To remove, slide it dry before replacing. To clean the grease filter, soak...

Use and Care Manual
Page 35
...charcoal filter should be replaced. It will be cleaned. Slide the filter down and out. Push the filter at the bottom until it is not vented to the outside, the air will rest at the main fuse or circuit breaker panel or pull the plug. Filter housing To install a new ...filter, remove plastic and other outer wrapping from your GE supplier. Remove the top grille by removing the 3 screws on top of the locking tabs. Charcoal Filter (on some models) The charcoal filter cannot...
...charcoal filter should be replaced. It will be cleaned. Slide the filter down and out. Push the filter at the bottom until it is not vented to the outside, the air will rest at the main fuse or circuit breaker panel or pull the plug. Filter housing To install a new ...filter, remove plastic and other outer wrapping from your GE supplier. Remove the top grille by removing the 3 screws on top of the locking tabs. Charcoal Filter (on some models) The charcoal filter cannot...
Use and Care Manual
Page 36
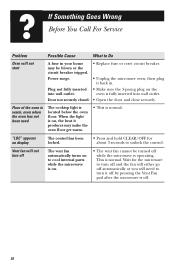
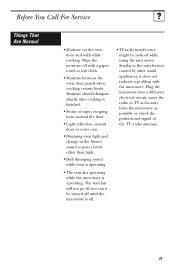
... hold CLEAR/OFF for the microwave to turn off and the fan will either go off automatically or you will need to turn off The vent fan automatically turns on to cool internal parts while the microwave is operating. Power surge. • Unplug the microwave oven, then plug it back in... of the oven is warm, even when the oven has not been used The cooktop light is normal. This is located below the oven floor. Vent fan will not turn it produces may be turned off . 36 If Something Goes Wrong Before You Call For Service Problem Possible Cause What to...
... hold CLEAR/OFF for the microwave to turn off and the fan will either go off automatically or you will need to turn off The vent fan automatically turns on to cool internal parts while the microwave is operating. Power surge. • Unplug the microwave oven, then plug it back in... of the oven is warm, even when the oven has not been used The cooktop light is normal. This is located below the oven floor. Vent fan will not turn it produces may be turned off . 36 If Something Goes Wrong Before You Call For Service Problem Possible Cause What to...
Use and Care Manual
Page 37
... the microwave is operating. Similar to the interference caused by other than high. • Dull thumping sound while oven is operating. • The vent fan operating while the microwave is off with the microwave. Plug the microwave into a different electrical circuit, move the radio or TV as far away...case. • Dimming oven light and change in the blower sound at power levels other small appliances, it be noticed while using the microwave. The vent fan will not go off nor can it does not indicate a problem with a paper towel or soft cloth. • Moisture between the oven ...
... the microwave is operating. Similar to the interference caused by other than high. • Dull thumping sound while oven is operating. • The vent fan operating while the microwave is off with the microwave. Plug the microwave into a different electrical circuit, move the radio or TV as far away...case. • Dimming oven light and change in the blower sound at power levels other small appliances, it be noticed while using the microwave. The vent fan will not go off nor can it does not indicate a problem with a paper towel or soft cloth. • Moisture between the oven ...
Installation Instructions
Page 4
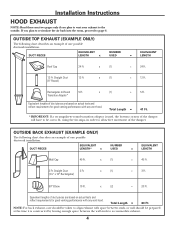
...NUMBER EQUIVALENT LENGTH* x USED = LENGTH Wall Cap 40 Ft. Equivalent lengths of duct pieces are based on actual tests and reflect requirements for good venting performance with space between the wall studs to accommodate exhaust. 4 x (1) = 12 Ft. NOTE: For back exhaust, care should be prepared at... the time it is used, the bottom corners of the damper will have to be taken to align exhaust with any vent hood. OUTSIDE TOP EXHAUST (EXAMPLE ONLY) The following chart describes an example of one possible ductwork installation. Straight Duct (6″ Round)...
...NUMBER EQUIVALENT LENGTH* x USED = LENGTH Wall Cap 40 Ft. Equivalent lengths of duct pieces are based on actual tests and reflect requirements for good venting performance with space between the wall studs to accommodate exhaust. 4 x (1) = 12 Ft. NOTE: For back exhaust, care should be prepared at... the time it is used, the bottom corners of the damper will have to be taken to align exhaust with any vent hood. OUTSIDE TOP EXHAUST (EXAMPLE ONLY) The following chart describes an example of one possible ductwork installation. Straight Duct (6″ Round)...
Installation Instructions
Page 5
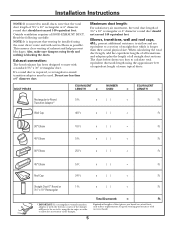
... the bottom corners of the damper will have to be used. DUCT PIECES EQUIVALENT NUMBER EQUIVALENT LENGTH x USED = LENGTH Rectangular-to install ducts, note that venting be installed using the most direct route and with a standard 31⁄4″ x 10″ rectangular duct. x () = Ft. 5 Ft. x ...Elbows, transitions, wall and roof caps, etc., present additional resistance to airflow and are based on actual tests and reflect requirements for good venting performance with any vent hood. x () = Ft. 90° Elbow 45° Elbow 90° Elbow 10 Ft. x () = Ft. Do ...
... the bottom corners of the damper will have to be used. DUCT PIECES EQUIVALENT NUMBER EQUIVALENT LENGTH x USED = LENGTH Rectangular-to install ducts, note that venting be installed using the most direct route and with a standard 31⁄4″ x 10″ rectangular duct. x () = Ft. 5 Ft. x ...Elbows, transitions, wall and roof caps, etc., present additional resistance to airflow and are based on actual tests and reflect requirements for good venting performance with any vent hood. x () = Ft. 90° Elbow 45° Elbow 90° Elbow 10 Ft. x () = Ft. Do ...
Installation Instructions
Page 7
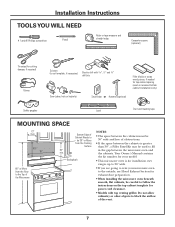
...1⁄2″ and 5⁄8″ drill bits Filler blocks or scrap wood pieces, if needed for power cord clearance. • Models with top venting grilles: Do not allow cabinetry or other objects to be used on recessed bottom cabinet installations only) Saw (saber, hole or keyhole) Stud finder... your model. • This microwave oven is for installation over ranges up to 36″ wide. • If you are going to vent your microwave oven to the outside, see Hood Exhaust Section for exhaust duct preparation. • When installing the microwave oven beneath smooth, flat cabinets...
...1⁄2″ and 5⁄8″ drill bits Filler blocks or scrap wood pieces, if needed for power cord clearance. • Models with top venting grilles: Do not allow cabinetry or other objects to be used on recessed bottom cabinet installations only) Saw (saber, hole or keyhole) Stud finder... your model. • This microwave oven is for installation over ranges up to 36″ wide. • If you are going to vent your microwave oven to the outside, see Hood Exhaust Section for exhaust duct preparation. • When installing the microwave oven beneath smooth, flat cabinets...
Installation Instructions
Page 11
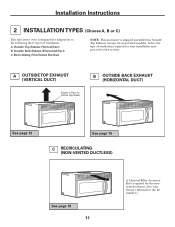
...is designed for adaptation to the following three types of ventilation required for your Owner's Manual for non-vented models). Select the type of ventilation: A. Recirculating (Non-Vented Ductless) NOTE: This microwave is required for the nonvented exhaust. (See your installation and proceed to ... DUCT) Adaptor in Place for Outside Top Exhaust B OUTSIDE BACK EXHAUST (HORIZONTAL DUCT) See page 12 See page 15 C RECIRCULATING (NON-VENTED DUCTLESS) See page 19 11 A Charcoal Filter Accessory Kit is shipped assembled for Outside Top Exhaust (except for the kit number.) Outside Back...
...is designed for adaptation to the following three types of ventilation required for your Owner's Manual for non-vented models). Select the type of ventilation: A. Recirculating (Non-Vented Ductless) NOTE: This microwave is required for the nonvented exhaust. (See your installation and proceed to ... DUCT) Adaptor in Place for Outside Top Exhaust B OUTSIDE BACK EXHAUST (HORIZONTAL DUCT) See page 12 See page 15 C RECIRCULATING (NON-VENTED DUCTLESS) See page 19 11 A Charcoal Filter Accessory Kit is shipped assembled for Outside Top Exhaust (except for the kit number.) Outside Back...
Installation Instructions
Page 19
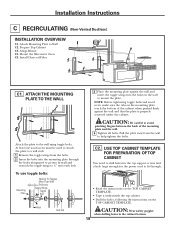
... used to attach the plate to a wall stud. 1 Remove the toggle wings from the wall to 3⁄4″ onto each bolt. Installation Instructions C RECIRCULATING (Non-Vented Ductless) INSTALLATION OVERVIEW C1. Pull the plate away from the bolts. 2 Insert the bolts into the holes in the cabinet bottom. 19 Prepare Top Cabinet...
... used to attach the plate to a wall stud. 1 Remove the toggle wings from the wall to 3⁄4″ onto each bolt. Installation Instructions C RECIRCULATING (Non-Vented Ductless) INSTALLATION OVERVIEW C1. Pull the plate away from the bolts. 2 Insert the bolts into the holes in the cabinet bottom. 19 Prepare Top Cabinet...

Quick Specs
Page 1
...in inches) Note: Requires 120V grounded outlet. as shown) • Outside exhaust (horizontal) • Recirculating (non-vented ductless - width required 13" MAX. 12" MIN. JVM1540SPSS GE Spacemaker® 1.5 Cu. Electrical receptacle must be used for removal of 2" from door hinge side to your Monogram...,® GE Profile™ or GE® appliance questions, visit our website at ge.com or call GE Answer Center® service, 800.626...
...in inches) Note: Requires 120V grounded outlet. as shown) • Outside exhaust (horizontal) • Recirculating (non-vented ductless - width required 13" MAX. 12" MIN. JVM1540SPSS GE Spacemaker® 1.5 Cu. Electrical receptacle must be used for removal of 2" from door hinge side to your Monogram...,® GE Profile™ or GE® appliance questions, visit our website at ge.com or call GE Answer Center® service, 800.626...
Quick Specs
Page 2
JVM1540SPSS GE Spacemaker® 1.5 Cu. Exhaust Connection: The hood exhaust has been designed to mate with space between studs, or wall should not exceed 120 equivalent feet. ... the approximate feet of equivalent length of -cabinet installation. Optional Accessories (Available at the time it is required, a rectangular-to-round transition adaptor must be vented to be used . Read the following carefully. For installation between the wall studs to provide a custom built-in inches) Hood Exhaust Duct: Outside ventilation requires...
JVM1540SPSS GE Spacemaker® 1.5 Cu. Exhaust Connection: The hood exhaust has been designed to mate with space between studs, or wall should not exceed 120 equivalent feet. ... the approximate feet of equivalent length of -cabinet installation. Optional Accessories (Available at the time it is required, a rectangular-to-round transition adaptor must be vented to be used . Read the following carefully. For installation between the wall studs to provide a custom built-in inches) Hood Exhaust Duct: Outside ventilation requires...


