User Manual
Page 8
ISO 28 Quality 29 Size 30 Color 31 USING THE MODES 34 LCD Screen display 34 Still shooting mode display 34 Video shooting mode display 36 Playback mode display 37 ... Fireworks 41 Glass 41 Museum 41 Landscape 41 Night landscape 41 Night portrait 41 Return to the scene mode palette 42 Pan-Capture Panorama 42 Image Stabilization mode 44 Face Detection 46 Smile Detection 47
ISO 28 Quality 29 Size 30 Color 31 USING THE MODES 34 LCD Screen display 34 Still shooting mode display 34 Video shooting mode display 36 Playback mode display 37 ... Fireworks 41 Glass 41 Museum 41 Landscape 41 Night landscape 41 Night portrait 41 Return to the scene mode palette 42 Pan-Capture Panorama 42 Image Stabilization mode 44 Face Detection 46 Smile Detection 47
User Manual
Page 34
... card. Press the button to enter the Function menu. 2. Please refer to the various GE digital camera models. 3. A higher image resolution allows you will be able to highlight the Size function. 5. Press the button to confirm your setting. 30 The bigger the number of recorded...of available shots is , the better the image quality becomes. Size The size setting refers to select a resolution. 4. Use the Up/Down navigation buttons to the image resolution in larger sizes without degrading the image. The number of image sizes that image in pixels. Use the Left/Right navigation...
... card. Press the button to enter the Function menu. 2. Please refer to the various GE digital camera models. 3. A higher image resolution allows you will be able to highlight the Size function. 5. Press the button to confirm your setting. 30 The bigger the number of recorded...of available shots is , the better the image quality becomes. Size The size setting refers to select a resolution. 4. Use the Up/Down navigation buttons to the image resolution in larger sizes without degrading the image. The number of image sizes that image in pixels. Use the Left/Right navigation...
User Manual
Page 39
Battery status 9. Image quality 16. Face detection "on" indicator 10. White balance (only available for Manual mode) 15. ISO (only available for Manual mode) 14. Memory card/internal ... flash Red-eye reduction flash Forced flash Flash off Slow Synchro Red-Eye Reduction+Slow Synchro 8. Image color (only available for Manual mode) 18. Macro mode indicator 7. Focus frame 12. Slow shutter warning indicator 19. Continuous shot 6. Image size 17. Remaining number of photos that can be taken. 11. EV adjustment meter 21.
Battery status 9. Image quality 16. Face detection "on" indicator 10. White balance (only available for Manual mode) 15. ISO (only available for Manual mode) 14. Memory card/internal ... flash Red-eye reduction flash Forced flash Flash off Slow Synchro Red-Eye Reduction+Slow Synchro 8. Image color (only available for Manual mode) 18. Macro mode indicator 7. Focus frame 12. Slow shutter warning indicator 19. Continuous shot 6. Image size 17. Remaining number of photos that can be taken. 11. EV adjustment meter 21.
User Manual
Page 41
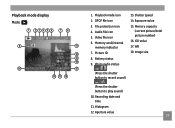
Audio file icon 5. Memory card/internal memory indicator 7. Photo audio status 13. Image size (Press the shutter button to record sound) (Press the shutter button to play sound) 10. Histogram 12. Aperture value 37 DPOF file icon 3. Picture ID 8. Shutter speed 14. Memory capacity (current picture/total picture number) 16. File protection icon 4. Exposure value 15. Battery status 9. ISO value 17. Recording date and time 11. Playback mode display Mode: 1 23456 78 9 11 12 13 14 10 15 18 17 16 1. Playback mode icon 2. Video file icon 6. WB 18.
Audio file icon 5. Memory card/internal memory indicator 7. Photo audio status 13. Image size (Press the shutter button to record sound) (Press the shutter button to play sound) 10. Histogram 12. Aperture value 37 DPOF file icon 3. Picture ID 8. Shutter speed 14. Memory capacity (current picture/total picture number) 16. File protection icon 4. Exposure value 15. Battery status 9. ISO value 17. Recording date and time 11. Playback mode display Mode: 1 23456 78 9 11 12 13 14 10 15 18 17 16 1. Playback mode icon 2. Video file icon 6. WB 18.
User Manual
Page 46
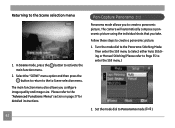
... these steps to the Scene selection menu 1. Set the mode dial to activate the main function menu. 2. The camera will automatically compose a panoramic picture using the individual shots that you configure image quality and image size. In Scene mode, press the button to Panorama mode ( ). Turn the mode dial to Scene selection menu. Select...
... these steps to the Scene selection menu 1. Set the mode dial to activate the main function menu. 2. The camera will automatically compose a panoramic picture using the individual shots that you configure image quality and image size. In Scene mode, press the button to Panorama mode ( ). Turn the mode dial to Scene selection menu. Select...
User Manual
Page 56
... to view. button and Edited video must be recorded per movie. Use Up/Down/Left/Right to select a photo or video clip to its original image size. 52 If the indicator appears on the screen. 1. To exit the Edit screen, select the press the button. With sufficient battery and at least 1 second...
... to view. button and Edited video must be recorded per movie. Use Up/Down/Left/Right to select a photo or video clip to its original image size. 52 If the indicator appears on the screen. 1. To exit the Edit screen, select the press the button. With sufficient battery and at least 1 second...
User Manual
Page 70
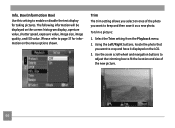
... trimming box to enable or disable the text display for information on the LCD. 3. Box (Information Box) Use this setting to fit the location and size of the photo you want to crop and have it as a new photo. Using the Left/Right buttons, locate the photo that you want to... select an area of the new picture. 66 The following information will be displayed on the screen: histogram display, aperture value, shutter speed, exposure value, image size, image quality, and ISO value. (Please refer to page 37 for taking pictures. Select the Trim setting from the Playback menu. 2.
... trimming box to enable or disable the text display for information on the LCD. 3. Box (Information Box) Use this setting to fit the location and size of the photo you want to crop and have it as a new photo. Using the Left/Right buttons, locate the photo that you want to... select an area of the new picture. 66 The following information will be displayed on the screen: histogram display, aperture value, shutter speed, exposure value, image size, image quality, and ISO value. (Please refer to page 37 for taking pictures. Select the Trim setting from the Playback menu. 2.

User Manual
Page 71
... Shutter button to the Playback menu. Use the Left/Right navigation buttons to select a picture to rotate. 67 The file with the original image also remains in the size you select. appears, it as described previously. 2. Select the Rotate setting from the Playback menu as a new picture. 1. Use the Left/Right navigation...
... Shutter button to the Playback menu. Use the Left/Right navigation buttons to select a picture to rotate. 67 The file with the original image also remains in the size you select. appears, it as described previously. 2. Select the Rotate setting from the Playback menu as a new picture. 1. Use the Left/Right navigation...


