User Manual
Page 18
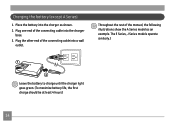
Plug one end of the connecting cable into the charger as an example. The E Series, J Series models operate similarly.) 1 2 Leave the battery to charge until the charger light goes green. (To maximize battery life, the first charge should be at least 4 hours) 14 Charging the battery (except A Series) 1. Place the battery into the charger base. 3. Plug the other end of the manual, the following illustrations show the A Series model as shown. 2. Throughout the rest of the connecting cable into a wall outlet.
Plug one end of the connecting cable into the charger as an example. The E Series, J Series models operate similarly.) 1 2 Leave the battery to charge until the charger light goes green. (To maximize battery life, the first charge should be at least 4 hours) 14 Charging the battery (except A Series) 1. Place the battery into the charger base. 3. Plug the other end of the manual, the following illustrations show the A Series model as shown. 2. Throughout the rest of the connecting cable into a wall outlet.
User Manual
Page 27
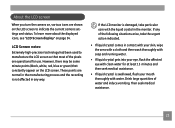
However, there may be some minute points (black, white, red, blue or green) that most of the pixels are operational for at least 15 minutes and then seek medical assistance. • If liquid crystal is swallowed, flush your ... the LCD screen so that constantly appear on the LCD screen. LCD Screen notes: Extremely high-precision technology had been used to indicate the current camera settings and status. These points are normal in the manufacturing process and the recording is damaged, take the urgent action indicated. • If liquid crystal...
However, there may be some minute points (black, white, red, blue or green) that most of the pixels are operational for at least 15 minutes and then seek medical assistance. • If liquid crystal is swallowed, flush your ... the LCD screen so that constantly appear on the LCD screen. LCD Screen notes: Extremely high-precision technology had been used to indicate the current camera settings and status. These points are normal in the manufacturing process and the recording is damaged, take the urgent action indicated. • If liquid crystal...
User Manual
Page 28
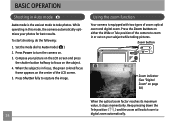
... in focus, the green colored focus frame appears on the center of zoom: optical zoom and digital zoom. To start shooting, do the following: 1. Set the mode dial to capture the image. Using the zoom function Your camera is the easiest mode to turn the camera on page 58) When...2. Compose your picture on the LCD screen and press the shutter button halfway to focus on either the Wide or Tele position of the camera to 24 digital zoom automatically. BASIC OPERATION Shooting in or out on your subject while taking pictures. Keep pressing down the Tele position ( ) and the...
... in focus, the green colored focus frame appears on the center of zoom: optical zoom and digital zoom. To start shooting, do the following: 1. Set the mode dial to capture the image. Using the zoom function Your camera is the easiest mode to turn the camera on page 58) When...2. Compose your picture on the LCD screen and press the shutter button halfway to focus on either the Wide or Tele position of the camera to 24 digital zoom automatically. BASIC OPERATION Shooting in or out on your subject while taking pictures. Keep pressing down the Tele position ( ) and the...
User Manual
Page 44
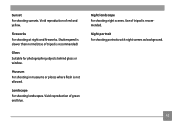
.... 40 Leaf For shooting plants. Indoor For shooting people indoors. Vivid reproduction of 12 scene types to the optimal settings for you. Camera automatically adjusts and corrects exposure value (EV). Use Up/Down/Left/Right to disturb the subject being photographed. The scene mode palette appears...for photographing children and pets. Sport For shooting fast-moving objects. You just need to select the right scene for the occasion and the camera will automatically adjust to match your needs. Children Suitable for snowy landscape. Manual Scene mode (SCN) In Manual Scene mode, you can...
.... 40 Leaf For shooting plants. Indoor For shooting people indoors. Vivid reproduction of 12 scene types to the optimal settings for you. Camera automatically adjusts and corrects exposure value (EV). Use Up/Down/Left/Right to disturb the subject being photographed. The scene mode palette appears...for photographing children and pets. Sport For shooting fast-moving objects. You just need to select the right scene for the occasion and the camera will automatically adjust to match your needs. Children Suitable for snowy landscape. Manual Scene mode (SCN) In Manual Scene mode, you can...
User Manual
Page 45
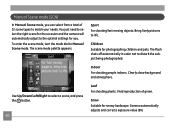
Night landscape For shooting night scenes. Shutterspeed is slower than normal.(Use of green and blue. Museum For shooting in museums or places where flash is recommended) Glass Suitable for photographing objects behind glass or window. Use of red and yellow. Night portrait For shooting portraits with night scenes as background. 41 Fireworks For shooting at night and fireworks. Sunset For shooting sunsets. Landscape For shooting landscapes. Vivid reproduction of tripod is recommended. Vivid reproduction of tripod is not allowed.
Night landscape For shooting night scenes. Shutterspeed is slower than normal.(Use of green and blue. Museum For shooting in museums or places where flash is recommended) Glass Suitable for photographing objects behind glass or window. Use of red and yellow. Night portrait For shooting portraits with night scenes as background. 41 Fireworks For shooting at night and fireworks. Sunset For shooting sunsets. Landscape For shooting landscapes. Vivid reproduction of tripod is recommended. Vivid reproduction of tripod is not allowed.
User Manual
Page 47
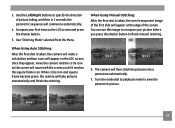
...4. Once they appear, move with the scenery until it reaches the square frame icon. The camera will take pictures automatically and finish the stitching. 6. When circle icon and square frame become green, the camera will then stitch the pictures into a panorama automatically. 7. Turn the mode dial to playback ...selected from the Menu. Compose your picture before you press the shutter button to specify the direction of the first shot will move the camera and the circle icon on the LCD screen and press the shutter button. 5. 3. You can use this image to view the panoramic...
...4. Once they appear, move with the scenery until it reaches the square frame icon. The camera will take pictures automatically and finish the stitching. 6. When circle icon and square frame become green, the camera will then stitch the pictures into a panorama automatically. 7. Turn the mode dial to playback ...selected from the Menu. Compose your picture before you press the shutter button to specify the direction of the first shot will move the camera and the circle icon on the LCD screen and press the shutter button. 5. 3. You can use this image to view the panoramic...