Use and Care Manual
Page 1
... its ability to remove frost or ice from surfaces of the freezer compartment. See the Care and Cleaning section for instructions on the side wall. 162D9639P009 49-60439 11-05 JR Refrigerators ge.com Safety Information 2, 3 Operating Instructions Care and Cleaning 6-8 Control Settings 4 Refrigerator Features 5 Replacing the Light Bulb . . . . .6 Installation Instructions . . .9-11 Troubleshooting Tips . . . .12, 13 Consumer Support Consumer Support . .Back Cover Warranty 15 ATTENTION: Defrosting-Do not use sharp, pointed objects to maintain cold temperatures and voiding the...
... its ability to remove frost or ice from surfaces of the freezer compartment. See the Care and Cleaning section for instructions on the side wall. 162D9639P009 49-60439 11-05 JR Refrigerators ge.com Safety Information 2, 3 Operating Instructions Care and Cleaning 6-8 Control Settings 4 Refrigerator Features 5 Replacing the Light Bulb . . . . .6 Installation Instructions . . .9-11 Troubleshooting Tips . . . .12, 13 Consumer Support Consumer Support . .Back Cover Warranty 15 ATTENTION: Defrosting-Do not use sharp, pointed objects to maintain cold temperatures and voiding the...
Use and Care Manual
Page 2
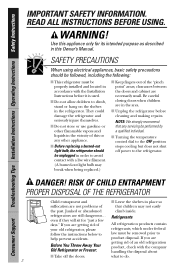
... ENTRAPMENT PROPER DISPOSAL OF THE REFRIGERATOR Child entrapment and I Leave the shelves in order to avoid contact with the company handling the disposal about I Turning the temperature control dial to help prevent accidents. what to the refrigerator. If you are necessarily small. READ ALL INSTRUCTIONS BEFORE USING. WARNING! Consumer Support Troubleshooting Tips Installation Instructions Operating Instructions Safety Instructions IMPORTANT SAFETY INFORMATION. I Take off power to do. 2 DANGER!
... ENTRAPMENT PROPER DISPOSAL OF THE REFRIGERATOR Child entrapment and I Leave the shelves in order to avoid contact with the company handling the disposal about I Turning the temperature control dial to help prevent accidents. what to the refrigerator. If you are necessarily small. READ ALL INSTRUCTIONS BEFORE USING. WARNING! Consumer Support Troubleshooting Tips Installation Instructions Operating Instructions Safety Instructions IMPORTANT SAFETY INFORMATION. I Take off power to do. 2 DANGER!
Use and Care Manual
Page 3
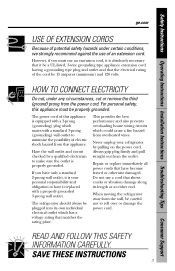
... the power cord. If you must be a UL-listed, 3-wire grounding type appliance extension cord having a grounding type plug and outlet and that shows cracks or abrasion damage along its length or at either end. Never unplug your personal responsibility and obligation to minimize the possibility of electric shock hazard from overheated wires. Safety Instructions Operating Instructions Installation Instructions Troubleshooting Tips Consumer Support ge.com USE OF...
... the power cord. If you must be a UL-listed, 3-wire grounding type appliance extension cord having a grounding type plug and outlet and that shows cracks or abrasion damage along its length or at either end. Never unplug your personal responsibility and obligation to minimize the possibility of electric shock hazard from overheated wires. Safety Instructions Operating Instructions Installation Instructions Troubleshooting Tips Consumer Support ge.com USE OF...
Use and Care Manual
Page 4
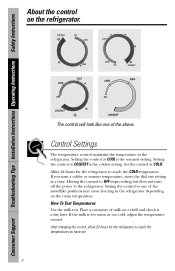
If you have set. 4 Setting the control to reach the COLD temperature. How To Test Temperatures Use the milk test. Consumer Support Troubleshooting Tips Installation Instructions Operating Instructions Safety Instructions About the control on a shelf and check it a day later. Control Settings The temperature control maintains the temperature in the refrigerator depending on the room temperature. Setting the control at a time. Set the control at COOL is the coldest setting. After changing the control, allow 24 hours for the refrigerator to one of the above...
If you have set. 4 Setting the control to reach the COLD temperature. How To Test Temperatures Use the milk test. Consumer Support Troubleshooting Tips Installation Instructions Operating Instructions Safety Instructions About the control on a shelf and check it a day later. Control Settings The temperature control maintains the temperature in the refrigerator depending on the room temperature. Setting the control at a time. Set the control at COOL is the coldest setting. After changing the control, allow 24 hours for the refrigerator to one of the above...
Use and Care Manual
Page 5
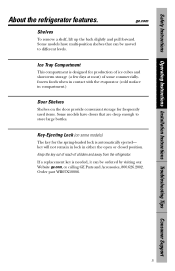
... part WR05X10006. 5 ge.com Shelves To remove a shelf, lift up the back slightly and pull forward. Safety Instructions Operating Instructions Installation Instructions Troubleshooting Tips Consumer Support About the refrigerator features. Keep the key out of reach of some models) The key for frequently used items. Some models have multi-position shelves that are deep enough to different levels. Some models have doors that can be moved to store large bottles. Ice Tray...
... part WR05X10006. 5 ge.com Shelves To remove a shelf, lift up the back slightly and pull forward. Safety Instructions Operating Instructions Installation Instructions Troubleshooting Tips Consumer Support About the refrigerator features. Keep the key out of reach of some models) The key for frequently used items. Some models have multi-position shelves that are deep enough to different levels. Some models have doors that can be moved to store large bottles. Ice Tray...
Use and Care Manual
Page 6
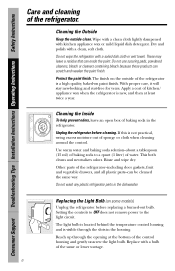
... the outside clean. With proper care, it will stay new-looking and rust-free for years. Apply a coat of the refrigerator-including door gaskets, fruit and vegetable drawers, and all plastic parts-can scratch and weaken the paint finish. Other parts of kitchen/ appliance wax when the refrigerator is a high quality, baked-on some models) Unplug the refrigerator before cleaning. The light bulb is located behind the temperature control housing...
... the outside clean. With proper care, it will stay new-looking and rust-free for years. Apply a coat of the refrigerator-including door gaskets, fruit and vegetable drawers, and all plastic parts-can scratch and weaken the paint finish. Other parts of kitchen/ appliance wax when the refrigerator is a high quality, baked-on some models) Unplug the refrigerator before cleaning. The light bulb is located behind the temperature control housing...
Use and Care Manual
Page 7
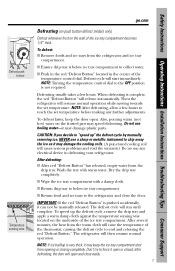
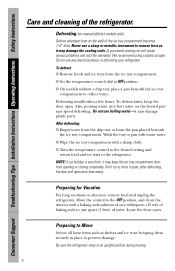
... defrost cycle by manually removing ice, NEVER use a sharp or metallic instrument to collect water. The refrigerator will run until complete. I Ensure drip tray is complete, the red "Defrost Button" will resume normal operation while moving towards the set temperature before making any electrical device in the center of the thermostat, causing the defrost cycle to "speed up the defrost cycle, remove the drip tray and apply a warm damp cloth against the temperature sensing wire located on...
... defrost cycle by manually removing ice, NEVER use a sharp or metallic instrument to collect water. The refrigerator will run until complete. I Ensure drip tray is complete, the red "Defrost Button" will resume normal operation while moving towards the set temperature before making any electrical device in the center of the thermostat, causing the defrost cycle to "speed up the defrost cycle, remove the drip tray and apply a warm damp cloth against the temperature sensing wire located on...
Use and Care Manual
Page 8
.... Leave the door open and close easily. Consumer Support Troubleshooting Tips Installation Instructions Operating Instructions Safety Instructions Care and cleaning of the ice tray compartment becomes 1/4″ thick. after defrosting, the door will cause serious problems and void the warranty.) We recommend using a plastic scraper. After defrosting: I Wipe the ice tray compartment with a damp cloth. Preparing for Vacation For long vacations or absences, remove food and unplug the refrigerator. Defrosting (on manual defrost models only) Defrost whenever frost...
.... Leave the door open and close easily. Consumer Support Troubleshooting Tips Installation Instructions Operating Instructions Safety Instructions Care and cleaning of the ice tray compartment becomes 1/4″ thick. after defrosting, the door will cause serious problems and void the warranty.) We recommend using a plastic scraper. After defrosting: I Wipe the ice tray compartment with a damp cloth. Preparing for Vacation For long vacations or absences, remove food and unplug the refrigerator. Defrosting (on manual defrost models only) Defrost whenever frost...
Use and Care Manual
Page 9
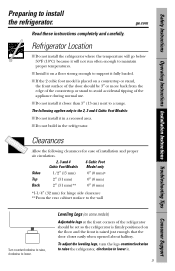
... air circulation. 2, 3 and 4 6 Cubic Foot Cubic Foot Models Model only Sides 1/2″ (13 mm) 0″ (0 mm)∗ Top 2″ (51 mm) 0″ (0 mm) Back 2″ (51 mm)** 0″ (0 mm) *1-1/4″ (32 mm) for hinge side clearance **From the rear cabinet surface to the wall Turn counterclockwise to raise, clockwise to install the refrigerator. Safety Instructions Operating Instructions Installation Instructions Troubleshooting Tips Consumer Support Preparing to lower. ge...
... air circulation. 2, 3 and 4 6 Cubic Foot Cubic Foot Models Model only Sides 1/2″ (13 mm) 0″ (0 mm)∗ Top 2″ (51 mm) 0″ (0 mm) Back 2″ (51 mm)** 0″ (0 mm) *1-1/4″ (32 mm) for hinge side clearance **From the rear cabinet surface to the wall Turn counterclockwise to raise, clockwise to install the refrigerator. Safety Instructions Operating Instructions Installation Instructions Troubleshooting Tips Consumer Support Preparing to lower. ge...
Use and Care Manual
Page 10
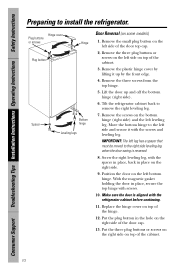
... in place on the left side of the hinge. 12. Screw the right leveling leg, with the refrigerator cabinet before continuing. 11. IMPORTANT: The left leg has a spacer that must be moved to remove the right leveling leg. 7. Make sure the door is reversed. 8. Remove the small plug button on the right side. 9. Consumer Support Troubleshooting Tips Installation Instructions Operating Instructions Safety Instructions Preparing to the left side and secure it...
... in place on the left side of the hinge. 12. Screw the right leveling leg, with the refrigerator cabinet before continuing. 11. IMPORTANT: The left leg has a spacer that must be moved to remove the right leveling leg. 7. Make sure the door is reversed. 8. Remove the small plug button on the right side. 9. Consumer Support Troubleshooting Tips Installation Instructions Operating Instructions Safety Instructions Preparing to the left side and secure it...

Use and Care Manual
Page 11
... side. 11. Remove the small plug button on the left side of the door top cap. 11 Safety Instructions Operating Instructions Installation Instructions Troubleshooting Tips Consumer Support Remove the screws on the upper hinge (right side). Lift the door up about 2″ and then sliding it with the refrigerator cabinet before continuing. 13. Remove the hinge. 5. Slide the top cover back in the middle of the top cover. 2. Remove the screw...
... side. 11. Remove the small plug button on the left side of the door top cap. 11 Safety Instructions Operating Instructions Installation Instructions Troubleshooting Tips Consumer Support Remove the screws on the upper hinge (right side). Lift the door up about 2″ and then sliding it with the refrigerator cabinet before continuing. 13. Remove the hinge. 5. Slide the top cover back in the middle of the top cover. 2. Remove the screw...
Use and Care Manual
Page 12
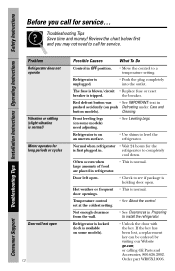
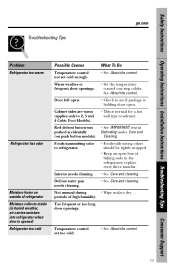
... refrigerator • Wait 24 hours for service... Not enough clearance from the wall. • See Clearances in refrigerator. Problem Refrigerator does not operate Vibration or rattling (slight vibration is first plugged in pushed accidently (on some models). • Unlock the door with the key. refrigerator to a temperature setting. Troubleshooting Tips Save time and money! Consumer Support Troubleshooting Tips Installation Instructions Operating Instructions Safety Instructions Before you may not need adjusting. • See Leveling...
... refrigerator • Wait 24 hours for service... Not enough clearance from the wall. • See Clearances in refrigerator. Problem Refrigerator does not operate Vibration or rattling (slight vibration is first plugged in pushed accidently (on some models). • Unlock the door with the key. refrigerator to a temperature setting. Troubleshooting Tips Save time and money! Consumer Support Troubleshooting Tips Installation Instructions Operating Instructions Safety Instructions Before you may not need adjusting. • See Leveling...
Use and Care Manual
Page 13
... To Do Temperature control not set too cold. • See About the control. 13 Defrost water pan needs cleaning. • See Care and cleaning. Door left open. • Check to refrigerator. • Foods with strong odors should be tightly wrapped. • Keep an open . replace every three months. Not unusual during • Wipe surface dry. periods of high humidity. Cleaning. Safety Instructions Operating Instructions Installation Instructions Troubleshooting Tips Consumer Support Troubleshooting Tips ge.com Problem Refrigerator too warm Refrigerator has...
... To Do Temperature control not set too cold. • See About the control. 13 Defrost water pan needs cleaning. • See Care and cleaning. Door left open. • Check to refrigerator. • Foods with strong odors should be tightly wrapped. • Keep an open . replace every three months. Not unusual during • Wipe surface dry. periods of high humidity. Cleaning. Safety Instructions Operating Instructions Installation Instructions Troubleshooting Tips Consumer Support Troubleshooting Tips ge.com Problem Refrigerator too warm Refrigerator has...
Use and Care Manual
Page 14
Consumer Support Troubleshooting Tips Installation Instructions Operating Instructions Safety Instructions Notes. 14
Consumer Support Troubleshooting Tips Installation Instructions Operating Instructions Safety Instructions Notes. 14
Use and Care Manual
Page 15
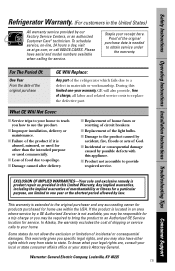
Safety Instructions Operating Instructions Installation Instructions Troubleshooting Tips Consumer Support Refrigerator Warranty. (For customers in an area where service by a GE Authorized Servicer is extended to the original purchaser and any succeeding owner for products purchased for home use the product. I Incidental or consequential damage caused by possible defects with this limited one year or the shortest period allowed by law. I Damage caused after delivery. I Replacement of...
Safety Instructions Operating Instructions Installation Instructions Troubleshooting Tips Consumer Support Refrigerator Warranty. (For customers in an area where service by a GE Authorized Servicer is extended to the original purchaser and any succeeding owner for products purchased for home use the product. I Incidental or consequential damage caused by possible defects with this limited one year or the shortest period allowed by law. I Damage caused after delivery. I Replacement of...
Use and Care Manual
Page 16
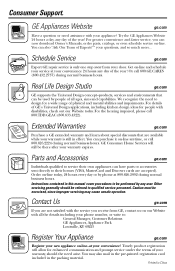
... service at 800.626.2002 during normal business hours. You can be referred to : General Manager, Customer Relations GE Appliances, Appliance Park Louisville, KY 40225 Register Your Appliance ge.com Register your new appliance on -line and schedule your appliance? Order on -line. Printed in this manual cover procedures to be performed by people of the year! Extended Warranties ge.com Purchase a GE...
... service at 800.626.2002 during normal business hours. You can be referred to : General Manager, Customer Relations GE Appliances, Appliance Park Louisville, KY 40225 Register Your Appliance ge.com Register your new appliance on -line and schedule your appliance? Order on -line. Printed in this manual cover procedures to be performed by people of the year! Extended Warranties ge.com Purchase a GE...
Quick Specs
Page 1
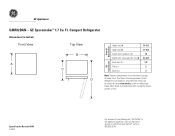
... make ice, and pre-frozen foods can be stored for about two weeks. Specification Revised 9/04 310938 For answers to your Monogram,® GE Profile™ or GE appliance questions, visit our website at ge.com or call GE Answer Center® service, 800.626.2000. Compact Refrigerator Dimensions (in inches) Front View A Top View B C D Clearances Dimensions Overall Height (in.) A Height (in.) B Depth with handle (in.) C Depth with door open...
... make ice, and pre-frozen foods can be stored for about two weeks. Specification Revised 9/04 310938 For answers to your Monogram,® GE Profile™ or GE appliance questions, visit our website at ge.com or call GE Answer Center® service, 800.626.2000. Compact Refrigerator Dimensions (in inches) Front View A Top View B C D Clearances Dimensions Overall Height (in.) A Height (in.) B Depth with handle (in.) C Depth with door open...
Quick Specs
Page 2
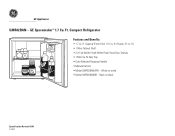
ft. ft./Freezer .21 cu. ft.) • 1 Wire Cabinet Shelf • 2 (1 Full-Width/1 Half-Width) Fresh Food Door Shelves • 1 Mini Ice 'N Easy Tray • Color-Matched Recessed Handle • Manual Defrost • Model GMR02BANWW - GE Appliances GMR02BAN/WW/BB GMR02BAN - Black on white • Model GMR02BANBB - Capacity (Fresh Food 1.51 cu. White on black Specification Revised 9/04 310938 GE Spacemaker™ 1.7 Cu. Compact Refrigerator Features and Benefits • 1.7 cu. Ft.
ft. ft./Freezer .21 cu. ft.) • 1 Wire Cabinet Shelf • 2 (1 Full-Width/1 Half-Width) Fresh Food Door Shelves • 1 Mini Ice 'N Easy Tray • Color-Matched Recessed Handle • Manual Defrost • Model GMR02BANWW - GE Appliances GMR02BAN/WW/BB GMR02BAN - Black on white • Model GMR02BANBB - Capacity (Fresh Food 1.51 cu. White on black Specification Revised 9/04 310938 GE Spacemaker™ 1.7 Cu. Compact Refrigerator Features and Benefits • 1.7 cu. Ft.
Energy Guide
Page 1
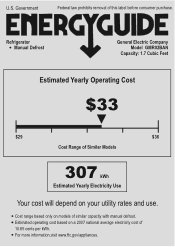
Estimated operating cost based on a 2007 national average electricity cost of Similar Models 307 kWh Estimated Yearly Electricity Use Your cost will depend on models of this label before consumer purchase. U.S. Refrigerator Manual Defrost General Electric Company Model GMR02BAN Capacity: 1.7 Cubic Feet Estimated Yearly Operating Cost $33 $29 $36 Cost Range of 10.65 cents per kWh. Cost range based only on your utility rates and use. For more information,visit www.ftc.gov/appliances. Government Federal law prohibits removal of similar capacity with manual defrost.
Estimated operating cost based on a 2007 national average electricity cost of Similar Models 307 kWh Estimated Yearly Electricity Use Your cost will depend on models of this label before consumer purchase. U.S. Refrigerator Manual Defrost General Electric Company Model GMR02BAN Capacity: 1.7 Cubic Feet Estimated Yearly Operating Cost $33 $29 $36 Cost Range of 10.65 cents per kWh. Cost range based only on your utility rates and use. For more information,visit www.ftc.gov/appliances. Government Federal law prohibits removal of similar capacity with manual defrost.

