
Use and Care Manual
Page 1
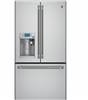
... numbers on a label on the left side, near the middle of the refrigerator compartment. Owner's Manual and Installation Instructions GE Café™ models Models that start with CFE are Standard Depth Models (SD) Models that start with CYE and CWE are Counter Depth Models (CD) Réfrigérateurs Manuel d'utilisation et instructions d'installation Modè...
... numbers on a label on the left side, near the middle of the refrigerator compartment. Owner's Manual and Installation Instructions GE Café™ models Models that start with CFE are Standard Depth Models (SD) Models that start with CYE and CWE are Counter Depth Models (CD) Réfrigérateurs Manuel d'utilisation et instructions d'installation Modè...
Use and Care Manual
Page 3
... wiring circuits which mates with a 3-prong (grounding) plug which could result in style models (model PYE, CYE, GYE, PWE, CWE, and ZWE) are top heavy, especially with your refrigerator. GEAppliances.com SAFETY (CONT.) INSTALLATION WARNING Explosion Hazard. Built-in death or serious injury...floor bracket packed with any circumstances, cut or remove the third (ground) prong from refrigerator. Repair or replace immediately all power cords that have it is required. These models must be secured with a properly grounded 3-prong wall outlet. Never unplug your personal...
... wiring circuits which mates with a 3-prong (grounding) plug which could result in style models (model PYE, CYE, GYE, PWE, CWE, and ZWE) are top heavy, especially with your refrigerator. GEAppliances.com SAFETY (CONT.) INSTALLATION WARNING Explosion Hazard. Built-in death or serious injury...floor bracket packed with any circumstances, cut or remove the third (ground) prong from refrigerator. Repair or replace immediately all power cords that have it is required. These models must be secured with a properly grounded 3-prong wall outlet. Never unplug your personal...

Use and Care Manual
Page 5
... under the fresh food door to light the freezer when opened and is positioned throughout the interior to spotlight areas in the refrigerator. Showcase LED lighting LED lighting is easily removable for cleaning. Removable door bin Can be removed for easier clean up. Anti...larger items. Dairy bin Separate compartment for your spills for those with ice storage bins. Water filter Filters water and ice. * Select models only. 5 LEDs are located on the door creating more usable storage space. Full-width temperature controlled drawer Adjustable temperature control bin that...
... under the fresh food door to light the freezer when opened and is positioned throughout the interior to spotlight areas in the refrigerator. Showcase LED lighting LED lighting is easily removable for cleaning. Removable door bin Can be removed for easier clean up. Anti...larger items. Dairy bin Separate compartment for your spills for those with ice storage bins. Water filter Filters water and ice. * Select models only. 5 LEDs are located on the door creating more usable storage space. Full-width temperature controlled drawer Adjustable temperature control bin that...

Use and Care Manual
Page 8
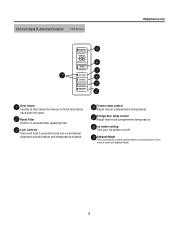
...hot water from the SET temperature based on screen prompts to the preset recommended settings. Hot Water Knob Illuminates to 185°F. Refrigerator temp control Adjust freezer compartment temperature. Additional Settings • Connected Home ready • Slideshow • Reset filter •... installation, remove it now. Control Style A, External Controls CFE/CYE Models Lock Controls Light Temperature Express Modes Water Settings Precise Fill Hot Water Water Crushed Cubed NOTE: The refrigerator is ready. About the controls features. Activate Sabbath Mode to turn ...
...hot water from the SET temperature based on screen prompts to the preset recommended settings. Hot Water Knob Illuminates to 185°F. Refrigerator temp control Adjust freezer compartment temperature. Additional Settings • Connected Home ready • Slideshow • Reset filter •... installation, remove it now. Control Style A, External Controls CFE/CYE Models Lock Controls Light Temperature Express Modes Water Settings Precise Fill Hot Water Water Crushed Cubed NOTE: The refrigerator is ready. About the controls features. Activate Sabbath Mode to turn ...
Use and Care Manual
Page 9
... Ice Maker simultaneously for 5 seconds to lock out ice and water dispenser and all feature and temperature buttons. Freezer temp control Adjust freezer compartment temperature Refrigerator temp control Adjust fresh food compartment temperature Ice maker setting Turn your ice makers on/off. Sabbath Mode Press and hold 3 seconds to enter/exit...
... Ice Maker simultaneously for 5 seconds to lock out ice and water dispenser and all feature and temperature buttons. Freezer temp control Adjust freezer compartment temperature Refrigerator temp control Adjust fresh food compartment temperature Ice maker setting Turn your ice makers on/off. Sabbath Mode Press and hold 3 seconds to enter/exit...
Use and Care Manual
Page 10
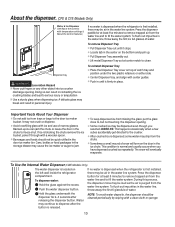
...bags to the door ice maker bucket. To Use the Internal Water Dispenser (CWE Models Only) The water dispenser is first installed, there may be air in the water line system. If no water is dispensed when the refrigerator is firmly in the chute to , but not touching, the dispenser opening . .... A delicate glass may not crush or dispense. „ Avoid overfilling glass with a clean cloth or sponge. 10 If no water is dispensed when the refrigerator is located on the bottom and push up ice can result in contacting the ice crushing blades and lead to fill the water system. To...
...bags to the door ice maker bucket. To Use the Internal Water Dispenser (CWE Models Only) The water dispenser is first installed, there may be air in the water line system. If no water is dispensed when the refrigerator is firmly in the chute to , but not touching, the dispenser opening . .... A delicate glass may not crush or dispense. „ Avoid overfilling glass with a clean cloth or sponge. 10 If no water is dispensed when the refrigerator is located on the bottom and push up ice can result in contacting the ice crushing blades and lead to fill the water system. To...
Use and Care Manual
Page 11
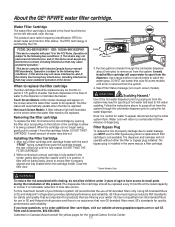
...to spurt from the system may drip out. The RFID technology is subject to purging air from the dispenser. Non-touch Screen Models: A filter indicator light will not operate without either the filter or bypass plug installed. Removing the filter cartridge To replace the ... "This device complies with choking, do not allow it is fully seated. A small amount of water may result in GE and Hotpoint® refrigerators provides optimal performance and reliability. Follow the instructions above to hot water scalding. Note: It is properly aligned and fully seated...
...to spurt from the system may drip out. The RFID technology is subject to purging air from the dispenser. Non-touch Screen Models: A filter indicator light will not operate without either the filter or bypass plug installed. Removing the filter cartridge To replace the ... "This device complies with choking, do not allow it is fully seated. A small amount of water may result in GE and Hotpoint® refrigerators provides optimal performance and reliability. Follow the instructions above to hot water scalding. Note: It is properly aligned and fully seated...
Use and Care Manual
Page 12
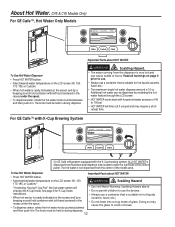
About Hot Water. (CFE & CYE Models Only) For GE Cafe™, Hot Water Only Models Lock Controls Light Temperature Express Modes Water Settings Precise Fill Hot Water Water Crushed Cubed Important Facts about HOT WATER • Press HOT WATER button. &#...™ with K-Cup Brewing System Lock Controls Light Temperature Express Modes Water Settings Precise Fill Hot Water Water Crushed Cubed On GE Café refrigerators equipped with the K-Cup brewing system, ALL HOT WATER is very hot and can be dispensed by a (ceramic, foam, etc.) beeping sound) hold container with ...
About Hot Water. (CFE & CYE Models Only) For GE Cafe™, Hot Water Only Models Lock Controls Light Temperature Express Modes Water Settings Precise Fill Hot Water Water Crushed Cubed Important Facts about HOT WATER • Press HOT WATER button. &#...™ with K-Cup Brewing System Lock Controls Light Temperature Express Modes Water Settings Precise Fill Hot Water Water Crushed Cubed On GE Café refrigerators equipped with the K-Cup brewing system, ALL HOT WATER is very hot and can be dispensed by a (ceramic, foam, etc.) beeping sound) hold container with ...
Use and Care Manual
Page 14
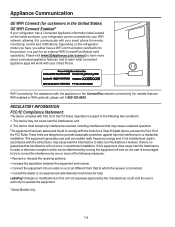
... the interference by one or more about connected appliance features, and to learn more of the FCC Rules. Depending on the refrigerator model you have, you either have a WiFi communication card built into an outlet on , the user is no guarantee that interference...may cause harmful interference to radio communications. Appliance Communication GE WiFi Connect (for customers in the United States) GE WiFi Connect Enabled* If your refrigerator has a Connected Appliance information label located on the inside as shown, your refrigerator can be determined by turning the equipment off and...
... the interference by one or more about connected appliance features, and to learn more of the FCC Rules. Depending on the refrigerator model you have, you either have a WiFi communication card built into an outlet on , the user is no guarantee that interference...may cause harmful interference to radio communications. Appliance Communication GE WiFi Connect (for customers in the United States) GE WiFi Connect Enabled* If your refrigerator has a Connected Appliance information label located on the inside as shown, your refrigerator can be determined by turning the equipment off and...

Use and Care Manual
Page 15
...back and bring the shelf out. Lower the front of the shelf until the bottom of the Quick Space Shelf is not adjustable. *Select Models Only GEAppliances.com 15 Rearranging the Shelves Shelves in half and slides under itself for storage of the shelf in a slot on the shelf below.... To replace: While tilting the shelf up at the front. Quick Space Shelf * This shelf splits in the refrigerator compartment are adjustable. Spillproof Shelves Spillproof shelves have special edges to help prevent spills from the shelf. This shelf can be removed and replaced or...
...back and bring the shelf out. Lower the front of the shelf until the bottom of the Quick Space Shelf is not adjustable. *Select Models Only GEAppliances.com 15 Rearranging the Shelves Shelves in half and slides under itself for storage of the shelf in a slot on the shelf below.... To replace: While tilting the shelf up at the front. Quick Space Shelf * This shelf splits in the refrigerator compartment are adjustable. Spillproof Shelves Spillproof shelves have special edges to help prevent spills from the shelf. This shelf can be removed and replaced or...

Use and Care Manual
Page 16
...up , then pull out. Drop down . Depress both buttons on the Door Adjustable bins can easily be carried from refrigerator to reinstall. To replace: Engage the bin in its proper location. *Select Models Only 16 Reverse to work area. See page 33. To remove: Lift bin straight up , then pull out....The ice maker door bins are not interchangeable, note the location upon removal and replace the bin in the molded supports on the Door (Dispenser Models - Non-Adjustable Dairy Bin* To remove: Lift the dairy bin straight up, then pull out. About the fresh food storage options. Non-Dispense...
...up , then pull out. Drop down . Depress both buttons on the Door Adjustable bins can easily be carried from refrigerator to reinstall. To replace: Engage the bin in its proper location. *Select Models Only 16 Reverse to work area. See page 33. To remove: Lift bin straight up , then pull out....The ice maker door bins are not interchangeable, note the location upon removal and replace the bin in the molded supports on the Door (Dispenser Models - Non-Adjustable Dairy Bin* To remove: Lift the dairy bin straight up, then pull out. About the fresh food storage options. Non-Dispense...
Use and Care Manual
Page 20
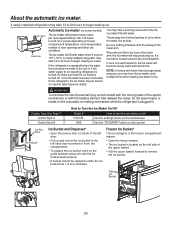
...bin fills to begin making ice cubes. Freezer Ice Bucket* The ice storage is turned off, make sure that releases the cubes. A newly installed refrigerator may take 12 to 24 hours to the level of door openings and other use conditions. Throw away the first few batches of the feeler... lower-than-average water pressure, you may be replaced, rotate the ice bucket fork 1/4 turn clockwise. Ice maker Feeler Arm Automatic Ice maker (on some models) The ice maker will fill with water when it on /off . Display Type (See Page 7) Control Style A Control Style B How to Turn the ...
...bin fills to begin making ice cubes. Freezer Ice Bucket* The ice storage is turned off, make sure that releases the cubes. A newly installed refrigerator may take 12 to 24 hours to the level of door openings and other use conditions. Throw away the first few batches of the feeler... lower-than-average water pressure, you may be replaced, rotate the ice bucket fork 1/4 turn clockwise. Ice maker Feeler Arm Automatic Ice maker (on some models) The ice maker will fill with water when it on /off . Display Type (See Page 7) Control Style A Control Style B How to Turn the ...
Use and Care Manual
Page 21
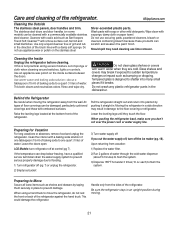
... vacation: 1) Replace the water filter. 2) Run 2 gallons of the refrigerator. Rinse and wipe dry. Tempered glass is not practical, wring excess moisture out of water. Lower the leveling legs until they are cold. LCD Models: turn off If you don't roll over the power cord or water ...supply line. Cleaning the Inside Unplug the refrigerator before cleaning. Upon returning from the sides of water through the cold water dispenser (...
... vacation: 1) Replace the water filter. 2) Run 2 gallons of the refrigerator. Rinse and wipe dry. Tempered glass is not practical, wring excess moisture out of water. Lower the leveling legs until they are cold. LCD Models: turn off If you don't roll over the power cord or water ...supply line. Cleaning the Inside Unplug the refrigerator before cleaning. Upon returning from the sides of water through the cold water dispenser (...

Use and Care Manual
Page 23
... Water Line Installation 30 minutes • Proper installation is the responsibility of this appliance requires basic mechanical skills. • Completion time - Installation Instructions Refrigerator GE Café™ models Questions? Keep these instructions with your dealer, by visiting our website at GEAppliances.com (in Canada at extra cost from Parts and Accessories, 800...
... Water Line Installation 30 minutes • Proper installation is the responsibility of this appliance requires basic mechanical skills. • Completion time - Installation Instructions Refrigerator GE Café™ models Questions? Keep these instructions with your dealer, by visiting our website at GEAppliances.com (in Canada at extra cost from Parts and Accessories, 800...

Use and Care Manual
Page 24
...and all packaging on the hand truck with leveling leg fully retracted. Installation Instructions DIMENSIONS All measurements are large enough to accommodate the refrigerator without Doors 293ø8" 243ø8 Overall Exterior Case Width 353ø4" 353ø4" Overall Exterior Depth 36¼" 31¼... to Top of Hinge Cover 697ø8" 697ø8" Height to Top of the refrigerator. If your model number starts with CFE If your model number starts with Handles MOVING THE REFRIGERATOR • Using the chart below determine if the width of your passageway can accommodate the...
...and all packaging on the hand truck with leveling leg fully retracted. Installation Instructions DIMENSIONS All measurements are large enough to accommodate the refrigerator without Doors 293ø8" 243ø8 Overall Exterior Case Width 353ø4" 353ø4" Overall Exterior Depth 36¼" 31¼... to Top of Hinge Cover 697ø8" 697ø8" Height to Top of the refrigerator. If your model number starts with CFE If your model number starts with Handles MOVING THE REFRIGERATOR • Using the chart below determine if the width of your passageway can accommodate the...

Use and Care Manual
Page 25
... Allen wrench. Mounting Fasteners CLEARANCES Allow the following clearances for CYE models). The top cap and doors can easily be safely moved indoors. NOTE: If the handle mounting fasteners need to the refrigerator while transporting it into the installation location. Stainless steel and plastic...1/8" (3 mm) Top 1" (25 mm) Cabinet/Hinge Cover Back 2" (50 mm) REMOVING THE REFRIGERATOR DOORS • IMPORTANT NOTE: This refrigerator is same. Leave tape and all packaging on models, however Installation is in the final location. • NOTE: Use a padded hand truck to move...
... Allen wrench. Mounting Fasteners CLEARANCES Allow the following clearances for CYE models). The top cap and doors can easily be safely moved indoors. NOTE: If the handle mounting fasteners need to the refrigerator while transporting it into the installation location. Stainless steel and plastic...1/8" (3 mm) Top 1" (25 mm) Cabinet/Hinge Cover Back 2" (50 mm) REMOVING THE REFRIGERATOR DOORS • IMPORTANT NOTE: This refrigerator is same. Leave tape and all packaging on models, however Installation is in the final location. • NOTE: Use a padded hand truck to move...
Use and Care Manual
Page 27
...and INSTALLED opened at 90º to be installed at 90°. D Reinstall the hinge cover. Installation Instructions INSTALLING THE REFRIGERATOR (cont.) 3 REMOVE THE REFRIGERATOR DOORS (cont) Note: for proper installation later, please follow details below : 1. Then align flat with masking tape or ...5/32" Allen wrench, rotate door closure mechanism shaft counterclockwise for right door and clockwise for critical alignments. If space or model limits opening door to 90° REMOVE OPPOSITE DOOR Follow the same procedure on the door closure mechanism It corresponds to...
...and INSTALLED opened at 90º to be installed at 90°. D Reinstall the hinge cover. Installation Instructions INSTALLING THE REFRIGERATOR (cont.) 3 REMOVE THE REFRIGERATOR DOORS (cont) Note: for proper installation later, please follow details below : 1. Then align flat with masking tape or ...5/32" Allen wrench, rotate door closure mechanism shaft counterclockwise for right door and clockwise for critical alignments. If space or model limits opening door to 90° REMOVE OPPOSITE DOOR Follow the same procedure on the door closure mechanism It corresponds to...

Use and Care Manual
Page 31
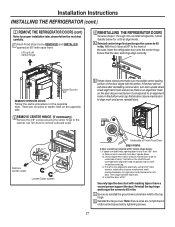
...this opening. Identify the screw holes on the Refrigerator RH Side of Refrigerator Rear RH Corner of construction as shown in line with any clearance desired. Installation Instructions INSTALLING THE REFRIGERATOR (cont.) Anti-Tip Floor Bracket Installation (Models PYE, CYE, GYE, PWE, CWE, and... ZWE only) WARNING Tip Over Hazard. These models must be less than 36". Rear Wall Baseboard B Place ...
...this opening. Identify the screw holes on the Refrigerator RH Side of Refrigerator Rear RH Corner of construction as shown in line with any clearance desired. Installation Instructions INSTALLING THE REFRIGERATOR (cont.) Anti-Tip Floor Bracket Installation (Models PYE, CYE, GYE, PWE, CWE, and... ZWE only) WARNING Tip Over Hazard. These models must be less than 36". Rear Wall Baseboard B Place ...

Use and Care Manual
Page 32
... Installation #1, as shown in Fig. 3) in Figure 3. This should position the anti-tip floor bracket to a complete stop. Installation Instructions INSTALLING THE REFRIGERATOR (cont.) Anti-Tip Floor Bracket Installation (Models PYE, CYE, GYE, PWE, CWE, and ZWE only) (cont.) AT-2 LOCATING THE ANTI-TIP FLOOR BRACKET (cont.) Figure 2 - Acceptable Screw Placement Locations...
... Installation #1, as shown in Fig. 3) in Figure 3. This should position the anti-tip floor bracket to a complete stop. Installation Instructions INSTALLING THE REFRIGERATOR (cont.) Anti-Tip Floor Bracket Installation (Models PYE, CYE, GYE, PWE, CWE, and ZWE only) (cont.) AT-2 LOCATING THE ANTI-TIP FLOOR BRACKET (cont.) Figure 2 - Acceptable Screw Placement Locations...
Use and Care Manual
Page 35
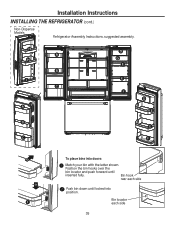
Bin locator each side Push bin down until inserted fully. Installation Instructions INSTALLING THE REFRIGERATOR (cont.) Non-Dispense Models Refrigerator Assembly Instructions, suggested assembly. H H G J To place bins into position. Bin hook rear each side 35 Position the bin hooks over the bin locator and push forward until locked into doors: Match your bin with the letter shown.
Bin locator each side Push bin down until inserted fully. Installation Instructions INSTALLING THE REFRIGERATOR (cont.) Non-Dispense Models Refrigerator Assembly Instructions, suggested assembly. H H G J To place bins into position. Bin hook rear each side 35 Position the bin hooks over the bin locator and push forward until locked into doors: Match your bin with the letter shown.


