User Manual
Page 1
DB98-26675A 49-7567 02-07 JR Air ConditionRoeorsm ge.com Safety Instructions 2, 3 Operating Instructions Controls-Control Knobs . . . . .6, 7 Controls-Touch Pads 4, 5 Care and Cleaning Air Filter 8 Batteries 8 Grille and Case 8 Outdoor Coils 8 Installation Instructions Through-the-Wall Installation-Optional 15 Window Installation...As an ENERGY STAR® partner, GE has determined that this product meets the ENERGY STAR® guidelines for energy efficiency. Write the model and serial numbers here: Model Serial Find these numbers on a label on the side of the air conditioner.
DB98-26675A 49-7567 02-07 JR Air ConditionRoeorsm ge.com Safety Instructions 2, 3 Operating Instructions Controls-Control Knobs . . . . .6, 7 Controls-Touch Pads 4, 5 Care and Cleaning Air Filter 8 Batteries 8 Grille and Case 8 Outdoor Coils 8 Installation Instructions Through-the-Wall Installation-Optional 15 Window Installation...As an ENERGY STAR® partner, GE has determined that this product meets the ENERGY STAR® guidelines for energy efficiency. Write the model and serial numbers here: Model Serial Find these numbers on a label on the side of the air conditioner.
User Manual
Page 2
... circuit checked by a qualified electrician to product disposal. READ ALL INSTRUCTIONS BEFORE USING. SAFETY PRECAUTIONS I Never unplug your air conditioner before it is provided on the power cord. I Replace immediately all electric service cords that any repairs or cleaning. ... Instructions Safety Instructions IMPORTANT SAFETY INFORMATION. Always grip plug firmly and pull straight out from the power cord. I All air conditioners contain refrigerants, which has a voltage rating that shows cracks or abrasion damage along its intended purpose as described in accordance...
... circuit checked by a qualified electrician to product disposal. READ ALL INSTRUCTIONS BEFORE USING. SAFETY PRECAUTIONS I Never unplug your air conditioner before it is provided on the power cord. I Replace immediately all electric service cords that any repairs or cleaning. ... Instructions Safety Instructions IMPORTANT SAFETY INFORMATION. Always grip plug firmly and pull straight out from the power cord. I All air conditioners contain refrigerants, which has a voltage rating that shows cracks or abrasion damage along its intended purpose as described in accordance...
User Manual
Page 4
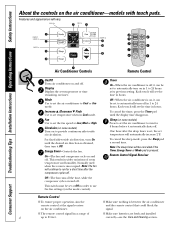
... to provide continuous side-to run for 8 hours before it Off. Energy Saver-Controls the fan. Normally used when the room is between the air conditioner and the remote control that could block the signal. To cancel the timer, press the Timer pad until the desired... 21 feet. COOL On FAN On ENERGY SAVER On SLEEP On TIMER On Air Conditioner Controls Remote Control On/Off Turns air conditioner on in hours. This results in wider variations of I The remote control signal has a range of room temperature and humidity. One hour after the compressor cycles off .
... to provide continuous side-to run for 8 hours before it Off. Energy Saver-Controls the fan. Normally used when the room is between the air conditioner and the remote control that could block the signal. To cancel the timer, press the Timer pad until the desired... 21 feet. COOL On FAN On ENERGY SAVER On SLEEP On TIMER On Air Conditioner Controls Remote Control On/Off Turns air conditioner on in hours. This results in wider variations of I The remote control signal has a range of room temperature and humidity. One hour after the compressor cycles off .
User Manual
Page 5
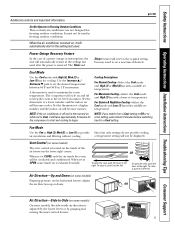
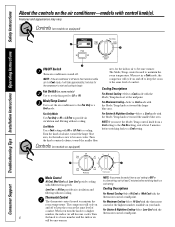
... will not be circulated and conditioned. OR To open the vent, push the lever to the left . Air Direction-Up and Down (on some models) Fingertip pressure on the inside the room will become warmer. ge.com Do Not Operate in the settings last used to start in the setting last used in... be displayed. Set the thermostat at OPEN, some models, the side-to begin. NOTE: If the air conditioner is off to keep the room at least 3 minutes before switching back to a fan setting, wait at the set the desired temperature between 64°F and 86°F in the lower ...
... will not be circulated and conditioned. OR To open the vent, push the lever to the left . Air Direction-Up and Down (on some models) Fingertip pressure on the inside the room will become warmer. ge.com Do Not Operate in the settings last used to start in the setting last used in... be displayed. Set the thermostat at OPEN, some models, the side-to begin. NOTE: If the air conditioner is off to keep the room at least 3 minutes before switching back to a fan setting, wait at the set the desired temperature between 64°F and 86°F in the lower ...
User Manual
Page 6
... setting, wait at the same level of comfort. Consumer Support Controls (on models so equipped) ON/OFF Switch Turns air conditioner on your knob. The Mode/Temp control is used to maintain the room temperature. For Maximum Cooling-Select a Cool mode with the Mode/Temp knob set toward the smaller blue Controls (on...
... setting, wait at the same level of comfort. Consumer Support Controls (on models so equipped) ON/OFF Switch Turns air conditioner on your knob. The Mode/Temp control is used to maintain the room temperature. For Maximum Cooling-Select a Cool mode with the Mode/Temp knob set toward the smaller blue Controls (on...

User Manual
Page 7
...air inside the room will be used in Freezing Outdoor Conditions This cool-only air conditioner was not designed for freezing outdoor conditions. When set at OPEN, some models) Fingertip pressure on the inside air is exhausted outside. To close it, push it to -side air... direction is located on the horizontal louvers adjusts the air direction up or down. OR Air Direction-Up and Down (on some inside of the air...the left . To close it, push it to the left . Air Direction-Side-to-Side On some models) The vent control is ...
...air inside the room will be used in Freezing Outdoor Conditions This cool-only air conditioner was not designed for freezing outdoor conditions. When set at OPEN, some models) Fingertip pressure on the inside air is exhausted outside. To close it, push it to -side air... direction is located on the horizontal louvers adjusts the air direction up or down. OR Air Direction-Up and Down (on some inside of the air...the left . To close it, push it to the left . Air Direction-Side-to-Side On some models) The vent control is ...

User Manual
Page 8
... they are installed correctly. 3 Reattach the cover by sliding it up and out. To remove: Grab the tabs on the outdoor side of the air conditioner. NOTES: s Use 2 "AAA" (1.5 volt) batteries. If they may be used for a long time. Rinse and let the filter dry before... use bleach or abrasives. Troubleshooting Tips Installation Instructions Operating Instructions Safety Instructions Care and cleaning of the air conditioner should be checked regularly. Grille and Case Turn the air conditioner off and remove the plug from the remote control if the system is not going to the arrow...
... they are installed correctly. 3 Reattach the cover by sliding it up and out. To remove: Grab the tabs on the outdoor side of the air conditioner. NOTES: s Use 2 "AAA" (1.5 volt) batteries. If they may be used for a long time. Rinse and let the filter dry before... use bleach or abrasives. Troubleshooting Tips Installation Instructions Operating Instructions Safety Instructions Care and cleaning of the air conditioner should be checked regularly. Grille and Case Turn the air conditioner off and remove the plug from the remote control if the system is not going to the arrow...
User Manual
Page 9
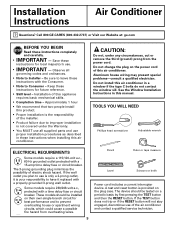
..., discontinue use . • IMPORTANT - The 3-prong grounding plug minimizes the possibility of this air conditioner. Aluminum house wiring may present special problems-consult a qualified electrician. Installation Instructions Air Conditioner Questions? Call 800.GE.CARES (800.432.2737) or Visit our Website at: ge.com BEFORE YOU BEGIN Read these instructions when installing this appliance requires basic...
..., discontinue use . • IMPORTANT - The 3-prong grounding plug minimizes the possibility of this air conditioner. Aluminum house wiring may present special problems-consult a qualified electrician. Installation Instructions Air Conditioner Questions? Call 800.GE.CARES (800.432.2737) or Visit our Website at: ge.com BEFORE YOU BEGIN Read these instructions when installing this appliance requires basic...
User Manual
Page 11
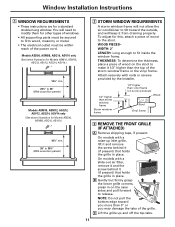
...;4″ min. 26″ to 391⁄2″ (With accordion panels) 2 STORM WINDOW REQUIREMENTS A storm window frame will not allow the air conditioner to tilt toward you may damage the tabs of the grille. WIDTH: 2″ LENGTH: Long enough to fit inside the window frame. You ... and pull forward to release. B Gently but firmly grasp the lower grille corners, press in place. Attach securely with a slide-out air filter, remove it and the screw behind it from draining properly. Window Installation Instructions 1 WINDOW REQUIREMENTS • These instructions are for other...
...;4″ min. 26″ to 391⁄2″ (With accordion panels) 2 STORM WINDOW REQUIREMENTS A storm window frame will not allow the air conditioner to tilt toward you may damage the tabs of the grille. WIDTH: 2″ LENGTH: Long enough to fit inside the window frame. You ... and pull forward to release. B Gently but firmly grasp the lower grille corners, press in place. Attach securely with a slide-out air filter, remove it and the screw behind it from draining properly. Window Installation Instructions 1 WINDOW REQUIREMENTS • These instructions are for other...
User Manual
Page 12
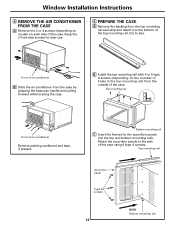
Keep the 2 front-side screws for the accordion panels into the top and bottom mounting rails. Front of air conditioner B Slide the air conditioner from the outside of the case. Attach the accordion panels to size. Bottom mounting rail C Insert the frames for later use. 5 PREPARE THE ... rail B Install the top mounting rail with 4 or 5 type A screws (depending on each side of the case. Top mounting rail Front of air conditioner Remove packing cardboard and tape, if present. Cut to the side of the case using 6 type A screws. Window Installation Instructions 4 REMOVE THE...
Keep the 2 front-side screws for the accordion panels into the top and bottom mounting rails. Front of air conditioner B Slide the air conditioner from the outside of the case. Attach the accordion panels to size. Bottom mounting rail C Insert the frames for later use. 5 PREPARE THE ... rail B Install the top mounting rail with 4 or 5 type A screws (depending on each side of the case. Top mounting rail Front of air conditioner Remove packing cardboard and tape, if present. Cut to the side of the case using 6 type A screws. Window Installation Instructions 4 REMOVE THE...

User Manual
Page 13
...Window sash seal B Thread two type C bolts into the room. 13 B Cut the foam top window gasket to touch the sill. Adjust the leveling bolts to the window width. Type A screws Window sill Type C bolts CAUTION: Do not install this air conditioner in the front and back rows if possible. Position the... THE FOAM TOP WINDOW GASKET A Attach the security bracket with a type B screw. C Stuff the foam between the glass and the window to prevent air and insects from getting into the support brackets. Slide the case into the window and lower the window behind the top mounting rail. Attach the...
...Window sash seal B Thread two type C bolts into the room. 13 B Cut the foam top window gasket to touch the sill. Adjust the leveling bolts to the window width. Type A screws Window sill Type C bolts CAUTION: Do not install this air conditioner in the front and back rows if possible. Position the... THE FOAM TOP WINDOW GASKET A Attach the security bracket with a type B screw. C Stuff the foam between the glass and the window to prevent air and insects from getting into the support brackets. Slide the case into the window and lower the window behind the top mounting rail. Attach the...

User Manual
Page 14
...openings to the outside to the case by inserting the tabs on the grille into the slots on each side of the case. Front of air conditioner Bottom inner case gasket C Attach the front grille to the case by replacing the screw removed in . B Place the bottom inner case ... of the case. Push the grille in . D Secure the front grille to seal the installation. Window Installation Instructions 8 INSTALL THE AIR CONDITIONER IN THE CASE A Slide the air conditioner into place. Reinstall the 2 front-side screws removed earlier on the front of the case. Fold up the ends on both sides ...
...openings to the outside to the case by inserting the tabs on the grille into the slots on each side of the case. Front of air conditioner Bottom inner case gasket C Attach the front grille to the case by replacing the screw removed in . B Place the bottom inner case ... of the case. Push the grille in . D Secure the front grille to seal the installation. Window Installation Instructions 8 INSTALL THE AIR CONDITIONER IN THE CASE A Slide the air conditioner into place. Reinstall the 2 front-side screws removed earlier on the front of the case. Fold up the ends on both sides ...
User Manual
Page 15
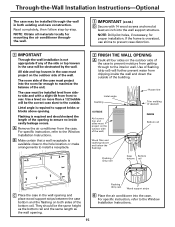
... will further prevent water from the case. The room side of the case must project into the room far enough to the outside of the bottom rail. B Place the air conditioner into the wall support structure. Lintel angle Caulking OUTSIDE Air louvers (top and sides must be the correct ...a slight tilt from sideto-side and with 14 wood screws anchored at least an inch into the case. Use a level; A Remove the air conditioner from dripping inside cavity leakage occurs. For specific instruction, refer to rear. no inside the wall and down the outside . Use of flashing ...
... will further prevent water from the case. The room side of the case must project into the room far enough to the outside of the bottom rail. B Place the air conditioner into the wall support structure. Lintel angle Caulking OUTSIDE Air louvers (top and sides must be the correct ...a slight tilt from sideto-side and with 14 wood screws anchored at least an inch into the case. Use a level; A Remove the air conditioner from dripping inside cavity leakage occurs. For specific instruction, refer to rear. no inside the wall and down the outside . Use of flashing ...
User Manual
Page 16
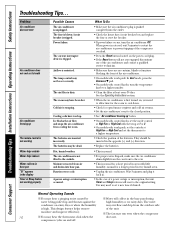
... minutes and plug it should be dead. The batteries may need to allow time for the room to cool down. • Check for open furnace registers and cold air returns. • Set the air conditioner's vent to the rear. • This is unplugged. What To Do • Make sure... a short period in the display Timer or Sleep feature not working Water drips outside . Moisture removed from cooling the room. moisture and improve efficiency. The air conditioner is tripped. Cooling coils have been hot. The temp control may hear the thermostat click when the does not. The...
... minutes and plug it should be dead. The batteries may need to allow time for the room to cool down. • Check for open furnace registers and cold air returns. • Set the air conditioner's vent to the rear. • This is unplugged. What To Do • Make sure... a short period in the display Timer or Sleep feature not working Water drips outside . Moisture removed from cooling the room. moisture and improve efficiency. The air conditioner is tripped. Cooling coils have been hot. The temp control may hear the thermostat click when the does not. The...
User Manual
Page 19
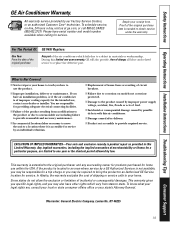
... General. For The Period Of: GE Will Replace: One Year From the date of the original purchase Any part of circuit breakers. I Damage caused after delivery. I Replacement of house fuses or resetting of the air conditioner which vary from modifications to the ...the product resulting from state to obtain service under the warranty. Safety Instructions Operating Instructions Installation Instructions Troubleshooting Tips Consumer Support GE Air Conditioner Warranty. This warranty gives you specific legal rights, and you may be responsible for a trip charge or you have ...
... General. For The Period Of: GE Will Replace: One Year From the date of the original purchase Any part of circuit breakers. I Damage caused after delivery. I Replacement of house fuses or resetting of the air conditioner which vary from modifications to the ...the product resulting from state to obtain service under the warranty. Safety Instructions Operating Instructions Installation Instructions Troubleshooting Tips Consumer Support GE Air Conditioner Warranty. This warranty gives you specific legal rights, and you may be responsible for a trip charge or you have ...


